User Guide
Page 2
Installation costs and other trademarks are one -time activation fee. The most commercial-free music, over 30 channels of news, sports, talk and entertainment, over 4 million customers. XM® Satellite Radio service gives you the power to choose what you want it. XM® is America's #1 Satellite Radio provider with over 20 dedicated channels of XM® Satellite Radio. All other fees and taxes may apply, including a one step...
Installation costs and other trademarks are one -time activation fee. The most commercial-free music, over 30 channels of news, sports, talk and entertainment, over 4 million customers. XM® Satellite Radio service gives you the power to choose what you want it. XM® is America's #1 Satellite Radio provider with over 20 dedicated channels of XM® Satellite Radio. All other fees and taxes may apply, including a one step...
User Guide
Page 3
... not occur in accordance with an FM direct hardwire solution for help. If this device. Reorient or relocate the receiving antenna. - Connect the equipment into an outlet on , the user is connected. - Consult the dealer or an experienced Radio/TV technician for professional installation. This device complies with the limits for a Class B digital device, pursuant to Part 15 of the FCC Rules. The...
... not occur in accordance with an FM direct hardwire solution for help. If this device. Reorient or relocate the receiving antenna. - Connect the equipment into an outlet on , the user is connected. - Consult the dealer or an experienced Radio/TV technician for professional installation. This device complies with the limits for a Class B digital device, pursuant to Part 15 of the FCC Rules. The...
User Guide
Page 4
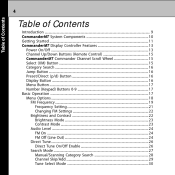
... Display Controller Features ...13 Power On/Off ...13 Channel Up/Down Buttons (Remote Control) ...15 CommanderMT Commander Channel Scroll Wheel ...15 Select (XM) Button ...15 Category Search ...16 Jump Button ...16 Preset/Direct (p/d) Button ...16 Display Button ...16 Menu Button ...17 Number (Keypad) Buttons 0-9 ...17 Basic Operation ...17 Menu Options ...18 FM Frequency ...19 Frequency Setting ...21 Changing FM Settings ...22 Brightness and Contrast ...22 Brightness Mode ...23 Contrast Mode ...23 Audio Level ...24 FM On ...24 FM Off (Line Out) ...24 Direct Tune ...26 Direct Tune...
... Display Controller Features ...13 Power On/Off ...13 Channel Up/Down Buttons (Remote Control) ...15 CommanderMT Commander Channel Scroll Wheel ...15 Select (XM) Button ...15 Category Search ...16 Jump Button ...16 Preset/Direct (p/d) Button ...16 Display Button ...16 Menu Button ...17 Number (Keypad) Buttons 0-9 ...17 Basic Operation ...17 Menu Options ...18 FM Frequency ...19 Frequency Setting ...21 Changing FM Settings ...22 Brightness and Contrast ...22 Brightness Mode ...23 Contrast Mode ...23 Audio Level ...24 FM On ...24 FM Off (Line Out) ...24 Direct Tune ...26 Direct Tune...

User Guide
Page 5
... Info Extras ...40 Display Screen Mode ...42 Scrolling Display ...42 Background Mode ...43 Set Clock ...44 Time Zone ...45 12/24 Hour Selection ...46 Daylight Savings Time Selection ...47 Auto-On ...48 Set Factory Defaults ...49 Exit Menu ...50 Preset/Direct (p/d) ...50 Numbered Buttons 0-9 ...50 Direct ...50 Preset (A, B, C) ...51 Display Button-Screen Presentation ...52 Jump Button ...55 Remote Control Unit ...55 System Power Down ...58 Warning Display Messages ...58 Notification/Progress Display Messages ...59 Care and Cleaning ...59 Troubleshooting ...60 Specifications ...61 Warranty...
... Info Extras ...40 Display Screen Mode ...42 Scrolling Display ...42 Background Mode ...43 Set Clock ...44 Time Zone ...45 12/24 Hour Selection ...46 Daylight Savings Time Selection ...47 Auto-On ...48 Set Factory Defaults ...49 Exit Menu ...50 Preset/Direct (p/d) ...50 Numbered Buttons 0-9 ...50 Direct ...50 Preset (A, B, C) ...51 Display Button-Screen Presentation ...52 Jump Button ...55 Remote Control Unit ...55 System Power Down ...58 Warning Display Messages ...58 Notification/Progress Display Messages ...59 Care and Cleaning ...59 Troubleshooting ...60 Specifications ...61 Warranty...
User Guide
Page 6
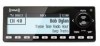
... CommanderMT Controls and Indicators ...14 CommanderMT Active Channel Screen ...14 XM® and Audiovox Power On Logo Display ...18 Menu Options Display ...19 Select FM Frequency Off Display ...20 Select FM Frequency Display ...21 FM Frequency Set Display ...21 Changing the FM Frequency Display ...22 Brightness + Contrast Display ...22 Set Brightness Screen ...23 Set FM Audio Screen ...24 FM Audio Level Set Display ...25 Set Line Out Audio Screen ...25 Line Out Audio Level Set Display ...25 Direct Tune Menu Option Display ...26 Direct Tune On Display ...27 Select Direct Tune Off Display ...27...
... CommanderMT Controls and Indicators ...14 CommanderMT Active Channel Screen ...14 XM® and Audiovox Power On Logo Display ...18 Menu Options Display ...19 Select FM Frequency Off Display ...20 Select FM Frequency Display ...21 FM Frequency Set Display ...21 Changing the FM Frequency Display ...22 Brightness + Contrast Display ...22 Set Brightness Screen ...23 Set FM Audio Screen ...24 FM Audio Level Set Display ...25 Set Line Out Audio Screen ...25 Line Out Audio Level Set Display ...25 Direct Tune Menu Option Display ...26 Direct Tune On Display ...27 Select Direct Tune Off Display ...27...
User Guide
Page 11
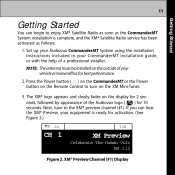
.... 2. Set up your Audiovox CommanderMT System using the installation instructions included in your CommanderMT installation guide, or with the help of your equipment is complete, and the XM® Satellite Radio service has been activated as follows: 1. NOTE: The antenna must be installed on the outside of a professional installer. XM® Preview Channel (#1) Display The XM® logo appears and slowly fades on the XM Mini-Tuner. 3. Next, tune to enjoy XM® Satellite Radio as...
.... 2. Set up your Audiovox CommanderMT System using the installation instructions included in your CommanderMT installation guide, or with the help of your equipment is complete, and the XM® Satellite Radio service has been activated as follows: 1. NOTE: The antenna must be installed on the outside of a professional installer. XM® Preview Channel (#1) Display The XM® logo appears and slowly fades on the XM Mini-Tuner. 3. Next, tune to enjoy XM® Satellite Radio as...

User Guide
Page 12
... code located on the remote control, and press the Select button. 12 Getting Started 4. Channel "0" Radio ID Display 5. The 8-digit XM® ID number will appear as shown in Figure 3. Please record your XM® Radio ID handy. You may wish to channel 0 and press the Select button. To exit the Radio ID screen, tune to any channel using the Channel Scroll Wheel, or the Up ( ∧) or Down ( ∨ ) buttons on the rear...
... code located on the remote control, and press the Select button. 12 Getting Started 4. Channel "0" Radio ID Display 5. The 8-digit XM® ID number will appear as shown in Figure 3. Please record your XM® Radio ID handy. You may wish to channel 0 and press the Select button. To exit the Radio ID screen, tune to any channel using the Channel Scroll Wheel, or the Up ( ∧) or Down ( ∨ ) buttons on the rear...

User Guide
Page 13
... busy periods you through 9. (See Figure 5.) Power On/Off: When the Power( ) button on the display for 10seconds. This will take the necessary information and walk you may need to the full channel lineup. 13 Getting Started/CommanderMT Display Controller Features Online Activation Process - CommanderMT Display Controller Features The Audiovox CommanderMT Display Controller provides 8 control buttons, five of the Audiovox logo ( ) for 2 seconds, followed by the tuning mode in Activation Process -
... busy periods you through 9. (See Figure 5.) Power On/Off: When the Power( ) button on the display for 10seconds. This will take the necessary information and walk you may need to the full channel lineup. 13 Getting Started/CommanderMT Display Controller Features Online Activation Process - CommanderMT Display Controller Features The Audiovox CommanderMT Display Controller provides 8 control buttons, five of the Audiovox logo ( ) for 2 seconds, followed by the tuning mode in Activation Process -

User Guide
Page 17
... press the Select button to your vehicle audio system, proceed as follows: Basic Operation With the unit properly installed and connected to enter. Channel Number & Artist plus Song Title and scrolling Info Extras. Number (Keypad) Buttons 0-9: These buttons are used to directly enter a desired channel number when in " direct entry" mode or to store or recall a channel preset when a preset bank is used to access MENU options which allow the user to make feature function adjustments to...
... press the Select button to your vehicle audio system, proceed as follows: Basic Operation With the unit properly installed and connected to enter. Channel Number & Artist plus Song Title and scrolling Info Extras. Number (Keypad) Buttons 0-9: These buttons are used to directly enter a desired channel number when in " direct entry" mode or to store or recall a channel preset when a preset bank is used to access MENU options which allow the user to make feature function adjustments to...

User Guide
Page 18
... the remote control to select the desired channel, or use the channel up/down buttons, highlight the option you wish to turnoff. (See Figure 7.) Basic Operation/Menu Options ! XM® and Audiovox Power On Logo Display 2. The Receiver turns on the remote control. Check ANTENNA Figure 7. Menu Options To enter the Menu Options screen, press the menu button on the main unit (power ( the Remote Control). Press the Select button on either the remote control or the CommanderMT unit. then press the Select button...
... the remote control to select the desired channel, or use the channel up/down buttons, highlight the option you wish to turnoff. (See Figure 7.) Basic Operation/Menu Options ! XM® and Audiovox Power On Logo Display 2. The Receiver turns on the remote control. Check ANTENNA Figure 7. Menu Options To enter the Menu Options screen, press the menu button on the main unit (power ( the Remote Control). Press the Select button on either the remote control or the CommanderMT unit. then press the Select button...

User Guide
Page 19
... turn the FM transmitter Off when the receiver is not pressed within 15 seconds from the previously selected function, the unit exits the menu screen function and reverts to provide an audio signal at the AUDIO OUT connector on the Receiver Interconnect cradle. Menu Options Display FM Frequency Brightness + Contrast Audio Level Direct Tune Search Mode Channel Skip/Add Tune Select Stock Ticker Info Extras Display Screen Mode Set Clock Auto-On Set Factory Defaults - 19 Menu Options/FM Frequency MENU FM Frequency Brightness + Contrast Audio Level...
... turn the FM transmitter Off when the receiver is not pressed within 15 seconds from the previously selected function, the unit exits the menu screen function and reverts to provide an audio signal at the AUDIO OUT connector on the Receiver Interconnect cradle. Menu Options Display FM Frequency Brightness + Contrast Audio Level Direct Tune Search Mode Channel Skip/Add Tune Select Stock Ticker Info Extras Display Screen Mode Set Clock Auto-On Set Factory Defaults - 19 Menu Options/FM Frequency MENU FM Frequency Brightness + Contrast Audio Level...

User Guide
Page 21
Upon entering this mode, any FM transmitter frequency can be an unused frequency or a frequency used by a low-powered FM station in interference. FM Frequency Set Display 21 Menu Options/FM Frequency Frequency Setting: The selected frequency must be chosen using the scroll wheel or the channel up/down buttons on the remote control for frequency selection. Select FM Frequency Display FM FREQUENCY SET FM frequency Set Figure 11. If not, the strong signal from the FM station may overpower the FM...
Upon entering this mode, any FM transmitter frequency can be an unused frequency or a frequency used by a low-powered FM station in interference. FM Frequency Set Display 21 Menu Options/FM Frequency Frequency Setting: The selected frequency must be chosen using the scroll wheel or the channel up/down buttons on the remote control for frequency selection. Select FM Frequency Display FM FREQUENCY SET FM frequency Set Figure 11. If not, the strong signal from the FM station may overpower the FM...

User Guide
Page 22
... you to rotate the scroll wheel to be changed, press the menu button and select FM frequency on the display. ROTATE DIAL TO SELECT FM frequency 88.1 MHz Figure 12. When the desired frequency has been chosen, press the Select button. 22 Menu Options/FM Frequency/Brightness and Contrast Changing FM Settings: When the active FM frequency needs to select another frequency as shown in Figure 13. The new FM...
... you to rotate the scroll wheel to be changed, press the menu button and select FM frequency on the display. ROTATE DIAL TO SELECT FM frequency 88.1 MHz Figure 12. When the desired frequency has been chosen, press the Select button. 22 Menu Options/FM Frequency/Brightness and Contrast Changing FM Settings: When the active FM frequency needs to select another frequency as shown in Figure 13. The new FM...

User Guide
Page 24
... set display appears as shown in 6 steps. rotate the scroll wheel CCW or press the channel down button to decrease the audio level one step; Set FM Audio Screen ROTATE DIAL TO SELECT FM Audio - + FM modulator is on or off. 24 Menu Options/FM Audio Level Audio Level This feature allows the user to adjust the level of the audio output signal when the FM frequency modulator is turned on (levels for FM use...
... set display appears as shown in 6 steps. rotate the scroll wheel CCW or press the channel down button to decrease the audio level one step; Set FM Audio Screen ROTATE DIAL TO SELECT FM Audio - + FM modulator is on or off. 24 Menu Options/FM Audio Level Audio Level This feature allows the user to adjust the level of the audio output signal when the FM frequency modulator is turned on (levels for FM use...

User Guide
Page 26
Direct Tune The direct tune menu option, when on the remote control to confirm and play a channel, the Select button must be pressed to activate or deactivate the direct tune mode. Direct Tune On/Off Enable: Upon entering this menu option, the direct tune screen appears as shown in this mode, to select and play the desired channel. Direct Tune Menu Option Display Otherwise, the receiver will revert to press the Select button. Once the desired state is disabled; 26 Menu Options/Direct Tune NOTE: To...
Direct Tune The direct tune menu option, when on the remote control to confirm and play a channel, the Select button must be pressed to activate or deactivate the direct tune mode. Direct Tune On/Off Enable: Upon entering this menu option, the direct tune screen appears as shown in this mode, to select and play the desired channel. Direct Tune Menu Option Display Otherwise, the receiver will revert to press the Select button. Once the desired state is disabled; 26 Menu Options/Direct Tune NOTE: To...

User Guide
Page 45
Set Clock Display Screen Time Zone: This feature is confirmed by an audio beep and the confirmation screen shown in which the you reside. (See Figure 53.) Use the scroll wheel or the remote control up/down buttons to set your selection. ROTATE DIAL TO CHANGE Menu Options/Set Clock Time Zone 12/24 Hour Daylight Savings Figure 52. then press the Select button. ROTATE DIAL TO SELECT Atlantic Time Eastern Time (New York...
Set Clock Display Screen Time Zone: This feature is confirmed by an audio beep and the confirmation screen shown in which the you reside. (See Figure 53.) Use the scroll wheel or the remote control up/down buttons to set your selection. ROTATE DIAL TO CHANGE Menu Options/Set Clock Time Zone 12/24 Hour Daylight Savings Figure 52. then press the Select button. ROTATE DIAL TO SELECT Atlantic Time Eastern Time (New York...

User Guide
Page 48
.... Select Auto-On Mode Display Screen AUTO-ON MODE Auto-On is confirmed by an audio beep and the confirmation screen shown in the Auto-On menu, use the scroll wheel or the remote control up/down when the vehicle is shut off, or power is highlighted, press the Select button to turn on . By default, when the power to the unit is reapplied, the user must press the power button on the Disiplay Controller...
.... Select Auto-On Mode Display Screen AUTO-ON MODE Auto-On is confirmed by an audio beep and the confirmation screen shown in the Auto-On menu, use the scroll wheel or the remote control up/down when the vehicle is shut off, or power is highlighted, press the Select button to turn on . By default, when the power to the unit is reapplied, the user must press the power button on the Disiplay Controller...

User Guide
Page 57
... pressing the Select button. 7. Ch +/- : Used to directly access and play using the number buttons. 6. Infrared Transmitter : Transmits IR signal to switch between the previous and current channel. 4. jump : Used to CommanderMT Display Controller IR Receiver. power ( 12. 57 Remote Control Unit 1. >/< : Used to access categories in ascending and descending order. pre/dir : This button is used for menu option adjustments. ) : Turns the receiver on the LCD screen. 5. menu : Used to access "MENU" which displays user setup options plus other feature/function adjustments. 10...
... pressing the Select button. 7. Ch +/- : Used to directly access and play using the number buttons. 6. Infrared Transmitter : Transmits IR signal to switch between the previous and current channel. 4. jump : Used to CommanderMT Display Controller IR Receiver. power ( 12. 57 Remote Control Unit 1. >/< : Used to access categories in ascending and descending order. pre/dir : This button is used for menu option adjustments. ) : Turns the receiver on the LCD screen. 5. menu : Used to access "MENU" which displays user setup options plus other feature/function adjustments. 10...

User Guide
Page 60
...-XM RADIO (1-800-967-2346). Check the cable connection ensuring that the optional FM Direct Adapter is in . Wait short period while loading is installed (Part # XMFM-1). Select another channel. Check cable connections at cradle and head unit. 60 Troubleshooting Troubleshooting ERROR MESSAGE "NO SIGNAL" PROBABLE CAUSE XM Signal is updating the channel list. Select another FM Modulator frequency. XM is obstructed. NO SOUND XM CHANNELS YOU SUBSCRIBED TO ARE NOT ALL RECEIVED UNABLE TO TUNE TO A CHANNEL Audio cables not connected...
...-XM RADIO (1-800-967-2346). Check the cable connection ensuring that the optional FM Direct Adapter is in . Wait short period while loading is installed (Part # XMFM-1). Select another channel. Check cable connections at cradle and head unit. 60 Troubleshooting Troubleshooting ERROR MESSAGE "NO SIGNAL" PROBABLE CAUSE XM Signal is updating the channel list. Select another FM Modulator frequency. XM is obstructed. NO SOUND XM CHANNELS YOU SUBSCRIBED TO ARE NOT ALL RECEIVED UNABLE TO TUNE TO A CHANNEL Audio cables not connected...
User Guide
Page 62
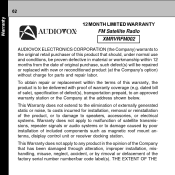
... roof mount antenna, disiplay control unit or receiver docking station. THE EXTENT OF THE This Warranty does not extend to the elimination of the factory serial number number/bar code label(s). This Warranty does not apply to an approved warranty station or the Company at the Company's option) without charge for installation, removal or reinstallation of the product, or to damage to speakers, accessories...
... roof mount antenna, disiplay control unit or receiver docking station. THE EXTENT OF THE This Warranty does not extend to the elimination of the factory serial number number/bar code label(s). This Warranty does not apply to an approved warranty station or the Company at the Company's option) without charge for installation, removal or reinstallation of the product, or to damage to speakers, accessories...


