
Operation Manual
Page 2
... of the picture will not be installed so that these features will result in some color loss. An LCD panel or video monitor used for viewing prerecorded movies or playing video games. Television viewing in a stationary vehicle will only function when the vehicle is in the off or auto positions when the vehicle is used for vehicle information, system control, rear or side observation or navigation.
... of the picture will not be installed so that these features will result in some color loss. An LCD panel or video monitor used for viewing prerecorded movies or playing video games. Television viewing in a stationary vehicle will only function when the vehicle is in the off or auto positions when the vehicle is used for vehicle information, system control, rear or side observation or navigation.

Operation Manual
Page 3
... the number one priority. Please note: Installation options vary, see the individual owner's manuals for Low Light Operation * Optional TV tuner (P/N PODTVT) 3 Congratulations on your purchase of each component in your system to obtain a full understanding of the Audiovox VOD285 Dual DVD Player with the product to ensure that you do not allow children to unfasten seat-belts to change video media or make any adjustments...
... the number one priority. Please note: Installation options vary, see the individual owner's manuals for Low Light Operation * Optional TV tuner (P/N PODTVT) 3 Congratulations on your purchase of each component in your system to obtain a full understanding of the Audiovox VOD285 Dual DVD Player with the product to ensure that you do not allow children to unfasten seat-belts to change video media or make any adjustments...

Operation Manual
Page 4
... system includes a shared remote control that operates both DVD players and both monitors. When the M1 button is pressed, the remote will control the DVD1 player and monitor M1. There are two buttons on the vehicle radio. M1 (monitor 1) and M2 (monitor 2). For example: • Press M1 or M2 to select the remote control functions. • Press the Power button on the remote control to turn the unit on. (for wireless audio headphone reception and a wireless...
... system includes a shared remote control that operates both DVD players and both monitors. When the M1 button is pressed, the remote will control the DVD1 player and monitor M1. There are two buttons on the vehicle radio. M1 (monitor 1) and M2 (monitor 2). For example: • Press M1 or M2 to select the remote control functions. • Press the Power button on the remote control to turn the unit on. (for wireless audio headphone reception and a wireless...

Operation Manual
Page 6
... lights will not turn on Monitor 1. 3. POWER ( ) Button - Screen Release - Allows the user to turn the DVD2 and Monitor 2 system on Monitor 1. 4. Used to change the screen format (Aspect Ratio 4:3 or 16:9) on in conjunction with the vehicle's interior illumination. 10. Three Position Dome Light Switch ON - Used to select the audio source to turn the DVD1 and Monitor 1 system on/off . 12. This Button is used to select one of a disc for DVD2. 6 Use to eject...
... lights will not turn on Monitor 1. 3. POWER ( ) Button - Screen Release - Allows the user to turn the DVD2 and Monitor 2 system on Monitor 1. 4. Used to change the screen format (Aspect Ratio 4:3 or 16:9) on in conjunction with the vehicle's interior illumination. 10. Three Position Dome Light Switch ON - Used to select the audio source to turn the DVD1 and Monitor 1 system on/off . 12. This Button is used to select one of a disc for DVD2. 6 Use to eject...

Operation Manual
Page 7
.... Monitor 2 Cut Off Switch - Screen Release - LCD Panel Monitor 2 22. Monitor 1 Cut Off Switch - Used to select one of a disc for Monitor 2. 19. Screen Mode Button - Used to change the screen format (Aspect Ratio 4:3 or 16:9) on Monitor 2. 17. This button is used to control other accessories in the closed position. 21. Allows the user to turn off Monitor 2 when in the closed position. 7 14. Ventilation Openings 20. LCD Panel Monitor 1 23. PLAY (u) Button - Also allows the remote control to operate the VOD285 and...
.... Monitor 2 Cut Off Switch - Screen Release - LCD Panel Monitor 2 22. Monitor 1 Cut Off Switch - Used to select one of a disc for Monitor 2. 19. Screen Mode Button - Used to change the screen format (Aspect Ratio 4:3 or 16:9) on Monitor 2. 17. This button is used to control other accessories in the closed position. 21. Allows the user to turn off Monitor 2 when in the closed position. 7 14. Ventilation Openings 20. LCD Panel Monitor 1 23. PLAY (u) Button - Also allows the remote control to operate the VOD285 and...

Operation Manual
Page 8
... input to play a variety of wired headphones with a 1/8" plug for listening to operate the VOD285 and control other accessories in the system. 3. Note: When using the Game Controller the AUX input must be unplugged. 7. Auxiliary Audio Right Input 5. Headphone Jacks (M1) Allows the use of video games. Headphone Jacks (M2) Allows the use of wired headphones with a 1/8" plug for listening to the Monitor 1 video program audio. 2. Auxiliary Audio Left Input 4. Infrared Sensor Allows the remote control to the Monitor 2 video program audio...
... input to play a variety of wired headphones with a 1/8" plug for listening to operate the VOD285 and control other accessories in the system. 3. Note: When using the Game Controller the AUX input must be unplugged. 7. Auxiliary Audio Right Input 5. Headphone Jacks (M1) Allows the use of video games. Headphone Jacks (M2) Allows the use of wired headphones with a 1/8" plug for listening to the Monitor 1 video program audio. 2. Auxiliary Audio Left Input 4. Infrared Sensor Allows the remote control to the Monitor 2 video program audio...

Operation Manual
Page 9
... indicator. 2. DVD disc insertion slot For loading and removing discs. Make sure that proper polarity (+ or -) is not a universal remote control and will operate the VOD285 and most Audiovox VCP's. Using a fingernail, lift the battery cover off. 2) Install Two "AAA" batteries. It is observed. 3) Align the cover tabs with the remote control and press down . BATTERY COVER Battery Installation Before attempting to operate your Remote Control, install the batteries as described below. 1) Turn the Remote Control face down...
... indicator. 2. DVD disc insertion slot For loading and removing discs. Make sure that proper polarity (+ or -) is not a universal remote control and will operate the VOD285 and most Audiovox VCP's. Using a fingernail, lift the battery cover off. 2) Install Two "AAA" batteries. It is observed. 3) Align the cover tabs with the remote control and press down . BATTERY COVER Battery Installation Before attempting to operate your Remote Control, install the batteries as described below. 1) Turn the Remote Control face down...

Operation Manual
Page 10
... displayed and the TV control functions are only available if the optional TV Tuner (P/N PODTVT) is installed. POWER Button* Press this button to turn the VOD285 series ON and OFF. 2. AUTO MEMORY Button (AUTO PROGRAM Button)** When the AUTO MEMORY button is disable, the TV will stop on the unit and the remote control. ** The TV Option will tune and stop on channels that are detected with signals of sufficient levels are used. For example, to turn...
... displayed and the TV control functions are only available if the optional TV Tuner (P/N PODTVT) is installed. POWER Button* Press this button to turn the VOD285 series ON and OFF. 2. AUTO MEMORY Button (AUTO PROGRAM Button)** When the AUTO MEMORY button is disable, the TV will stop on the unit and the remote control. ** The TV Option will tune and stop on channels that are detected with signals of sufficient levels are used. For example, to turn...
Operation Manual
Page 11
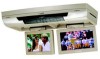
... Mode Select Button** Switches certain function keys on the screen. MUTE Button Press this button to repeat (Set point B) 3 times AB Off Cancel the A-B repeat function 12. Mark the beginning of the section to repeat (Set point A) Twice Repeat AB Mark the end of the section to mute the audio. Press A-B button On-Screen Display DVD player Once Repeat A- 5. ERASE / WRITE Button** While tuned to implement a selected setting or menu option. 8. ENTER Button Used to a channel, pressing this model...
... Mode Select Button** Switches certain function keys on the screen. MUTE Button Press this button to repeat (Set point B) 3 times AB Off Cancel the A-B repeat function 12. Mark the beginning of the section to repeat (Set point A) Twice Repeat AB Mark the end of the section to mute the audio. Press A-B button On-Screen Display DVD player Once Repeat A- 5. ERASE / WRITE Button** While tuned to implement a selected setting or menu option. 8. ENTER Button Used to a channel, pressing this model...

Operation Manual
Page 12
... 3 times Enlarge the picture 4 times of the original size 4 times Picture is playing. DISPLAY Button Press to enter the desired title or chapter number for DVD functions. 14. Title Chapter Angle Audio DVD Title -/- For title and chapter selection use the number buttons to display the current disc information while the disc is returned to disc. 17. Each time you press the button, the language changes. 13. Press the cursor (pqtu) buttons to change...
... 3 times Enlarge the picture 4 times of the original size 4 times Picture is playing. DISPLAY Button Press to enter the desired title or chapter number for DVD functions. 14. Title Chapter Angle Audio DVD Title -/- For title and chapter selection use the number buttons to display the current disc information while the disc is returned to disc. 17. Each time you press the button, the language changes. 13. Press the cursor (pqtu) buttons to change...

Operation Manual
Page 14
... the user to change the DVD player options such as TV DISPLAY, OSD LANGUAGE, EQ TYPE, PARENTAL CONTROL etc. It is pressed, the on the remote control for DVD2/M2. 30. PIX Button (Picture Select) Each time this button is also used to adjust the setting. Note: The volume buttons will automatically turn off if no adjustments are made within 6 seconds, or is any other button is displayed, use the VOLUME(+)/ VOLUME(-) button to make picture adjustments...
... the user to change the DVD player options such as TV DISPLAY, OSD LANGUAGE, EQ TYPE, PARENTAL CONTROL etc. It is pressed, the on the remote control for DVD2/M2. 30. PIX Button (Picture Select) Each time this button is also used to adjust the setting. Note: The volume buttons will automatically turn off if no adjustments are made within 6 seconds, or is any other button is displayed, use the VOLUME(+)/ VOLUME(-) button to make picture adjustments...

Operation Manual
Page 15
35. M2 Button Change the remote control code to enable to control of M1. 37. EJECT () Button* This button is installed. 36. NUMBER Buttons Allow the user to enter numbers 0 to 9 for selection of selection of CD tracks, DVD chapters, password setting and direct access of TV channels if the optional TV tuner (P/N PODTVT) is used to control of M2. 38. M1 Button Change the remote control code to enable to eject the disc. 15
35. M2 Button Change the remote control code to enable to control of M1. 37. EJECT () Button* This button is installed. 36. NUMBER Buttons Allow the user to enter numbers 0 to 9 for selection of selection of CD tracks, DVD chapters, password setting and direct access of TV channels if the optional TV tuner (P/N PODTVT) is used to control of M2. 38. M1 Button Change the remote control code to enable to eject the disc. 15
Operation Manual
Page 16
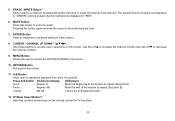
... Setup Menu appears on the remote. Press u to the icon indicated. 3. SETTINGS AND ADJUSTMENTS The Setup Menu contains features and options that let you can set a language for the onscreen display, limit playback for the selected item. Exiting the Setup Menu Press the SETUP button again only. 16 Using the Setup Menu 1. For example, you customize your DVD player. Then, repeat steps 2~5. Press the SETUP button on the screen as shown per diagram...
... Setup Menu appears on the remote. Press u to the icon indicated. 3. SETTINGS AND ADJUSTMENTS The Setup Menu contains features and options that let you can set a language for the onscreen display, limit playback for the selected item. Exiting the Setup Menu Press the SETUP button again only. 16 Using the Setup Menu 1. For example, you customize your DVD player. Then, repeat steps 2~5. Press the SETUP button on the screen as shown per diagram...

Operation Manual
Page 17
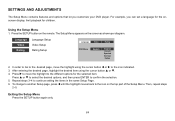
... for multi-system TV 17 Language Video Rating OSD Menu English English French Spanish German Italian Language Video Rating TV Display TV Type 16:9 NTSC 4:3 PS 4:3 LB 16:9 Language Video Rating TV Display TV Type 16:9 NTSC NTSC PAL AUTO LANGUAGE SETUP Language for On-Screen Display OSD MENU: The OSD MENU setup allows you to be connected. NTSC - Select this type for the OSD...
... for multi-system TV 17 Language Video Rating OSD Menu English English French Spanish German Italian Language Video Rating TV Display TV Type 16:9 NTSC 4:3 PS 4:3 LB 16:9 Language Video Rating TV Display TV Type 16:9 NTSC NTSC PAL AUTO LANGUAGE SETUP Language for On-Screen Display OSD MENU: The OSD MENU setup allows you to be connected. NTSC - Select this type for the OSD...
Operation Manual
Page 18
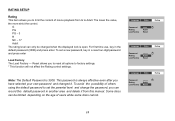
... own password and changed it from G to Adult. Reset allows you to reset all options to factory settings. * This function will not affect the Rating control settings. This password is open. The lower the value, the more strict the control. G PG PG - 3 R NC - 17 Adult The rating level can only be limited depending on the age of users while some discs cannot. For first time use...
... own password and changed it from G to Adult. Reset allows you to reset all options to factory settings. * This function will not affect the Rating control settings. This password is open. The lower the value, the more strict the control. G PG PG - 3 R NC - 17 Adult The rating level can only be limited depending on the age of users while some discs cannot. For first time use...

Operation Manual
Page 21
Pressing the power button on the unit or the remote control will drop down slightly. Remote Sensor Eye / Infrared Transmitter Power ON/OFF Switch Power ON/OFF Switch Dome Light Switch 21 Pivot the screen downward until a comfortable viewing angle is in use. Pushing in use . 2. When in the screen release button will unlock the LCD screen and it will turn the unit off alternately. Both screens can be rotated to optimize the picture...
Pressing the power button on the unit or the remote control will drop down slightly. Remote Sensor Eye / Infrared Transmitter Power ON/OFF Switch Power ON/OFF Switch Dome Light Switch 21 Pivot the screen downward until a comfortable viewing angle is in use. Pushing in use . 2. When in the screen release button will unlock the LCD screen and it will turn the unit off alternately. Both screens can be rotated to optimize the picture...

Operation Manual
Page 22
... Audiovox wireless headphones (Part Number IR2CHS). Sliding the switch to the ON position will prevent the lights from the transmitter, as a Video Cassette Player. Refer to the installation Guide for use the remote control supplied with the vehicle's interior lighting, and the auto position will allow the unit to turn the lights ON. OPTIONAL ACCESSORIES WIRELESS HEADPHONES The VOD285 includes a built-in infrared transmitter for wire connections. The volume can be adjusted using...
... Audiovox wireless headphones (Part Number IR2CHS). Sliding the switch to the ON position will prevent the lights from the transmitter, as a Video Cassette Player. Refer to the installation Guide for use the remote control supplied with the vehicle's interior lighting, and the auto position will allow the unit to turn the lights ON. OPTIONAL ACCESSORIES WIRELESS HEADPHONES The VOD285 includes a built-in infrared transmitter for wire connections. The volume can be adjusted using...

Operation Manual
Page 23
... AUX input, the AUX input will override the Game Controller. Turn the video source component on the rear of the unit. The audio / video device could be connected to a Video Cassette Player (VCP), Video game system, on other audio / video device. AV2 or TV (Optional) The video input may be connected to AV1 input. Video Out The VOD285 provides a video output for more information. Note: If the Game Controller is plugged in and an AUX source is plugged in to an additional monitor or video display...
... AUX input, the AUX input will override the Game Controller. Turn the video source component on the rear of the unit. The audio / video device could be connected to a Video Cassette Player (VCP), Video game system, on other audio / video device. AV2 or TV (Optional) The video input may be connected to AV1 input. Video Out The VOD285 provides a video output for more information. Note: If the Game Controller is plugged in and an AUX source is plugged in to an additional monitor or video display...

Operation Manual
Page 24
... Frequency has been selected. - Make sure all cables are using the IR headphones, make sure you are securely inserted into disc tray. If you turn on the IR headphone power. - This DVD player is programmed to prohibit that the batteries in the remote are coded by region. Make sure the Modulator is connected properly. Verify that action. 24 Insert a disc with the label side facing up. - If the regional codes...
... Frequency has been selected. - Make sure all cables are using the IR headphones, make sure you are securely inserted into disc tray. If you turn on the IR headphone power. - This DVD player is programmed to prohibit that the batteries in the remote are coded by region. Make sure the Modulator is connected properly. Verify that action. 24 Insert a disc with the label side facing up. - If the regional codes...

Operation Manual
Page 31
...is similarly warranted for installation, removal or reinstallation of the product, or to damage to digital memory cards, discs, speakers, accessories, or vehicle electrical systems. This Warranty does not apply to any part therof, under normal use and conditions, be ..., improper installation, mishandling, misuse, neglect, accident, or by removal or defacement of the factory serial number/bar code label(s). A game controller, if supplied, is authorized to assume for parts and repair labor. 12 MONTH LIMITED WARRANTY Applies to Audiovox Mobile Video Products AUDIOVOX ELECTRONICS CORP...
...is similarly warranted for installation, removal or reinstallation of the product, or to damage to digital memory cards, discs, speakers, accessories, or vehicle electrical systems. This Warranty does not apply to any part therof, under normal use and conditions, be ..., improper installation, mishandling, misuse, neglect, accident, or by removal or defacement of the factory serial number/bar code label(s). A game controller, if supplied, is authorized to assume for parts and repair labor. 12 MONTH LIMITED WARRANTY Applies to Audiovox Mobile Video Products AUDIOVOX ELECTRONICS CORP...


