
Operating Instructions
Page 15
...automatically loaded into unit extended horizontally Power Reconnected Monitor is the same at any point. Parking Brake Inhibit When the pink "Parking" wire is connected to the vehicle Parking Brake circuit, the front TFT monitor will display video when the Parking Brake is engaged. (When the... Measures Obstruction Monitor loading out horizontally Self Protection OPEN Button Pressed Monitor is extended horizontally to the aspect ratio of 16 to resume. VM9314 Aspect Ratio Press the DISP button (10) on the remote control or WIDE button (13) on the right and left sides of the ...
...automatically loaded into unit extended horizontally Power Reconnected Monitor is the same at any point. Parking Brake Inhibit When the pink "Parking" wire is connected to the vehicle Parking Brake circuit, the front TFT monitor will display video when the Parking Brake is engaged. (When the... Measures Obstruction Monitor loading out horizontally Self Protection OPEN Button Pressed Monitor is extended horizontally to the aspect ratio of 16 to resume. VM9314 Aspect Ratio Press the DISP button (10) on the remote control or WIDE button (13) on the right and left sides of the ...
Operating Instructions
Page 18
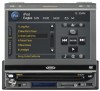
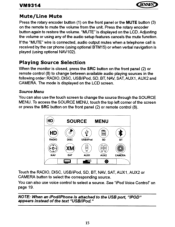
VM9314 Mute/Line Mute Press the rotary encoder button (1) on the front panel orthe MUTE button (3) on the remote to restore the volume. If the "MUTE" wire is connected, audio output mutes when a telephone call is received by the car phone (using optional BTM15) or when verbal navigation is displayed on the ...
VM9314 Mute/Line Mute Press the rotary encoder button (1) on the front panel orthe MUTE button (3) on the remote to restore the volume. If the "MUTE" wire is connected, audio output mutes when a telephone call is received by the car phone (using optional BTM15) or when verbal navigation is displayed on the ...

Operating Instructions
Page 75
..." connection Speakers damaged Replace speakers HeaVily biased volume balance Adjust the channel balance to parking brake wire Parking brake is not engaged Flashing image or inter- VM9314 TROUBLESHOOTING Table 13: Troubleshooting Problem Cause Corrective Action GENERAL Unit will not power on Radio Fuse ... panel Battery depleted Replace battery with current TV system settings Improper video signal connections Turn TFT Auto Open on Check wiring and correct stop vehicle in use Use original copy Speaker power rating not Connect proper speakers compatible with unit Speaker ...
..." connection Speakers damaged Replace speakers HeaVily biased volume balance Adjust the channel balance to parking brake wire Parking brake is not engaged Flashing image or inter- VM9314 TROUBLESHOOTING Table 13: Troubleshooting Problem Cause Corrective Action GENERAL Unit will not power on Radio Fuse ... panel Battery depleted Replace battery with current TV system settings Improper video signal connections Turn TFT Auto Open on Check wiring and correct stop vehicle in use Use original copy Speaker power rating not Connect proper speakers compatible with unit Speaker ...

Operating Instructions
Page 82
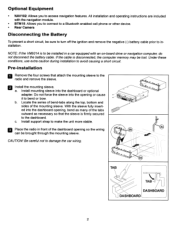
... the Box VM9314 Head Unit Single 01 N Sleeve Wiring Harness Parking Brake Sensor Extension Wire Mounting Hardware3 Voice control microphone with mounting brackets Cosmetic Trim Ring Remote Control with safe driving conditions. 1 Never install this unit where operation... 3.5mm Media Adaptor Cable Owners Manual Installation Guide Tools and Supplies You will need these tools and supplies to install your VM9314: Torx type, flat-head and Philips screwdrivers Wire cutters and strippers Tools to remove existing radio (screwdriver, socket wrench set or other tools) Electrical tape Crimping tool Volt...
... the Box VM9314 Head Unit Single 01 N Sleeve Wiring Harness Parking Brake Sensor Extension Wire Mounting Hardware3 Voice control microphone with mounting brackets Cosmetic Trim Ring Remote Control with safe driving conditions. 1 Never install this unit where operation... 3.5mm Media Adaptor Cable Owners Manual Installation Guide Tools and Supplies You will need these tools and supplies to install your VM9314: Torx type, flat-head and Philips screwdrivers Wire cutters and strippers Tools to remove existing radio (screwdriver, socket wrench set or other tools) Electrical tape Crimping tool Volt...
Operating Instructions
Page 83
...remove the sleeve. CAUTIONI Be careful not to make the unit more stable. , .... b. Install support strap to damage the car wiring. DASHBOARD 2 NO TE: If the VM9314 is firmly secured to the dashboard. Do not force the sleeve into the dashboard or optional adapter. If the cable is disconnected,... prior to installation. Under these conditions, use extra caution during installation to bend or bow. Install mounting sleeve into the opening so the wiring can be lost. Locate the series of bend-tabs along the top, bottom and sides of the dashboard opening or cause it to avoid...
...remove the sleeve. CAUTIONI Be careful not to make the unit more stable. , .... b. Install support strap to damage the car wiring. DASHBOARD 2 NO TE: If the VM9314 is firmly secured to the dashboard. Do not force the sleeve into the dashboard or optional adapter. If the cable is disconnected,... prior to installation. Under these conditions, use extra caution during installation to bend or bow. Install mounting sleeve into the opening so the wiring can be lost. Locate the series of bend-tabs along the top, bottom and sides of the dashboard opening or cause it to avoid...

Operating Instructions
Page 84
... and amperage to confirm operation (ignition switch must be supported with final mounting of the chassis. If unit does not operate, recheck all wiring until problem is complete, reconnect the battery negative terminal. fJ Connect antenna lead. ISO-DIN Installation D Remove mounting sleeve brackets. fJ Remove...! Make sure the unit is achieved, turn the unit on to avoid damaging the radio. The VM9314 uses one end of the perforated support strap (supplied) to vibration. D Connect wiring adapter to a secure part of the COl DVD player, the chassis must be on new radio using...
... and amperage to confirm operation (ignition switch must be supported with final mounting of the chassis. If unit does not operate, recheck all wiring until problem is complete, reconnect the battery negative terminal. fJ Connect antenna lead. ISO-DIN Installation D Remove mounting sleeve brackets. fJ Remove...! Make sure the unit is achieved, turn the unit on to avoid damaging the radio. The VM9314 uses one end of the perforated support strap (supplied) to vibration. D Connect wiring adapter to a secure part of the COl DVD player, the chassis must be on new radio using...
Operating Instructions
Page 85
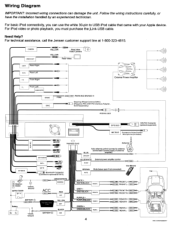
Wiring Diagram IMPORTANT: Incorrect wiring connections can use the white 30-pin to optional BTM10) Extemal power amplifier control earPhone 1"'"";;;M..;;,ut;;.a.:;.(le;.;a;.;.ve;..o;;.:;p.e.._n_ifn...;o.t..c.;.;o...;n...;ne;.;.c.t.e....Wheel Control (SWC po---~IIIII(r:J(Requires PAC SWI-PS Interface Adapter. d.;.;):...._, Ground ACC BATIERY(!) BATIERY8 BLACK OND FRONTl GREY + GREY/BLACK - Follow the wiring instructions carefully, or have the installation handled by an experienced technician. Need Help? FRONTR PURPLE + PURPLEIBLACK REARR GREEN + GREEN/BLACK - FRONTR+ FRONTR- ...
Wiring Diagram IMPORTANT: Incorrect wiring connections can use the white 30-pin to optional BTM10) Extemal power amplifier control earPhone 1"'"";;;M..;;,ut;;.a.:;.(le;.;a;.;.ve;..o;;.:;p.e.._n_ifn...;o.t..c.;.;o...;n...;ne;.;.c.t.e....Wheel Control (SWC po---~IIIII(r:J(Requires PAC SWI-PS Interface Adapter. d.;.;):...._, Ground ACC BATIERY(!) BATIERY8 BLACK OND FRONTl GREY + GREY/BLACK - Follow the wiring instructions carefully, or have the installation handled by an experienced technician. Need Help? FRONTR PURPLE + PURPLEIBLACK REARR GREEN + GREEN/BLACK - FRONTR+ FRONTR- ...


