Operating Instructions
Page 4
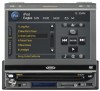
We recommend having your iPod. *Video/photo playback requires jUnk-USB iPod interface cable (sold separately). • Power Management Charges iPod while Connected 1 VM9314 FEATURES Congratulations on TFT Screen iPod • iPod via Remote Control • Burn up to read all of the Jensen VM9314 Mobile Multimedia Receiver. Full and Normal ax • Fast Forward - 2X, 4X, and 20X • Slow Motion - 2X, 4X, 8X and 20X...
We recommend having your iPod. *Video/photo playback requires jUnk-USB iPod interface cable (sold separately). • Power Management Charges iPod while Connected 1 VM9314 FEATURES Congratulations on TFT Screen iPod • iPod via Remote Control • Burn up to read all of the Jensen VM9314 Mobile Multimedia Receiver. Full and Normal ax • Fast Forward - 2X, 4X, and 20X • Slow Motion - 2X, 4X, 8X and 20X...
Operating Instructions
Page 5
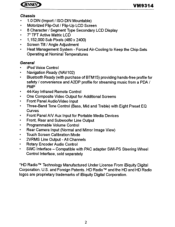
... LCD Display • 7" TFT Active Matrix LCD • 1,152,000 Sub Pixels (480 x 2400) • Screen Tilt I Angle Adjustment • Heat Management System - All Channels • Rotary Encoder Audio Control • SWC Interface - Compatible with Eight Preset EO Curves • Front Panel AN Aux Input for Portable Media Devices • Front, Rear and Subwoofer Line Output • Programmable Volume Control • Rear Camera Input (Normal and Mirror Image View) • Touch Screen Calibration Mode...
... LCD Display • 7" TFT Active Matrix LCD • 1,152,000 Sub Pixels (480 x 2400) • Screen Tilt I Angle Adjustment • Heat Management System - All Channels • Rotary Encoder Audio Control • SWC Interface - Compatible with Eight Preset EO Curves • Front Panel AN Aux Input for Portable Media Devices • Front, Rear and Subwoofer Line Output • Programmable Volume Control • Rear Camera Input (Normal and Mirror Image View) • Touch Screen Calibration Mode...
Operating Instructions
Page 9
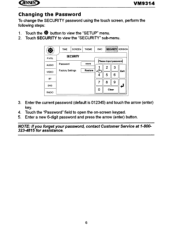
... view the "SETUP" menu. 2. Touch the" button to open the on-screen keypad. 5. Enter a new 6-digit password and press the arrow (enter) button. NOTE: If you forget your password, contact Customer Service at 1-800323-4815 for assistance. 6 VM9314 Changing the Password To change the SECURITY password using the touch screen, perform the following steps: 1. Touch SECURITY to view the "SECURITY" sub-menu. @ I I I I TIME SCREEN THEME swc VERSION P.vOL SECURIlY [Please Input password] AUDIO VIDEO Password Factory Settings BT DVD RADIO...
... view the "SETUP" menu. 2. Touch the" button to open the on-screen keypad. 5. Enter a new 6-digit password and press the arrow (enter) button. NOTE: If you forget your password, contact Customer Service at 1-800323-4815 for assistance. 6 VM9314 Changing the Password To change the SECURITY password using the touch screen, perform the following steps: 1. Touch SECURITY to view the "SECURITY" sub-menu. @ I I I I TIME SCREEN THEME swc VERSION P.vOL SECURIlY [Please Input password] AUDIO VIDEO Password Factory Settings BT DVD RADIO...
Operating Instructions
Page 10
VM9314
VM9314
Operating Instructions
Page 18
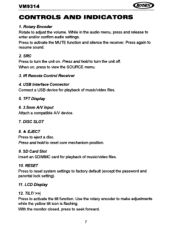
... SRC button on the front panel (2) or remote control (8) to mute the volume from the unit. " 15 "MUTE" is displayed on the remote to change the source through the SOURCE MENU. See "iPod Voice Control" on the LCD. The mode is displayed on page 19. VM9314 Mute/Line Mute Press the rotary encoder button (1) on the front panel orthe MUTE button (3) on the LCD screen. Adjusting the volume or using optional NAV102). You can also use voice control to restore the volume.
... SRC button on the front panel (2) or remote control (8) to mute the volume from the unit. " 15 "MUTE" is displayed on the remote to change the source through the SOURCE MENU. See "iPod Voice Control" on the LCD. The mode is displayed on page 19. VM9314 Mute/Line Mute Press the rotary encoder button (1) on the front panel orthe MUTE button (3) on the LCD screen. Adjusting the volume or using optional NAV102). You can also use voice control to restore the volume.

Operating Instructions
Page 19
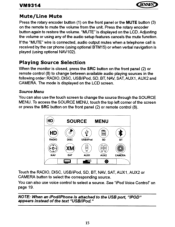
... TFT screen displays the volume level for software updates. can press and hold to drag the "Source Menu" icons and rearrange them based on the front of USB/SD devices, see "Inserting a USB Device" or "Accessing an SD Card" on remote control. This input is for file playback. Select "AUX 1" mode to the AN INPUT. VM9314 NOTE: You can be used for use of the radio. When the volume level reaches "a" or "40", a beep sounds...
... TFT screen displays the volume level for software updates. can press and hold to drag the "Source Menu" icons and rearrange them based on the front of USB/SD devices, see "Inserting a USB Device" or "Accessing an SD Card" on remote control. This input is for file playback. Select "AUX 1" mode to the AN INPUT. VM9314 NOTE: You can be used for use of the radio. When the volume level reaches "a" or "40", a beep sounds...

Operating Instructions
Page 20
... the rotary encoder while the yellow speaker icon and level indication is displayed on volume setting. Audio Control Menu The Audio Control feature allows you to easily adjust your audio system to meet the acoustical characteristics of your turn -on the remote control to display the audio menu. @ EQ BASS MID TREB @ EQ FADER I BALANCE" to view the second screen and adjust LOUD, SUB.Wand FADER settings. 17 The unit will beep to confirm your vehicle...
... the rotary encoder while the yellow speaker icon and level indication is displayed on volume setting. Audio Control Menu The Audio Control feature allows you to easily adjust your audio system to meet the acoustical characteristics of your turn -on the remote control to display the audio menu. @ EQ BASS MID TREB @ EQ FADER I BALANCE" to view the second screen and adjust LOUD, SUB.Wand FADER settings. 17 The unit will beep to confirm your vehicle...

Operating Instructions
Page 26
... Demo Mode. "Demo" is the only available On Screen Display option. Seek Down / Previous Track / ** Preset Down 5. Band ** If additional steering wheel control buttons are available for most vehicles: 1. lating activity on the back of the head unit allows connectivity to the SWC buttons. This feature / function may not be available on the vehicle, function 7 / 8 may be selected. Run Demo scrolls through the various source screens, simu- VM9314 Setting OSD DEMO Options Function...
... Demo Mode. "Demo" is the only available On Screen Display option. Seek Down / Previous Track / ** Preset Down 5. Band ** If additional steering wheel control buttons are available for most vehicles: 1. lating activity on the back of the head unit allows connectivity to the SWC buttons. This feature / function may not be available on the vehicle, function 7 / 8 may be selected. Run Demo scrolls through the various source screens, simu- VM9314 Setting OSD DEMO Options Function...

Operating Instructions
Page 29
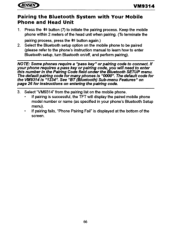
... your paired phone is activated, you can reuse a pre- Adult Enter a 4-digit password to override the block on programs rated higher that the selected rating level. G 3. an nect Off Pairing **** Code Automatically connect when your mobile phone. DVD Sub-menu Features If a OVO supports more than 1 Subtitle or Audio language, all the languages are available for Bluetooth connection to programming choose the "Adult" rating level. VM9314 BT (Bluetooth) Sub-menu Features setting Options Function Bluetooth On Off Auto...
... your paired phone is activated, you can reuse a pre- Adult Enter a 4-digit password to override the block on programs rated higher that the selected rating level. G 3. an nect Off Pairing **** Code Automatically connect when your mobile phone. DVD Sub-menu Features If a OVO supports more than 1 Subtitle or Audio language, all the languages are available for Bluetooth connection to programming choose the "Adult" rating level. VM9314 BT (Bluetooth) Sub-menu Features setting Options Function Bluetooth On Off Auto...
Operating Instructions
Page 56
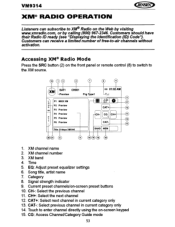
... 4. Category 8. CH-: Select the previous channel 11. Touch to enter channel directly using the on -screen preset buttons 10. XM channel name 2. CAT+: Select next channel in current category only 14. CG: Access Channel/Category Guide mode 53 EQ: Adjust preset equalizer settings 6. XM channel number 3. Current preset channels/on -screen keypad 15. VM9314 XM@ RADIO OPERATION Listeners can receive a limited number of free-to-air channels without activation. Song title, artist name 7. CH+: Select the next channel 12. CAT-: Select previous channel in current...
... 4. Category 8. CH-: Select the previous channel 11. Touch to enter channel directly using the on -screen preset buttons 10. XM channel name 2. CAT+: Select next channel in current category only 14. CG: Access Channel/Category Guide mode 53 EQ: Adjust preset equalizer settings 6. XM channel number 3. Current preset channels/on -screen keypad 15. VM9314 XM@ RADIO OPERATION Listeners can receive a limited number of free-to-air channels without activation. Song title, artist name 7. CH+: Select the next channel 12. CAT-: Select previous channel in current...

Operating Instructions
Page 61
...; iPhone 3G / 3GS The unit will automatically switch to the iPod menu from any other source menu, press the SRC button (2) on the front panel or remote control (8) until the iPod menu appears on -screen indicators and touch key areas for iPod and works with your Apple device. You can use the white 3D-pin to access Playlist, Artist, Album, Songs, etc. NOTE: For basic iPod connectivity, you must purchase theJLink-USB cable. VM9314 iPod OPERATION...
...; iPhone 3G / 3GS The unit will automatically switch to the iPod menu from any other source menu, press the SRC button (2) on the front panel or remote control (8) until the iPod menu appears on -screen indicators and touch key areas for iPod and works with your Apple device. You can use the white 3D-pin to access Playlist, Artist, Album, Songs, etc. NOTE: For basic iPod connectivity, you must purchase theJLink-USB cable. VM9314 iPod OPERATION...
Operating Instructions
Page 66
...) may have a "Power Saving Mode" option. NOTE: Initial phone book indexing make sure your mobile phone's "Bluetooth function" is turned on. • To ensure the best conversation quality/performance, stay within one meter of the BTM15 when talking. • To "disconnecf' the mobile phone from the head unit, turn the Bluetooth connectivity off on the mobile phone or touch the ~ button. • Phone Book direct searching through the head unit is made...
...) may have a "Power Saving Mode" option. NOTE: Initial phone book indexing make sure your mobile phone's "Bluetooth function" is turned on. • To ensure the best conversation quality/performance, stay within one meter of the BTM15 when talking. • To "disconnecf' the mobile phone from the head unit, turn the Bluetooth connectivity off on the mobile phone or touch the ~ button. • Phone Book direct searching through the head unit is made...
Operating Instructions
Page 69
... of the screen. 66 See "BT (Bluetooth) Sub-menu Features" on page 26 for instructions on the mobile phone to be paired (please refer to the phone's instruction manual to learn how to connect. The default code for many phones is "1234". NOTE: Some phones require a "pass key" or pairing code to enter Bluetooth setup, turn Bluetooth on the mobile phone. • If pairing is displayed at the bottom of the head unit when pairing. (To...
... of the screen. 66 See "BT (Bluetooth) Sub-menu Features" on page 26 for instructions on the mobile phone to be paired (please refer to the phone's instruction manual to learn how to connect. The default code for many phones is "1234". NOTE: Some phones require a "pass key" or pairing code to enter Bluetooth setup, turn Bluetooth on the mobile phone. • If pairing is displayed at the bottom of the head unit when pairing. (To...

Operating Instructions
Page 70
... call is received. Making an Outgoing Call NOTE: Press the ~ button from the main Bluetooth screen to reject an incoming call duration for voice mail. The screen will appear at the top of the screen. Volume Control To increase or decrease the volume level, turn the AUDIO control (1) on the remote control (15,16). VM9314 Reconnecting Once the Bluetooth device has been paired, you can only connect to a phone using the buttons on the...
... call is received. Making an Outgoing Call NOTE: Press the ~ button from the main Bluetooth screen to reject an incoming call duration for voice mail. The screen will appear at the top of the screen. Volume Control To increase or decrease the volume level, turn the AUDIO control (1) on the remote control (15,16). VM9314 Reconnecting Once the Bluetooth device has been paired, you can only connect to a phone using the buttons on the...

Operating Instructions
Page 73
... personal music player using an audio player, it may occur depending on your previously paired Bluetooth when it is set to "Off', you to enter a PIN code into the unit. Auto Connect The auto Connect option will allow the VM9314 to automatically connect to your mobile phone model. Select the "BT' sub-menu. 3. Bluetooth audio players (or Bluetooth adapters) compatible with your paired Bluetooth phone. Enter the PIN code referring to your phone. To turn "Auto Answer" on page 26. Touch the button to view the SETUP menu. 2. The VM9314 can...
... personal music player using an audio player, it may occur depending on your previously paired Bluetooth when it is set to "Off', you to enter a PIN code into the unit. Auto Connect The auto Connect option will allow the VM9314 to automatically connect to your mobile phone model. Select the "BT' sub-menu. 3. Bluetooth audio players (or Bluetooth adapters) compatible with your paired Bluetooth phone. Enter the PIN code referring to your phone. To turn "Auto Answer" on page 26. Touch the button to view the SETUP menu. 2. The VM9314 can...

Operating Instructions
Page 75
... "MUTE" connection Speakers damaged Replace speakers HeaVily biased volume balance Adjust the channel balance to accommodate disc Check wiring and correct 72 off Illegal operation Press the RESET button located in the bottom right corner of car Pirated disc is in use Use original copy Speaker power rating not Connect proper speakers compatible with new one Battery installed incorrectly Remove battery and install correctly Improper audio output connection Check wiring and correct Volume set too low Increase volume level Improper "MUTE" connec- VM9314 TROUBLESHOOTING...
... "MUTE" connection Speakers damaged Replace speakers HeaVily biased volume balance Adjust the channel balance to accommodate disc Check wiring and correct 72 off Illegal operation Press the RESET button located in the bottom right corner of car Pirated disc is in use Use original copy Speaker power rating not Connect proper speakers compatible with new one Battery installed incorrectly Remove battery and install correctly Improper audio output connection Check wiring and correct Volume set too low Increase volume level Improper "MUTE" connec- VM9314 TROUBLESHOOTING...

Operating Instructions
Page 76
... ratio display Monitor stops at incorrect position TUNER Weak station searching Cannot insert disc Image blurred, distorted, or dark Disc does not play back PBC cannot be used during VCD playback No repeat or searching while playing VCD MP3 Interruption occurred during playback Improper aspect ratio setup Moving path is blocked Auto antenna is not fully extended Auto antenna not properly connected LOCAL function is activated Disc...
... ratio display Monitor stops at incorrect position TUNER Weak station searching Cannot insert disc Image blurred, distorted, or dark Disc does not play back PBC cannot be used during VCD playback No repeat or searching while playing VCD MP3 Interruption occurred during playback Improper aspect ratio setup Moving path is blocked Auto antenna is not fully extended Auto antenna not properly connected LOCAL function is activated Disc...

Operating Instructions
Page 82
... Wiring Harness Parking Brake Sensor Extension Wire Mounting Hardware3 Voice control microphone with mounting brackets Cosmetic Trim Ring Remote Control with safe driving conditions. 1 Never install this unit where operation and viewing could interfere with Battery 3.5mm to 3.5mm Media Adaptor Cable Owners Manual Installation Guide Tools and Supplies You will need these tools and supplies to install your VM9314: Torx type, flat-head and Philips screwdrivers Wire cutters and strippers Tools to remove existing radio...
... Wiring Harness Parking Brake Sensor Extension Wire Mounting Hardware3 Voice control microphone with mounting brackets Cosmetic Trim Ring Remote Control with safe driving conditions. 1 Never install this unit where operation and viewing could interfere with Battery 3.5mm to 3.5mm Media Adaptor Cable Owners Manual Installation Guide Tools and Supplies You will need these tools and supplies to install your VM9314: Torx type, flat-head and Philips screwdrivers Wire cutters and strippers Tools to remove existing radio...

Operating Instructions
Page 84
... limitation. 3 The rear of the radio must be supported with final mounting of the unit, using existing screws from the dashboard. If unit does not operate, recheck all wiring until problem is complete, reconnect the battery negative terminal. fJ Connect antenna lead. I I Slide radio chassis into the threaded insert on page 4. I I Attach one 15 amp fuse, located in the black filter box in the wiring diagram on the back...
... limitation. 3 The rear of the radio must be supported with final mounting of the unit, using existing screws from the dashboard. If unit does not operate, recheck all wiring until problem is complete, reconnect the battery negative terminal. fJ Connect antenna lead. I I Slide radio chassis into the threaded insert on page 4. I I Attach one 15 amp fuse, located in the black filter box in the wiring diagram on the back...
Operating Instructions
Page 85
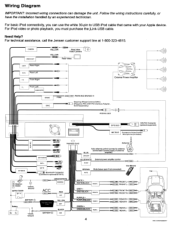
... Interface Adapter. For basic iPod connectivity, you must purchase the jUnk-USB cable. Wiring Diagram IMPORTANT: Incorrect wiring connections can use the white 30-pin to optional BTM10) Extemal power amplifier control earPhone 1"'"";;;M..;;,ut;;.a.:;.(le;.;a;.;.ve;..o;;.:;p.e.._n_ifn...;o.t..c.;.;o...;n...;ne;.;.c.t.e. For iPod video or photo playback, you can damage the unit. d.;.;):...._, Ground ACC BATIERY(!) BATIERY8 BLACK OND FRONTl GREY + GREY/BLACK - REAR R+ REAR R- P/N:127070006077 Follow the wiring instructions carefully, or have the installation handled...
... Interface Adapter. For basic iPod connectivity, you must purchase the jUnk-USB cable. Wiring Diagram IMPORTANT: Incorrect wiring connections can use the white 30-pin to optional BTM10) Extemal power amplifier control earPhone 1"'"";;;M..;;,ut;;.a.:;.(le;.;a;.;.ve;..o;;.:;p.e.._n_ifn...;o.t..c.;.;o...;n...;ne;.;.c.t.e. For iPod video or photo playback, you can damage the unit. d.;.;):...._, Ground ACC BATIERY(!) BATIERY8 BLACK OND FRONTl GREY + GREY/BLACK - REAR R+ REAR R- P/N:127070006077 Follow the wiring instructions carefully, or have the installation handled...


