User Manual
Page 7
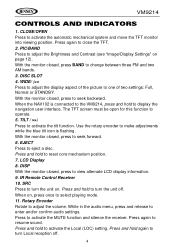
...Press to seek forward. 6. While in the audio menu, press and release to activate the Local (LOC) setting. Press and hold to turn Local reception off . VM9214 CONTROLS AND INDICATORS 1. DISP With the monitor closed , press to eject a disc. SRC Press to view alternate LCD display information. 9. WIDE.... Press and hold again to adjust the Brightness and Contrast (see "Image/Display Settings" on . DISC SLOT 4. PIC/BAND Press to turn the unit off . 4 Press and hold to reset core mechanism position. 7. CLOSE/OPEN Press to activate the automatic mechanical system and move...
...Press to seek forward. 6. While in the audio menu, press and release to activate the Local (LOC) setting. Press and hold to turn Local reception off . VM9214 CONTROLS AND INDICATORS 1. DISP With the monitor closed , press to eject a disc. SRC Press to view alternate LCD display information. 9. WIDE.... Press and hold again to adjust the Brightness and Contrast (see "Image/Display Settings" on . DISC SLOT 4. PIC/BAND Press to turn the unit off . 4 Press and hold to reset core mechanism position. 7. CLOSE/OPEN Press to activate the automatic mechanical system and move...
User Manual
Page 10
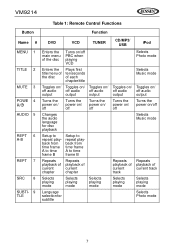
VM9214 Table 1: Remote Control Functions Button Function Name # DVD VCD TUNER CD/MP3/ USB iPod MENU 1 TITLE 2 MUTE 3 POWE 4 R/ AUDIO 5 REPT 6 A-B REPT 7 SRC 8 SUBTI- 9 TLE Enters the main menu of the disc Turns on/off PBC when playing VCD Enters the Plays first title menu of ten seconds the disc ...of each chapter/title Toggles on/ Toggles on/ off audio off audio output output Turns the power on/ off Turns the power on/ off Changes the audio language for disc playback Setup to repeat playback from time frame A to time frame B...
VM9214 Table 1: Remote Control Functions Button Function Name # DVD VCD TUNER CD/MP3/ USB iPod MENU 1 TITLE 2 MUTE 3 POWE 4 R/ AUDIO 5 REPT 6 A-B REPT 7 SRC 8 SUBTI- 9 TLE Enters the main menu of the disc Turns on/off PBC when playing VCD Enters the Plays first title menu of ten seconds the disc ...of each chapter/title Toggles on/ Toggles on/ off audio off audio output output Turns the power on/ off Turns the power on/ off Changes the audio language for disc playback Setup to repeat playback from time frame A to time frame B...

User Manual
Page 14
... the monitor into the compartment. If "TFT Auto Open" is "off . While the blue tilt icon is flashing, turn the rotary encoder to adjust the tilt angle in relationship to the viewing position. VM9214 USING THE TFT MONITOR Open/Close TFT Monitor Open TFT Monitor Press the OPEN button (1) on the front... panel or press the ( ) button (25) on the remote control to "Manual", the TFT will not close when the key is turned off " when the unit is turned on, press the...
... the monitor into the compartment. If "TFT Auto Open" is "off . While the blue tilt icon is flashing, turn the rotary encoder to adjust the tilt angle in relationship to the viewing position. VM9214 USING THE TFT MONITOR Open/Close TFT Monitor Open TFT Monitor Press the OPEN button (1) on the front... panel or press the ( ) button (25) on the remote control to "Manual", the TFT will not close when the key is turned off " when the unit is turned on, press the...
User Manual
Page 15
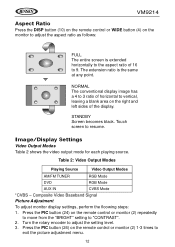
...Mode AUX IN CVBS Mode *CVBS - Image/Display Settings Video Output Modes Table 2 shows the video output mode for each playing source. Turn the rotary encoder to resume. Touch screen to adjust the setting level. 3. Composite Video Baseband Signal Picture Adjustment To adjust monitor display settings,...: 1. Press the PIC button (24) on the remote control or monitor (2) repeatedly to move from the "BRIGHT" setting to "CONTRAST". 2. VM9214 Aspect Ratio Press the DISP button (10) on the remote control or WIDE button (4) on the monitor to adjust the aspect ratio as follows: ...
...Mode AUX IN CVBS Mode *CVBS - Image/Display Settings Video Output Modes Table 2 shows the video output mode for each playing source. Turn the rotary encoder to resume. Touch screen to adjust the setting level. 3. Composite Video Baseband Signal Picture Adjustment To adjust monitor display settings,...: 1. Press the PIC button (24) on the remote control or monitor (2) repeatedly to move from the "BRIGHT" setting to "CONTRAST". 2. VM9214 Aspect Ratio Press the DISP button (10) on the remote control or WIDE button (4) on the monitor to adjust the aspect ratio as follows: ...

User Manual
Page 17
... a telephone call is closed, press the SRC button on the front panel (10) or remote control (8) to restore the volume. The Beep tone can also turn the unit on. Mute/Line Mute Press the rotary encoder button (11) on the front panel or the MUTE button (3) on the remote to power... mode is displayed on the LCD. You can be disabled through the Setup menu. VM9214 OPERATING INSTRUCTIONS Power On / Off Press the /SRC button (10) on the unit (or the button (4) on the remote control) to turn on the unit by the car phone (using any of the unit light up and...
... a telephone call is closed, press the SRC button on the front panel (10) or remote control (8) to restore the volume. The Beep tone can also turn the unit on. Mute/Line Mute Press the rotary encoder button (11) on the front panel or the MUTE button (3) on the remote to power... mode is displayed on the LCD. You can be disabled through the Setup menu. VM9214 OPERATING INSTRUCTIONS Power On / Off Press the /SRC button (10) on the unit (or the button (4) on the remote control) to turn on the unit by the car phone (using any of the unit light up and...

User Manual
Page 19
...b. Push and hold the rotary encoder while the blue speaker icon and level indication is displayed on the type of the cabin equalizer. VM9214 information regarding the use this feature, the TFT monitor must be adjusted. Audio Control Menu The Audio Control feature allows you to easily ... Fader and Balance boosts the effects of vehicle and its measurements. Volume Adjustment Volume Increase/Decrease To increase or decrease the volume level, turn -on volume setting. Press the buttons (19, 17) to highlight the audio feature to meet the acoustical characteristics of your audio system...
...b. Push and hold the rotary encoder while the blue speaker icon and level indication is displayed on the type of the cabin equalizer. VM9214 information regarding the use this feature, the TFT monitor must be adjusted. Audio Control Menu The Audio Control feature allows you to easily ... Fader and Balance boosts the effects of vehicle and its measurements. Volume Adjustment Volume Increase/Decrease To increase or decrease the volume level, turn -on volume setting. Press the buttons (19, 17) to highlight the audio feature to meet the acoustical characteristics of your audio system...
User Manual
Page 23
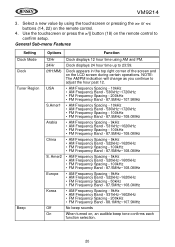
... Spacing - 9kHz • AM Frequency Band - 522kHz~1620kHz • FM Frequency Spacing - 100kHz • FM Frequency Band - 87.5MHz~108.0MHz S. VM9214 3. Amer2 • AM Frequency Spacing - 5kHz • AM Frequency Band - 520kHz~1600kHz • FM Frequency Spacing - 100kHz • FM Frequency Band ...1602kHz • FM Frequency Spacing - 200kHz • FM Frequency Band - 88.1MHz~107.9MHz Off No beep sounds On When turned on the LCD screen during certain operations. General Sub-menu Features Setting Clock Mode Clock Tuner Region Beep Options Function 12Hr Clock displays ...
... Spacing - 9kHz • AM Frequency Band - 522kHz~1620kHz • FM Frequency Spacing - 100kHz • FM Frequency Band - 87.5MHz~108.0MHz S. VM9214 3. Amer2 • AM Frequency Spacing - 5kHz • AM Frequency Band - 520kHz~1600kHz • FM Frequency Spacing - 100kHz • FM Frequency Band ...1602kHz • FM Frequency Spacing - 200kHz • FM Frequency Band - 88.1MHz~107.9MHz Off No beep sounds On When turned on the LCD screen during certain operations. General Sub-menu Features Setting Clock Mode Clock Tuner Region Beep Options Function 12Hr Clock displays ...

User Manual
Page 24
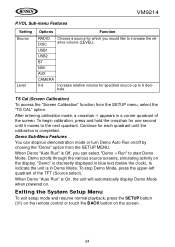
...when the option is displayed in English. DVD subtitles automatically appear in English. Selecting a crossover frequency sets a cut-off Turn the subwoofer on the disc. VM9214 Language Sub-menu Features If a DVD supports more than 1 Subtitle or Audio language, all the languages are available for... low volumes. Turn bass boost on/off frequency of the subwoofer's LPF (low-pass filter). If the selected language is ...
...when the option is displayed in English. DVD subtitles automatically appear in English. Selecting a crossover frequency sets a cut-off Turn the subwoofer on the disc. VM9214 Language Sub-menu Features If a DVD supports more than 1 Subtitle or Audio language, all the languages are available for... low volumes. Turn bass boost on/off frequency of the subwoofer's LPF (low-pass filter). If the selected language is ...

User Manual
Page 26
The TFT panel automatically opens when the unit is turned on the current video input signal - Setting Options Function Camera In Normal Mirror TFT ... the monitor return to CAMERA mode upon shifting into the viewing position and Camera mode is selected upon reverse driving. VM9214 NOTE: Record the password and keep it was previously out The color signals are output in a safe place for each..., the parental lock feature is unavailable. The rating for future reference. When the ignition is turned OFF, the TFT panel DOES NOT retract if it in the standard PAL format.
The TFT panel automatically opens when the unit is turned on the current video input signal - Setting Options Function Camera In Normal Mirror TFT ... the monitor return to CAMERA mode upon shifting into the viewing position and Camera mode is selected upon reverse driving. VM9214 NOTE: Record the password and keep it was previously out The color signals are output in a safe place for each..., the parental lock feature is unavailable. The rating for future reference. When the ignition is turned OFF, the TFT panel DOES NOT retract if it in the standard PAL format.
User Manual
Page 27
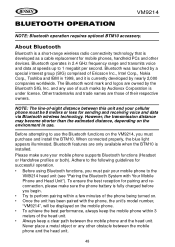
VM9214 P.VOL Sub-menu Features Setting Source Level Options Function RADIO DISC Choose a source for which you can stop Demo Mode, press the upper-left quadrant ... "Demo > Run" to start Demo Mode. When Demo "Auto Run" is Off, you would like to the next quadrant. To stop /run demonstration mode or turn Demo Auto Run on . USB1 USB2 BT NAV AUX CAMERA 0-6 Increase relative volume for each quadrant until it moves to increase the relative volume (LEVEL...
VM9214 P.VOL Sub-menu Features Setting Source Level Options Function RADIO DISC Choose a source for which you can stop Demo Mode, press the upper-left quadrant ... "Demo > Run" to start Demo Mode. When Demo "Auto Run" is Off, you would like to the next quadrant. To stop /run demonstration mode or turn Demo Auto Run on . USB1 USB2 BT NAV AUX CAMERA 0-6 Increase relative volume for each quadrant until it moves to increase the relative volume (LEVEL...

User Manual
Page 31
... available stations in AM/FM tuner mode, press and hold the rotary encoder again to stop preview scan. Select a band (if needed). 2. Touch again to turn Local off. When the Local function is illuminated. 28...
... available stations in AM/FM tuner mode, press and hold the rotary encoder again to stop preview scan. Select a band (if needed). 2. Touch again to turn Local off. When the Local function is illuminated. 28...
User Manual
Page 51
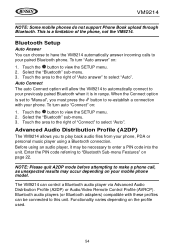
...or Handsfree profiles or both). Never place a metal object or any use . BLUETOOTH OPERATION VM9214 NOTE: Bluetooth operation requires optional BTM10 accessory. The Bluetooth word mark and logos are owned ...license. Bluetooth was launched by a special interest group (SIG) comprised of such marks by Audiovox Corporation is fully charged before you must pair your mobile phone to perform pairing within 3...head unit. • Always keep the mobile phone within a few minutes of the phone being turned on. • Once the unit has been paired with Your Mobile Phone and Head Unit")....
...or Handsfree profiles or both). Never place a metal object or any use . BLUETOOTH OPERATION VM9214 NOTE: Bluetooth operation requires optional BTM10 accessory. The Bluetooth word mark and logos are owned ...license. Bluetooth was launched by a special interest group (SIG) comprised of such marks by Audiovox Corporation is fully charged before you must pair your mobile phone to perform pairing within 3...head unit. • Always keep the mobile phone within a few minutes of the phone being turned on. • Once the unit has been paired with Your Mobile Phone and Head Unit")....

User Manual
Page 52
... through the head unit is only available if the mobile phone supports Phone Book Download. PLEASE DO NOT use the power saving mode with the VM9214. • Before accepting or making a call, make sure your mobile phone's "Bluetooth function" is made to download a phone book. If... ensure the best conversation quality/performance, stay within one meter of the BTM10 when talking. • To "disconnect" the mobile phone from the head unit, turn the Bluetooth connectivity off on -screen indicators and touch key areas for Bluetooth operation are outlined below. 14 15 1 16 17 2 BT E Q 1 2...
... through the head unit is only available if the mobile phone supports Phone Book Download. PLEASE DO NOT use the power saving mode with the VM9214. • Before accepting or making a call, make sure your mobile phone's "Bluetooth function" is made to download a phone book. If... ensure the best conversation quality/performance, stay within one meter of the BTM10 when talking. • To "disconnect" the mobile phone from the head unit, turn the Bluetooth connectivity off on -screen indicators and touch key areas for Bluetooth operation are outlined below. 14 15 1 16 17 2 BT E Q 1 2...
User Manual
Page 54
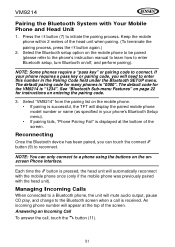
..." on page 22 for instructions on the mobile phone to be paired (please refer to the phone's instruction manual to learn how to connect. Select "VM9214" from the pairing list on the mobile phone. • If pairing is received. The default pairing code for the... number or name (as specified in the Pairing Code field under the Bluetooth SETUP menu. VM9214 Pairing the Bluetooth System with the head unit). NOTE: Some phones require a "pass key" or pairing code to enter Bluetooth setup, turn Bluetooth on the onscreen Phone interface. Each time the button is "0000". An incoming...
..." on page 22 for instructions on the mobile phone to be paired (please refer to the phone's instruction manual to learn how to connect. Select "VM9214" from the pairing list on the mobile phone. • If pairing is received. The default pairing code for the... number or name (as specified in the Pairing Code field under the Bluetooth SETUP menu. VM9214 Pairing the Bluetooth System with the head unit). NOTE: Some phones require a "pass key" or pairing code to enter Bluetooth setup, turn Bluetooth on the onscreen Phone interface. Each time the button is "0000". An incoming...

User Manual
Page 55
Rejecting an Incoming Call Touch the button to automatically dial the last call received. 1. Volume Control To increase or decrease the volume level, turn the AUDIO control (5) on the remote control (15, 16). Making an Outgoing Call NOTE: Press the button from the main Bluetooth screen to reject an ... can be answered directly or left for 3 seconds, and then return to answer calls or hang up. To end the conversation, press the button (12). VM9214 NOTE: The TALK button on the BTM10 can be used to the previous mode.
Rejecting an Incoming Call Touch the button to automatically dial the last call received. 1. Volume Control To increase or decrease the volume level, turn the AUDIO control (5) on the remote control (15, 16). Making an Outgoing Call NOTE: Press the button from the main Bluetooth screen to reject an ... can be answered directly or left for 3 seconds, and then return to answer calls or hang up. To end the conversation, press the button (12). VM9214 NOTE: The TALK button on the BTM10 can be used to the previous mode.
User Manual
Page 57
... player using an audio player, it is in range. When the Connect option is a limitation of the phone, not the VM9214. Functionality varies depending on page 22. To turn "Auto answer" on: 1. Touch the area to the right of "Auto answer" to re-establish a connection with these ...occur depending on : 1. Select the "Bluetooth" sub-menu. 3. Auto Connect The auto Connect option will allow the VM9214 to automatically connect to play back audio files from your phone. To turn auto "Connect" on your paired Bluetooth phone. Bluetooth Setup Auto Answer You can choose to have the...
... player using an audio player, it is in range. When the Connect option is a limitation of the phone, not the VM9214. Functionality varies depending on page 22. To turn "Auto answer" on: 1. Touch the area to the right of "Auto answer" to re-establish a connection with these ...occur depending on : 1. Select the "Bluetooth" sub-menu. 3. Auto Connect The auto Connect option will allow the VM9214 to automatically connect to play back audio files from your phone. To turn auto "Connect" on your paired Bluetooth phone. Bluetooth Setup Auto Answer You can choose to have the...
User Manual
Page 58
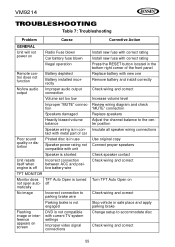
...is not compatible with current TV system settings Improper video signal connections Change setup to the center position Speaker wiring is turned Turn TFT Auto Open on Radio Fuse blown Car battery fuse blown Install new fuse with correct rating Install new fuse ..." connection Speakers damaged Replace speakers Heavily biased volume balance Adjust the channel balance to accommodate disc Check wiring and correct 55 VM9214 TROUBLESHOOTING Table 7: Troubleshooting Problem Cause Corrective Action GENERAL Unit will not power on not open auto- off Incorrect connection between ...
...is not compatible with current TV system settings Improper video signal connections Change setup to the center position Speaker wiring is turned Turn TFT Auto Open on Radio Fuse blown Car battery fuse blown Install new fuse with correct rating Install new fuse ..." connection Speakers damaged Replace speakers Heavily biased volume balance Adjust the channel balance to accommodate disc Check wiring and correct 55 VM9214 TROUBLESHOOTING Table 7: Troubleshooting Problem Cause Corrective Action GENERAL Unit will not power on not open auto- off Incorrect connection between ...
User Manual
Page 59
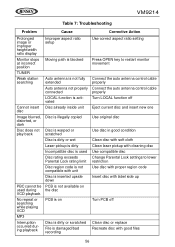
VM9214 Table 7: Troubleshooting Problem Cause Corrective Action Prolonged image or improper height/width ratio display Monitor stops at incorrect ...setting Press OPEN key to restart monitor movement Connect the auto antenna control cable properly Connect the auto antenna control cable properly Turn LOCAL function off Eject current disc and insert new one Use original disc Use disc in good condition Clean disc with ... Parental Lock settings to lower restriction Use disc with proper region code Insert disc with label side up Turn PCB off Clean disc or replace Recreate disc with good files 56
VM9214 Table 7: Troubleshooting Problem Cause Corrective Action Prolonged image or improper height/width ratio display Monitor stops at incorrect ...setting Press OPEN key to restart monitor movement Connect the auto antenna control cable properly Connect the auto antenna control cable properly Turn LOCAL function off Eject current disc and insert new one Use original disc Use disc in good condition Clean disc with ... Parental Lock settings to lower restriction Use disc with proper region code Insert disc with label side up Turn PCB off Clean disc or replace Recreate disc with good files 56


