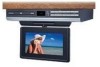
Owners Manual
Page 2
... SERVICING TO QUALIFIED SERVICE PERSONNEL. Pulling the cord may be of sufficient magnitude to constitute a risk of electric shock to persons. NO USER-SERVICEABLE PARTS INSIDE. CAUTION INVISIBLE LASER RADIATION IS EMITTED WHEN OPENED AND INTERLOCKS DEFEATED. AVOID EXPOSURE TO BEAM This product contains a low power laser device. On Condensation • When left in this owner's manual. CAUTION: USE OF CONTROLS...
... SERVICING TO QUALIFIED SERVICE PERSONNEL. Pulling the cord may be of sufficient magnitude to constitute a risk of electric shock to persons. NO USER-SERVICEABLE PARTS INSIDE. CAUTION INVISIBLE LASER RADIATION IS EMITTED WHEN OPENED AND INTERLOCKS DEFEATED. AVOID EXPOSURE TO BEAM This product contains a low power laser device. On Condensation • When left in this owner's manual. CAUTION: USE OF CONTROLS...
Owners Manual
Page 3
... the receiving antenna. • Increase the separation between the equipment and receiver. • Connect the equipment into an outlet on a circuit different from that may cause undesired operation. This Class B digital apparatus complies with the limits for limited viewing uses only. and 6,516,132." licensed for a Class B digital device, pursuant to provide reasonable protection against harmful interference in a particular installation.
... the receiving antenna. • Increase the separation between the equipment and receiver. • Connect the equipment into an outlet on a circuit different from that may cause undesired operation. This Class B digital apparatus complies with the limits for limited viewing uses only. and 6,516,132." licensed for a Class B digital device, pursuant to provide reasonable protection against harmful interference in a particular installation.
Owners Manual
Page 4
...rain or moisture, does not operate normally, or has been dropped. - 3 - Use only with the apparatus. Read these instructions. 3. Heed all instructions. 5. Do not block any heat sources such as the power-supply cord or plug is damaged, liquid has ...the polarized or grounding-type plug. Keep these instructions. 2. Do not install near water. 6. Servicing is used, use attachments/accessories specified by the manufacturer, or sold with a cart, stand, tripod, bracket, or table specified by the manufacturer. 12. IMPORTANT SAFETY INSTRUCTIONS 1. Do not defeat...
...rain or moisture, does not operate normally, or has been dropped. - 3 - Use only with the apparatus. Read these instructions. 3. Heed all instructions. 5. Do not block any heat sources such as the power-supply cord or plug is damaged, liquid has ...the polarized or grounding-type plug. Keep these instructions. 2. Do not install near water. 6. Servicing is used, use attachments/accessories specified by the manufacturer, or sold with a cart, stand, tripod, bracket, or table specified by the manufacturer. 12. IMPORTANT SAFETY INSTRUCTIONS 1. Do not defeat...
Owners Manual
Page 5
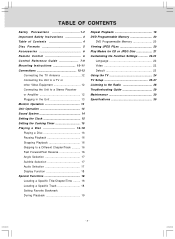
... Safety Precautions 1-2 Important Safety Instructions 3 Table of Contents 4 Disc Formats 5 Accessories 6 Remote Control 6 Control Reference Guide 7-9 Mounting Instructions 10-11 Connections 12-13 Connecting the TV Antenna 12 Connecting the Unit to a TV or other Video Equipment 12 Connecting the Unit to a Stereo Receiver or Amplifier 12 Plugging in the Unit 13 Monitor Operation 13 Unit Operation 14 Sound System 14 Setting the Clock 15 Setting the Cooking Timer 15 Playing a Disc 16-18 Playing a Disc 16 Pausing...
... Safety Precautions 1-2 Important Safety Instructions 3 Table of Contents 4 Disc Formats 5 Accessories 6 Remote Control 6 Control Reference Guide 7-9 Mounting Instructions 10-11 Connections 12-13 Connecting the TV Antenna 12 Connecting the Unit to a TV or other Video Equipment 12 Connecting the Unit to a Stereo Receiver or Amplifier 12 Plugging in the Unit 13 Monitor Operation 13 Unit Operation 14 Sound System 14 Setting the Clock 15 Setting the Cooking Timer 15 Playing a Disc 16-18 Playing a Disc 16 Pausing...
Owners Manual
Page 7
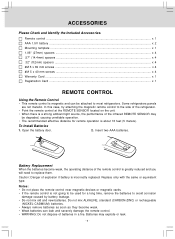
... the battery door. 2. Battery Replacement When the batteries become weak. • Weak batteries can be degraded, causing unreliable operation. • The recommended effective distance for a long time, remove the batteries to the side of the refrigerator. • Point the remote control at the REMOTE SENSOR located on the unit. • When there is a strong ambient light source, the performance of explosion...
... the battery door. 2. Battery Replacement When the batteries become weak. • Weak batteries can be degraded, causing unreliable operation. • The recommended effective distance for a long time, remove the batteries to the side of the refrigerator. • Point the remote control at the REMOTE SENSOR located on the unit. • When there is a strong ambient light source, the performance of explosion...
Owners Manual
Page 8
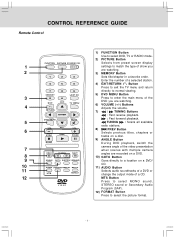
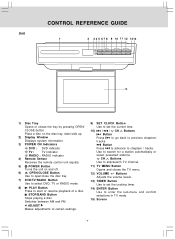
.... CONTROL REFERENCE GUIDE Remote Control 1) FUNCTION Button Use to select DVD, TV or RADIO mode. 2) PICTURE Button PICTURE Selects from preset screen display 1 settings to match the type of show you are watching. 2 3) MEMORY Button 1 2 3 Sets title/chapter in a favorite order. EXIT TV MENU 6) VOLUME (+/-) Buttons 4 Adjusts the volume. TUNING : Scans all available radio stations. 6 8) PREV Button Selects previous titles, chapters or STOP tracks on a disc. 9) ANGLE Button BAND During DVD playback, switch the camera angle of the video presentation...
.... CONTROL REFERENCE GUIDE Remote Control 1) FUNCTION Button Use to select DVD, TV or RADIO mode. 2) PICTURE Button PICTURE Selects from preset screen display 1 settings to match the type of show you are watching. 2 3) MEMORY Button 1 2 3 Sets title/chapter in a favorite order. EXIT TV MENU 6) VOLUME (+/-) Buttons 4 Adjusts the volume. TUNING : Scans all available radio stations. 6 8) PREV Button Selects previous titles, chapters or STOP tracks on a disc. 9) ANGLE Button BAND During DVD playback, switch the camera angle of the video presentation...
Owners Manual
Page 9
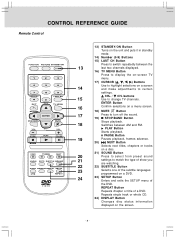
... a menu screen. 18) MUTE Button 17 Press to certain settings. REPEAT Button Repeats chapter or title of the DVD. CONTROL REFERENCE GUIDE Remote Control PICTURE 1 4 7 EXIT 2 3 5 6 8 9 LAST CH 0 TV MENU RETURN DVD MENU MUTE STOP BAND FORMAT MTS SOUND 13) STANDBY/ON Button Turns on the unit and puts it in standby mode. 14) Number (0-9) Buttons 15) LAST CH Button Press to switch repeatedly between the 13 last two channels displayed. 16) TV MENU Button Press to display the on-screen TV menu. 17) CURSOR ( , , , ) Buttons Use...
... a menu screen. 18) MUTE Button 17 Press to certain settings. REPEAT Button Repeats chapter or title of the DVD. CONTROL REFERENCE GUIDE Remote Control PICTURE 1 4 7 EXIT 2 3 5 6 8 9 LAST CH 0 TV MENU RETURN DVD MENU MUTE STOP BAND FORMAT MTS SOUND 13) STANDBY/ON Button Turns on the unit and puts it in standby mode. 14) Number (0-9) Buttons 15) LAST CH Button Press to switch repeatedly between the 13 last two channels displayed. 16) TV MENU Button Press to display the on-screen TV menu. 17) CURSOR ( , , , ) Buttons Use...
Owners Manual
Page 10
.... 2) Display Window Displays system information. 3) POWER ON Indicators DVD : DVD indicator TV : TV indicator RADIO : RADIO indicator 4) Remote Sensor Receives the remote control unit signals. 5) POWER Button Turns the unit on and off. 6) OPEN/CLOSE Button Use to open/close the disc tray. 7) DVD/TV/RADIO Button Use to select DVD, TV or RADIO mode. 8) PLAY Button Press to chapters / tracks. Button Press to advance to start or resume playback of a disc. Use to skip/search TV channel. 11) TV MENU Button Opens and closes the TV menu. 12) VOLUME +/- ADJUST...
.... 2) Display Window Displays system information. 3) POWER ON Indicators DVD : DVD indicator TV : TV indicator RADIO : RADIO indicator 4) Remote Sensor Receives the remote control unit signals. 5) POWER Button Turns the unit on and off. 6) OPEN/CLOSE Button Use to open/close the disc tray. 7) DVD/TV/RADIO Button Use to select DVD, TV or RADIO mode. 8) PLAY Button Press to chapters / tracks. Button Press to advance to start or resume playback of a disc. Use to skip/search TV channel. 11) TV MENU Button Opens and closes the TV menu. 12) VOLUME +/- ADJUST...

Owners Manual
Page 13
... ANTENNA Audio cable (not supplied) Stereo Receiver or Amplifier (White) (Red) L AUDIO IN R - 12 - FM ANTENNA TV or other Video Equipment Use the Audio/Video cable (not supplied). Connect the R (right) AUDIO OUT and L (left) AUDIO OUT jacks on the rear of the unit to a Stereo Receiver or Amplifier ANALOG CONNECTION Use the Audio cable (not supplied). TV antenna To the TV ANT IN 2 terminal 1 FM ANTENNA Connecting the Unit to a TV or other Video Equipment (yellow) (white) (red) Audio/Video cable (not supplied) VIDEO IN L AUDIO IN R Connecting the Unit to the VIDEO...
... ANTENNA Audio cable (not supplied) Stereo Receiver or Amplifier (White) (Red) L AUDIO IN R - 12 - FM ANTENNA TV or other Video Equipment Use the Audio/Video cable (not supplied). Connect the R (right) AUDIO OUT and L (left) AUDIO OUT jacks on the rear of the unit to a Stereo Receiver or Amplifier ANALOG CONNECTION Use the Audio cable (not supplied). TV antenna To the TV ANT IN 2 terminal 1 FM ANTENNA Connecting the Unit to a TV or other Video Equipment (yellow) (white) (red) Audio/Video cable (not supplied) VIDEO IN L AUDIO IN R Connecting the Unit to the VIDEO...
Owners Manual
Page 15
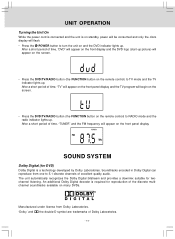
... clock display will flash. • Press the POWER button to 5.1 discrete channels of the discrete multichannel soundtracks available on many DVDs. After a short period of time, "TUNER" and the FM frequency will appear on the remote control) to RADIO mode and the radio indicator lights up picture) will appear on the screen. • Press the DVD/TV/RADIO button (the FUNCTION button on the front panel display. SOUND SYSTEM Dolby Digital (for...
... clock display will flash. • Press the POWER button to 5.1 discrete channels of the discrete multichannel soundtracks available on many DVDs. After a short period of time, "TUNER" and the FM frequency will appear on the remote control) to RADIO mode and the radio indicator lights up picture) will appear on the screen. • Press the DVD/TV/RADIO button (the FUNCTION button on the front panel display. SOUND SYSTEM Dolby Digital (for...
Owners Manual
Page 17
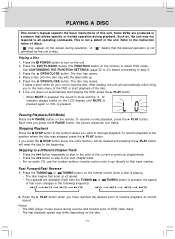
... disc tray closes. PLAY button. Press the TUNING or TUNING button on the screen during playback. Refer to the instruction notes of this unit. See CUSTOMIZING THE FUNCTION SETTINGS (page 22 to 23) before proceeding to select DVD mode. To resume playback at the location where you press the PAUSE button, the picture advances one frame. " " may appear on the remote control when a disc...
... disc tray closes. PLAY button. Press the TUNING or TUNING button on the screen during playback. Refer to the instruction notes of this unit. See CUSTOMIZING THE FUNCTION SETTINGS (page 22 to 23) before proceeding to select DVD mode. To resume playback at the location where you press the PAUSE button, the picture advances one frame. " " may appear on the remote control when a disc...

Owners Manual
Page 20
... REPEAT DISC button on the remote control until Bookmark1 appears. 2. While the disc is played repeatedly. Press the ENTER button. Notes: • Some discs may not work with marking operation. • The marking is played repeatedly. Press the ENTER button to select Single/All/Off. All: Repeat the entire CD. While the disc is playing, use the or button on the remote to...
... REPEAT DISC button on the remote control until Bookmark1 appears. 2. While the disc is played repeatedly. Press the ENTER button. Notes: • Some discs may not work with marking operation. • The marking is played repeatedly. Press the ENTER button to select Single/All/Off. All: Repeat the entire CD. While the disc is playing, use the or button on the remote to...
Owners Manual
Page 21
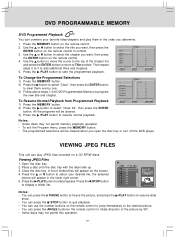
... remote control to program the new title and chapter. Press the PLAY button to start the programmed playback. DVD PROGRAMMABLE MEMORY DVD Programmed Playback You can press the ANGLE buttonon the remote control to rotate direction of the picture by one. 3) Follow above steps 1-4 of DVD Programmable Memory to confirm. 3. Viewing JPEG Files 1. Press the MEMORY button on the screen. 4. Open the disc tray. 2. Use the or button...
... remote control to program the new title and chapter. Press the PLAY button to start the programmed playback. DVD PROGRAMMABLE MEMORY DVD Programmed Playback You can press the ANGLE buttonon the remote control to rotate direction of the picture by one. 3) Follow above steps 1-4 of DVD Programmable Memory to confirm. 3. Viewing JPEG Files 1. Press the MEMORY button on the screen. 4. Open the disc tray. 2. Use the or button...

Owners Manual
Page 23
... select DVD Menu. 3. Press the SETUP button in stop mode. 2. Use the or button to make adjustments, then press the ENTER button. 5. Note: Some DVDs may not play in stop mode. 2. Press the or button to make adjustments, then press the ENTER button. 4. Use the or button to select VIDEO. 3. Use the or button to the normal screen. Press the EXIT button to return to select Subtitle. 3. If this case, the DVD player automatically displays...
... select DVD Menu. 3. Press the SETUP button in stop mode. 2. Use the or button to make adjustments, then press the ENTER button. 5. Note: Some DVDs may not play in stop mode. 2. Press the or button to make adjustments, then press the ENTER button. 4. Use the or button to select VIDEO. 3. Use the or button to the normal screen. Press the EXIT button to return to select Subtitle. 3. If this case, the DVD player automatically displays...
Owners Manual
Page 24
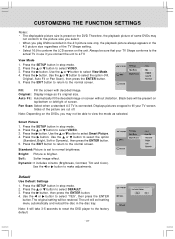
... SETUP button in use if you connect the unit to the actual TV in stop mode. 2. Bright: Picture is connected. Press the or button to select VIDEO. 3. Note: It will exit setting menu automatically and reload the disc in stop mode. 2. CUSTOMIZING THE FUNCTION SETTINGS Notes: • The displayable picture size is preset on screen without distortion. Press the or button to select DEFAULT. 3. Black bars will be able to the picture size...
... SETUP button in use if you connect the unit to the actual TV in stop mode. 2. Bright: Picture is connected. Press the or button to select VIDEO. 3. Note: It will exit setting menu automatically and reload the disc in stop mode. 2. CUSTOMIZING THE FUNCTION SETTINGS Notes: • The displayable picture size is preset on screen without distortion. Press the or button to select DEFAULT. 3. Black bars will be able to the picture size...
Owners Manual
Page 25
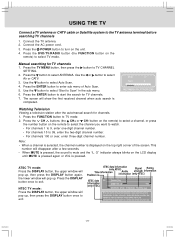
... EXIT AUTO SCAN Watching Television Viewing a television station after a few seconds. • When MUTE is pressed, the sound is mute and the "L O" indicator always blinks on the remote to select the channel you want to watch. • For channels 1 to 9, enter one-digit channel number. • For channels 10 to select Auto Scan. 4. Press the FUNCTION button to the TV antenna terminal before searching TV channels 1. Manual searching for TV channels 1. USING THE TV Connect a TV antenna or CATV cable...
... EXIT AUTO SCAN Watching Television Viewing a television station after a few seconds. • When MUTE is pressed, the sound is mute and the "L O" indicator always blinks on the remote to select the channel you want to watch. • For channels 1 to 9, enter one-digit channel number. • For channels 10 to select Auto Scan. 4. Press the FUNCTION button to the TV antenna terminal before searching TV channels 1. Manual searching for TV channels 1. USING THE TV Connect a TV antenna or CATV cable...
Owners Manual
Page 26
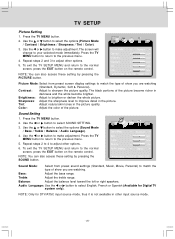
TV SETUP Picture Setting 1. Use the or button to sharpen the picture quality. Contrast: Adjust to select the options (Picture Mode / Contrast / Brightness / Sharpness / Tint / Color). 3. Press the TV MENU button. 2. NOTE: You can also access these setting by pressing the SOUND button. Tint: Adjust natural skin tones in darkness and the white become brighter. Repeat steps 2 to 4 to the normal screen, press the EXIT button on the remote control. NOTE: Only for Digital TV system only...
TV SETUP Picture Setting 1. Use the or button to sharpen the picture quality. Contrast: Adjust to select the options (Picture Mode / Contrast / Brightness / Sharpness / Tint / Color). 3. Press the TV MENU button. 2. NOTE: You can also access these setting by pressing the SOUND button. Tint: Adjust natural skin tones in darkness and the white become brighter. Repeat steps 2 to 4 to the normal screen, press the EXIT button on the remote control. NOTE: Only for Digital TV system only...
Owners Manual
Page 27
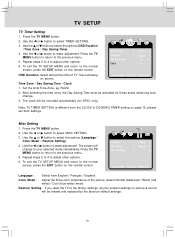
... settings. Color Mode : Adjust the three color temperature of TV menu showing on the remote control. Select Normal (balanced) / Warm (red white) / Cool (blue white) mode. The screen will be activated for ATSC only). Use the or button to the normal screen, press the EXIT button on screen. Repeat steps 2 to 4 to the previous menu. 5. Press the TV MENU button to return to adjust other options. 6. TV SETUP TV Timer Setting 1. Press the TV MENU button. 2. Press the TV MENU button to return to select TIMER SETTING...
... settings. Color Mode : Adjust the three color temperature of TV menu showing on the remote control. Select Normal (balanced) / Warm (red white) / Cool (blue white) mode. The screen will be activated for ATSC only). Use the or button to the normal screen, press the EXIT button on screen. Repeat steps 2 to 4 to the previous menu. 5. Press the TV MENU button to return to adjust other options. 6. TV SETUP TV Timer Setting 1. Press the TV MENU button. 2. Press the TV MENU button to return to select TIMER SETTING...
Owners Manual
Page 28
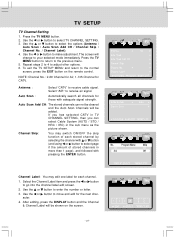
... TV MENU button. 2. Use the or button to receive cable signal. Antenna : Select "CATV" to make adjustment. Auto Scan Add CH: The stored channels can select Cable System (AUTO / STD / HRC / IRC) in more than 1 page), and followed with adequate signal strength. TV SETUP TV Channel Setting 1. Use the or button to go into the channel label edit screen. 2. Channel Label UP/DOWN ADJUST "MENU":EXIT Channel Label: You may switch ON/OFF the skip function of each channel. 1. Select the Channel...
... TV MENU button. 2. Use the or button to receive cable signal. Antenna : Select "CATV" to make adjustment. Auto Scan Add CH: The stored channels can select Cable System (AUTO / STD / HRC / IRC) in more than 1 page), and followed with adequate signal strength. TV SETUP TV Channel Setting 1. Use the or button to go into the channel label edit screen. 2. Channel Label UP/DOWN ADJUST "MENU":EXIT Channel Label: You may switch ON/OFF the skip function of each channel. 1. Select the Channel...

Owners Manual
Page 30
... picture and sound. TV Snowy picture, multiple image, picture distorted, picture blurred and noisy sound. The unit and disc region number are incom- No picture CAUSE (AND REMEDY) • Ensure the AC power cord is connected. • The unit is not turned on. • Remove any obstacles between the remote and the unit. • Use the remote near the unit. • Point the remote at the remote sensor on the screen...
... picture and sound. TV Snowy picture, multiple image, picture distorted, picture blurred and noisy sound. The unit and disc region number are incom- No picture CAUSE (AND REMEDY) • Ensure the AC power cord is connected. • The unit is not turned on. • Remove any obstacles between the remote and the unit. • Use the remote near the unit. • Point the remote at the remote sensor on the screen...


