Owners Manual
Page 5
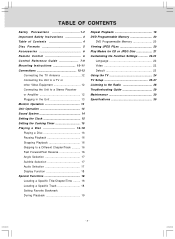
... Safety Precautions 1-2 Important Safety Instructions 3 Table of Contents 4 Disc Formats 5 Accessories 6 Remote Control 6 Control Reference Guide 7-9 Mounting Instructions 10-11 Connections 12-13 Connecting the TV Antenna 12 Connecting the Unit to a TV or other Video Equipment 12 Connecting the Unit to a Stereo Receiver or Amplifier 12 Plugging in...Modes for CD or JPEG Disc 21 Customizing the Function Settings 22-23 Language 22 Video 22 Default 23 Using the TV 24 TV Setup 25-27 Listening to the Radio 28 Troubleshooting Guide 29 Maintenance 30 Specifications 30 - 4 -
... Safety Precautions 1-2 Important Safety Instructions 3 Table of Contents 4 Disc Formats 5 Accessories 6 Remote Control 6 Control Reference Guide 7-9 Mounting Instructions 10-11 Connections 12-13 Connecting the TV Antenna 12 Connecting the Unit to a TV or other Video Equipment 12 Connecting the Unit to a Stereo Receiver or Amplifier 12 Plugging in...Modes for CD or JPEG Disc 21 Customizing the Function Settings 22-23 Language 22 Video 22 Default 23 Using the TV 24 TV Setup 25-27 Listening to the Radio 28 Troubleshooting Guide 29 Maintenance 30 Specifications 30 - 4 -
Owners Manual
Page 7
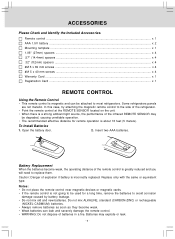
... remove batteries as soon as they become weak, the operating distance of batteries in a fire. In this case, try attaching the magnetic remote control to avoid corrosion damage caused by battery leakage. • Do not mix old and new batteries. Notes: • Do not place the... operation. • The recommended effective distance for a long time, remove the batteries to the side of the refrigerator. • Point the remote control at the REMOTE SENSOR located on the unit. • When there is a strong ambient light source, the performance of explosion if battery is about 16 feet...
... remove batteries as soon as they become weak, the operating distance of batteries in a fire. In this case, try attaching the magnetic remote control to avoid corrosion damage caused by battery leakage. • Do not mix old and new batteries. Notes: • Do not place the... operation. • The recommended effective distance for a long time, remove the batteries to the side of the refrigerator. • Point the remote control at the REMOTE SENSOR located on the unit. • When there is a strong ambient light source, the performance of explosion if battery is about 16 feet...
Owners Manual
Page 8
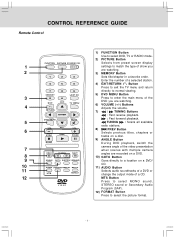
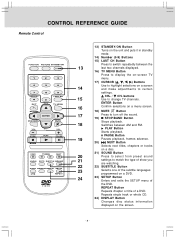
... and return 7 8 9 directly to normal viewing. DVD MENU MUTE 5 : Fast forward playback. EXIT TV MENU 6) VOLUME (+/-) Buttons 4 Adjusts the volume. CONTROL REFERENCE GUIDE Remote Control 1) FUNCTION Button Use to select DVD, TV or RADIO mode. 2) PICTURE Button PICTURE Selects from preset screen display 1 settings to match the type of show you are watching...
... and return 7 8 9 directly to normal viewing. DVD MENU MUTE 5 : Fast forward playback. EXIT TV MENU 6) VOLUME (+/-) Buttons 4 Adjusts the volume. CONTROL REFERENCE GUIDE Remote Control 1) FUNCTION Button Use to select DVD, TV or RADIO mode. 2) PICTURE Button PICTURE Selects from preset screen display 1 settings to match the type of show you are watching...
Owners Manual
Page 9
... DVD. 24 23) SETUP Button Enters and exits the SETUP menu of the DVD. CH+ / CH- CONTROL REFERENCE GUIDE Remote Control PICTURE 1 4 7 EXIT 2 3 5 6 8 9 LAST CH 0 TV MENU RETURN DVD MENU MUTE STOP BAND FORMAT MTS SOUND 13) STANDBY/ON Button Turns on the unit and puts it in ... to turn off the sound. 19) STOP/BAND Button Stops playback. 18 Switches between the 13 last two channels displayed. 16) TV MENU Button Press to display the on-screen TV menu. 17) CURSOR ( , , , ) Buttons Use to highlight selections on a screen 14 and make adjustments to certain settings...
... DVD. 24 23) SETUP Button Enters and exits the SETUP menu of the DVD. CH+ / CH- CONTROL REFERENCE GUIDE Remote Control PICTURE 1 4 7 EXIT 2 3 5 6 8 9 LAST CH 0 TV MENU RETURN DVD MENU MUTE STOP BAND FORMAT MTS SOUND 13) STANDBY/ON Button Turns on the unit and puts it in ... to turn off the sound. 19) STOP/BAND Button Stops playback. 18 Switches between the 13 last two channels displayed. 16) TV MENU Button Press to display the on-screen TV menu. 17) CURSOR ( , , , ) Buttons Use to highlight selections on a screen 14 and make adjustments to certain settings...
Owners Manual
Page 10
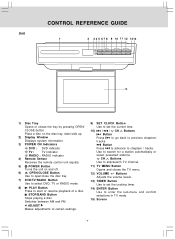
...on the disc tray, label side up. 2) Display Window Displays system information. 3) POWER ON Indicators DVD : DVD indicator TV : TV indicator RADIO : RADIO indicator 4) Remote Sensor Receives the remote control unit signals. 5) POWER Button Turns the unit on and off. 6) OPEN/CLOSE Button Use to open/close the ...disc tray. 7) DVD/TV/RADIO Button Use to select DVD, TV or RADIO mode. 8) PLAY Button Press to chapters ...
...on the disc tray, label side up. 2) Display Window Displays system information. 3) POWER ON Indicators DVD : DVD indicator TV : TV indicator RADIO : RADIO indicator 4) Remote Sensor Receives the remote control unit signals. 5) POWER Button Turns the unit on and off. 6) OPEN/CLOSE Button Use to open/close the ...disc tray. 7) DVD/TV/RADIO Button Use to select DVD, TV or RADIO mode. 8) PLAY Button Press to chapters ...
Owners Manual
Page 15
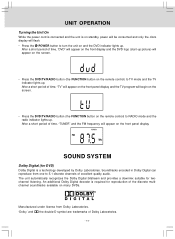
...begin on the screen. • Press the DVD/TV/RADIO button (the FUNCTION button on the remote control) to RADIO mode and the radio indicator lights up. SOUND SYSTEM Dolby Digital (for twochannel listening. After a short period of time, "TV" will appear on the front panel display and the...power will be consumed and only the clock display will appear on the screen. • Press the DVD/TV/RADIO button (the FUNCTION button on the remote control) to TV mode and the TV indicator lights up. An additional Dolby Digital decoder is a technology developed by Dolby Laboratories. After a short ...
...begin on the screen. • Press the DVD/TV/RADIO button (the FUNCTION button on the remote control) to RADIO mode and the radio indicator lights up. SOUND SYSTEM Dolby Digital (for twochannel listening. After a short period of time, "TV" will appear on the front panel display and the...power will be consumed and only the clock display will appear on the screen. • Press the DVD/TV/RADIO button (the FUNCTION button on the remote control) to TV mode and the TV indicator lights up. An additional Dolby Digital decoder is a technology developed by Dolby Laboratories. After a short ...
Owners Manual
Page 17
... one frame. Press the OPEN/CLOSE button. Press the TUNING or TUNING button on the remote control when a disc is pressed, the speed of the disc. 6. Such as, the unit may differ depending on the LCD display until MUTE is pressed again or VOL is not permitted by the unit or disc.... Press the DVD/TV/RADIO button (the FUNCTION button on the screen during reverse and forward scan of the current...
... one frame. Press the OPEN/CLOSE button. Press the TUNING or TUNING button on the remote control when a disc is pressed, the speed of the disc. 6. Such as, the unit may differ depending on the LCD display until MUTE is pressed again or VOL is not permitted by the unit or disc.... Press the DVD/TV/RADIO button (the FUNCTION button on the screen during reverse and forward scan of the current...

Owners Manual
Page 19
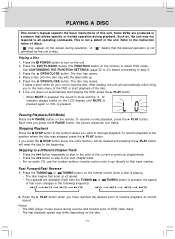
Time: The elapsed time from the beginning of the title/chapter currently playing and total titles/chapter on the remote to select the option (Title, Chapter or Time) then press the corresponding number button(s) for the Title/Chapter/Time you want . 3. Title/Chapter: The...seconds later. Press the GOTO button. 2. PLAYING A DISC Display Function While the disc is playing, press the DISPLAY button on the remote control repeatedly to display information on the remote to select the option (Track, Time or Disc Time) then press the corresponding number button(s) for the Track/Time/Disc time you...
Time: The elapsed time from the beginning of the title/chapter currently playing and total titles/chapter on the remote to select the option (Title, Chapter or Time) then press the corresponding number button(s) for the Title/Chapter/Time you want . 3. Title/Chapter: The...seconds later. Press the GOTO button. 2. PLAYING A DISC Display Function While the disc is playing, press the DISPLAY button on the remote control repeatedly to display information on the remote to select the option (Track, Time or Disc Time) then press the corresponding number button(s) for the Track/Time/Disc time you...

Owners Manual
Page 20
...the window. To Set Other Bookmarks 1. While the disc is playing, press the REPEAT DISC button on the remote control until Bookmark1 appears, then use the and buttons on the remote to select Single/All/Off. To Resume Normal Playback 3. Press the GOTO button until the " " indicator ... You can play the favorite bookmark. While the disc is played repeatedly. While the disc is playing, use the or button on the remote to select "Repeat", then press the ENTER button to select Bookmark2/Bookmark3. 2. While the disc is playing, press the REPEAT DISC button on...
...the window. To Set Other Bookmarks 1. While the disc is playing, press the REPEAT DISC button on the remote control until Bookmark1 appears, then use the and buttons on the remote to select Single/All/Off. To Resume Normal Playback 3. Press the GOTO button until the " " indicator ... You can play the favorite bookmark. While the disc is played repeatedly. While the disc is playing, use the or button on the remote to select "Repeat", then press the ENTER button to select Bookmark2/Bookmark3. 2. While the disc is playing, press the REPEAT DISC button on...
Owners Manual
Page 21
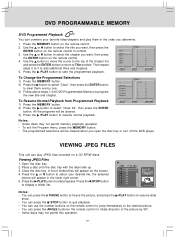
... the lower right corner. 5. DVD PROGRAMMABLE MEMORY DVD Programmed Playback You can combine your desired file, the selected picture will appear on the remote control. 2. Use the or button to select the title you determine. 1. Press the STOP button to select "Clear All", then press the...picture by one. 3) Follow above steps 1-4 of folders/files will appear in the order you want , then press the ENTER button on the remote control. 4. A list of DVD Programmable Memory to confirm. 3. Press the PLAY button to select your favorite titles/chapters and play JPEG files ...
... the lower right corner. 5. DVD PROGRAMMABLE MEMORY DVD Programmed Playback You can combine your desired file, the selected picture will appear on the remote control. 2. Use the or button to select the title you determine. 1. Press the STOP button to select "Clear All", then press the...picture by one. 3) Follow above steps 1-4 of folders/files will appear in the order you want , then press the ENTER button on the remote control. 4. A list of DVD Programmable Memory to confirm. 3. Press the PLAY button to select your favorite titles/chapters and play JPEG files ...

Owners Manual
Page 22
...items: • Repeat (Off/Single/All): Off: Resumes normal playback. Press the or button on the remote control to navigate between the left/right windows and the or button on the remote control to select tracks/files shown on the left side of the selected tracks/files. 3. It means that...Programmed Playback 1. Use the and buttons to select "Add to start the program playback. " " will appear in front of all tracks on the remote to select "Program view", then press the ENTER button. Press the PLAY button to program", press the ENTER button. Use the and buttons on the...
...items: • Repeat (Off/Single/All): Off: Resumes normal playback. Press the or button on the remote control to navigate between the left/right windows and the or button on the remote control to select tracks/files shown on the left side of the selected tracks/files. 3. It means that...Programmed Playback 1. Use the and buttons to select "Add to start the program playback. " " will appear in front of all tracks on the remote to select "Program view", then press the ENTER button. Press the PLAY button to program", press the ENTER button. Use the and buttons on the...
Owners Manual
Page 25
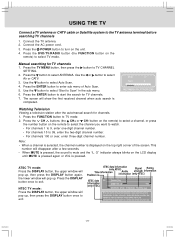
... seconds. • When MUTE is pressed, the sound is completed. Note: • When a channel is selected, the channel number is displayed on the LCD display until MUTE is pressed again or VOL is pressed. This number will pop up . Use the or button to select Auto Scan. 4. Use the... button once to exit. - 24 - Press the POWER button to turn on the remote) to start the search for TV channels 1. Manual searching for TV channels. 7. Press the ENTER button to select TV mode. Press the button to TV CHANNEL SETTING. 2. Press the CH buttons (the CH+ or CH- Press the DISPLAY...
... seconds. • When MUTE is pressed, the sound is completed. Note: • When a channel is selected, the channel number is displayed on the LCD display until MUTE is pressed again or VOL is pressed. This number will pop up . Use the or button to select Auto Scan. 4. Use the... button once to exit. - 24 - Press the POWER button to turn on the remote) to start the search for TV channels 1. Manual searching for TV channels. 7. Press the ENTER button to select TV mode. Press the button to TV CHANNEL SETTING. 2. Press the CH buttons (the CH+ or CH- Press the DISPLAY...
Owners Manual
Page 26
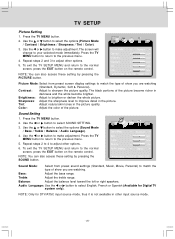
... Treble: Adjust the treble range. Audio Language: Use the or button to the normal screen, press the EXIT button on the remote control. Press the TV MENU button to return to sharpen the picture quality. Contrast: Adjust to the previous menu. 5. Use the or button to improve... Soft & Personal). Use the or button to the normal screen, press the EXIT button on the remote control. To exit the TV SETUP MENU and return to make adjustment. Press the TV MENU button. 2. TV SETUP Picture Setting 1. Repeat steps 2 and 3 to brighten or darken the whole picture. Brightness: ...
... Treble: Adjust the treble range. Audio Language: Use the or button to the normal screen, press the EXIT button on the remote control. Press the TV MENU button to return to sharpen the picture quality. Contrast: Adjust to the previous menu. 5. Use the or button to improve... Soft & Personal). Use the or button to the normal screen, press the EXIT button on the remote control. To exit the TV SETUP MENU and return to make adjustment. Press the TV MENU button. 2. TV SETUP Picture Setting 1. Repeat steps 2 and 3 to brighten or darken the whole picture. Brightness: ...
Owners Manual
Page 27
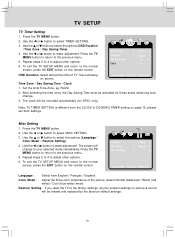
... the options (OSD Duration / Time Zone / Day Saving Time). 4. Repeat steps 2 to 4 to the normal screen, press the EXIT button on the remote control. To exit the TV SETUP MENU and return to the factory settings, all your selected mode immediately. Color Mode : Adjust the three color temperature of... showing on page 15, please set both settings. Set the local Time Zone, eg. Restore Setting: If you reset the TV to the normal screen, press the EXIT button on the remote control. UP/DOWN ADJUST "MENU":EXIT Time Zone / Day Saving Time / Clock 1. Pacific. 2. Misc Setting 1. Use the...
... the options (OSD Duration / Time Zone / Day Saving Time). 4. Repeat steps 2 to 4 to the normal screen, press the EXIT button on the remote control. To exit the TV SETUP MENU and return to the factory settings, all your selected mode immediately. Color Mode : Adjust the three color temperature of... showing on page 15, please set both settings. Set the local Time Zone, eg. Restore Setting: If you reset the TV to the normal screen, press the EXIT button on the remote control. UP/DOWN ADJUST "MENU":EXIT Time Zone / Day Saving Time / Clock 1. Pacific. 2. Misc Setting 1. Use the...
Owners Manual
Page 28
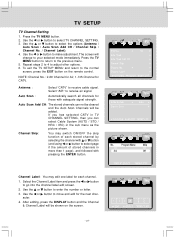
...channel with or button (and using or button to your selected mode immediately. Use the or button to select TV CHANNEL SETTING. 3. Channel Skip: You may edit one label for those with pressing the ENTER button. acter. ... as the picture shown. Use the or button to enter the number or letter. 3. Press the TV MENU button to return to make adjustment. Use the or button to receive cable signal. Use the or...Scan Auto Scan Add CH Channel Skip Channel No. Press the TV MENU button. 2. The screen will be shown on the remote control. TV SETUP TV Channel Setting 1.
...channel with or button (and using or button to your selected mode immediately. Use the or button to select TV CHANNEL SETTING. 3. Channel Skip: You may edit one label for those with pressing the ENTER button. acter. ... as the picture shown. Use the or button to enter the number or letter. 3. Press the TV MENU button to return to make adjustment. Use the or button to receive cable signal. Use the or...Scan Auto Scan Add CH Channel Skip Channel No. Press the TV MENU button. 2. The screen will be shown on the remote control. TV SETUP TV Channel Setting 1.
Owners Manual
Page 29
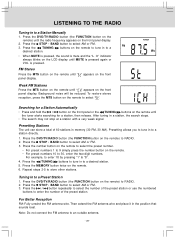
...a • When MUTE is pressed, the sound is mute and the "L O" indicator always blinks on the LCD display until MUTE is pressed again or VOL is pressed. Weak FM Stations Press the MTS button on the remote until " " appears on the front panel display. Press the MEMORY button twice on the... RADIO. 2. Presetting allows you to tune in to a Station Manually 1. Press the DVD/TV/RADIO button (the FUNCTION button on the remote. 6. Press the DVD/TV/RADIO button (the FUNCTION button on the remote to tune in to a Preset Station 1. Note: Do not connect the FM antenna to select AM or FM. 3. ...
...a • When MUTE is pressed, the sound is mute and the "L O" indicator always blinks on the LCD display until MUTE is pressed again or VOL is pressed. Weak FM Stations Press the MTS button on the remote until " " appears on the front panel display. Press the MEMORY button twice on the... RADIO. 2. Presetting allows you to tune in to a Station Manually 1. Press the DVD/TV/RADIO button (the FUNCTION button on the remote. 6. Press the DVD/TV/RADIO button (the FUNCTION button on the remote to tune in to a Preset Station 1. Note: Do not connect the FM antenna to select AM or FM. 3. ...

Owners Manual
Page 30
...• The system is too hot. The unit and disc region number are incom- The picture is not clear Severe hum or noise is heard. TV Snowy picture, multiple image, picture distorted, picture blurred and noisy sound. Wait about an hour for it to properly. • Increase the volume....tem- No picture and sound. patible. • Condensation may have speaker output. • This unit is in pause mode. Colored patches of picture. The remote does not function. No color of picture. • Clean the disc. • The disc is scratched. • Clean the disc. • There is...
...• The system is too hot. The unit and disc region number are incom- The picture is not clear Severe hum or noise is heard. TV Snowy picture, multiple image, picture distorted, picture blurred and noisy sound. Wait about an hour for it to properly. • Increase the volume....tem- No picture and sound. patible. • Condensation may have speaker output. • This unit is in pause mode. Colored patches of picture. The remote does not function. No color of picture. • Clean the disc. • The disc is scratched. • Clean the disc. • There is...


