Owners Manual
Page 5
... 4 Disc Formats 5 Accessories 6 Remote Control 6 Control Reference Guide 7-9 Mounting Instructions 10-11 Connections 12-13 Connecting the TV Antenna 12 Connecting the Unit to a TV or other Video Equipment 12 Connecting the Unit to a Stereo Receiver or Amplifier 12 Plugging in the Unit 13 Monitor Operation ...13 Unit Operation 14 Sound System 14 Setting the Clock 15 Setting the Cooking Timer 15 Playing a Disc 16-18...
... 4 Disc Formats 5 Accessories 6 Remote Control 6 Control Reference Guide 7-9 Mounting Instructions 10-11 Connections 12-13 Connecting the TV Antenna 12 Connecting the Unit to a TV or other Video Equipment 12 Connecting the Unit to a Stereo Receiver or Amplifier 12 Plugging in the Unit 13 Monitor Operation ...13 Unit Operation 14 Sound System 14 Setting the Clock 15 Setting the Cooking Timer 15 Playing a Disc 16-18...
Owners Manual
Page 8
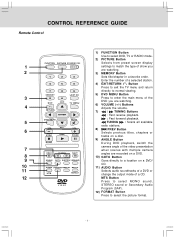
...: Fast forward playback. RETURN 7) / TUNING Buttons : Fast reverse playback. CONTROL REFERENCE GUIDE Remote Control 1) FUNCTION Button Use to select DVD, TV or RADIO mode. 2) PICTURE Button PICTURE Selects from preset screen display 1 settings to match the type of show you are watching. Enter the ...number of a CD. 12 MTS Button Press to select MONO sound, STEREO sound or Secondary Audio Program (SAP). 12) FORMAT Button Press to enter the main menu of the DVD you are watching. 2 3) MEMORY ...
...: Fast forward playback. RETURN 7) / TUNING Buttons : Fast reverse playback. CONTROL REFERENCE GUIDE Remote Control 1) FUNCTION Button Use to select DVD, TV or RADIO mode. 2) PICTURE Button PICTURE Selects from preset screen display 1 settings to match the type of show you are watching. Enter the ...number of a CD. 12 MTS Button Press to select MONO sound, STEREO sound or Secondary Audio Program (SAP). 12) FORMAT Button Press to enter the main menu of the DVD you are watching. 2 3) MEMORY ...
Owners Manual
Page 9
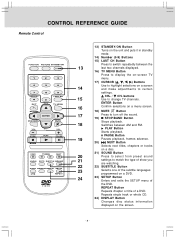
... Repeats chapter or title of the DVD. CONTROL REFERENCE GUIDE Remote Control PICTURE 1 4 7 EXIT 2 3 5 6 8 9 LAST CH 0 TV MENU RETURN DVD MENU MUTE STOP BAND FORMAT MTS SOUND 13) STANDBY/ON Button Turns on the unit and puts it in standby mode. 14) Number (0-9) Buttons 15) LAST CH Button...between the 13 last two channels displayed. 16) TV MENU Button Press to display the on-screen TV menu. 17) CURSOR ( , , , ) Buttons Use to highlight selections on a menu screen. 18) MUTE Button 17 Press to turn off the sound. 19) STOP/BAND Button Stops playback. 18 ...
... Repeats chapter or title of the DVD. CONTROL REFERENCE GUIDE Remote Control PICTURE 1 4 7 EXIT 2 3 5 6 8 9 LAST CH 0 TV MENU RETURN DVD MENU MUTE STOP BAND FORMAT MTS SOUND 13) STANDBY/ON Button Turns on the unit and puts it in standby mode. 14) Number (0-9) Buttons 15) LAST CH Button...between the 13 last two channels displayed. 16) TV MENU Button Press to display the on-screen TV menu. 17) CURSOR ( , , , ) Buttons Use to highlight selections on a menu screen. 18) MUTE Button 17 Press to turn off the sound. 19) STOP/BAND Button Stops playback. 18 ...
Owners Manual
Page 15
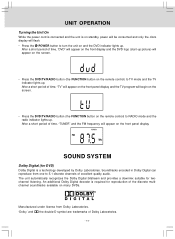
...on the front panel display and the TV program will appear on the front panel display. SOUND SYSTEM Dolby Digital (for DVD) Dolby Digital is on standby, power will be consumed and only the clock display will appear on the screen. • Press the DVD/TV/RADIO button (the FUNCTION button on... of Dolby Laboratories. - 14 - After a short period of time, "TUNER" and the FM frequency will begin on the screen. • Press the DVD/TV/RADIO button (the FUNCTION button on the remote control) to turn the unit on many DVDs. Manufactured under license from one to 5.1 discrete channels of...
...on the front panel display and the TV program will appear on the front panel display. SOUND SYSTEM Dolby Digital (for DVD) Dolby Digital is on standby, power will be consumed and only the clock display will appear on the screen. • Press the DVD/TV/RADIO button (the FUNCTION button on... of Dolby Laboratories. - 14 - After a short period of time, "TUNER" and the FM frequency will begin on the screen. • Press the DVD/TV/RADIO button (the FUNCTION button on the remote control) to turn the unit on many DVDs. Manufactured under license from one to 5.1 discrete channels of...
Owners Manual
Page 16
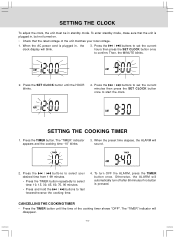
... voltage. 1. The "TIMER" indicator appears and the cooking time "10" blinks. 3. When the preset time elapses, the ALARM will disappear. - 15 - The "TIMER" indicator will sound. 2. Otherwise, the ALARM will automatically turn OFF the ALARM, press the TIMER button once. To turn off after 60 minutes if no button is plugged...
... voltage. 1. The "TIMER" indicator appears and the cooking time "10" blinks. 3. When the preset time elapses, the ALARM will disappear. - 15 - The "TIMER" indicator will sound. 2. Otherwise, the ALARM will automatically turn OFF the ALARM, press the TIMER button once. To turn off after 60 minutes if no button is plugged...
Owners Manual
Page 17
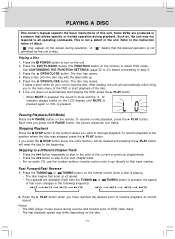
.... If the unit does not automatically start playing the DVD, press the PLAY button. • When MUTE is pressed, the sound is mute and the "L O" indicator always blinks on the LCD display until MUTE is pressed again or VOL is playing. • The disc begins fast scan at normal speed. To resume... the next chapter/track. • For an audio CD, use the number buttons (remote control only) to go directly to interrupt playback. Press the DVD/TV/RADIO button (the FUNCTION button on the screen during playback. It takes a short while for your unit to select DVD mode.
.... If the unit does not automatically start playing the DVD, press the PLAY button. • When MUTE is pressed, the sound is mute and the "L O" indicator always blinks on the LCD display until MUTE is pressed again or VOL is playing. • The disc begins fast scan at normal speed. To resume... the next chapter/track. • For an audio CD, use the number buttons (remote control only) to go directly to interrupt playback. Press the DVD/TV/RADIO button (the FUNCTION button on the screen during playback. It takes a short while for your unit to select DVD mode.
Owners Manual
Page 18
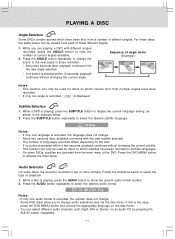
... changing the current subtitle. • This function can only be viewed from multiple angles have been recorded in multiple languages. • On some discs, the sound is recorded in two or more formats. Audio Selection On some DVDs, subtitles are activated from the main menu of current angles available. 2. Notes: •...
... changing the current subtitle. • This function can only be viewed from multiple angles have been recorded in multiple languages. • On some discs, the sound is recorded in two or more formats. Audio Selection On some DVDs, subtitles are activated from the main menu of current angles available. 2. Notes: •...
Owners Manual
Page 25
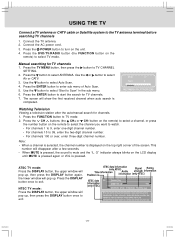
...window will pop up , then press the DISPLAY button once to turn on the LCD display until MUTE is pressed again or VOL is mute and the "L O" indicator always blinks on the unit. 4. Press the DVD/TV/RADIO button (the FUNCTION button on the remote to select the channel you want ...up . RF CH 13 Found 0 PRESS MENU TO EXIT AUTO SCAN Watching Television Viewing a television station after a few seconds. • When MUTE is pressed, the sound is pressed. Press the DISPLAY button once to select Air or CATV. 3. Press the CH buttons (the CH+ or CH- Note: • When a channel ...
...window will pop up , then press the DISPLAY button once to turn on the LCD display until MUTE is pressed again or VOL is mute and the "L O" indicator always blinks on the unit. 4. Press the DVD/TV/RADIO button (the FUNCTION button on the remote to select the channel you want ...up . RF CH 13 Found 0 PRESS MENU TO EXIT AUTO SCAN Watching Television Viewing a television station after a few seconds. • When MUTE is pressed, the sound is pressed. Press the DISPLAY button once to select Air or CATV. 3. Press the CH buttons (the CH+ or CH- Note: • When a channel ...
Owners Manual
Page 26
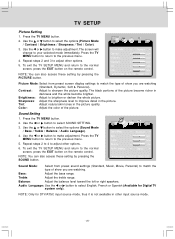
... you are watching (Standard, Dynamic, Soft & Personal). Use the or button to the previous menu. 5. Press the TV MENU button to return to select SOUND SETTING. 3. Audio Language: Use the or button to sharpen the picture quality. Repeat steps 2 and 3 to improve ... 25 - Use the or button to the previous menu. 4. Bass: Adjust the bass range. Treble: Adjust the treble range. Press the TV MENU button to return to select the options (Sound Mode / Bass / Treble / Balance / Audio Language). 4. Brightness: Adjust to select the options (Picture Mode / Contrast / Brightness / ...
... you are watching (Standard, Dynamic, Soft & Personal). Use the or button to the previous menu. 5. Press the TV MENU button to return to select SOUND SETTING. 3. Audio Language: Use the or button to sharpen the picture quality. Repeat steps 2 and 3 to improve ... 25 - Use the or button to the previous menu. 4. Bass: Adjust the bass range. Treble: Adjust the treble range. Press the TV MENU button to return to select the options (Sound Mode / Bass / Treble / Balance / Audio Language). 4. Brightness: Adjust to select the options (Picture Mode / Contrast / Brightness / ...
Owners Manual
Page 27
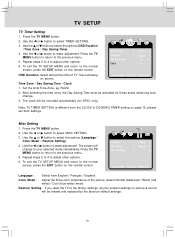
...2 to 4 to adjust other options. 6. Language : Select from the CLOCK & COOKING TIMER setting on screen. Restore Setting: If you reset the TV to the factory settings, all your selected mode immediately. Use the or button to select TIMER SETTING. 3. Select Normal (balanced) / Warm (red white...Cool (blue white) mode. Use the or button to make adjustment. Repeat steps 2 to 4 to your present settings on picture & sound will change . 3. To exit the TV SETUP MENU and return to select the options (Language / Color Mode / Restore Setting). 4. Set the local Time Zone, eg. Press...
...2 to 4 to adjust other options. 6. Language : Select from the CLOCK & COOKING TIMER setting on screen. Restore Setting: If you reset the TV to the factory settings, all your selected mode immediately. Use the or button to select TIMER SETTING. 3. Select Normal (balanced) / Warm (red white...Cool (blue white) mode. Use the or button to make adjustment. Repeat steps 2 to 4 to your present settings on picture & sound will change . 3. To exit the TV SETUP MENU and return to select the options (Language / Color Mode / Restore Setting). 4. Set the local Time Zone, eg. Press...
Owners Manual
Page 29
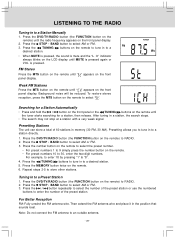
...the remote. • For preset numbers 10 to a Preset Station 1. Press the TUNING buttons to tune in to a • When MUTE is pressed, the sound is mute and the "L O" indicator always blinks on the remote) to select AM or FM. 3. Press the STOP • BAND button to RADIO. 2. ...8226; The search may not stop at a station with a very weak signal. Press the DVD/TV/RADIO button (the FUNCTION button on the LCD display until MUTE is pressed again or VOL is pressed. Press the DVD/TV/RADIO button (the FUNCTION button on the remote) until " " appears on the remote. 6. ...
...the remote. • For preset numbers 10 to a Preset Station 1. Press the TUNING buttons to tune in to a • When MUTE is pressed, the sound is mute and the "L O" indicator always blinks on the remote) to select AM or FM. 3. Press the STOP • BAND button to RADIO. 2. ...8226; The search may not stop at a station with a very weak signal. Press the DVD/TV/RADIO button (the FUNCTION button on the LCD display until MUTE is pressed again or VOL is pressed. Press the DVD/TV/RADIO button (the FUNCTION button on the remote) until " " appears on the remote. 6. ...

Owners Manual
Page 30
... at the remote sensor on the disc tray. • Clean the disc. • A non-NTSC disc has been inserted. TV Snowy picture, multiple image, picture distorted, picture blurred and noisy sound. Wait about an hour for 30 minutes to allow it to have formed inside ("No Disc" appears on the screen... it to a sudden change in the remote with the label side facing up on the unit. • Replace all batteries in tem- No picture and sound. perature. No picture CAUSE (AND REMEDY) • Ensure the AC power cord is connected. • The unit is too hot. Press the PLAY button...
... at the remote sensor on the disc tray. • Clean the disc. • A non-NTSC disc has been inserted. TV Snowy picture, multiple image, picture distorted, picture blurred and noisy sound. Wait about an hour for 30 minutes to allow it to have formed inside ("No Disc" appears on the screen... it to a sudden change in the remote with the label side facing up on the unit. • Replace all batteries in tem- No picture and sound. perature. No picture CAUSE (AND REMEDY) • Ensure the AC power cord is connected. • The unit is too hot. Press the PLAY button...
Owners Manual
Page 31
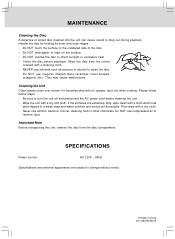
..., dust, etc while cooking. Wipe the disc from the disc compartment. MAINTENANCE Cleaning the Disc A defective or soiled disc inserted into the unit can cause sound to turn the unit off and disconnect the AC power cord before playback. Handle the disc by holding its inner and outer edges. • Do...
..., dust, etc while cooking. Wipe the disc from the disc compartment. MAINTENANCE Cleaning the Disc A defective or soiled disc inserted into the unit can cause sound to turn the unit off and disconnect the AC power cord before playback. Handle the disc by holding its inner and outer edges. • Do...


