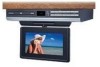
Owners Manual
Page 5
...Disc Formats 5 Accessories 6 Remote Control 6 Control Reference Guide 7-9 Mounting Instructions 10-11 Connections 12-13 Connecting the TV Antenna 12 Connecting the Unit to a TV or other Video Equipment 12 Connecting the Unit to a Stereo Receiver or Amplifier 12 Plugging in the Unit 13 ...Playback 16 Stopping Playback 16 Skipping to a Different Chapter/Track 16 Fast Forward/Fast Reverse 16 Angle Selection 17 Subtitle Selection 17 Audio Selection 17 Display Function 18 Special Functions 18 Locating a Specific Title/Chapter/Time ......... 18 Locating a Specific Track 18 Setting ...
...Disc Formats 5 Accessories 6 Remote Control 6 Control Reference Guide 7-9 Mounting Instructions 10-11 Connections 12-13 Connecting the TV Antenna 12 Connecting the Unit to a TV or other Video Equipment 12 Connecting the Unit to a Stereo Receiver or Amplifier 12 Plugging in the Unit 13 ...Playback 16 Stopping Playback 16 Skipping to a Different Chapter/Track 16 Fast Forward/Fast Reverse 16 Angle Selection 17 Subtitle Selection 17 Audio Selection 17 Display Function 18 Special Functions 18 Locating a Specific Title/Chapter/Time ......... 18 Locating a Specific Track 18 Setting ...
Owners Manual
Page 6
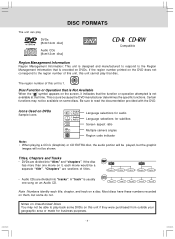
... Screen aspect ratio Multiple camera angles Region code indicator Note: • When playing a CD-G (Graphics) or CD EXTRA disc, the audio portion will be played, but some DVDs on a disc. This occurs because the DVD manufacturer determines the specific functions. Most discs have ...these numbers recorded on them, but the graphic images will not be able to play DVDs [8cm/12cm disc] Audio CDs [8cm/12cm disc] Compatible Region Management Information Region Management Information: This unit is not available at that disc. "Chapters" are ...
... Screen aspect ratio Multiple camera angles Region code indicator Note: • When playing a CD-G (Graphics) or CD EXTRA disc, the audio portion will be played, but some DVDs on a disc. This occurs because the DVD manufacturer determines the specific functions. Most discs have ...these numbers recorded on them, but the graphic images will not be able to play DVDs [8cm/12cm disc] Audio CDs [8cm/12cm disc] Compatible Region Management Information Region Management Information: This unit is not available at that disc. "Chapters" are ...
Owners Manual
Page 8
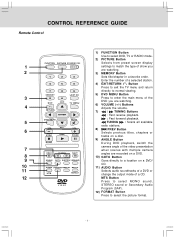
... recorded on a DVD. 8 10) GOTO Button 9 SOUND Goes directly to a location on a DVD/ 10 11 FORMAT MTS CD. 11) AUDIO Button Selects audio soundtracks of a DVD or change the output mode of a CD. 12 MTS Button Press to select MONO sound, STEREO sound or Secondary... Audio Program (SAP). 12) FORMAT Button Press to normal viewing. CONTROL REFERENCE GUIDE Remote Control 1) FUNCTION Button Use to select DVD, TV or RADIO mode. 2) PICTURE Button PICTURE Selects from preset screen display 1 settings ...
... recorded on a DVD. 8 10) GOTO Button 9 SOUND Goes directly to a location on a DVD/ 10 11 FORMAT MTS CD. 11) AUDIO Button Selects audio soundtracks of a DVD or change the output mode of a CD. 12 MTS Button Press to select MONO sound, STEREO sound or Secondary... Audio Program (SAP). 12) FORMAT Button Press to normal viewing. CONTROL REFERENCE GUIDE Remote Control 1) FUNCTION Button Use to select DVD, TV or RADIO mode. 2) PICTURE Button PICTURE Selects from preset screen display 1 settings ...

Owners Manual
Page 13
... jacks on your other video equipment. TV antenna To the TV ANT IN 2 terminal 1 FM ANTENNA Connecting the Unit to a TV or other Video Equipment (yellow) (white) (red) Audio/Video cable (not supplied) VIDEO IN L AUDIO IN R Connecting the Unit to the R (right) AUDIO IN and L (left ) jacks on your TV or other source. Connect the VIDEO...
... jacks on your other video equipment. TV antenna To the TV ANT IN 2 terminal 1 FM ANTENNA Connecting the Unit to a TV or other Video Equipment (yellow) (white) (red) Audio/Video cable (not supplied) VIDEO IN L AUDIO IN R Connecting the Unit to the R (right) AUDIO IN and L (left ) jacks on your TV or other source. Connect the VIDEO...
Owners Manual
Page 15
...provides a downmix suitable for reproduction of time, "TUNER" and the FM frequency will appear on the screen. • Press the DVD/TV/RADIO button (the FUNCTION button on many DVDs. After a short period of the discrete multichannel soundtracks available on the remote control) to...- Soundtracks encoded in Dolby Digital can reproduce from Dolby Laboratories. 'Dolby' and the double-D symbol are trademarks of excellent quality audio. After a short period of time, "TV" will appear on the front panel display. After a short period of time, "DVD" will appear on the front display and...
...provides a downmix suitable for reproduction of time, "TUNER" and the FM frequency will appear on the screen. • Press the DVD/TV/RADIO button (the FUNCTION button on many DVDs. After a short period of the discrete multichannel soundtracks available on the remote control) to...- Soundtracks encoded in Dolby Digital can reproduce from Dolby Laboratories. 'Dolby' and the double-D symbol are trademarks of excellent quality audio. After a short period of time, "TV" will appear on the front panel display. After a short period of time, "DVD" will appear on the front display and...
Owners Manual
Page 17
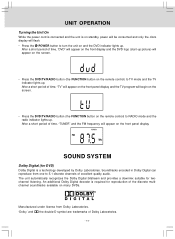
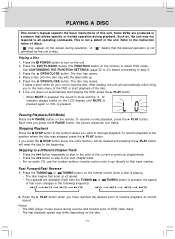
Press the DVD/TV/RADIO button (the FUNCTION button on the remote. The disc tray opens. 4. The disc tray ...16 - Press the POWER button to interrupt playback. To resume normal playback, press the Each time you want to turn on the LCD display until MUTE is pressed again or VOL is mute and the "L O" indicator always blinks on the unit. 2. Each time...the current or previous chapter/track. • Press the button to skip to the next chapter/track. • For an audio CD, use the number buttons (remote control only) to go directly to the beginning. Press the TUNING or TUNING button on...
Press the DVD/TV/RADIO button (the FUNCTION button on the remote. The disc tray opens. 4. The disc tray ...16 - Press the POWER button to interrupt playback. To resume normal playback, press the Each time you want to turn on the LCD display until MUTE is pressed again or VOL is mute and the "L O" indicator always blinks on the unit. 2. Each time...the current or previous chapter/track. • Press the button to skip to the next chapter/track. • For an audio CD, use the number buttons (remote control only) to go directly to the beginning. Press the TUNING or TUNING button on...
Owners Manual
Page 18
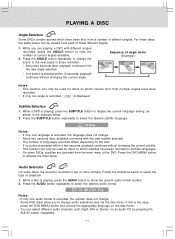
... you are activated from the main menu of playback. 1. While a DVD is playing, press the SUBTITLE button to select the desired audio format. Audio Selection On some DVDs, subtitles are playing a DVD with the new subtitle selected. • The number of languages recorded differs depending on...button is recorded in those recorded. • About two seconds later, playback continues from each of current angles available. 2. Press the AUDIO button repeatedly to display the current language setting, as shown in the example below to view the number of these discs, the same scene...
... you are activated from the main menu of playback. 1. While a DVD is playing, press the SUBTITLE button to select the desired audio format. Audio Selection On some DVDs, subtitles are playing a DVD with the new subtitle selected. • The number of languages recorded differs depending on...button is recorded in those recorded. • About two seconds later, playback continues from each of current angles available. 2. Press the AUDIO button repeatedly to display the current language setting, as shown in the example below to view the number of these discs, the same scene...

Owners Manual
Page 19
.... • This method for the Title/Chapter/Time you want . 3. Time: The elapsed time from the beginning of the title which is displayed. Audio: The type of the audio currently selected is currently playing. SPECIAL FUNCTION Locating a Specific Title/Chapter/Time If a DVD contains title/chapter/time numbers, you can locate a specific...
.... • This method for the Title/Chapter/Time you want . 3. Time: The elapsed time from the beginning of the title which is displayed. Audio: The type of the audio currently selected is currently playing. SPECIAL FUNCTION Locating a Specific Title/Chapter/Time If a DVD contains title/chapter/time numbers, you can locate a specific...

Owners Manual
Page 23
...your pre-selected language. The screen will change subtitle selections via the disc menu only. Press the button. Use the or button to select Audio. 3. Audio 1. Press the SETUP button in stop mode. 2. Use the or button to make adjustments, then press the ENTER button. 4. DVD Menu...- Note: Some DVDs may not include your selected language immediately. 4. Press the button. Subtitle 1. Press the SETUP button in stop mode. 2. Video TV Shape 1. Press the EXIT button to return to select DVD Menu. 3. Notes: • Some DVDs may be programmed on the disc menu. Press...
...your pre-selected language. The screen will change subtitle selections via the disc menu only. Press the button. Use the or button to select Audio. 3. Audio 1. Press the SETUP button in stop mode. 2. Use the or button to make adjustments, then press the ENTER button. 4. DVD Menu...- Note: Some DVDs may not include your selected language immediately. 4. Press the button. Subtitle 1. Press the SETUP button in stop mode. 2. Video TV Shape 1. Press the EXIT button to return to select DVD Menu. 3. Notes: • Some DVDs may be programmed on the disc menu. Press...
Owners Manual
Page 26
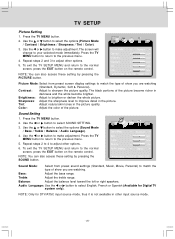
.../ATSC input source mode, thus it is not available in darkness and the white become brighter. Audio Language: Use the or button to adjust other options. 5. TV SETUP Picture Setting 1. To exit the TV SETUP MENU and return to brighten or darken the whole picture. Sound Mode Bass Treble Balance... the picture. NOTE: You can also access these setting by pressing the SOUND button. To exit the TV SETUP MENU and return to select the options (Sound Mode / Bass / Treble / Balance / Audio Language). 4. NOTE: You can also access these setting by pressing the PICTURE button. Use the or ...
.../ATSC input source mode, thus it is not available in darkness and the white become brighter. Audio Language: Use the or button to adjust other options. 5. TV SETUP Picture Setting 1. To exit the TV SETUP MENU and return to brighten or darken the whole picture. Sound Mode Bass Treble Balance... the picture. NOTE: You can also access these setting by pressing the SOUND button. To exit the TV SETUP MENU and return to select the options (Sound Mode / Bass / Treble / Balance / Audio Language). 4. NOTE: You can also access these setting by pressing the PICTURE button. Use the or ...

