Operation Manual
Page 1
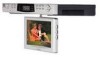
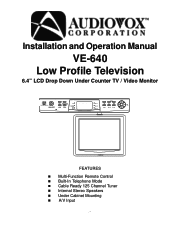
Installation and Operation Manual VE-640 Low Profile Television 6.4" LCD Drop Down Under Counter TV / Video Monitor ON/OFF TV FM/AM A/V TEL TV FM/AM AM PM CH 1 CH 2 CH 3 SEEK SET CH 1 CH 2 CH 3 CH VOL AUDIOVOX FEATURES n Multi-Function Remote Control n Built-In Telephone Mode n Cable Ready 125 Channel Tuner n Internal Stereo Speakers n Under Cabinet Mounting n A/V Input -1-
Installation and Operation Manual VE-640 Low Profile Television 6.4" LCD Drop Down Under Counter TV / Video Monitor ON/OFF TV FM/AM A/V TEL TV FM/AM AM PM CH 1 CH 2 CH 3 SEEK SET CH 1 CH 2 CH 3 CH VOL AUDIOVOX FEATURES n Multi-Function Remote Control n Built-In Telephone Mode n Cable Ready 125 Channel Tuner n Internal Stereo Speakers n Under Cabinet Mounting n A/V Input -1-
Operation Manual
Page 2
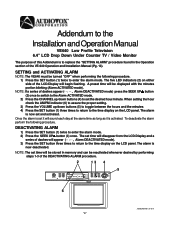
...following procedure. The alarm is now set it will begin flashing. Addendum to the Installation and Operation Manual VE640 Low Profile Television 6.4" LCD Drop Down Under Counter TV / Video Monitor The purpose of this Addendum is to replace the "SETTING ALARM" procedure found in memory ...is set and activated. The set the desired hour/minute. NOTE: If a series of the VE-640 Operation and Installation Manual (Pg. 13). SETTING and ACTIVATING ALARM NOTE: The VE640 must be displayed with the minutes portion blinking (Alarm ACTIVATED mode). A preset time will appear Alarm ...
...following procedure. The alarm is now set it will begin flashing. Addendum to the Installation and Operation Manual VE640 Low Profile Television 6.4" LCD Drop Down Under Counter TV / Video Monitor The purpose of this Addendum is to replace the "SETTING ALARM" procedure found in memory ...is set and activated. The set the desired hour/minute. NOTE: If a series of the VE-640 Operation and Installation Manual (Pg. 13). SETTING and ACTIVATING ALARM NOTE: The VE640 must be displayed with the minutes portion blinking (Alarm ACTIVATED mode). A preset time will appear Alarm ...
Operation Manual
Page 3
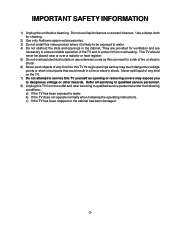
... to ensure reliable operation of any kind on the TV. 7) Do not attempt to qualified service personnel under the following the operating instructions. Use a damp cloth for ventilation and are provided for cleaning. 2) Use only Audiovox approved accessories. 3) Do not install this video product... where it from the outlet and refer servicing to service this TV from overheating. This TV should never be exposed to be placed near or over a radiator...
... to ensure reliable operation of any kind on the TV. 7) Do not attempt to qualified service personnel under the following the operating instructions. Use a damp cloth for ventilation and are provided for cleaning. 2) Use only Audiovox approved accessories. 3) Do not install this video product... where it from the outlet and refer servicing to service this TV from overheating. This TV should never be exposed to be placed near or over a radiator...
Operation Manual
Page 5
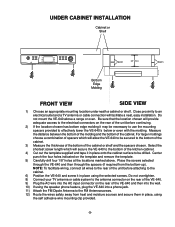
...supplied and tape it in place onto the cabinet surface to an electrical outlet and a TV antenna or cable connection will allow the VE-640 to be drilled. Place the screws selected through the VE-640 and then through the spacers (if required from heat and moisture sources and secure them in... place using the self adhesive wire mounting clip provided. -5- Do not overtighten. 8) Connect your TV antenna or cable system to the antenna connector on the rear of the VE-640. 9) Plug the AC wire into a phone jack. 11) Attach the FM Dipole Antenna to the electrical connectors...
...supplied and tape it in place onto the cabinet surface to an electrical outlet and a TV antenna or cable connection will allow the VE-640 to be drilled. Place the screws selected through the VE-640 and then through the spacers (if required from heat and moisture sources and secure them in... place using the self adhesive wire mounting clip provided. -5- Do not overtighten. 8) Connect your TV antenna or cable system to the antenna connector on the rear of the VE-640. 9) Plug the AC wire into a phone jack. 11) Attach the FM Dipole Antenna to the electrical connectors...
Operation Manual
Page 6
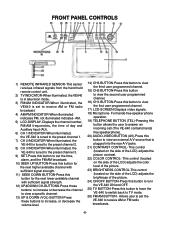
...1) REMOTE INFRARED SENSOR-This sensor receives infrared signals from the hand held remote control unit. 2) TV INDICATOR-When illuminated, the VE640 is in television mode. 3) FM/AM INDICATOR-When illuminated, the VE640 is plugged into the rear A/V jacks. 21) CONTRAST CONTROL- For hands-free speaker phone operation.... Input (AU). 6) CH 1 INDICATOR-When illuminated, the VE-640 is tuned to the preset channel 1. 7) CH 2 INDICATOR-When illuminated, the VE-640 is tuned to the preset channel 2. 8) CH 3 INDICATOR-When illuminated, the VE-640 is tuned to the preset channel 3. 9) SET-Press this button...
...1) REMOTE INFRARED SENSOR-This sensor receives infrared signals from the hand held remote control unit. 2) TV INDICATOR-When illuminated, the VE640 is in television mode. 3) FM/AM INDICATOR-When illuminated, the VE640 is plugged into the rear A/V jacks. 21) CONTRAST CONTROL- For hands-free speaker phone operation.... Input (AU). 6) CH 1 INDICATOR-When illuminated, the VE-640 is tuned to the preset channel 1. 7) CH 2 INDICATOR-When illuminated, the VE-640 is tuned to the preset channel 2. 8) CH 3 INDICATOR-When illuminated, the VE-640 is tuned to the preset channel 3. 9) SET-Press this button...
Operation Manual
Page 7
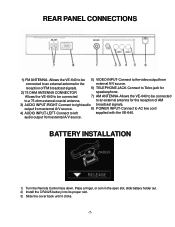
TV-ANT. BATTERY INSTALLATION 1) Turn the Remote Control face down. to an external antenna for the external A/V source. audio output from external A/V source. 8) POWER INPUT-Connect to AC line cord 4) AUDIO INPUT-LEFT-Connect to a 75 ohm external coaxial antenna. Allows the VE-640 to be connected to...to Telco jack for 2) 75 OHM ANTENNA CONNECTOR speakerphone. AUDIO-IN VIDEO-IN 1) FM ANTENNA- Allows the VE-640 to be connected 7) AM ANTENNA-Allows the VE-640 to be 5) VIDEO INPUT-Connect to the video output from connected to an external antenna for the reception of ...
TV-ANT. BATTERY INSTALLATION 1) Turn the Remote Control face down. to an external antenna for the external A/V source. audio output from external A/V source. 8) POWER INPUT-Connect to AC line cord 4) AUDIO INPUT-LEFT-Connect to a 75 ohm external coaxial antenna. Allows the VE-640 to be connected to...to Telco jack for 2) 75 OHM ANTENNA CONNECTOR speakerphone. AUDIO-IN VIDEO-IN 1) FM ANTENNA- Allows the VE-640 to be connected 7) AM ANTENNA-Allows the VE-640 to be 5) VIDEO INPUT-Connect to the video output from connected to an external antenna for the reception of ...
Operation Manual
Page 8
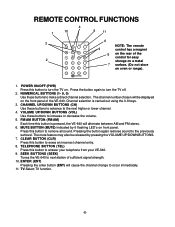
...button again to occur immediately. 11. Channel selection is pressed, the VE-640 will cause the channel change to turn the TV on front panel. Pressing the button again restores sound to make a direct channel selection. TV-Select TV function. -8- FM/AM BUTTON (FM/AM) Each time this button to... next station of the VE-640. MUTE BUTTON (MUTE) Indicated by pressing the VOLUME UP/DOWN BUTTONS. 7. SEEK BUTTONS (SEEK) Tunes the VE-640 to remove all sound. CHANNEL ...
...button again to occur immediately. 11. Channel selection is pressed, the VE-640 will cause the channel change to turn the TV on front panel. Pressing the button again restores sound to make a direct channel selection. TV-Select TV function. -8- FM/AM BUTTON (FM/AM) Each time this button to... next station of the VE-640. MUTE BUTTON (MUTE) Indicated by pressing the VOLUME UP/DOWN BUTTONS. 7. SEEK BUTTONS (SEEK) Tunes the VE-640 to remove all sound. CHANNEL ...
Operation Manual
Page 9
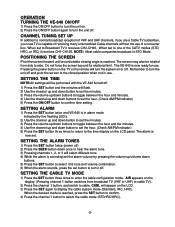
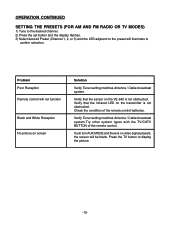
... return to the time display on the LCD panel. SETTING ALARM 1) Press the SET button twice and VE-640 is now set the hour. (Check AM/PM indicator) 5) Press the ON/OFF button to confirm time ...CH2-CH69. The alarm is in use. SETTING THE CABLE TV MODE 1) Press the SET button three times to enter the cable configuration mode. The VE-640 is sounding set the alarm volume by five flashing LED's. 2)...button to set button to turn it off . When the desired mode is reached. OPERATION TURNING THE VE-640 ON/OFF 1) Press the ON/OFF button to turn the unit on the display. (Pressing channel 1 ...
... return to the time display on the LCD panel. SETTING ALARM 1) Press the SET button twice and VE-640 is now set the hour. (Check AM/PM indicator) 5) Press the ON/OFF button to confirm time ...CH2-CH69. The alarm is in use. SETTING THE CABLE TV MODE 1) Press the SET button three times to enter the cable configuration mode. The VE-640 is sounding set the alarm volume by five flashing LED's. 2)...button to set button to turn it off . When the desired mode is reached. OPERATION TURNING THE VE-640 ON/OFF 1) Press the ON/OFF button to turn the unit on the display. (Pressing channel 1 ...
Operation Manual
Page 10
... Reception No picture on screen Solution Verify Tuner setting matches Antenna / Cable broadcast system. OPERATION CONTINUED SETTING THE PRESETS (FOR AM AND FM RADIO OR TV MODES) 1) Tune to the desired channel. 2) Press the set button and the display flashes. 3) Select desired Preset (Channel 1, 2, or 3) and the LED ...adjacent to the preset will illuminate to display the picture. -10- Verify that the infrared LED on the VE-640 is not obstructed. Press the TV button to confirm selection. Verify that the sensor on the transmitter is not obstructed.
... Reception No picture on screen Solution Verify Tuner setting matches Antenna / Cable broadcast system. OPERATION CONTINUED SETTING THE PRESETS (FOR AM AND FM RADIO OR TV MODES) 1) Tune to the desired channel. 2) Press the set button and the display flashes. 3) Select desired Preset (Channel 1, 2, or 3) and the LED ...adjacent to the preset will illuminate to display the picture. -10- Verify that the infrared LED on the VE-640 is not obstructed. Press the TV button to confirm selection. Verify that the sensor on the transmitter is not obstructed.
Operation Manual
Page 11
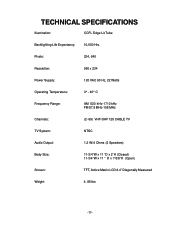
TECHNICAL SPECIFICATIONS Illumination: CCFL Edge Lit Tube Backlighting Life Expectancy: 10,000 Hrs. Pixels: 224, 640 Resolution: 960 x 234 Power Supply: 120 VAC 60 Hz, 22 Watts Operating Temperature: 0° - 40° C Frequency Range: AM 520 kHz-1710 kHz FM 87.5 MHz-108 MHz Channels: (2- 69) VHF/UHF 125 CABLE TV TV System: NTSC Audio Output: 1.2 W/4 Ohms (2 Speakers) Body Size: 11-3/4"W x 11 "D x 2"H (Closed) 11-3/4"W x 11 " D x 7-5/8"H (Open) Screen: TFT, Active Matrix LCD 6.4" Diagonally Measured Weight: 4. 85 lbs -11-
TECHNICAL SPECIFICATIONS Illumination: CCFL Edge Lit Tube Backlighting Life Expectancy: 10,000 Hrs. Pixels: 224, 640 Resolution: 960 x 234 Power Supply: 120 VAC 60 Hz, 22 Watts Operating Temperature: 0° - 40° C Frequency Range: AM 520 kHz-1710 kHz FM 87.5 MHz-108 MHz Channels: (2- 69) VHF/UHF 125 CABLE TV TV System: NTSC Audio Output: 1.2 W/4 Ohms (2 Speakers) Body Size: 11-3/4"W x 11 "D x 2"H (Closed) 11-3/4"W x 11 " D x 7-5/8"H (Open) Screen: TFT, Active Matrix LCD 6.4" Diagonally Measured Weight: 4. 85 lbs -11-


