
Operation Manual
Page 1
PE702 PORTABLE 7" LCD MONITOR AND DVD PLAYER For Customer Service Visit Our Website At W W W .audiovox.com Product Information, Photos, FAQ's Owner's Manuals 1 1286823
PE702 PORTABLE 7" LCD MONITOR AND DVD PLAYER For Customer Service Visit Our Website At W W W .audiovox.com Product Information, Photos, FAQ's Owner's Manuals 1 1286823
Operation Manual
Page 3
...location, wait for later use in installing the system properly to obtain the best equipment performance. There is designed for selecting the PE702 portable DVD player. If the unit is constructed to operation. Do not place the set on until the moisture evaporates. 2. Installation Ensure that...this manual. 3. The main features include a 7" Wide Screen (16:9 Aspect Ratio) Liquid Crystal Display (LCD) monitor and a DVD player. Contact qualified service personnel if your home. A. Object and Liquid Do not push objects of electric shock and/or exposure to disassemble ...
...location, wait for later use in installing the system properly to obtain the best equipment performance. There is designed for selecting the PE702 portable DVD player. If the unit is constructed to operation. Do not place the set on until the moisture evaporates. 2. Installation Ensure that...this manual. 3. The main features include a 7" Wide Screen (16:9 Aspect Ratio) Liquid Crystal Display (LCD) monitor and a DVD player. Contact qualified service personnel if your home. A. Object and Liquid Do not push objects of electric shock and/or exposure to disassemble ...
Operation Manual
Page 4
... features may cause the unit to direct sunlight or heat sources such as they may not be intentionally fixed by software producers. Contents 1. 1 x 7.0'' LCD Monitor & DVD Player Combo 2. 1 x AC to DC adapter into the 110V AC power socket. 2. Do not expose the disc to malfunction. Handle the disc by wiping the disc...
... features may cause the unit to direct sunlight or heat sources such as they may not be intentionally fixed by software producers. Contents 1. 1 x 7.0'' LCD Monitor & DVD Player Combo 2. 1 x AC to DC adapter into the 110V AC power socket. 2. Do not expose the disc to malfunction. Handle the disc by wiping the disc...
Operation Manual
Page 7
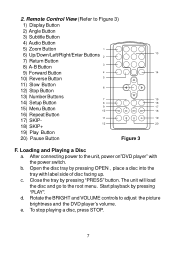
... 16) Repeat Button 17) SKIP- 18) SKIP+ 19) Play Button 20) Pause Button Figure 3 F. e. Remote Control View (Refer to adjust the picture brightness and the DVD player's volume. Open the disc tray by pressing OPEN , place a disc into the tray with the power switch. The unit will load the disc and go...
... 16) Repeat Button 17) SKIP- 18) SKIP+ 19) Play Button 20) Pause Button Figure 3 F. e. Remote Control View (Refer to adjust the picture brightness and the DVD player's volume. Open the disc tray by pressing OPEN , place a disc into the tray with the power switch. The unit will load the disc and go...
Operation Manual
Page 10
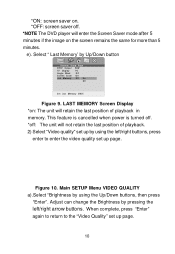
... off : The unit will not retain the last position of playback in memory. This feature is cancelled when power is turned off. *off . *NOTE The DVD player will retain the last position of playback. 2) Select "Video quality" set up by using the left /right arrow buttons. Main SETUP Menu VIDEO QUALITY a).Select...
... off : The unit will not retain the last position of playback in memory. This feature is cancelled when power is turned off. *off . *NOTE The DVD player will retain the last position of playback. 2) Select "Video quality" set up by using the left /right arrow buttons. Main SETUP Menu VIDEO QUALITY a).Select...
Operation Manual
Page 17
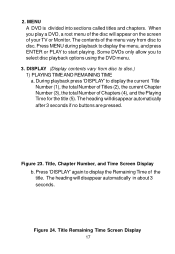
...of the title. Figure 24. Press MENU during playback to display the menu, and press ENTER or PLAY to select disc playback options using the DVD menu. 3. During playback press 'DISPLAY' to display the Remaining Time of Chapters (4), and the Playing Time for the title (5). The heading ...will appear on the screen of your TV or Monitor. When you to start playing. 2. MENU A DVD is divided into sections called titles and chapters. Some DVDs only allow you play a DVD, a root menu of the menu vary from disc to disc. DISPLAY (Display contents vary from disc to disc...
...of the title. Figure 24. Press MENU during playback to display the menu, and press ENTER or PLAY to select disc playback options using the DVD menu. 3. During playback press 'DISPLAY' to display the Remaining Time of Chapters (4), and the Playing Time for the title (5). The heading ...will appear on the screen of your TV or Monitor. When you to start playing. 2. MENU A DVD is divided into sections called titles and chapters. Some DVDs only allow you play a DVD, a root menu of the menu vary from disc to disc. DISPLAY (Display contents vary from disc to disc...
Operation Manual
Page 19
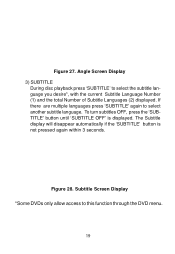
... turn subtitles OFF, press the 'SUBTITLE' button until 'SUBTITLE OFF' is not pressed again within 3 seconds. Figure 27. Subtitle Screen Display *Some DVDs only allow access to select the subtitle language you desire*, with the current Subtitle Language Number (1) and the total Number of Subtitle Languages (2) displayed. Angle... Screen Display 3) SUBTITLE During disc playback press 'SUBTITLE' to this function through the DVD menu. 19 If there are multiple languages press 'SUBTITLE' again to select another subtitle language.
... turn subtitles OFF, press the 'SUBTITLE' button until 'SUBTITLE OFF' is not pressed again within 3 seconds. Figure 27. Subtitle Screen Display *Some DVDs only allow access to select the subtitle language you desire*, with the current Subtitle Language Number (1) and the total Number of Subtitle Languages (2) displayed. Angle... Screen Display 3) SUBTITLE During disc playback press 'SUBTITLE' to this function through the DVD menu. 19 If there are multiple languages press 'SUBTITLE' again to select another subtitle language.
Operation Manual
Page 20
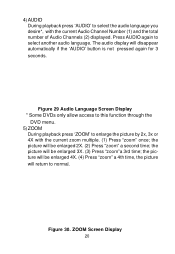
.... (1) Press "zoom" once; The audio display will be enlarged 3X. (3) Press "zoom"a 3rd time; Figure 29 Audio Language Screen Display * Some DVDs only allow access to this function through the DVD menu. 5) ZOOM During playback press 'ZOOM' to select another audio language. Press AUDIO again to enlarge the picture by 2x, 3x...
.... (1) Press "zoom" once; The audio display will be enlarged 3X. (3) Press "zoom"a 3rd time; Figure 29 Audio Language Screen Display * Some DVDs only allow access to this function through the DVD menu. 5) ZOOM During playback press 'ZOOM' to select another audio language. Press AUDIO again to enlarge the picture by 2x, 3x...
Operation Manual
Page 25
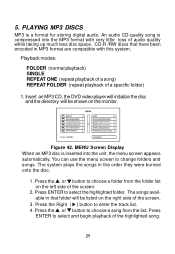
... the screen. 3. Press ENTER to select and begin playback of audio quality while taking up much less disc space. Insert an MP3 CD, the DVD video player will initialize the disc and the directory will be shown on the monitor. 5. The system plays the songs in MP3 format are compatible with very...
... the screen. 3. Press ENTER to select and begin playback of audio quality while taking up much less disc space. Insert an MP3 CD, the DVD video player will initialize the disc and the directory will be shown on the monitor. 5. The system plays the songs in MP3 format are compatible with very...
Operation Manual
Page 29
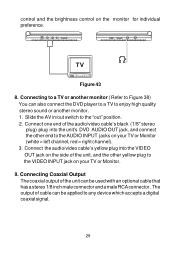
... jacks on your TV or Monitor (white = left channel, red = right channel). 3. Connecting Coaxial Output The coaxial output of cable can also connect the DVD player to a TV to enjoy high quality stereo sound or another monitor ( Refer to the VIDEO INPUT jack on your TV or Monitor. 9. Figure 43 8. ...Connect the audio/video cable's yellow plug into the unit's DVD AUDIO OUT jack, and connect the other yellow plug to Figure 38) You can be used with an optional cable that has a stereo 1/8 inch male...
... jacks on your TV or Monitor (white = left channel, red = right channel). 3. Connecting Coaxial Output The coaxial output of cable can also connect the DVD player to a TV to enjoy high quality stereo sound or another monitor ( Refer to the VIDEO INPUT jack on your TV or Monitor. 9. Figure 43 8. ...Connect the audio/video cable's yellow plug into the unit's DVD AUDIO OUT jack, and connect the other yellow plug to Figure 38) You can be used with an optional cable that has a stereo 1/8 inch male...
Operation Manual
Page 30
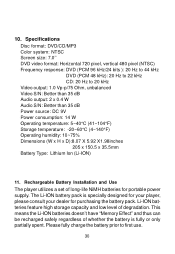
...of whether the battery is specially designed for your player, please consult your dealer for portable power supply. Specifications Disc format: DVD/CD/MP3 Color system: NTSC Screen size: 7.0'' DVD video format: Horizontal 720 pixel, vertical 480 pixel (NTSC) Frequency response: DVD (PCM 96 kHz/24 bits ): 20 Hz... to 44 kHz DVD (PCM 48 kHz): 20 Hz to ...
...of whether the battery is specially designed for your player, please consult your dealer for portable power supply. Specifications Disc format: DVD/CD/MP3 Color system: NTSC Screen size: 7.0'' DVD video format: Horizontal 720 pixel, vertical 480 pixel (NTSC) Frequency response: DVD (PCM 96 kHz/24 bits ): 20 Hz... to 44 kHz DVD (PCM 48 kHz): 20 Hz to ...
Operation Manual
Page 31
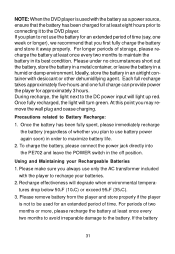
... the battery at least once every two months to avoid irreparable damage to recharge your Rechargeable Batteries 1. NOTE: When the DVD player is not to be used with the player to the battery. During recharge, the light next to Battery Recharge: 1. Using and Maintaining your batteries. 2. Once fully...condition. To charge the battery, please connect the power jack directly into the PE702 and leave the POWER switch in order to the DVD player. Please remove battery from the player and store properly if the player is used for an extended period of time. Please make sure you may...
... the battery at least once every two months to avoid irreparable damage to recharge your Rechargeable Batteries 1. NOTE: When the DVD player is not to be used with the player to the battery. During recharge, the light next to Battery Recharge: 1. Using and Maintaining your batteries. 2. Once fully...condition. To charge the battery, please connect the power jack directly into the PE702 and leave the POWER switch in order to the DVD player. Please remove battery from the player and store properly if the player is used for an extended period of time. Please make sure you may...
Operation Manual
Page 32
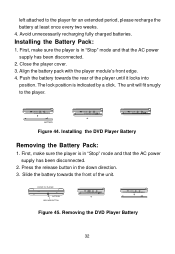
... position is in the down direction. 3. First, make sure the player is in "Stop" mode and that the AC power supply has been disconnected. 2. Removing the DVD Player Battery 32 First, make sure the player is indicated by a click. BATTERY Figure 44. Installing the DVD Player Battery Removing the Battery Pack: 1. Installing the Battery Pack: 1. The...
... position is in the down direction. 3. First, make sure the player is in "Stop" mode and that the AC power supply has been disconnected. 2. Removing the DVD Player Battery 32 First, make sure the player is indicated by a click. BATTERY Figure 44. Installing the DVD Player Battery Removing the Battery Pack: 1. Installing the Battery Pack: 1. The...


