Operation Manual
Page 2
... extremely careful when working on headphones always adjust the volume setting to the driver if the LCD panel or video monitor is used for television reception, video or DVD play , the LCD panel or video monitor must be installed so that operates when the vehicle is in use any solvents or cleaning materials when cleaning the video monitor. This includes any portion of the driver's seat where it is connected to the...
... extremely careful when working on headphones always adjust the volume setting to the driver if the LCD panel or video monitor is used for television reception, video or DVD play , the LCD panel or video monitor must be installed so that operates when the vehicle is in use any solvents or cleaning materials when cleaning the video monitor. This includes any portion of the driver's seat where it is connected to the...
Operation Manual
Page 3
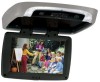
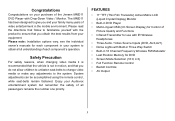
... Wireless Headphones • Three Audio / Video Source Inputs (DVD, AUX,AV1) • Dome Lights with Drop-Down Video / Monitor. System adjustments can be accomplished using the remote control, while seat-belts remain fastened. Please read the directions that you and your family many years of video entertainment in DVD Player • Multi-Lingual OSD (On Screen Display) for DVD • Screen Mode Selection (16:9, 4:3) • Full Function Remote Control • Backlit Controls • AV Output 3 Congratulations Congratulations on your...
... Wireless Headphones • Three Audio / Video Source Inputs (DVD, AUX,AV1) • Dome Lights with Drop-Down Video / Monitor. System adjustments can be accomplished using the remote control, while seat-belts remain fastened. Please read the directions that you and your family many years of video entertainment in DVD Player • Multi-Lingual OSD (On Screen Display) for DVD • Screen Mode Selection (16:9, 4:3) • Full Function Remote Control • Backlit Controls • AV Output 3 Congratulations Congratulations on your...
Operation Manual
Page 4
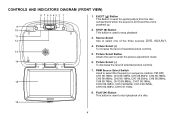
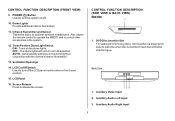
... 90.3MHz, CH13 90.5MHz, CH14 90.7MHz, CH15 90.9MHz, CH16 91.1Mhz. 8. CONTROLS AND INDICATORS DIAGRAM (FRONT VIEW) 8 7 6 5 43 2 1 9 10 11 12 1. EJECT () Button This Button is used for ejecting discs from the disc compartment when the source is DVD and the unit is used to select one of a disc. 16 4 FMM Source Select Switch Used to enter the picture adjustment mode. 14 6. Source Select Use to start playback of the three sources: DVD, AUX,AV1. 4.
... 90.3MHz, CH13 90.5MHz, CH14 90.7MHz, CH15 90.9MHz, CH16 91.1Mhz. 8. CONTROLS AND INDICATORS DIAGRAM (FRONT VIEW) 8 7 6 5 43 2 1 9 10 11 12 1. EJECT () Button This Button is used for ejecting discs from the disc compartment when the source is DVD and the unit is used to select one of a disc. 16 4 FMM Source Select Switch Used to enter the picture adjustment mode. 14 6. Source Select Use to start playback of the three sources: DVD, AUX,AV1. 4.
Operation Manual
Page 5
... View 1 1. Also allows the remote control to operate the MMD11 and to load disc when disc is inserted. Ventilation Openings 14. Insert disc with the vehicle's interior illumination. 13. LCD Cut Off Switch Used to turn off . 10. Dome Lights Provide additional interior illumination. 11. Auxiliary Video Input 2. POWER ( ) Button Used to turn the system on the dome lights. Three Position Dome Light Switch ON - AUTO - DVD Disc insertion Slot For loading and removing discs. Auxiliary Audio Right Input...
... View 1 1. Also allows the remote control to operate the MMD11 and to load disc when disc is inserted. Ventilation Openings 14. Insert disc with the vehicle's interior illumination. 13. LCD Cut Off Switch Used to turn off . 10. Dome Lights Provide additional interior illumination. 11. Auxiliary Video Input 2. POWER ( ) Button Used to turn the system on the dome lights. Three Position Dome Light Switch ON - AUTO - DVD Disc insertion Slot For loading and removing discs. Auxiliary Audio Right Input...

Operation Manual
Page 6
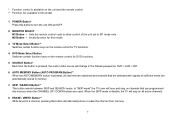
... MENU SETUP 16 17 REPEAT 27 AUDIO ZOOM 18 26 SUBTITLE A-B 19 25 20 21 24 22 23 It is observed. 3) Align the cover tabs with the remote control and slide the cover until it locks. Make sure that proper polarity (+ or -) is not a universal remote control and will operate the MMD11. Using your Remote Control, install the batteries as described below. 1) Turn the Remote Control face down. REMOTE CONTROL OPERATION MAIN FUNCTION...
... MENU SETUP 16 17 REPEAT 27 AUDIO ZOOM 18 26 SUBTITLE A-B 19 25 20 21 24 22 23 It is observed. 3) Align the cover tabs with the remote control and slide the cover until it locks. Make sure that proper polarity (+ or -) is not a universal remote control and will operate the MMD11. Using your Remote Control, install the batteries as described below. 1) Turn the Remote Control face down. REMOTE CONTROL OPERATION MAIN FUNCTION...
Operation Manual
Page 7
POWER Button* Press this model 3. TV Mode Select Button** Switches certain function keys on the remote control for DVD functions. 5. Invalid function for TV functions. 4. AUTO MEMORY Button (AUTO PROGRAM Button)** When the AUTO MEMORY button is pressed, the audio / video source will change in memory. 7. ERASE / WRITE Button** While tuned to M1 mode only. Sets the remote control code to allow control of sufficient levels are automatically stored in the following sequence: DVD > AUX > AV1. 6. M2 Button - SKIP / SEARCH Button** This button selects between SKIP and ...
POWER Button* Press this model 3. TV Mode Select Button** Switches certain function keys on the remote control for DVD functions. 5. Invalid function for TV functions. 4. AUTO MEMORY Button (AUTO PROGRAM Button)** When the AUTO MEMORY button is pressed, the audio / video source will change in memory. 7. ERASE / WRITE Button** While tuned to M1 mode only. Sets the remote control code to allow control of sufficient levels are automatically stored in the following sequence: DVD > AUX > AV1. 6. M2 Button - SKIP / SEARCH Button** This button selects between SKIP and ...
Operation Manual
Page 8
... Button Allows the user to access the DVD menu (DVD MODE). 16. DISPLAY Press to disc menu. RETURN Button Press Return Once : Go to display current disc information while the disc is playing. For Title/Chapter selection use CHq to enter the desired Title Chapter selection. 13. Use the CHp to increase the channel number and use the numeric buttons to decrease the channel number. ** 14. FMM ON / OFF Button* Turns the wireless FM Modulator on the screen. CHANNEL SELECT Button* Selects...
... Button Allows the user to access the DVD menu (DVD MODE). 16. DISPLAY Press to disc menu. RETURN Button Press Return Once : Go to display current disc information while the disc is playing. For Title/Chapter selection use CHq to enter the desired Title Chapter selection. 13. Use the CHp to increase the channel number and use the numeric buttons to decrease the channel number. ** 14. FMM ON / OFF Button* Turns the wireless FM Modulator on the screen. CHANNEL SELECT Button* Selects...
Operation Manual
Page 10
... LANGUAGE, PARENTAL CONTROL etc. Press A-B button On-Screen DisplayDVD player Once Repeat A- SETUP Button Press to display the Setup Menu which allows the user to point B. Pressing M1 then IRT ON/OFF will control the IR Transmitter for more information. 29. Refer to original size 28. Pressing the button again restores the sound to repeat (Set point B) 3 times AB Off Cancel the A-B repeat function 27. Mark...
... LANGUAGE, PARENTAL CONTROL etc. Press A-B button On-Screen DisplayDVD player Once Repeat A- SETUP Button Press to display the Setup Menu which allows the user to point B. Pressing M1 then IRT ON/OFF will control the IR Transmitter for more information. 29. Refer to original size 28. Pressing the button again restores the sound to repeat (Set point B) 3 times AB Off Cancel the A-B repeat function 27. Mark...
Operation Manual
Page 11
... Mode Button** This control toggles the unit between "Day" and "Night" LCD illumination modes. VOLUME DOWN (-) or UP (+)* Press to eject the disc. 11 PIX Button (Picture Select)* Each time this button is used to decrease or increase the level of CD tracks, DVD chapters and password. 35. 31. In the "Day" mode, the LCD backlit intensity is pressed. 33. EJECT () Button* This button is pressed, the on screen picture adjustment displays...
... Mode Button** This control toggles the unit between "Day" and "Night" LCD illumination modes. VOLUME DOWN (-) or UP (+)* Press to eject the disc. 11 PIX Button (Picture Select)* Each time this button is used to decrease or increase the level of CD tracks, DVD chapters and password. 35. 31. In the "Day" mode, the LCD backlit intensity is pressed. 33. EJECT () Button* This button is pressed, the on screen picture adjustment displays...
Operation Manual
Page 12
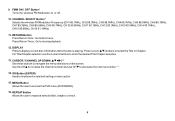
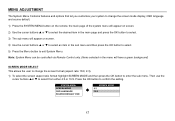
... the setting. SYSTEM MENU SCREEN MODE OSD LANGUAGE SOURCE DEFAULT DVD SCREEN MODE 4:3 16:9 12 Note: System Menu can be controlled via Remote Control only. (Items selected in the menu will appear on screen. 4) Use the cursor buttons p or q to select an item in the main page and press the OK button to select. 3) The sub menu will have a green background) SCREEN MODE SELECT This allows the user to change the screen mode display, OSD language and source default. 1) Press the SYSTEM MENU button...
... the setting. SYSTEM MENU SCREEN MODE OSD LANGUAGE SOURCE DEFAULT DVD SCREEN MODE 4:3 16:9 12 Note: System Menu can be controlled via Remote Control only. (Items selected in the menu will appear on screen. 4) Use the cursor buttons p or q to select an item in the main page and press the OK button to select. 3) The sub menu will have a green background) SCREEN MODE SELECT This allows the user to change the screen mode display, OSD language and source default. 1) Press the SYSTEM MENU button...
Operation Manual
Page 14
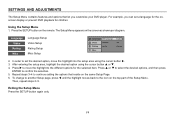
... the setup area using the cursor button p or q. 4. SETTINGS AND ADJUSTMENTS The Setup Menu contains features and options that reside on the same Setup Page. 6. To change to another Setup page, press t until the highlight moves back to confirm the selection. 5. Language Video Rating Misc Language Setup Video Setup Rating Setup Misc Setup Language OSD Language : English Video Rating Subtitle Audio : Off : English Misc 2. Exiting the Setup Menu Press the SETUP button again...
... the setup area using the cursor button p or q. 4. SETTINGS AND ADJUSTMENTS The Setup Menu contains features and options that reside on the same Setup Page. 6. To change to another Setup page, press t until the highlight moves back to confirm the selection. 5. Language Video Rating Misc Language Setup Video Setup Rating Setup Misc Setup Language OSD Language : English Video Rating Subtitle Audio : Off : English Misc 2. Exiting the Setup Menu Press the SETUP button again...

Operation Manual
Page 15
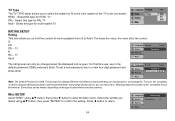
... 15 AUDIO SETUP select "AUDIO" using pq button, then press u button to enter the Submenu. Select the audio you to adjust screen setting (aspect ratio). 4:3 This displays the wide picture with black bands on the upper and lower portions of the screen. 16:9 This displays a wide picture with black bands on the upper and lower portion of the disc. Press t button to return. LANGUAGE SETUP Language for On-Screen Display OSD MENU...
... 15 AUDIO SETUP select "AUDIO" using pq button, then press u button to enter the Submenu. Select the audio you to adjust screen setting (aspect ratio). 4:3 This displays the wide picture with black bands on the upper and lower portions of the screen. 16:9 This displays a wide picture with black bands on the upper and lower portion of the disc. Press t button to return. LANGUAGE SETUP Language for On-Screen Display OSD MENU...
Operation Manual
Page 16
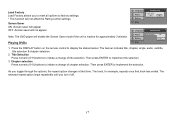
.... 16 Language Load Factory Video Rating Screen Saver : On Misc TV Type The TV TYPE setup allows you to select the system to fit to the color system of users while some discs cannot. Select this type for PAL TV Multi - The lower the value, the more strict the control. This password is always effective even after you desire using pq button, then press u button...
.... 16 Language Load Factory Video Rating Screen Saver : On Misc TV Type The TV TYPE setup allows you to select the system to fit to the color system of users while some discs cannot. Select this type for PAL TV Multi - The lower the value, the more strict the control. This password is always effective even after you desire using pq button, then press u button...
Operation Manual
Page 17
... to reset all options to factory settings. * This function will enable the Screen Saver mode if the unit is inactive for example, repeats once that time. Playing DVDs Language Load Factory Video Load Factory Screen Saver Yes No Rating Misc Language Load Factory Video Screen Saver Off Rating On Misc 1. The banner includes title, chapter, angle, audio, subtitle, title selection & chapter selection. 2. Then press ENTER to implement the selection. 3. As you turn...
... to reset all options to factory settings. * This function will enable the Screen Saver mode if the unit is inactive for example, repeats once that time. Playing DVDs Language Load Factory Video Load Factory Screen Saver Yes No Rating Misc Language Load Factory Video Screen Saver Off Rating On Misc 1. The banner includes title, chapter, angle, audio, subtitle, title selection & chapter selection. 2. Then press ENTER to implement the selection. 3. As you turn...
Operation Manual
Page 18
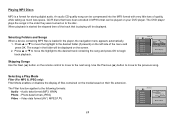
...remote control to move to the disc. Skipping Songs Use the Next (:) button on to the previous song. Selecting Folders and Songs When a device containing MP3 files is loaded in MP3 format can be displayed. Selecting a Play Mode Filter (For MP3 & JPEG only) Filter Mode enables or disables the display... (JPEG) Video - An audio CD-quality song can be displayed on your DVD player. Video data format (AV1, MPEG , ) 18 1/12 00:00:21 / TRACK01 TRACK02 TRACK03 TRACK04 TRACK05 TRACK06 Filter Flat Mode Repeat : off Audio Photo Vi d e o Music Playing The Filter function applies to ...
...remote control to move to the disc. Skipping Songs Use the Next (:) button on to the previous song. Selecting Folders and Songs When a device containing MP3 files is loaded in MP3 format can be displayed. Selecting a Play Mode Filter (For MP3 & JPEG only) Filter Mode enables or disables the display... (JPEG) Video - An audio CD-quality song can be displayed on your DVD player. Video data format (AV1, MPEG , ) 18 1/12 00:00:21 / TRACK01 TRACK02 TRACK03 TRACK04 TRACK05 TRACK06 Filter Flat Mode Repeat : off Audio Photo Vi d e o Music Playing The Filter function applies to ...
Operation Manual
Page 21
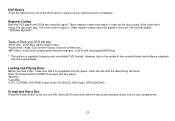
... load and Play a Disc Press the Power button to the variety of disc manufacturers and software, playback cannot be used with the label facing the driver. The unit will play . Insert the disc with this unit. This unit's code is compatible with downloaded MP3 files). * This system is capable of playing most recordable DVD formats. However, due to turn the unit ON. Note: the following Discs CANNOT be guaranteed. Select DVD mode and insert...
... load and Play a Disc Press the Power button to the variety of disc manufacturers and software, playback cannot be used with the label facing the driver. The unit will play . Insert the disc with this unit. This unit's code is compatible with downloaded MP3 files). * This system is capable of playing most recordable DVD formats. However, due to turn the unit ON. Note: the following Discs CANNOT be guaranteed. Select DVD mode and insert...

Operation Manual
Page 22
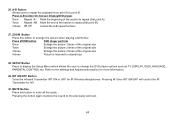
Power ON/OFF Remote Sensor Button Infrared Transmitter Screen Release OVERHEAD DOME LIGHTS The Dome Lights integrated into the MMD11 are controlled by pivoting the screen to the unit when the remote control is displaying a picture, adjust the viewing angle, by a three position slide switch. Refer to turn ON and OFF with the dome light switch in the ON position, as this could result in use the internal backlighting will...
Power ON/OFF Remote Sensor Button Infrared Transmitter Screen Release OVERHEAD DOME LIGHTS The Dome Lights integrated into the MMD11 are controlled by pivoting the screen to the unit when the remote control is displaying a picture, adjust the viewing angle, by a three position slide switch. Refer to turn ON and OFF with the dome light switch in the ON position, as this could result in use the internal backlighting will...
Operation Manual
Page 23
... power button or remote control. Video Out The MMD11 provides a video output for optional audio/video monitor(s). The headphone volume is displayed on the rear of sight from the source connected to an additional monitor or video display. This output will accept an audio / video input through the 3 RCA jacks located on the screen. See the documentation accompanying your installer for use accessory cable part number 11236820 required). Any number of wireless headphones may be a video game system, video camera, or other audio/video devices...
... power button or remote control. Video Out The MMD11 provides a video output for optional audio/video monitor(s). The headphone volume is displayed on the rear of sight from the source connected to an additional monitor or video display. This output will accept an audio / video input through the 3 RCA jacks located on the screen. See the documentation accompanying your installer for use accessory cable part number 11236820 required). Any number of wireless headphones may be a video game system, video camera, or other audio/video devices...
Operation Manual
Page 24
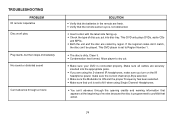
... power, make sure you put into the appropriate jacks. - Make sure that unit is set to dry out. - If the regional codes don't match, the disc can 't advance through a movie SOLUTION - Insert a disc with the label side facing up. - Verify that the remote sensor eye is selected. - This DVD player is connected properly. Clean it. - Condensation has formed. Allow player to Region Number 1. - Make sure your DVD is set...
... power, make sure you put into the appropriate jacks. - Make sure that unit is set to dry out. - If the regional codes don't match, the disc can 't advance through a movie SOLUTION - Insert a disc with the label side facing up. - Verify that the remote sensor eye is selected. - This DVD player is connected properly. Clean it. - Condensation has formed. Allow player to Region Number 1. - Make sure your DVD is set...
Operation Manual
Page 27
..., neglect, accident, or by removal or defacement of the factory serial number/bar code label(s). No person or representative is authorized to assume for installation, removal or reinstallation of the product, or to damage to digital memory/media devices, gaming devices, discs, speakers, accessories, or vehicle electrical systems. This Warranty does not apply to any product or part thereof which vary from...
..., neglect, accident, or by removal or defacement of the factory serial number/bar code label(s). No person or representative is authorized to assume for installation, removal or reinstallation of the product, or to damage to digital memory/media devices, gaming devices, discs, speakers, accessories, or vehicle electrical systems. This Warranty does not apply to any product or part thereof which vary from...


