Owners Manual
Page 5
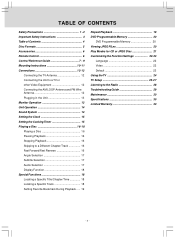
... Contents 4 Disc Formats 5 Accessories 6 Remote Control 6 Control Reference Guide 7 - 9 Mounting Instructions 10-11 Connections 12-13 Connecting the TV Antenna 12 Connecting the Unit to a TV or other Video Equipment 12 Connecting the AM LOOP Antenna and FM Wire Antenna 12 Plugging in the Unit 13 Monitor Operation ...Title/Chapter/Time 18 Locating a Specific Track 18 Setting Favorite Bookmark During Playback ..... 19 Repeat Playback 19 DVD Programmable Memory 20 DVD Programmable Memory 20 Viewing JPEG FILes 20 Play Modes for CD or JPEG Disc 21 Customizing the Function Settings...
... Contents 4 Disc Formats 5 Accessories 6 Remote Control 6 Control Reference Guide 7 - 9 Mounting Instructions 10-11 Connections 12-13 Connecting the TV Antenna 12 Connecting the Unit to a TV or other Video Equipment 12 Connecting the AM LOOP Antenna and FM Wire Antenna 12 Plugging in the Unit 13 Monitor Operation ...Title/Chapter/Time 18 Locating a Specific Track 18 Setting Favorite Bookmark During Playback ..... 19 Repeat Playback 19 DVD Programmable Memory 20 DVD Programmable Memory 20 Viewing JPEG FILes 20 Play Modes for CD or JPEG Disc 21 Customizing the Function Settings...

Owners Manual
Page 7
......x 4 #M 5 x 40 mm screws ...x 4 FM wire antenna ...x 1 AM LOOP antenna ...x 1 REMOTE CONTROL Using the Remote Control • This remote control is magnetic and can leak and severely damage the remote control. • WARNING: Do not dispose of the remote control is greatly reduced and you will need to the side of the...8226; When there is about 16 feet (5 meters). Notes: • Do not place the remote control near magnetic devices or magnetic cards. • If the remote control is incorrectly replaced. Batteries may be attached to be considered and local rules or laws governing...
......x 4 #M 5 x 40 mm screws ...x 4 FM wire antenna ...x 1 AM LOOP antenna ...x 1 REMOTE CONTROL Using the Remote Control • This remote control is magnetic and can leak and severely damage the remote control. • WARNING: Do not dispose of the remote control is greatly reduced and you will need to the side of the...8226; When there is about 16 feet (5 meters). Notes: • Do not place the remote control near magnetic devices or magnetic cards. • If the remote control is incorrectly replaced. Batteries may be attached to be considered and local rules or laws governing...

Owners Manual
Page 8
... Button 11 MTS Goes directly to a location on a DVD/ CD. 12 11) AUDIO Button Selects audio soundtracks of a DVD or change the output mode of show you are watching. 2 3) MEMORY Button 1 2 3 Sets title/chapter in a favorite order. CONTROL REFERENCE GUIDE Remote Control 1) FUNCTION Button Use to select DVD, TV or RADIO mode. 2) PICTURE Button PICTURE 1 Selects...
... Button 11 MTS Goes directly to a location on a DVD/ CD. 12 11) AUDIO Button Selects audio soundtracks of a DVD or change the output mode of show you are watching. 2 3) MEMORY Button 1 2 3 Sets title/chapter in a favorite order. CONTROL REFERENCE GUIDE Remote Control 1) FUNCTION Button Use to select DVD, TV or RADIO mode. 2) PICTURE Button PICTURE 1 Selects...
Owners Manual
Page 9
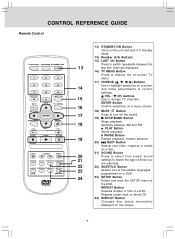
...between the 13 last two channels displayed. 16) TV MENU Button Press to display the on-screen TV menu. 17) CURSOR ( , , , ) Buttons Use to highlight selections on a DVD. 24 23) SETUP Button Enters and exits the SETUP menu of the DVD. CH+ / CH- PAUSE Button 19 Pauses ... of the subtitle languages programmed on a screen 14 and make adjustments to certain settings. CONTROL REFERENCE GUIDE Remote Control PICTURE 1 4 7 EXIT 2 3 5 6 8 9 LAST CH 0 TV MENU RETURN DVD MENU MUTE STOP BAND FORMAT MTS SOUND 13) STANDBY/ON Button Turns on the unit and puts it ...
...between the 13 last two channels displayed. 16) TV MENU Button Press to display the on-screen TV menu. 17) CURSOR ( , , , ) Buttons Use to highlight selections on a DVD. 24 23) SETUP Button Enters and exits the SETUP menu of the DVD. CH+ / CH- PAUSE Button 19 Pauses ... of the subtitle languages programmed on a screen 14 and make adjustments to certain settings. CONTROL REFERENCE GUIDE Remote Control PICTURE 1 4 7 EXIT 2 3 5 6 8 9 LAST CH 0 TV MENU RETURN DVD MENU MUTE STOP BAND FORMAT MTS SOUND 13) STANDBY/ON Button Turns on the unit and puts it ...
Owners Manual
Page 10
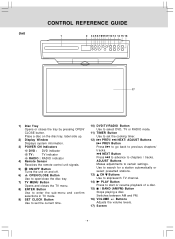
...+/- Place a disc on the disc tray, label side up. 2) Display Window Displays system information. 3) POWER ON Indicators DVD : DVD indicator TV : TV indicator RADIO : RADIO indicator 4) Remote Sensor Receives the remote control unit signals. 5) ON/OFF Button Turns the unit on and off. 6) OPEN/CLOSE Button Use to open/close the... enter the sub-menu and confirm selections in TV mode. 9) SET CLOCK Button Use to set the current time. 10) DVD/TV/RADIO Button Use to select DVD, TV or RADIO mode. 11) TIMER Button Use to set the cooking timer. 12) PREV/ NEXT/ ADJUST Buttons PREV Button Press...
...+/- Place a disc on the disc tray, label side up. 2) Display Window Displays system information. 3) POWER ON Indicators DVD : DVD indicator TV : TV indicator RADIO : RADIO indicator 4) Remote Sensor Receives the remote control unit signals. 5) ON/OFF Button Turns the unit on and off. 6) OPEN/CLOSE Button Use to open/close the... enter the sub-menu and confirm selections in TV mode. 9) SET CLOCK Button Use to set the current time. 10) DVD/TV/RADIO Button Use to select DVD, TV or RADIO mode. 11) TIMER Button Use to set the cooking timer. 12) PREV/ NEXT/ ADJUST Buttons PREV Button Press...
Owners Manual
Page 15
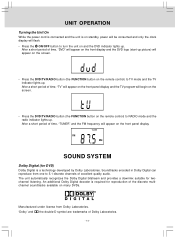
... symbol are trademarks of time, "TUNER" and the FM frequency will begin on the screen. • Press the DVD/TV/RADIO button (the FUNCTION button on the remote control) to turn the unit on the front panel display. SOUND SYSTEM Dolby Digital (for reproduction of the discrete multichannel ...picture) will appear on the screen. • Press the DVD/TV/RADIO button (the FUNCTION button on the remote control) to 5.1 discrete channels of time, "TV" will appear on the front panel display and the TV program will appear on and the DVD indicator lights up . After a short period of excellent ...
... symbol are trademarks of time, "TUNER" and the FM frequency will begin on the screen. • Press the DVD/TV/RADIO button (the FUNCTION button on the remote control) to turn the unit on the front panel display. SOUND SYSTEM Dolby Digital (for reproduction of the discrete multichannel ...picture) will appear on the screen. • Press the DVD/TV/RADIO button (the FUNCTION button on the remote control) to 5.1 discrete channels of time, "TV" will appear on the front panel display and the TV program will appear on and the DVD indicator lights up . After a short period of excellent ...
Owners Manual
Page 17
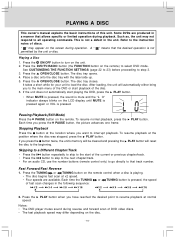
... available. Press the DVD/TV/RADIO button (the FUNCTION button on the screen during operation. PLAY button. Refer to all operating commands. " " may not respond to the instruction notes of DVD video discs. • ... is mute and the "L O" indicator always blinks on the remote. The disc tray opens. 4. Press the ON/OFF button to select DVD mode. Place a disc onto the disc tray with the label...desired operation is pressed. Pausing Playback (Still Mode) Press the PAUSE button on the LCD display until MUTE is pressed again or VOL is not permitted by the unit or disc...
... available. Press the DVD/TV/RADIO button (the FUNCTION button on the screen during operation. PLAY button. Refer to all operating commands. " " may not respond to the instruction notes of DVD video discs. • ... is mute and the "L O" indicator always blinks on the remote. The disc tray opens. 4. Press the ON/OFF button to select DVD mode. Place a disc onto the disc tray with the label...desired operation is pressed. Pausing Playback (Still Mode) Press the PAUSE button on the LCD display until MUTE is pressed again or VOL is not permitted by the unit or disc...

Owners Manual
Page 19
...GOTO button. 2. Press the ENTER button to display Title. 2. Title/Chapter: The number of the DVD. - 18 - The unit will start playback about 3 seconds later. Press the or button on the remote to this process. • Some scenes may not respond to select the option (Title, Chapter or...by directly selecting track number. 1. Subtitle: The subtitle number and language currently selected is displayed. Press the or button on the remote to confirm. Time: The elapsed time from the beginning of the audio currently selected is playing, press the DISPLAY button on the...
...GOTO button. 2. Press the ENTER button to display Title. 2. Title/Chapter: The number of the DVD. - 18 - The unit will start playback about 3 seconds later. Press the or button on the remote to this process. • Some scenes may not respond to select the option (Title, Chapter or...by directly selecting track number. 1. Subtitle: The subtitle number and language currently selected is displayed. Press the or button on the remote to confirm. Time: The elapsed time from the beginning of the audio currently selected is playing, press the DISPLAY button on the...
Owners Manual
Page 20
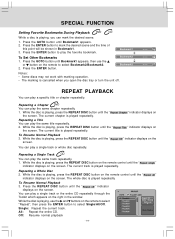
... can play the favorite bookmark. The current chapter is played repeatedly. While the disc is playing, press the REPEAT DISC button on the remote control until Bookmark1 appears, then use the and buttons on the screen. You can play a specific title or chapter repeatedly. SPECIAL FUNCTION... screen. To Resume Normal Playback 3. To Set Other Bookmarks 1. " indicator displays on " indicator displays on " indicator displays on the remote control until the " the screen. While the disc is playing, press the REPEAT DISC button until the " " indicator displays on the...
... can play the favorite bookmark. The current chapter is played repeatedly. While the disc is playing, press the REPEAT DISC button on the remote control until Bookmark1 appears, then use the and buttons on the screen. You can play a specific title or chapter repeatedly. SPECIAL FUNCTION... screen. To Resume Normal Playback 3. To Set Other Bookmarks 1. " indicator displays on " indicator displays on " indicator displays on the remote control until the " the screen. While the disc is playing, press the REPEAT DISC button until the " " indicator displays on the...
Owners Manual
Page 21
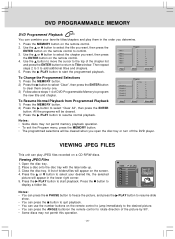
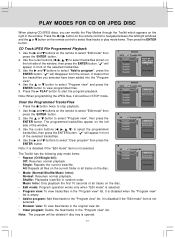
... and press the ENTER button to return to select "Clear All", then press the ENTER button. All the programs will appear on the remote control to confirm. 3. Viewing JPEG Files 1. Close the disc tray. Press the PLAY button to start the programmed playback. A list .... 4. Then repeat steps 2 to 3 to display a folder list. DVD PROGRAMMABLE MEMORY DVD Programmed Playback You can press the ANGLE buttonon the remote control to rotate direction of the picture by one. 3) Follow above steps 1-4 of DVD Programmable Memory to start playback. Press the MEMORY button on a CD-R/RW...
... and press the ENTER button to return to select "Clear All", then press the ENTER button. All the programs will appear on the remote control to confirm. 3. Viewing JPEG Files 1. Close the disc tray. Press the PLAY button to start the programmed playback. A list .... 4. Then repeat steps 2 to 3 to display a folder list. DVD PROGRAMMABLE MEMORY DVD Programmed Playback You can press the ANGLE buttonon the remote control to rotate direction of the picture by one. 3) Follow above steps 1-4 of DVD Programmable Memory to start playback. Press the MEMORY button on a CD-R/RW...
Owners Manual
Page 22
... • Program view: To view tracks/files in the "Program view" list. All: Repeats all files on the current folder or all tracks on the remote control to select files/tracks or play mode items: • Repeat (Off/Single/All): Off: Resumes normal playback. Shuffle: Playbacks track/file in the "... front of the selected tracks/files. 3. It means that the tracks/files you can modify the Play Modes through the Toolkit which appears on the remote to select the programmed tracks/files, then press the ENTER button. Use the and buttons to select "Edit mode" then press the ENTER button. ...
... • Program view: To view tracks/files in the "Program view" list. All: Repeats all files on the current folder or all tracks on the remote control to select files/tracks or play mode items: • Repeat (Off/Single/All): Off: Resumes normal playback. Shuffle: Playbacks track/file in the "... front of the selected tracks/files. 3. It means that the tracks/files you can modify the Play Modes through the Toolkit which appears on the remote to select the programmed tracks/files, then press the ENTER button. Use the and buttons to select "Edit mode" then press the ENTER button. ...
Owners Manual
Page 25
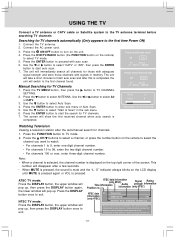
...automatically (Only appears to the first time Power ON) 1. Press the DISPLAY button once to select Air or CATV. 3. Press the DVD/TV/RADIO button (the FUNCTION button on the remote to select the channel you want to watch. • For channels 1 to 9, enter one-digit channel number. • For ... auto scan and after a few seconds. • When MUTE is pressed, the sound is mute and the "L O" indicator always blinks on the LCD display until MUTE is pressed again or VOL is completed, the unit will immediately search all channels for those with adequate signal strength and store...
...automatically (Only appears to the first time Power ON) 1. Press the DISPLAY button once to select Air or CATV. 3. Press the DVD/TV/RADIO button (the FUNCTION button on the remote to select the channel you want to watch. • For channels 1 to 9, enter one-digit channel number. • For ... auto scan and after a few seconds. • When MUTE is pressed, the sound is mute and the "L O" indicator always blinks on the LCD display until MUTE is pressed again or VOL is completed, the unit will immediately search all channels for those with adequate signal strength and store...
Owners Manual
Page 26
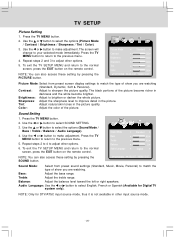
... bass range. Repeat steps 2 to 4 to the normal screen, press the EXIT button on the remote control. Press the TV MENU button. 2. To exit the TV SETUP MENU and return to adjust other options. 5. NOTE: Only for Digital TV system only). TV SETUP Picture Setting 1. Use the or button to select SOUND SETTING. 3. Press the...
... bass range. Repeat steps 2 to 4 to the normal screen, press the EXIT button on the remote control. Press the TV MENU button. 2. To exit the TV SETUP MENU and return to adjust other options. 5. NOTE: Only for Digital TV system only). TV SETUP Picture Setting 1. Use the or button to select SOUND SETTING. 3. Press the...

Owners Manual
Page 27
...button to the normal screen, press the EXIT button on the remote control. Set the local Time Zone, eg. Note: TV TIMER SETTING is different from English / Français / Español. To exit the TV SETUP MENU and return to make adjustment. Restore Setting: If .... The screen will be recorded automatically (for those areas observing such change to the normal screen, press the EXIT button on the remote control. To exit the TV SETUP MENU and return to your present settings on picture & sound will change . 3. Select Normal (balanced) / Warm (red white...
...button to the normal screen, press the EXIT button on the remote control. Set the local Time Zone, eg. Note: TV TIMER SETTING is different from English / Français / Español. To exit the TV SETUP MENU and return to make adjustment. Restore Setting: If .... The screen will be recorded automatically (for those areas observing such change to the normal screen, press the EXIT button on the remote control. To exit the TV SETUP MENU and return to your present settings on picture & sound will change . 3. Select Normal (balanced) / Warm (red white...
Owners Manual
Page 28
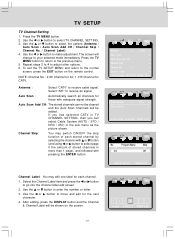
The screen will be added. To exit the TV SETUP MENU and return to enter the number or letter. 3. Channel Label UP/... SETTING, then you can not be cleared and the Auto Scan Channels will be shown on the remote control. Press the TV MENU button. 2. Repeat steps 2 to 4 to select the options (Antenna / Auto Scan / Auto Scan Add CH / Channel ...Air, 1-135 Channel for those with pressing the ENTER button. Select "AIR" to the previous menu. 5. Press the TV MENU button to return to receive air signal. After editing, press the DISPLAY button and the Channel & Channel Label will change ...
The screen will be added. To exit the TV SETUP MENU and return to enter the number or letter. 3. Channel Label UP/... SETTING, then you can not be cleared and the Auto Scan Channels will be shown on the remote control. Press the TV MENU button. 2. Repeat steps 2 to 4 to select the options (Antenna / Auto Scan / Auto Scan Add CH / Channel ...Air, 1-135 Channel for those with pressing the ENTER button. Select "AIR" to the previous menu. 5. Press the TV MENU button to return to receive air signal. After editing, press the DISPLAY button and the Channel & Channel Label will change ...
Owners Manual
Page 29
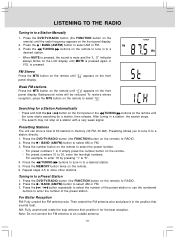
... directly. 1. Press the TUNING buttons to tune in to a Preset Station 1. Tuning in to a desired station. 5. Press the DVD/TV/RADIO button (the FUNCTION button on the remote to RADIO. 2. Press the / button repeatedly to select the number of the preset station or use the numbered buttons to 9 simply... press the number button on the LCD display until " " appears on the remote. 6. Then extend the FM antenna wire and place it for the best reception. Press the number button on the...
... directly. 1. Press the TUNING buttons to tune in to a Preset Station 1. Tuning in to a desired station. 5. Press the DVD/TV/RADIO button (the FUNCTION button on the remote to RADIO. 2. Press the / button repeatedly to select the number of the preset station or use the numbered buttons to 9 simply... press the number button on the LCD display until " " appears on the remote. 6. Then extend the FM antenna wire and place it for the best reception. Press the number button on the...

Owners Manual
Page 30
... or only a very low-level sound is heard. Press the PLAY button to return to normal play mode. • The DTS DVD cannot be decoded to a sudden change in tem- TV Snowy picture, multiple image, picture distorted, picture blurred and noisy sound. perature. The picture is not clear Severe hum or noise... the disc correctly with the label side facing up on the unit. • Replace all batteries in the remote with new ones. • Make sure that you've selected DVD mode. • The system is in the TV SETUP MENU. • Not plugged into AC outlet. • Make sure that you've selected...
... or only a very low-level sound is heard. Press the PLAY button to return to normal play mode. • The DTS DVD cannot be decoded to a sudden change in tem- TV Snowy picture, multiple image, picture distorted, picture blurred and noisy sound. perature. The picture is not clear Severe hum or noise... the disc correctly with the label side facing up on the unit. • Replace all batteries in the remote with new ones. • Make sure that you've selected DVD mode. • The system is in the TV SETUP MENU. • Not plugged into AC outlet. • Make sure that you've selected...


