
Operation Manual
Page 3
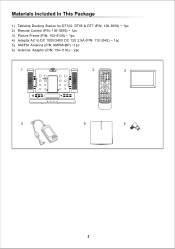
... DC 12V 2.5A (P/N: 112-3542) ~ 1pc 5) AM/FM Antenna (P/N: AMFM+BP) ~1pc 6) Antenna Adaptor (P/N: 154-1130) ~ 2pc 1 2 POWER FMM CHANNEL EJECT ON/OFF SELECT SOURCE AUTO MEMORY SKIP/ SEARCH ERASE/ WRITE MUTE 123 456 789 - + 0 SEEK / CH VOLUME PIX SEARCH MENU ENTER SEARCH SETUP RETURN SEEK / CH A-B REPEAT TV DVD RADIO TV/CATV DISPLAY BAND RECALL STORE AUDIO ZOOM ANGLE SUBTITLE II PAUSE STOP PLAY 3 4 5 6 1
... DC 12V 2.5A (P/N: 112-3542) ~ 1pc 5) AM/FM Antenna (P/N: AMFM+BP) ~1pc 6) Antenna Adaptor (P/N: 154-1130) ~ 2pc 1 2 POWER FMM CHANNEL EJECT ON/OFF SELECT SOURCE AUTO MEMORY SKIP/ SEARCH ERASE/ WRITE MUTE 123 456 789 - + 0 SEEK / CH VOLUME PIX SEARCH MENU ENTER SEARCH SETUP RETURN SEEK / CH A-B REPEAT TV DVD RADIO TV/CATV DISPLAY BAND RECALL STORE AUDIO ZOOM ANGLE SUBTITLE II PAUSE STOP PLAY 3 4 5 6 1

Operation Manual
Page 4
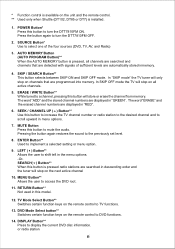
Main Features • Desk Top Docking Station. • 125 Channel Cable Ready TV tuner. • AM/FM Radio. • Alarm Clock. • AV Input • Bass Boost • 10 FM and 5 AM Presets 2
Main Features • Desk Top Docking Station. • 125 Channel Cable Ready TV tuner. • AM/FM Radio. • Alarm Clock. • AV Input • Bass Boost • 10 FM and 5 AM Presets 2

Operation Manual
Page 5
... Front Panel Controls 3 2 1 WARNING ! Speakers for radio tuning Up and Down. 17. Volume Up / Down Button - Used to go to show the Time, Source selected, and Radio Station. 14. DVD > TV > AV > RADIO 8. The alarm will turn off the alarm. The LCD display is used to the next channel Up or Down. 7. IR Receiver - Store Button - In operation mode these buttons are used for 9 minutes. 13. Used to select the clock...
... Front Panel Controls 3 2 1 WARNING ! Speakers for radio tuning Up and Down. 17. Volume Up / Down Button - Used to go to show the Time, Source selected, and Radio Station. 14. DVD > TV > AV > RADIO 8. The alarm will turn off the alarm. The LCD display is used to the next channel Up or Down. 7. IR Receiver - Store Button - In operation mode these buttons are used for 9 minutes. 13. Used to select the clock...

Operation Manual
Page 6
... cable TV system to this jack. 4. Yellow • AUDIO IN (L ) - Connect the FM radio antenna to this jack. 5. Connect the AM radio antenna to this jack. 4 AM IN - White • AUDIO IN (R) - DC 12V - Main Features Back Panel Connections VIDEO IN AUDIO IN L R DC 12V ANT FM IN AM IN 1 2 3 45 1. The video device could be a video game system, video camera, or other input device. • VIDEO...
... cable TV system to this jack. 4. Yellow • AUDIO IN (L ) - Connect the FM radio antenna to this jack. 5. Connect the AM radio antenna to this jack. 4 AM IN - White • AUDIO IN (R) - DC 12V - Main Features Back Panel Connections VIDEO IN AUDIO IN L R DC 12V ANT FM IN AM IN 1 2 3 45 1. The video device could be a video game system, video camera, or other input device. • VIDEO...

Operation Manual
Page 7
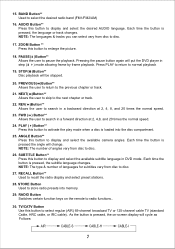
... from other Remote Control Function Descriptions 1 2 3 4 5 6 7 8 9 10 11 12 13 14 15 16 17 18 19 20 21 POWER FMM CHANNEL EJECT ON/OFF SELECT SOURCE AUTO MEMORY S K IP / SEARCH ERASE/ W R IT E MUTE 123 456 789 - + 0 SEEK / CH VOLUME PIX SEARCH MENU ENTER SEARCH SETUP RETURN SEEK / CH A-B REPEAT TV DVD RADIO TV/CATV DISPLAY BAND RECALL STORE AUDIO ZOOM ANGLE SUBTITLE II PAUSE STOP PLAY 42 41...
... from other Remote Control Function Descriptions 1 2 3 4 5 6 7 8 9 10 11 12 13 14 15 16 17 18 19 20 21 POWER FMM CHANNEL EJECT ON/OFF SELECT SOURCE AUTO MEMORY S K IP / SEARCH ERASE/ W R IT E MUTE 123 456 789 - + 0 SEEK / CH VOLUME PIX SEARCH MENU ENTER SEARCH SETUP RETURN SEEK / CH A-B REPEAT TV DVD RADIO TV/CATV DISPLAY BAND RECALL STORE AUDIO ZOOM ANGLE SUBTITLE II PAUSE STOP PLAY 42 41...
Operation Manual
Page 8
... model. 12. DVD Mode Select button** Switches certain function keys on the remote control to mute the audio. POWER Button* Press this button to DVD functions. 14. SOURCE Button* Use to turn the DTT7810FM OFF. 2. Press the button again to shift left in descending order and the tuner will store or erase the channel from memory. LEFT (3) Button** Allows the user to turn the DTT7810FM ON. ENTER Button** Used to access the DVD root. 11. MENU Button** Allows the user to implement a selected setting or menu...
... model. 12. DVD Mode Select button** Switches certain function keys on the remote control to mute the audio. POWER Button* Press this button to DVD functions. 14. SOURCE Button* Use to turn the DTT7810FM OFF. 2. Press the button again to shift left in descending order and the tuner will store or erase the channel from memory. LEFT (3) Button** Allows the user to turn the DTT7810FM ON. ENTER Button** Used to access the DVD root. 11. MENU Button** Allows the user to implement a selected setting or menu...
Operation Manual
Page 9
BAND Button** Used to pause the playback. ZOOM Button ** Press this button to enlarge the picture. 18. Each time the button is pressed, the language or track changes. PAUSE(;)Button** Allows the user to select the desired radio band (FM1/FM2/AM) 16. Pressing the pause button again will put the DVD player in step (;4) mode allowing frame by frame playback. AUDIO Button** Press this button to display and select the desired AUDIO language. 15. STOP( Press PLAY to return to disc. 17. NOTE: The languages & tracks you can select vary from disc to normal playback 19.
BAND Button** Used to pause the playback. ZOOM Button ** Press this button to enlarge the picture. 18. Each time the button is pressed, the language or track changes. PAUSE(;)Button** Allows the user to select the desired radio band (FM1/FM2/AM) 16. Pressing the pause button again will put the DVD player in step (;4) mode allowing frame by frame playback. AUDIO Button** Press this button to display and select the desired AUDIO language. 15. STOP( Press PLAY to return to disc. 17. NOTE: The languages & tracks you can select vary from disc to normal playback 19.
Operation Manual
Page 10
... channel number or radio station to the desired channel and to eject the disc. 8 SETUP Button** Allows the user to adjust the setting. PIX Button (PICTURE SELECT)** Each time this button to increase the volume level. 39. Once the desired adjustment bar is displayed, use the VOLUME UP/DOWN buttons to access the DVD setup menu and select various playback options (Display, OSD Language, Defaults, Parental Control, Password, Exit Setup). 35. FMM ON/OFF Not Used On This Model 41. CHANNEL SELECT Button** Not Used On This Model 42. REPEAT Button** Allows the user...
... channel number or radio station to the desired channel and to eject the disc. 8 SETUP Button** Allows the user to adjust the setting. PIX Button (PICTURE SELECT)** Each time this button to increase the volume level. 39. Once the desired adjustment bar is displayed, use the VOLUME UP/DOWN buttons to access the DVD setup menu and select various playback options (Display, OSD Language, Defaults, Parental Control, Password, Exit Setup). 35. FMM ON/OFF Not Used On This Model 41. CHANNEL SELECT Button** Not Used On This Model 42. REPEAT Button** Allows the user...
Operation Manual
Page 11
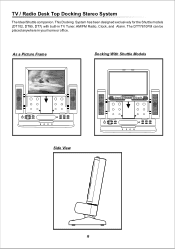
The DTT7810FM can be placed anywhere in TV Tuner, AM/FM Radio, Clock, and Alarm. TV / Radio Desk Top Docking Stereo System The Ideal Shuttle companion. As a Picture Frame Docking With Shuttle Models Side View 9 This Docking System has been designed exclusively for the Shuttle models (DT102, DT85, DT7) with built-in your home or office.
The DTT7810FM can be placed anywhere in TV Tuner, AM/FM Radio, Clock, and Alarm. TV / Radio Desk Top Docking Stereo System The Ideal Shuttle companion. As a Picture Frame Docking With Shuttle Models Side View 9 This Docking System has been designed exclusively for the Shuttle models (DT102, DT85, DT7) with built-in your home or office.
Operation Manual
Page 12
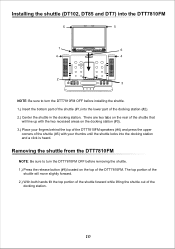
... Installing the shuttle (DT102, DT85 and DT7) into the DTT7810FM 5 5 1 6 4 4 2 3 NOTE: Be sure to turn the DTT7810FM OFF before removing the shuttle. 1.) Press the release button (#6) located on the docking station (#3). 3.) Place your fingers behind the top of the DTT7810FM speakers (#4) and press the upper corners of the shuttle (#5) with your thumbs until the shuttle locks into the lower part of...
... Installing the shuttle (DT102, DT85 and DT7) into the DTT7810FM 5 5 1 6 4 4 2 3 NOTE: Be sure to turn the DTT7810FM OFF before removing the shuttle. 1.) Press the release button (#6) located on the docking station (#3). 3.) Place your fingers behind the top of the DTT7810FM speakers (#4) and press the upper corners of the shuttle (#5) with your thumbs until the shuttle locks into the lower part of...
Operation Manual
Page 13
... type: a.) Press the "clock mode" button three times. A bell will also set AM/PM. This will appear to indicate the alarm tone has been selected. Note: During any of the setting procedures if no indicator displayed 4. When power is installed it will be displayed and the hours and minutes will appear to the AV inputs on the rear of the DVD shuttles is turned OFF the DTT7810FM...
... type: a.) Press the "clock mode" button three times. A bell will also set AM/PM. This will appear to indicate the alarm tone has been selected. Note: During any of the setting procedures if no indicator displayed 4. When power is installed it will be displayed and the hours and minutes will appear to the AV inputs on the rear of the DVD shuttles is turned OFF the DTT7810FM...
Operation Manual
Page 14
... channel has been stored in memory. -To store the next radio station in memory 1.) Press the "Recall" button. (The station number will be displayed on the LCD display) Press the "Recall" button again and "preset 1" will search for 2 seconds to start seek tuning . A maximum of 5 presets are available for complete DVD operating instructions. 12 Accessing Preset Stations - NOTE: Consult the owners manual...
... channel has been stored in memory. -To store the next radio station in memory 1.) Press the "Recall" button. (The station number will be displayed on the LCD display) Press the "Recall" button again and "preset 1" will search for 2 seconds to start seek tuning . A maximum of 5 presets are available for complete DVD operating instructions. 12 Accessing Preset Stations - NOTE: Consult the owners manual...

Operation Manual
Page 15
... There is installed correctly. Make sure the volume is set to ON. Make sure no sound when using wireless headphones Make sure the IRT switch is turned UP. Is your system connections are inserted correctly (check polarity). Clean or replace disc. Make sure that is out of the player is not available at the DVD Player. Make sure the batteries of disc. Replace weak batteries. Make sure the correct source (DVD) has been selected. There...
... There is installed correctly. Make sure the volume is set to ON. Make sure no sound when using wireless headphones Make sure the IRT switch is turned UP. Is your system connections are inserted correctly (check polarity). Clean or replace disc. Make sure that is out of the player is not available at the DVD Player. Make sure the batteries of disc. Replace weak batteries. Make sure the correct source (DVD) has been selected. There...
Operation Manual
Page 17
... or noise, to correction of antenna problems, to costs incurred for parts and repair labor. This Warranty is in the opinion of the Company, has suffered or been damaged through alteration, improper installation, mishandling, misuse, neglect, accident, or by removal or defacement of the factory serial number/bar code label(s). ANY IMPLIED WARRANTIES, INCLUDING ANY IMPLIED WARRANTY OF MERCHANTABILITY, SHALL BE LIMITED...
... or noise, to correction of antenna problems, to costs incurred for parts and repair labor. This Warranty is in the opinion of the Company, has suffered or been damaged through alteration, improper installation, mishandling, misuse, neglect, accident, or by removal or defacement of the factory serial number/bar code label(s). ANY IMPLIED WARRANTIES, INCLUDING ANY IMPLIED WARRANTY OF MERCHANTABILITY, SHALL BE LIMITED...


