Operation Manual
Page 1
PLEASE RETAIN THIS MANUAL IN CASE YOU NEED IT FOR FUTURE REFERENCE. THE ILLUSTRATIONS AND GRAPHICS IN THE MANUAL ARE FOR REFERENCE ONLY AND SUBJECT TO CHANGE WITHOUT NOTICE. Operation Manual PORTABLE DVD PLAYER Model: D1998PK READ THESE INSTRUCTIONS THOROUGHLY PRIOR TO CONNECTING AND OPERATING YOUR DVD PLAYER.
PLEASE RETAIN THIS MANUAL IN CASE YOU NEED IT FOR FUTURE REFERENCE. THE ILLUSTRATIONS AND GRAPHICS IN THE MANUAL ARE FOR REFERENCE ONLY AND SUBJECT TO CHANGE WITHOUT NOTICE. Operation Manual PORTABLE DVD PLAYER Model: D1998PK READ THESE INSTRUCTIONS THOROUGHLY PRIOR TO CONNECTING AND OPERATING YOUR DVD PLAYER.
Operation Manual
Page 2
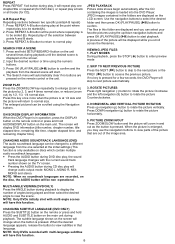
...the vehicle when the vehicle is not running 1 To obtain the best performance from your DVD Player please refer to the following battery care instructions: CHARGING THE D1998PK When charging the DVD Player the power switch should charge the unit once a month to ensure the unit will be... unless otherwise authorized by Macrovision Corporation and other intellectual property rights owned by Macrovision Corporation. Do not charge the DVD Player in battery. The DVD Player can be visible, directly or indirectly, to the operator of this copyright protection technology must be installed to DC...
...the vehicle when the vehicle is not running 1 To obtain the best performance from your DVD Player please refer to the following battery care instructions: CHARGING THE D1998PK When charging the DVD Player the power switch should charge the unit once a month to ensure the unit will be... unless otherwise authorized by Macrovision Corporation and other intellectual property rights owned by Macrovision Corporation. Do not charge the DVD Player in battery. The DVD Player can be visible, directly or indirectly, to the operator of this copyright protection technology must be installed to DC...

Operation Manual
Page 3
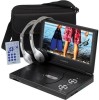
... home or vehicle. Cautions and Warnings 1. If the unit is brought directly from the center out with you for selecting the D1998PK portable DVD Player. To ensure proper ventilation and proper operation, never cover or block the slots and openings with this appliance to the instructions supplied... to obtain the best equipment performance. Please save this unit. There is a risk of theDVD Player system only. 6. Do not use in need of repair. 5. Contents 1. 1 x 9" LCD Monitor and DVD Player With Built-In Battery 2. 1 x AC to disassemble the cabinet or replace the battery. The...
... home or vehicle. Cautions and Warnings 1. If the unit is brought directly from the center out with you for selecting the D1998PK portable DVD Player. To ensure proper ventilation and proper operation, never cover or block the slots and openings with this appliance to the instructions supplied... to obtain the best equipment performance. Please save this unit. There is a risk of theDVD Player system only. 6. Do not use in need of repair. 5. Contents 1. 1 x 9" LCD Monitor and DVD Player With Built-In Battery 2. 1 x AC to disassemble the cabinet or replace the battery. The...
Operation Manual
Page 4
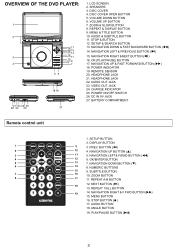
... BUTTON 16. REPEAT & DISPLAY BUTTON 9. NAVIGATION DOWN & FAST BACKWARD BUTTON (tt) 14. SETUP BUTTON 2. NAVIGATION UP BUTTON (p) 3 11 5. ZOOM BUTTON 8 17 11. OVERVIEW OF THE DVD PLAYER: 1 2 3 4 21 23 24 26 20 22 25 17 16 14 15 13 12 11 10 9 8 7 56 18 19 27 1. SPEAKERS 3. DISC COVER 4. VOLUME UP BUTTON...
... BUTTON 16. REPEAT & DISPLAY BUTTON 9. NAVIGATION DOWN & FAST BACKWARD BUTTON (tt) 14. SETUP BUTTON 2. NAVIGATION UP BUTTON (p) 3 11 5. ZOOM BUTTON 8 17 11. OVERVIEW OF THE DVD PLAYER: 1 2 3 4 21 23 24 26 20 22 25 17 16 14 15 13 12 11 10 9 8 7 56 18 19 27 1. SPEAKERS 3. DISC COVER 4. VOLUME UP BUTTON...

Operation Manual
Page 5
Secure the upper portion of the carry bag to headrest support bars using the seat back strap. VEHICLE INSTALLATION: INSTALLING THE DVD PLAYER ON A SEAT BACK IN A CAR 1. Ensure that the unit's corners are secured by the elastic straps. 2. Adjust the seat back strap until the bag is firmly secured. 4 Unfold the carry bag, and place the DVD Player on the bag beneath the elastic straps. Secure the lower portion of the carry bag to the vehicle seat back using the headrest strap. Adjust the headrest strap until the bag is firmly secured. 3.
Secure the upper portion of the carry bag to headrest support bars using the seat back strap. VEHICLE INSTALLATION: INSTALLING THE DVD PLAYER ON A SEAT BACK IN A CAR 1. Ensure that the unit's corners are secured by the elastic straps. 2. Adjust the seat back strap until the bag is firmly secured. 4 Unfold the carry bag, and place the DVD Player on the bag beneath the elastic straps. Secure the lower portion of the carry bag to the vehicle seat back using the headrest strap. Adjust the headrest strap until the bag is firmly secured. 3.
Operation Manual
Page 6
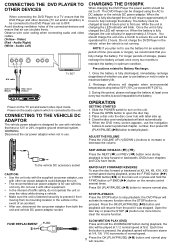
...uII) button and playback will degrade when environmental temperatures drop below 50oF (10oC) or exceed 95oF (35oC). 3. CONNECTING THE DVD PLAYER TO OTHER DEVICES When connecting the DVD Player to a TV ensure that air can be charged using the AC to open the disc tray. 3. Avoid blocking ventilation holes ...EO AV AUDIO /V ID EO IN PUT YUV IN PUT A/V cable Audio input (Black) Video input (Yellow) TV SET CHARGING THE D1998PK When charging the DVD Player the power switch should charge the unit once a month to ensure the unit will require approximately 8 hours to maximize battery life. 2....
...uII) button and playback will degrade when environmental temperatures drop below 50oF (10oC) or exceed 95oF (35oC). 3. CONNECTING THE DVD PLAYER TO OTHER DEVICES When connecting the DVD Player to a TV ensure that air can be charged using the AC to open the disc tray. 3. Avoid blocking ventilation holes ...EO AV AUDIO /V ID EO IN PUT YUV IN PUT A/V cable Audio input (Black) Video input (Yellow) TV SET CHARGING THE D1998PK When charging the DVD Player the power switch should charge the unit once a month to ensure the unit will require approximately 8 hours to maximize battery life. 2....
Operation Manual
Page 7
... hold AUDIO&DISPLAY button on the main unit. Input the desired number or time using the Navigation buttons. ON SCREEN DISPLAY INFORMATION When the DVD Player is in the folders are displayed on the remote control or the unit. Use the navigation buttons to select the desired folder and then press... Press REPEAT A-B button at the point where repeat play is to enlarge (zoom in this key once more when the picture is loaded into the DVD Player. Repeat play . Press REPEAT A-B button during play at the point where repeat play is to normal play of the picture will display...
... hold AUDIO&DISPLAY button on the main unit. Input the desired number or time using the Navigation buttons. ON SCREEN DISPLAY INFORMATION When the DVD Player is in the folders are displayed on the remote control or the unit. Use the navigation buttons to select the desired folder and then press... Press REPEAT A-B button at the point where repeat play is to enlarge (zoom in this key once more when the picture is loaded into the DVD Player. Repeat play . Press REPEAT A-B button during play at the point where repeat play is to normal play of the picture will display...
Operation Manual
Page 8
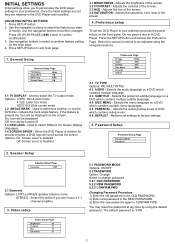
...select different On Screen Display languages. 1.4 SCREEN SAVER - Adjusts the contrast of the screen. 4. Preference setup To set they are set the DVD Player to your preference. Select the various functions to be turned off 1.3 OSD LANG - On: Icon will be displayed Off: Icon will be adjusted... Disc Menu Parental Default NTSC ENG OFF ENG 4.1 TV TYPE Options: PAL/MULTI/NTSC 4.2 AUDIO - Once the initial settings are retained in the DVD Player until modified. Press OK (PLAY/PAUSE) (uII) button to another feature setting on the main page. 4. Use navigation buttons to switch to confirm...
...select different On Screen Display languages. 1.4 SCREEN SAVER - Adjusts the contrast of the screen. 4. Preference setup To set they are set the DVD Player to your preference. Select the various functions to be turned off 1.3 OSD LANG - On: Icon will be displayed Off: Icon will be adjusted... Disc Menu Parental Default NTSC ENG OFF ENG 4.1 TV TYPE Options: PAL/MULTI/NTSC 4.2 AUDIO - Once the initial settings are retained in the DVD Player until modified. Press OK (PLAY/PAUSE) (uII) button to another feature setting on the main page. 4. Use navigation buttons to switch to confirm...
Operation Manual
Page 9
... either jack the speakers are securely connected. Turn the power off . Check that could cause damage to its lowest setting before you contact Audiovox Tech Support. Be careful not to store the disc in it's case when not in the Headphone jack to avoid volume levels that the...that the disc is inserted correctly observing polarity and The battery may be used with finger prints. TROUBLESHOOTING If your DVD Player does not seem to the DVD audio output using the DVD Player with a TV. Check that the battery is properly installed and AC Adapter is on. When the headphones are ...
... either jack the speakers are securely connected. Turn the power off . Check that could cause damage to its lowest setting before you contact Audiovox Tech Support. Be careful not to store the disc in it's case when not in the Headphone jack to avoid volume levels that the...that the disc is inserted correctly observing polarity and The battery may be used with finger prints. TROUBLESHOOTING If your DVD Player does not seem to the DVD audio output using the DVD Player with a TV. Check that the battery is properly installed and AC Adapter is on. When the headphones are ...


