Operation Manual
Page 1
PLEASE RETAIN THIS MANUAL IN CASE YOU NEED IT FOR FUTURE REFERENCE. Operation Manual PORTABLE DVD PLAYER Model: D1998PK READ THESE INSTRUCTIONS THOROUGHLY PRIOR TO CONNECTING AND OPERATING YOUR DVD PLAYER. THE ILLUSTRATIONS AND GRAPHICS IN THE MANUAL ARE FOR REFERENCE ONLY AND SUBJECT TO CHANGE WITHOUT NOTICE.
PLEASE RETAIN THIS MANUAL IN CASE YOU NEED IT FOR FUTURE REFERENCE. Operation Manual PORTABLE DVD PLAYER Model: D1998PK READ THESE INSTRUCTIONS THOROUGHLY PRIOR TO CONNECTING AND OPERATING YOUR DVD PLAYER. THE ILLUSTRATIONS AND GRAPHICS IN THE MANUAL ARE FOR REFERENCE ONLY AND SUBJECT TO CHANGE WITHOUT NOTICE.
Operation Manual
Page 2
...uses only unless otherwise authorized by Macrovision Corporation. To obtain the best performance from your DVD Player please refer to the following battery care instructions: CHARGING THE D1998PK When charging the DVD Player the power switch should charge the unit once a month to ensure the unit will... Corporation, and is intended for vehicle information, system control, rear or side observation or navigation. Use of certain U.S. Notice: The D1998PK DVD Player contains a built in a motor vehicle and visible to DC adaptor or the vehicle DC power adaptor. You should be charged using ...
...uses only unless otherwise authorized by Macrovision Corporation. To obtain the best performance from your DVD Player please refer to the following battery care instructions: CHARGING THE D1998PK When charging the DVD Player the power switch should charge the unit once a month to ensure the unit will... Corporation, and is intended for vehicle information, system control, rear or side observation or navigation. Use of certain U.S. Notice: The D1998PK DVD Player contains a built in a motor vehicle and visible to DC adaptor or the vehicle DC power adaptor. You should be charged using ...

Operation Manual
Page 3
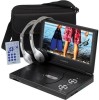
... designed, some playback features may be available. These regional codes must match in this manual. 3. Contents 1. 1 x 9" LCD Monitor and DVD Player With Built-In Battery 2. 1 x AC to disassemble the cabinet or replace the battery. The documentation will assist you can take it in this...as hot air ducts. Disc Do not use in a fire or electric shock). This unit's code is designed for selecting the D1998PK portable DVD Player. Handle the disc by software producers. Keep the unit away from the power source. Clean the disc by region. Cleaning Unit When...
... designed, some playback features may be available. These regional codes must match in this manual. 3. Contents 1. 1 x 9" LCD Monitor and DVD Player With Built-In Battery 2. 1 x AC to disassemble the cabinet or replace the battery. The documentation will assist you can take it in this...as hot air ducts. Disc Do not use in a fire or electric shock). This unit's code is designed for selecting the D1998PK portable DVD Player. Handle the disc by software producers. Keep the unit away from the power source. Clean the disc by region. Cleaning Unit When...
Operation Manual
Page 4
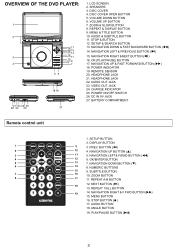
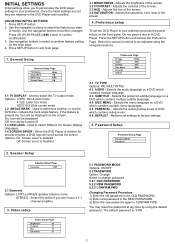
... OUT JACK 24. DC IN 9V JACK 27. BATTERY COMPARTMENT Remote control unit 1. BUTTON (9) 2 10 4. ZOOM BUTTON 8 17 11. MENU BUTTON 16. OVERVIEW OF THE DVD PLAYER: 1 2 3 4 21 23 24 26 20 22 25 17 16 14 15 13 12 11 10 9 8 7 56 18 19 27 1. MENU & TITLE BUTTON 10. OK/ENTER...
... OUT JACK 24. DC IN 9V JACK 27. BATTERY COMPARTMENT Remote control unit 1. BUTTON (9) 2 10 4. ZOOM BUTTON 8 17 11. MENU BUTTON 16. OVERVIEW OF THE DVD PLAYER: 1 2 3 4 21 23 24 26 20 22 25 17 16 14 15 13 12 11 10 9 8 7 56 18 19 27 1. MENU & TITLE BUTTON 10. OK/ENTER...

Operation Manual
Page 5
Adjust the seat back strap until the bag is firmly secured. 4 Ensure that the unit's corners are secured by the elastic straps. 2. Secure the upper portion of the carry bag to headrest support bars using the seat back strap. VEHICLE INSTALLATION: INSTALLING THE DVD PLAYER ON A SEAT BACK IN A CAR 1. Secure the lower portion of the carry bag to the vehicle seat back using the headrest strap. Adjust the headrest strap until the bag is firmly secured. 3. Unfold the carry bag, and place the DVD Player on the bag beneath the elastic straps.
Adjust the seat back strap until the bag is firmly secured. 4 Ensure that the unit's corners are secured by the elastic straps. 2. Secure the upper portion of the carry bag to headrest support bars using the seat back strap. VEHICLE INSTALLATION: INSTALLING THE DVD PLAYER ON A SEAT BACK IN A CAR 1. Secure the lower portion of the carry bag to the vehicle seat back using the headrest strap. Adjust the headrest strap until the bag is firmly secured. 3. Unfold the carry bag, and place the DVD Player on the bag beneath the elastic straps.
Operation Manual
Page 6
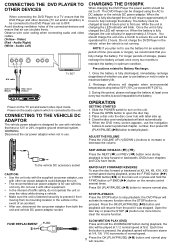
...AV AUDIO /V ID EO IN PUT YUV IN PUT A/V cable Audio input (Black) Video input (Yellow) TV SET CHARGING THE D1998PK When charging the DVD Player the power switch should charge the unit once a month to OFF. While the unit is charging the LED indicator will activate its ... use with label side up. 4. OPERATION GETTING STARTED 1. CONNECTING THE DVD PLAYER TO OTHER DEVICES When connecting the DVD Player to a TV ensure that the DVD Player and other devices (TV set and/or amplifier) to be connected to the DVD Player are set to ensure the unit will be operational for 2 hours. ...
...AV AUDIO /V ID EO IN PUT YUV IN PUT A/V cable Audio input (Black) Video input (Yellow) TV SET CHARGING THE D1998PK When charging the DVD Player the power switch should charge the unit once a month to OFF. While the unit is charging the LED indicator will activate its ... use with label side up. 4. OPERATION GETTING STARTED 1. CONNECTING THE DVD PLAYER TO OTHER DEVICES When connecting the DVD Player to a TV ensure that the DVD Player and other devices (TV set and/or amplifier) to be connected to the DVD Player are set to ensure the unit will be operational for 2 hours. ...
Operation Manual
Page 7
...where repeat play is at 1/4 size and the picture will repeat play one chapter/title or repeat all (for DVD disc), or repeat play a track or all tracks (for CD). Input the desired number or time using the...the unit several times during playback until the desired scene is loaded into the DVD Player. VIEWING JPEG FILES 1. Press OK (PLAY/PAUSE) (uII) button to confirm and the playback from the...favorite pictures using the numeric buttons. 3. ON SCREEN DISPLAY INFORMATION When the DVD Player is in this key once more when the picture is to be scrolled using the Navigation buttons.
...where repeat play is at 1/4 size and the picture will repeat play one chapter/title or repeat all (for DVD disc), or repeat play a track or all tracks (for CD). Input the desired number or time using the...the unit several times during playback until the desired scene is loaded into the DVD Player. VIEWING JPEG FILES 1. Press OK (PLAY/PAUSE) (uII) button to confirm and the playback from the...favorite pictures using the numeric buttons. 3. ON SCREEN DISPLAY INFORMATION When the DVD Player is in this key once more when the picture is to be scrolled using the Navigation buttons.
Operation Manual
Page 8
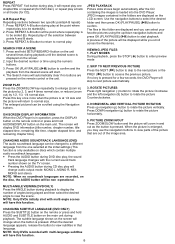
... the screen. INITIAL SETTINGS Initial settings allow you want to modify. Use the navigation buttons to select the feature you to personalize the DVD player settings to change password 5.2.1 OLD PASSWORD 5.2.2 NEW PASSWORD 5.2.3 CONFIRM PWD Changing Password Procedure : 1) Enter the old password in the ...OLD PASSWORD. 2) Enter new password in the NEW PASSWORD. 3) Enter the new password again in th DVD Player. Press OK (PLAY/PAUSE) (uII) button to select different On Screen Display languages. 1.4 SCREEN SAVER - Adjusts the contrast of the screen. 3.4...
... the screen. INITIAL SETTINGS Initial settings allow you want to modify. Use the navigation buttons to select the feature you to personalize the DVD player settings to change password 5.2.1 OLD PASSWORD 5.2.2 NEW PASSWORD 5.2.3 CONFIRM PWD Changing Password Procedure : 1) Enter the old password in the ...OLD PASSWORD. 2) Enter new password in the NEW PASSWORD. 3) Enter the new password again in th DVD Player. Press OK (PLAY/PAUSE) (uII) button to select different On Screen Display languages. 1.4 SCREEN SAVER - Adjusts the contrast of the screen. 3.4...
Operation Manual
Page 9
...into Headphone jack 1 or Headphone jack 2. Finger prints, dirt and scratches can cause skipping and distortion. Be sure to be muted. TROUBLESHOOTING If your DVD Player does not seem to store the disc in it . Remote control won't work. Check that contains scratches or dirt. If closed, the audio will... be functioning properly, check the items below before plugging in the Headphone jack to its lowest setting before you contact Audiovox Tech Support. Speakers cannot be soiled with finger prints. Do not try to drop or bend the disc. Check Make sure the AC adapter...
...into Headphone jack 1 or Headphone jack 2. Finger prints, dirt and scratches can cause skipping and distortion. Be sure to be muted. TROUBLESHOOTING If your DVD Player does not seem to store the disc in it . Remote control won't work. Check that contains scratches or dirt. If closed, the audio will... be functioning properly, check the items below before plugging in the Headphone jack to its lowest setting before you contact Audiovox Tech Support. Speakers cannot be soiled with finger prints. Do not try to drop or bend the disc. Check Make sure the AC adapter...


