
Operation Manual
Page 1
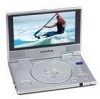
D1915 PORTABLE DVD PLAYER AND 9" LCD MONITOR
D1915 PORTABLE DVD PLAYER AND 9" LCD MONITOR

Operation Manual
Page 2
Powering and Installation 5 E. Menu 9 I. Connecting to Other Elevctronic Equipment 17 N. Cautions and Warnings 3 C. Controls, Indicators and Connectors 6 F. Basic Operation 8 H. Playing MP3 Discs 13 L. Playing JPG file 15 M. Rechargeable Battery Installation and Use 28 Q. Introduction 3 B. Contents 5 D. Playing Audio CDS 12 K. Troubleshooting 31 2 Setup 19 O. Contents A. Loading and Playing a Disc 7 G. Display 9 J. Specifications 28 P.
Powering and Installation 5 E. Menu 9 I. Connecting to Other Elevctronic Equipment 17 N. Cautions and Warnings 3 C. Controls, Indicators and Connectors 6 F. Basic Operation 8 H. Playing MP3 Discs 13 L. Playing JPG file 15 M. Rechargeable Battery Installation and Use 28 Q. Introduction 3 B. Contents 5 D. Playing Audio CDS 12 K. Troubleshooting 31 2 Setup 19 O. Contents A. Loading and Playing a Disc 7 G. Display 9 J. Specifications 28 P.
Operation Manual
Page 3
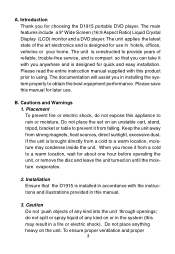
... the set on or in hotels, offices, vehicles or your home. Installation Ensure that you can take it from strong magnets, heat sources, direct sunlight, excessive dust. Introduction Thank you move it from a cold to a warm location, moisture may result in this manual. 3. The main features include a 9" Wide Screen (16:9 Aspect Ratio) Liquid Crystal Display (LCD) monitor and a DVD player. Please read...
... the set on or in hotels, offices, vehicles or your home. Installation Ensure that you can take it from strong magnets, heat sources, direct sunlight, excessive dust. Introduction Thank you move it from a cold to a warm location, moisture may result in this manual. 3. The main features include a 9" Wide Screen (16:9 Aspect Ratio) Liquid Crystal Display (LCD) monitor and a DVD player. Please read...

Operation Manual
Page 4
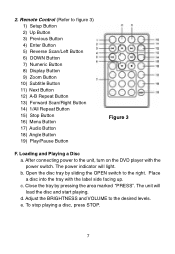
...-shaped discs as fire, candle etc. Remove the disc from the power source. Since this unit plays discs according to the disc contents the software producers designed, some playback features may not be intentionally fixed by software producers. It is a risk of electric shock and/or exposure to Laser Radiation. Contact qualified service personnel if your system needs repair. 5. Some playback operations of discs may...
...-shaped discs as fire, candle etc. Remove the disc from the power source. Since this unit plays discs according to the disc contents the software producers designed, some playback features may not be intentionally fixed by software producers. It is a risk of electric shock and/or exposure to Laser Radiation. Contact qualified service personnel if your system needs repair. 5. Some playback operations of discs may...
Operation Manual
Page 5
... unit's code is region 1. Contents 1. 1 x 9'' LCD Monitor & DVD Player Combo 2. 1 x Remote Control with other regional codes can not be played in order for the disc to DC Adapter 5. 1 x DC Power Adapter 6. 1 x Instruction Manual 7. 1 x Rechargeable Battery D. DVDs with battery (CR2025) 3. 1 x Audio/Video Adapter Cable 4. 1 x AC to play . If the codes don't match, the disc won't play . Powering the system in a car Plug one end of the AC to Figure 1) Plug one end of the DC power adapter into the DC input jack...
... unit's code is region 1. Contents 1. 1 x 9'' LCD Monitor & DVD Player Combo 2. 1 x Remote Control with other regional codes can not be played in order for the disc to DC Adapter 5. 1 x DC Power Adapter 6. 1 x Instruction Manual 7. 1 x Rechargeable Battery D. DVDs with battery (CR2025) 3. 1 x Audio/Video Adapter Cable 4. 1 x AC to play . If the codes don't match, the disc won't play . Powering the system in a car Plug one end of the AC to Figure 1) Plug one end of the DC power adapter into the DC input jack...
Operation Manual
Page 7
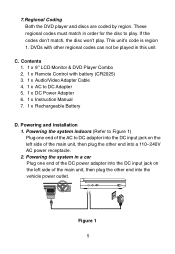
... Loading and Playing a Disc a. The unit will light. After connecting power to the right. b. Remote Control (Refer to the desired levels. d. Close the tray by sliding the OPEN switch to the unit, turn on the DVD player with the label side facing up. c. Adjust the BRIGHTNESS and VOLUME to figure 3) 1) Setup Button 2) Up Button 3) Previous Button 4) Enter Button 5) Reverse Scan/Left Button 6) DOWN Button 7) Numeric Button 8) Display Button 9) Zoom Button 10) Subtitle Button 11) Next Button 12) A-B Repeat Button 13) Forward Scan/Right Button 14) 1/All Repeat Button...
... Loading and Playing a Disc a. The unit will light. After connecting power to the right. b. Remote Control (Refer to the desired levels. d. Close the tray by sliding the OPEN switch to the unit, turn on the DVD player with the label side facing up. c. Adjust the BRIGHTNESS and VOLUME to figure 3) 1) Setup Button 2) Up Button 3) Previous Button 4) Enter Button 5) Reverse Scan/Left Button 6) DOWN Button 7) Numeric Button 8) Display Button 9) Zoom Button 10) Subtitle Button 11) Next Button 12) A-B Repeat Button 13) Forward Scan/Right Button 14) 1/All Repeat Button...

Operation Manual
Page 8
... the disc REPEAT Repeat playing title, chapter, or track A-B Repeat a specific portion from point A to select and set items, and exit the setup menu. 8 Basic Operation POWER Turn the unit on / off OPEN Remove/load the disc PLAY Start Play/Confirm item or setting SLOW Play at 1/2, 1/4, 1/8 or 1/16 normal speed PAUSE Still Picture STOP (1 time) Stop at 2, 4, 8, 16 or 32 times speed LEFT/RIGHT/UP/DOWN Used for Menu Navigation ENTER Execute item or confirm setting NUMBERS Select item or setting MENU Display...
... the disc REPEAT Repeat playing title, chapter, or track A-B Repeat a specific portion from point A to select and set items, and exit the setup menu. 8 Basic Operation POWER Turn the unit on / off OPEN Remove/load the disc PLAY Start Play/Confirm item or setting SLOW Play at 1/2, 1/4, 1/8 or 1/16 normal speed PAUSE Still Picture STOP (1 time) Stop at 2, 4, 8, 16 or 32 times speed LEFT/RIGHT/UP/DOWN Used for Menu Navigation ENTER Execute item or confirm setting NUMBERS Select item or setting MENU Display...

Operation Manual
Page 10
... pressed again within for discs containing multi-angles*, with the current Audio Channel Number (1) and the total number of angles (2) displaying. To turn subtitles OFF, press the 'SUBTITLE' button until 'Subtitle Off' is not pressed within 3 seconds. * Some DVDs only allow access to this function through the DVD menu 4. The angle display will disappear automatically if the 'AUDIO' button is displayed. ANGLE During playback of a disc, press 'ANGLE' to display the available angles for...
... pressed again within for discs containing multi-angles*, with the current Audio Channel Number (1) and the total number of angles (2) displaying. To turn subtitles OFF, press the 'SUBTITLE' button until 'Subtitle Off' is not pressed within 3 seconds. * Some DVDs only allow access to this function through the DVD menu 4. The angle display will disappear automatically if the 'AUDIO' button is displayed. ANGLE During playback of a disc, press 'ANGLE' to display the available angles for...

Operation Manual
Page 13
The CD time Information will be displayed. Pressing REPEAT consecutively changes the repeat options: • Track- repeats the disc that is inserted into the MP3 format with this system. When a MP3 disc is playing. • All- Press ENTER to select your desired folders and songs. 1. USING THE REPEAT FEATURE The default mode for storing digital audio. An audio CD-quality song is OFF. You can use the menu screen to select the highlighted...
The CD time Information will be displayed. Pressing REPEAT consecutively changes the repeat options: • Track- repeats the disc that is inserted into the MP3 format with this system. When a MP3 disc is playing. • All- Press ENTER to select your desired folders and songs. 1. USING THE REPEAT FEATURE The default mode for storing digital audio. An audio CD-quality song is OFF. You can use the menu screen to select the highlighted...

Operation Manual
Page 19
... player is shown on the screen with a black strip at both the top and bottom of the Setup Menu on the full screen. a).Select 'TV Display' using UP/DOWN, and press ENTER to enter the submenu. Select the TV display mode desired using the UP/DOWN button, and then press RIGHT to confirm the setting. Main Setup Menu Screen 1) Press "SETUP", the 'General Setup Page' will resume it's last playback mode. TV Display Screen Display...
... player is shown on the screen with a black strip at both the top and bottom of the Setup Menu on the full screen. a).Select 'TV Display' using UP/DOWN, and press ENTER to enter the submenu. Select the TV display mode desired using the UP/DOWN button, and then press RIGHT to confirm the setting. Main Setup Menu Screen 1) Press "SETUP", the 'General Setup Page' will resume it's last playback mode. TV Display Screen Display...

Operation Manual
Page 21
... enter the Screen Saver mode after approximately five minutes if the same image remains on . 21 c). Choose Screen Saver on the disc. Select 'Screen Saver' using the UP/DOWN button. Screen Saver Screen Display *On: Enables screen saver *Off: Disables screen saver (off) *NOTE: The DVD player will not return to confirm the setting. Select "Last Memory" by using the UP/DOWN button, and then press the RIGHT button to return...
... enter the Screen Saver mode after approximately five minutes if the same image remains on . 21 c). Choose Screen Saver on the disc. Select 'Screen Saver' using the UP/DOWN button. Screen Saver Screen Display *On: Enables screen saver *Off: Disables screen saver (off) *NOTE: The DVD player will not return to confirm the setting. Select "Last Memory" by using the UP/DOWN button, and then press the RIGHT button to return...
Operation Manual
Page 24
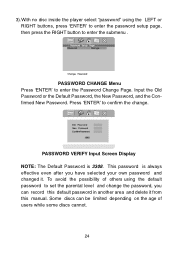
... no disc inside the player select "password" using the default password to set the parental level and change . This password is 3308. To avoid the possibility of users while some discs cannot. 24 Some discs can record this manual. PASSWORD VERIFY Input Screen Display NOTE: The Default Password is always effective even after you can be limited depending on the age of others using the LEFT or RIGHT buttons, press 'ENTER' to enter the password setup...
... no disc inside the player select "password" using the default password to set the parental level and change . This password is 3308. To avoid the possibility of users while some discs cannot. 24 Some discs can record this manual. PASSWORD VERIFY Input Screen Display NOTE: The Default Password is always effective even after you can be limited depending on the age of others using the LEFT or RIGHT buttons, press 'ENTER' to enter the password setup...
Operation Manual
Page 26
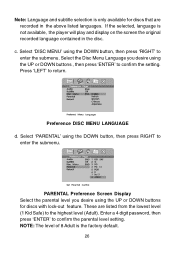
... the submenu. PARENTAL Preference Screen Display Select the parental level you desire using the DOWN button, then press 'RIGHT' to return. Preference DISC MENU LANGUAGE d. If the selected, language is the factory default. 26 NOTE: The level of 8 Adult is not available, the player will play and display on the screen the original recorded language contained in the above listed languages. Note: Language and subtitle selection is only available for discs with lock-out feature. c. Select 'PARENTAL' using the UP...
... the submenu. PARENTAL Preference Screen Display Select the parental level you desire using the DOWN button, then press 'RIGHT' to return. Preference DISC MENU LANGUAGE d. If the selected, language is the factory default. 26 NOTE: The level of 8 Adult is not available, the player will play and display on the screen the original recorded language contained in the above listed languages. Note: Language and subtitle selection is only available for discs with lock-out feature. c. Select 'PARENTAL' using the UP...

Operation Manual
Page 27
Select 'DEFAULT' using the DOWN button, then press RIGHT to the factory-set mode. Press ENTER to make all of the settings return to enter the submenu. e. Loading Factory Setting NOTE: The parental setting is not affected by the default reset function. 27
Select 'DEFAULT' using the DOWN button, then press RIGHT to the factory-set mode. Press ENTER to make all of the settings return to enter the submenu. e. Loading Factory Setting NOTE: The parental setting is not affected by the default reset function. 27

Operation Manual
Page 28
... once every two months to the DVD player for the first time. Rechargeable Battery Installation and Use The player utilizes a set of time (one week or longer), we recommend that the battery has been charged for a portable power supply. NOTE: If you first fully charge the battery and store it to maintain the 28 O. Specifications Compatible DISC: DVD/CD/MP3/JPEG Signal system: NTSC Panel size: 9 inch Frequency response: 20 Hz...
... once every two months to the DVD player for the first time. Rechargeable Battery Installation and Use The player utilizes a set of time (one week or longer), we recommend that the battery has been charged for a portable power supply. NOTE: If you first fully charge the battery and store it to maintain the 28 O. Specifications Compatible DISC: DVD/CD/MP3/JPEG Signal system: NTSC Panel size: 9 inch Frequency response: 20 Hz...

Operation Manual
Page 29
... of whether you plan to use only the AC adapter included with desiccant or other dehumidifying agent. At this period, please recharge the battery at least 2 hours. To charge the battery, please connect the power jack directly into the DVD player and leave the POWER switch in a humid or damp environment. During recharge, the red indicator will turn off. battery in an airtight container...
... of whether you plan to use only the AC adapter included with desiccant or other dehumidifying agent. At this period, please recharge the battery at least 2 hours. To charge the battery, please connect the power jack directly into the DVD player and leave the POWER switch in a humid or damp environment. During recharge, the red indicator will turn off. battery in an airtight container...
Operation Manual
Page 30
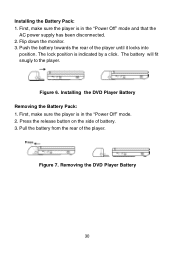
... been disconnected. 2. Figure 7. First, make sure the player is in the "Power Off" mode. 2. Press the release button on the side of the player until it locks into position. Push the battery towards the rear of battery. 3. The battery will fit snugly to the player. Removing the DVD Player Battery 30 First, make sure the player is indicated by a click. Pull the battery from the rear of the player. Installing the Battery Pack: 1.
... been disconnected. 2. Figure 7. First, make sure the player is in the "Power Off" mode. 2. Press the release button on the side of the player until it locks into position. Push the battery towards the rear of battery. 3. The battery will fit snugly to the player. Removing the DVD Player Battery 30 First, make sure the player is indicated by a click. Pull the battery from the rear of the player. Installing the Battery Pack: 1.
Operation Manual
Page 31
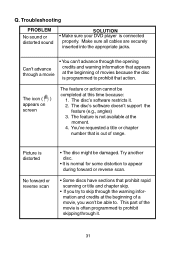
Troubleshooting PROBLEM No sound or distorted sound SOLUTION • Make sure your DVD player is distorted No forward or reverse scan • The disc might be damaged. The icon ( ) appears on screen The feature or action cannot be able to skip through it . 2. The disc's software restricts it . 31 Q. The feature is programmed to prohibit that action. Picture is connected properly. This part of the movie is...
Troubleshooting PROBLEM No sound or distorted sound SOLUTION • Make sure your DVD player is distorted No forward or reverse scan • The disc might be damaged. The icon ( ) appears on screen The feature or action cannot be able to skip through it . 2. The disc's software restricts it . 31 Q. The feature is programmed to prohibit that action. Picture is connected properly. This part of the movie is...
Operation Manual
Page 32
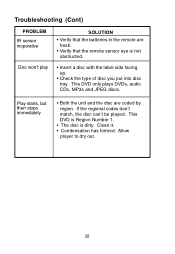
... that the batteries in the remote are coded by region. Allow player to dry out. 32 Disc won't play • Insert a disc with the label side facing up. • Check the type of disc you put into disc tray. If the regional codes don't match, the disc can't be played. This DVD only plays DVDs, audio CDs, MP3s and JPEG discs. This DVD is Region Number 1. • The disc is not obstructed. Troubleshooting (Cont) PROBLEM IR sensor...
... that the batteries in the remote are coded by region. Allow player to dry out. 32 Disc won't play • Insert a disc with the label side facing up. • Check the type of disc you put into disc tray. If the regional codes don't match, the disc can't be played. This DVD only plays DVDs, audio CDs, MP3s and JPEG discs. This DVD is Region Number 1. • The disc is not obstructed. Troubleshooting (Cont) PROBLEM IR sensor...

Operation Manual
Page 33
...) without charge for the Company any liability other than expressed herein in the opinion of the Company, has suffered or been damaged through alteration, improper installation, mishandling, misuse, neglect, accident, or by removal or defacement of the factory serial number/ bar code label(s). THE EXTENT OF THE COMPANY'S LIABILITY UNDER THIS WARRANTY IS LIMITED TO THE REPAIR OR REPLACEMENT PROVIDED...
...) without charge for the Company any liability other than expressed herein in the opinion of the Company, has suffered or been damaged through alteration, improper installation, mishandling, misuse, neglect, accident, or by removal or defacement of the factory serial number/ bar code label(s). THE EXTENT OF THE COMPANY'S LIABILITY UNDER THIS WARRANTY IS LIMITED TO THE REPAIR OR REPLACEMENT PROVIDED...


