User Guide
Page 1
7" LCD MO NIT OR D1718ES PORTABLE DVD PLAYER WITH TWO 7" MONITORS
7" LCD MO NIT OR D1718ES PORTABLE DVD PLAYER WITH TWO 7" MONITORS

User Guide
Page 2
... it will only function when the vehicle is in a motor vehicle and visible to the rear of the motor vehicle. 2 If the LCD panel or video monitor is used for television reception, video or DVD play , the LCD panel or video monitor must be installed to the driver if the LCD panel or video monitor is used for television reception, video or DVD play that operates when the vehicle...
... it will only function when the vehicle is in a motor vehicle and visible to the rear of the motor vehicle. 2 If the LCD panel or video monitor is used for television reception, video or DVD play , the LCD panel or video monitor must be installed to the driver if the LCD panel or video monitor is used for television reception, video or DVD play that operates when the vehicle...

User Guide
Page 3
... for choosing the D1718ES portable DVD player. Do not place the set on or in installing the system properly to a warm location, wait for later use in this manual. 3. Please read the entire instruction manual supplied with a cloth or other material. 4. Disassembly 3 Objects and Liquids Do not push objects of reliable, trouble-free service, and is compact so that the D1718ES is brought directly from a cold...
... for choosing the D1718ES portable DVD player. Do not place the set on or in installing the system properly to a warm location, wait for later use in this manual. 3. Please read the entire instruction manual supplied with a cloth or other material. 4. Disassembly 3 Objects and Liquids Do not push objects of reliable, trouble-free service, and is compact so that the D1718ES is brought directly from a cold...
User Guide
Page 4
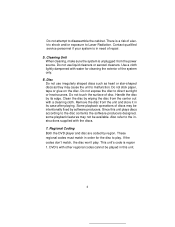
... the disc to malfunction. Regional Coding Both the DVD player and disc are coded by software producers. Do not touch the surface of repair. 5. Remove the disc from the unit and store it in order for cleaning the exterior of electric shock and/or exposure to Laser Radiation. Disc Do not use liquid cleaners or aerosol cleaners. Since this unit. 4 These regional codes must...
... the disc to malfunction. Regional Coding Both the DVD player and disc are coded by software producers. Do not touch the surface of repair. 5. Remove the disc from the unit and store it in order for cleaning the exterior of electric shock and/or exposure to Laser Radiation. Disc Do not use liquid cleaners or aerosol cleaners. Since this unit. 4 These regional codes must...
User Guide
Page 5
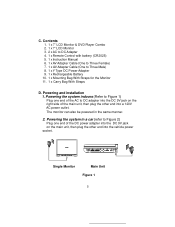
... AC power outlet. Powering the system indoors (Refer to Three Male) 8. 1 x Y Type DC Power Adapter 9. 1 x Rechargeable Battery 10. 1 x Mounting Bag With Straps for the Monitor 11. 1 x Carry Bag With Straps D. C. Contents 1. 1 x 7'' LCD Monitor & DVD Player Combo 2. 1 x 7" LCD Monitor 3. 2 x AC to DC Adapter 4. 1 x Remote Control with battery (CR2025) 5. 1 x Instruction Manual 6. 1 x AV Adapter Cable (One to Three Female) 7. 1 x AV Adapter Cable (One to Figure 1) Plug one end of the DC power adapter into...
... AC power outlet. Powering the system indoors (Refer to Three Male) 8. 1 x Y Type DC Power Adapter 9. 1 x Rechargeable Battery 10. 1 x Mounting Bag With Straps for the Monitor 11. 1 x Carry Bag With Straps D. C. Contents 1. 1 x 7'' LCD Monitor & DVD Player Combo 2. 1 x 7" LCD Monitor 3. 2 x AC to DC Adapter 4. 1 x Remote Control with battery (CR2025) 5. 1 x Instruction Manual 6. 1 x AV Adapter Cable (One to Three Female) 7. 1 x AV Adapter Cable (One to Figure 1) Plug one end of the DC power adapter into...
User Guide
Page 7
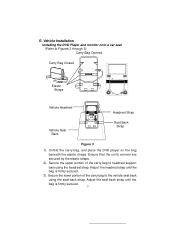
...the bag is firmly secured. 7 Vehicle Installation Installing the DVD Player and monitor onto a car seat (Refer to the vehicle seat back using the headrest strap. Unfold the carry bag, and place the DVD player on the bag beneath the elastic straps. E. Adjust the headrest strap until the bag is firmly... secured. 3). Secure the upper portion of the carry bag to Figures 3 through 5) Carry Bag Opened Carry Bag Closed ...
...the bag is firmly secured. 7 Vehicle Installation Installing the DVD Player and monitor onto a car seat (Refer to the vehicle seat back using the headrest strap. Unfold the carry bag, and place the DVD player on the bag beneath the elastic straps. E. Adjust the headrest strap until the bag is firmly... secured. 3). Secure the upper portion of the carry bag to Figures 3 through 5) Carry Bag Opened Carry Bag Closed ...
User Guide
Page 11
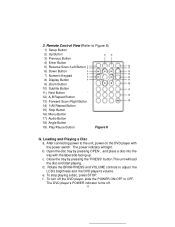
...Display Button 9) Zoom Button 10) Subtitle Button 11) Next Button 12) A-B Repeat Button 13) Forward Scan /Right Button 14) 1/All Repeat Button 15) Stop Button 16) Menu Button 17) Audio Button 18) Angle Button 19) Play/Pause Button Figure 8 G. b. Rotate the BRIGHTNESS and VOLUME controls to OFF. f. The DVD player's POWER indicator turns off the DVD player, slide the POWER ON/OFF to adjust the LCD's brightness and the DVD player's volume. e. Open the disc tray by pressing the "PRESS" button.The unit will light. Close the tray by pressing OPEN , and place a disc...
...Display Button 9) Zoom Button 10) Subtitle Button 11) Next Button 12) A-B Repeat Button 13) Forward Scan /Right Button 14) 1/All Repeat Button 15) Stop Button 16) Menu Button 17) Audio Button 18) Angle Button 19) Play/Pause Button Figure 8 G. b. Rotate the BRIGHTNESS and VOLUME controls to OFF. f. The DVD player's POWER indicator turns off the DVD player, slide the POWER ON/OFF to adjust the LCD's brightness and the DVD player's volume. e. Open the disc tray by pressing the "PRESS" button.The unit will light. Close the tray by pressing OPEN , and place a disc...

User Guide
Page 12
... bottom of the SETUP Menu on the screen using the UP/DOWN button, and then press RIGHT to confirm the setting. Press 'SETUP' again to a wide screen TV, a wide picture is shown on screen. SETUP Press 'SETUP' to display the Main screen of the screen. * Wide: When the player is connected to exit the SETUP Menu and the unit will display on the full screen. Select the TV display mode on the screen. TV Display Screen 12
... bottom of the SETUP Menu on the screen using the UP/DOWN button, and then press RIGHT to confirm the setting. Press 'SETUP' again to a wide screen TV, a wide picture is shown on screen. SETUP Press 'SETUP' to display the Main screen of the screen. * Wide: When the player is connected to exit the SETUP Menu and the unit will display on the full screen. Select the TV display mode on the screen. TV Display Screen 12
User Guide
Page 13
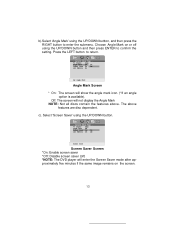
... disc dependent. Select 'Screen Saver' using the UP/DOWN buttton, and then press the RIGHT button to enter the submenu. Screen Saver Screen *On: Enable screen saver *Off: Disable screen saver (off using the UP/DOWN button and then press ENTER to return. The above . Press the LEFT button to confirm the setting. Choose Angle Mark on or off ) *NOTE: The DVD player will enter the Screen...
... disc dependent. Select 'Screen Saver' using the UP/DOWN buttton, and then press the RIGHT button to enter the submenu. Screen Saver Screen *On: Enable screen saver *Off: Disable screen saver (off using the UP/DOWN button and then press ENTER to return. The above . Press the LEFT button to confirm the setting. Choose Angle Mark on or off ) *NOTE: The DVD player will enter the Screen...
User Guide
Page 14
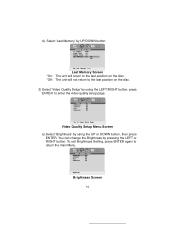
State Last Memory Screen *On: The unit will return to the last position on the disc. *Off: The unit will not return to the last position on the disc. 2) Select 'Video Quality Setup' by using the LEFT/RIGHT button, press ENTER to return the main Menu. To exit Brightness Setting, press ENTER again to enter the video quality setup page. Select 'Last Memory' by pressing the LEFT or RIGHT button. d). You can change the Brightness by UP/DOWN button. Video Quality Setup Menu Screen a).Select 'Brightness' by using the UP or DOWN button, then press ENTER. Brightness Screen 14
State Last Memory Screen *On: The unit will return to the last position on the disc. *Off: The unit will not return to the last position on the disc. 2) Select 'Video Quality Setup' by using the LEFT/RIGHT button, press ENTER to return the main Menu. To exit Brightness Setting, press ENTER again to enter the video quality setup page. Select 'Last Memory' by pressing the LEFT or RIGHT button. d). You can change the Brightness by UP/DOWN button. Video Quality Setup Menu Screen a).Select 'Brightness' by using the UP or DOWN button, then press ENTER. Brightness Screen 14
User Guide
Page 16
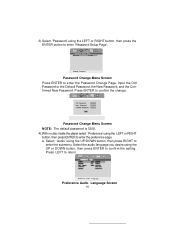
... ENTER to enter the preference page. Press ENTER to return. Password Change Menu Screen Press ENTER to enter the Password Change Page. a. Select the audio language you desire using the LEFT or RIGHT button, then press the ENTER button to enter 'Password Setup Page'. Input the Old Password or the Default Password, the New Password, and the Confirmed New Password. 3).Select 'Password' using the UP or DOWN button, then press ENTER to confirm the setting.
... ENTER to enter the preference page. Press ENTER to return. Password Change Menu Screen Press ENTER to enter the Password Change Page. a. Select the audio language you desire using the LEFT or RIGHT button, then press the ENTER button to enter 'Password Setup Page'. Input the Old Password or the Default Password, the New Password, and the Confirmed New Password. 3).Select 'Password' using the UP or DOWN button, then press ENTER to confirm the setting.

User Guide
Page 17
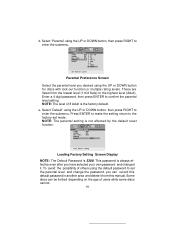
... selected language is only available for discs that are recorded in the disc. 17 Select the desired subtitle language or Subtitle Off using the UP or DOWN button, then press RIGHT to confirm the setting. Press LEFT to return. b. Preference Subtitle Language Screen c. Preference Disc Menu Language Screen Note: Language and subtitle selection is not available, the player will play and display on the screen the original recorded language contained in the above listed languages. Select 'Subtitle' the using the UP or DOWN button...
... selected language is only available for discs that are recorded in the disc. 17 Select the desired subtitle language or Subtitle Off using the UP or DOWN button, then press RIGHT to confirm the setting. Press LEFT to return. b. Preference Subtitle Language Screen c. Preference Disc Menu Language Screen Note: Language and subtitle selection is not available, the player will play and display on the screen the original recorded language contained in the above listed languages. Select 'Subtitle' the using the UP or DOWN button...
User Guide
Page 18
... using the UP or DOWN button for discs with lock-out function or multiple rating levels. Press ENTER to make the setting return to enter the submenu. NOTE: The parental setting is 3308. Some discs can record this default password in another area and delete it . These are listed from this manual. e. Select 'Default' using the UP or DOWN button, then press RIGHT to the factory-set the parental level and change the password...
... using the UP or DOWN button for discs with lock-out function or multiple rating levels. Press ENTER to make the setting return to enter the submenu. NOTE: The parental setting is 3308. Some discs can record this default password in another area and delete it . These are listed from this manual. e. Select 'Default' using the UP or DOWN button, then press RIGHT to the factory-set the parental level and change the password...

User Guide
Page 19
... the disc Repeat playing title, chapter, or track Repeat a specific portion from point A to select and set items, and exit the setup menu. 19 Basic Operation POWER OPEN PLAY SLOW PAUSE STOP SKIP+(NEXT) SKIP-(PREVIOUS) FORWARD REVERSE LEFT/RIGHT/UP/DOWN ENTER NUMBERS RETURN MENU REPEAT A-B DISPLAY ANGLE SUBTITLE AUDIO ZOOM SETUP Turn the unit on / off Remove/load the disc Start Play/Execute item or setting Play at 1/2, 1/4, 1/8 or 1/16 times speed Still Picture (1 time) Stop at the present playing point / (2 times) Stop playing Go...
... the disc Repeat playing title, chapter, or track Repeat a specific portion from point A to select and set items, and exit the setup menu. 19 Basic Operation POWER OPEN PLAY SLOW PAUSE STOP SKIP+(NEXT) SKIP-(PREVIOUS) FORWARD REVERSE LEFT/RIGHT/UP/DOWN ENTER NUMBERS RETURN MENU REPEAT A-B DISPLAY ANGLE SUBTITLE AUDIO ZOOM SETUP Turn the unit on / off Remove/load the disc Start Play/Execute item or setting Play at 1/2, 1/4, 1/8 or 1/16 times speed Still Picture (1 time) Stop at the present playing point / (2 times) Stop playing Go...

User Guide
Page 22
To turn subtitles OFF, press the 'SUBTITLE' button until 'SUBTITLE OFF' is not pressed again within 3 seconds. Subtitle Screen Display * Some DVDs only allow access to select another subtitle language. If there are multiple languages press 'SUBTITLE' again to this function through the DVD menu. 22 SUBTITLE During disc playback press 'SUBTITLE' to select the subtitle language you desire*, with the current Subtitle Language Number (1) and the total Number of Subtitle Languages (2) displayed. The Subtitle display will disappear automatically if the 'SUBTITLE' button is displayed. Angle ...
To turn subtitles OFF, press the 'SUBTITLE' button until 'SUBTITLE OFF' is not pressed again within 3 seconds. Subtitle Screen Display * Some DVDs only allow access to select another subtitle language. If there are multiple languages press 'SUBTITLE' again to this function through the DVD menu. 22 SUBTITLE During disc playback press 'SUBTITLE' to select the subtitle language you desire*, with the current Subtitle Language Number (1) and the total Number of Subtitle Languages (2) displayed. The Subtitle display will disappear automatically if the 'SUBTITLE' button is displayed. Angle ...
User Guide
Page 28
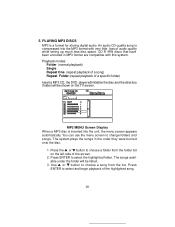
... be listed. 3. Playback modes: Folder (normal playback) Single Repeat One (repeat playback of a song) Repeat Folder (repeat playback of audio quality while taking up much less disc space. MP3 MENU Screen Display When a MP3 disc is a format for storing digital audio. CD-R /RW discs that have been encoded in the order they were burned onto the disc. 1. 5. You can use the menu screen to select the highlighted folder. The system plays the songs in MP3 format are compatible...
... be listed. 3. Playback modes: Folder (normal playback) Single Repeat One (repeat playback of a song) Repeat Folder (repeat playback of audio quality while taking up much less disc space. MP3 MENU Screen Display When a MP3 disc is a format for storing digital audio. CD-R /RW discs that have been encoded in the order they were burned onto the disc. 1. 5. You can use the menu screen to select the highlighted folder. The system plays the songs in MP3 format are compatible...

User Guide
Page 31
.... 8) Press "Stop" to center. n. You can select the picture you desire by using the UP/DOWN/LEFT/RIGHT/ENTER key. 10) Press "Play" or "OK", to a TV or another monitor a. CONNECTING TO OTHER EQUIPMENT 1. Connect one end of the supplied audio/video adapter cable (1/8" ) plug into the unit's DVD's AV jack, and connect the other end to right side. l. Press "display" 15th time, "WIPE FROM...
.... 8) Press "Stop" to center. n. You can select the picture you desire by using the UP/DOWN/LEFT/RIGHT/ENTER key. 10) Press "Play" or "OK", to a TV or another monitor a. CONNECTING TO OTHER EQUIPMENT 1. Connect one end of the supplied audio/video adapter cable (1/8" ) plug into the unit's DVD's AV jack, and connect the other end to right side. l. Press "display" 15th time, "WIPE FROM...
User Guide
Page 35
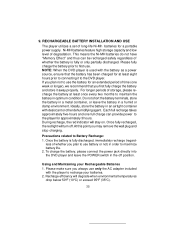
... been charged for a portable power supply. Once fully recharged, the red light will stay on. Once the battery is fully discharged, immediately recharge (regard- RECHARGEABLE BATTERY INSTALLATION AND USE The player utilizes a set of degradation. Ideally, store the battery in optimum condition. At this point you plan to recharge your Rechargeable Batteries 1. To charge the battery, please connect the power jack directly into the DVD player and leave the POWER switch...
... been charged for a portable power supply. Once fully recharged, the red light will stay on. Once the battery is fully discharged, immediately recharge (regard- RECHARGEABLE BATTERY INSTALLATION AND USE The player utilizes a set of degradation. Ideally, store the battery in optimum condition. At this point you plan to recharge your Rechargeable Batteries 1. To charge the battery, please connect the power jack directly into the DVD player and leave the POWER switch...
User Guide
Page 36
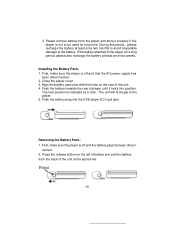
.... Installing the Battery Pack: 1. Align the battery pack pins with the holes on the left of battery and pull the battery from the player and store it locks into the DVD player DC input jack. Push the battery towards the rear of player until it properly if the player is off and that the AC power supply has been disconnected. 2. Removing the Battery Pack: 1. Press the release button...
.... Installing the Battery Pack: 1. Align the battery pack pins with the holes on the left of battery and pull the battery from the player and store it locks into the DVD player DC input jack. Push the battery towards the rear of player until it properly if the player is off and that the AC power supply has been disconnected. 2. Removing the Battery Pack: 1. Press the release button...

User Guide
Page 37
... WRITTEN WARRANTY. U.S.A. : AUDIOVOX ELECTRONICS CORPORATION, 150 MARCUS BLVD. This Warranty is similarly warranted for installation, removal or reinstallation of the product, or to damage to digital memory/media devices, gaming devices, discs, speakers, accessories, or electrical systems. This Warranty does not apply to any product or part thereof which vary from the date of original purchase, such defect(s) will be repaired or replaced...
... WRITTEN WARRANTY. U.S.A. : AUDIOVOX ELECTRONICS CORPORATION, 150 MARCUS BLVD. This Warranty is similarly warranted for installation, removal or reinstallation of the product, or to damage to digital memory/media devices, gaming devices, discs, speakers, accessories, or electrical systems. This Warranty does not apply to any product or part thereof which vary from the date of original purchase, such defect(s) will be repaired or replaced...


