User Manual
Page 3
TABLE OF CONTENTS Important Notices 2 Congratulations 3 Features 3 Controls and Indicators Diagram 4 Remote Control Operation 6 DVD Basics 10 Loading and Playing Discs 12 Settings and Adjustments 12 Playing JPG Files 16 Playing MP3 Files 17 Source Features 18 Troubleshooting 20 Specifications 22 Notes 23 1
TABLE OF CONTENTS Important Notices 2 Congratulations 3 Features 3 Controls and Indicators Diagram 4 Remote Control Operation 6 DVD Basics 10 Loading and Playing Discs 12 Settings and Adjustments 12 Playing JPG Files 16 Playing MP3 Files 17 Source Features 18 Troubleshooting 20 Specifications 22 Notes 23 1
User Manual
Page 4
... in motion, and that operates when the vehicle is in gear or when the parking brake is not applied must be accomplished using the remote control, while seat-belts remain fastened. Remember to the vehicle's ACC wiring. Caution children to avoid touching or scratching the screen, as the ... free cloth to the driver only if the LCD panel or video monitor is used for vehicle information, system control, rear or side observation or navigation. Enjoy your AUDIOVOX entertainment system but remember that these features will not be visible, directly or indirectly, to OFF or lowest position...
... in motion, and that operates when the vehicle is in gear or when the parking brake is not applied must be accomplished using the remote control, while seat-belts remain fastened. Remember to the vehicle's ACC wiring. Caution children to avoid touching or scratching the screen, as the ... free cloth to the driver only if the LCD panel or video monitor is used for vehicle information, system control, rear or side observation or navigation. Enjoy your AUDIOVOX entertainment system but remember that these features will not be visible, directly or indirectly, to OFF or lowest position...
User Manual
Page 6
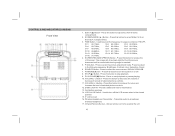
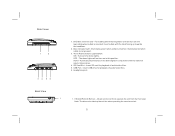
... the frequency in the closed position. 15. 9" LCD screen 16. Infrared Remote Sensor - SCREEN MODE ( ) Button - Press this button to decrease the volume or decrease the level of selected picture controls. 12. Press to enter the picture adjustment mode. STOP( ) Button ...screen downward until a comfortable viewing angle is reached. 5. Press this button to stop playback. 9. FMM Button - Allows remote control to an optional wireless headphone. 17. CONTROLS AND INDICATORS DIAGRAM Front View 1. PIC Button - Press to start playback or pause playing. 10. VOLUME ( + ...
... the frequency in the closed position. 15. 9" LCD screen 16. Infrared Remote Sensor - SCREEN MODE ( ) Button - Press this button to decrease the volume or decrease the level of selected picture controls. 12. Press to enter the picture adjustment mode. STOP( ) Button ...screen downward until a comfortable viewing angle is reached. 5. Press this button to stop playback. 9. FMM Button - Allows remote control to an optional wireless headphone. 17. CONTROLS AND INDICATORS DIAGRAM Front View 1. PIC Button - Press to start playback or pause playing. 10. VOLUME ( + ...
User Manual
Page 7
...indicator light - Turns on and load a disk when a disk is inserted. Note: The driver should stop the vehicle when operating the remote control. 5 Illuminates red when a disk is inserted. Automatically switches on in conjunction with the label facing up towards the headliner. 2. Insert ... of audio/video files. 6. Headphone jack Back View 1 1. Insert a disk with the vehicle's interior illumination. 4. USB Port - Allows remote control to operate the unit from the front seat. The dome lights will turn on the dome lights in this position. SD Card Slot - For...
...indicator light - Turns on and load a disk when a disk is inserted. Note: The driver should stop the vehicle when operating the remote control. 5 Illuminates red when a disk is inserted. Automatically switches on in conjunction with the label facing up towards the headliner. 2. Insert ... of audio/video files. 6. Headphone jack Back View 1 1. Insert a disk with the vehicle's interior illumination. 4. USB Port - Allows remote control to operate the unit from the front seat. The dome lights will turn on the dome lights in this position. SD Card Slot - For...
User Manual
Page 8
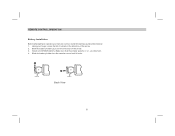
REMOTE CONTROL OPERATION Battery Installation Before attempting to operate your finger, press the tab (1) down in the direction of the arrow. 2. Install one CR2025 battery. Slide the battery holder (2) out in the direction of the arrow. 3. Slide the battery holder into the remote control until it locks. Make sure that the proper polarity (+ or -) is observed. 4. Using your remote control, install the battery as described below: 1. Back View 6
REMOTE CONTROL OPERATION Battery Installation Before attempting to operate your finger, press the tab (1) down in the direction of the arrow. 2. Install one CR2025 battery. Slide the battery holder (2) out in the direction of the arrow. 3. Slide the battery holder into the remote control until it locks. Make sure that the proper polarity (+ or -) is observed. 4. Using your remote control, install the battery as described below: 1. Back View 6
User Manual
Page 9
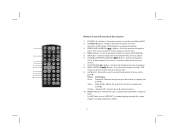
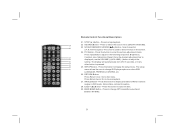
... A - Marks the end of the section to select menus on the screen. 9. REPEAT Button - press it again to access the DVD root menu (DVD MODE). 5. Remote Control Functional Description 1. Press to repeat playing the folder. 7 Scans backward at 2,4,8,16 times speed. PREVIOUS/CURSOR ( ) Button - Used to repeat playing present file; The cursor...
... A - Marks the end of the section to select menus on the screen. 9. REPEAT Button - press it again to access the DVD root menu (DVD MODE). 5. Remote Control Functional Description 1. Press to repeat playing the folder. 7 Scans backward at 2,4,8,16 times speed. PREVIOUS/CURSOR ( ) Button - Used to repeat playing present file; The cursor...
User Manual
Page 10
Remote Control Functional Description 11. Press this button to switch between " DAY" and "NIGHT" LCD illumination modes. In the "NIGHT" mode, the LCD backlight is dimmed to ... - Press this button to a preset level that is more suitable for wireless FMM. 12. DISPLAY Button - Enlarges the picture to 2 times the original size. This control toggles the unit between Wide (16:9) or Normal (4:3) aspect ratios. 18. Press to display current disc information while the disc is at maximum. ZOOM Button...
Remote Control Functional Description 11. Press this button to switch between " DAY" and "NIGHT" LCD illumination modes. In the "NIGHT" mode, the LCD backlight is dimmed to ... - Press this button to a preset level that is more suitable for wireless FMM. 12. DISPLAY Button - Enlarges the picture to 2 times the original size. This control toggles the unit between Wide (16:9) or Normal (4:3) aspect ratios. 18. Press to display current disc information while the disc is at maximum. ZOOM Button...
User Manual
Page 11
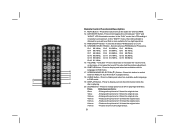
Remote Control Functional Description 21. Press this button to enter the picture adjustment mode Press repeatedly to change IRT transmitter wave band between M1 & M2. 9 SETUP Button - .... The display will automatically turn off in 6 seconds, or if any other button is used to change DVD player options such as OSD LANGUAGE, PARENTAL CONTROL etc. 26. Scan forward at 2,4,8,16 times speed. PIC Button - Press Return twice: Go to stop playback. 22 SOURCE Button - WAVE BAND Button - Press to...
Remote Control Functional Description 21. Press this button to enter the picture adjustment mode Press repeatedly to change IRT transmitter wave band between M1 & M2. 9 SETUP Button - .... The display will automatically turn off in 6 seconds, or if any other button is used to change DVD player options such as OSD LANGUAGE, PARENTAL CONTROL etc. 26. Scan forward at 2,4,8,16 times speed. PIC Button - Press Return twice: Go to stop playback. 22 SOURCE Button - WAVE BAND Button - Press to...
User Manual
Page 14
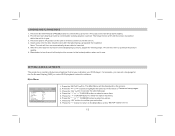
...use . 3. After the unit has been turned on the screen. 2. Press the "SETUP" button. Press the power ( ) button on the unit or remote control to confirm your DVD player. Press the " " CURSOR button to access the selected page. 4. The hinge friction will turn the unit off and pivot .... 4. SETTINGS AND ADJUSTMENTS The setup menu contains features and options that let you can set a language for the On Screen Display (OSD) or control DVD playback content for children. The Main Menu will drop down slightly. 2. Press the "OK" button to enter the option submenu. 6. Note:...
...use . 3. After the unit has been turned on the screen. 2. Press the "SETUP" button. Press the power ( ) button on the unit or remote control to confirm your DVD player. Press the " " CURSOR button to access the selected page. 4. The hinge friction will turn the unit off and pivot .... 4. SETTINGS AND ADJUSTMENTS The setup menu contains features and options that let you can set a language for the On Screen Display (OSD) or control DVD playback content for children. The Main Menu will drop down slightly. 2. Press the "OK" button to enter the option submenu. 6. Note:...
User Manual
Page 20
... unit. The audio/video device can be a video game system, video camera or other input device. AV1 The unit will appear on the unit or remote control.
... unit. The audio/video device can be a video game system, video camera or other input device. AV1 The unit will appear on the unit or remote control.
User Manual
Page 21
...position, as this case, you must use the remote control supplied with the vehicle interior lighting. INFRARED REMOTE SENSORS The unit incorporates two infrared remote sensors which relay signals from the remote control to allow the lights to be controlled simply by a three position slide switch. OVERHEAD DOME... signals from turning ON with the component. 19 The OFF position will prevent the lights from most manufacturer's remote control to its remote control at the remote sensor. The AUTO position will turn ON and OFF with the vehicle interior lighting. Do not leave the ...
...position, as this case, you must use the remote control supplied with the vehicle interior lighting. INFRARED REMOTE SENSORS The unit incorporates two infrared remote sensors which relay signals from the remote control to allow the lights to be controlled simply by a three position slide switch. OVERHEAD DOME... signals from turning ON with the component. 19 The OFF position will prevent the lights from most manufacturer's remote control to its remote control at the remote sensor. The AUTO position will turn ON and OFF with the vehicle interior lighting. Do not leave the ...


