
User Guide
Page 3
... Safety information...vi About this guide...vii Z97-WS specifications summary ix Package contents...xv Installation tools and components xvi Chapter 1: Product Introduction 1.1 Special features 1-1 1.1.1 Product highlights 1-1 1.1.2 ASUS-exclusive workstation features 1-2 1.1.3 Other special ... 2.1.5 ATX Power connection 2-7 2.1.6 SATA device connection 2-8 2.1.7 Front I/O Connector 2-9 2.1.8 Expansion Card installation 2-10 2.2 BIOS update utility 2-11 2.3 Motherboard rear and audio connections 2-13 2.3.1 Rear I/O connection 2-13 2.3.2 Audio I/O connections 2-15 2.4...
... Safety information...vi About this guide...vii Z97-WS specifications summary ix Package contents...xv Installation tools and components xvi Chapter 1: Product Introduction 1.1 Special features 1-1 1.1.1 Product highlights 1-1 1.1.2 ASUS-exclusive workstation features 1-2 1.1.3 Other special ... 2.1.5 ATX Power connection 2-7 2.1.6 SATA device connection 2-8 2.1.7 Front I/O Connector 2-9 2.1.8 Expansion Card installation 2-10 2.2 BIOS update utility 2-11 2.3 Motherboard rear and audio connections 2-13 2.3.1 Rear I/O connection 2-13 2.3.2 Audio I/O connections 2-15 2.4...
User Guide
Page 4
...3.11 Updating BIOS 3-60 3.11.1 EZ Update 3-60 3.11.2 ASUS EZ Flash 2 3-61 3.11.3 ASUS CrashFree BIOS 3 3-62 Chapter 4: Software support 4.1 Installing an operating system 4-1 4.2 Support DVD information 4-1 4.2.1 Running the support DVD 4-1 4.2.2 Obtaining the software manuals 4-3 4.3 Software information 4-4 4.4 AI Suite 3...4-4 4.4.1 Ai Charger 4-7 iv Chapter 3: BIOS setup 3.1 Knowing BIOS 3-1 3.2 BIOS setup... 3-44 3.6.9 Network Stack Configuration 3-45 3.7 Monitor menu 3-46 3.8 Boot menu 3-50 3.9 Tool menu 3-56 3.9.1 ASUS EZ Flash 2 Utility 3-56...
...3.11 Updating BIOS 3-60 3.11.1 EZ Update 3-60 3.11.2 ASUS EZ Flash 2 3-61 3.11.3 ASUS CrashFree BIOS 3 3-62 Chapter 4: Software support 4.1 Installing an operating system 4-1 4.2 Support DVD information 4-1 4.2.1 Running the support DVD 4-1 4.2.2 Obtaining the software manuals 4-3 4.3 Software information 4-4 4.4 AI Suite 3...4-4 4.4.1 Ai Charger 4-7 iv Chapter 3: BIOS setup 3.1 Knowing BIOS 3-1 3.2 BIOS setup... 3-44 3.6.9 Network Stack Configuration 3-45 3.7 Monitor menu 3-46 3.8 Boot menu 3-50 3.9 Tool menu 3-56 3.9.1 ASUS EZ Flash 2 Utility 3-56...

User Guide
Page 5
4.4.2 USB 3.0 Boost 4-8 4.4.3 EZ Update 4-9 4.4.4 USB BIOS Flashback 4-11 4.4.5 USB Charger 4-13 4.4.6 Push Notice 4-14 4.4.7 System Information 4-17 4.5 Audio configurations 4-18 4.6 ASUS Dr. Power Utility 4-20 Chapter 5: RAID support 5.1 RAID configurations 5-1 5.1.1 RAID definitions 5-1 5.1.2 Installing Serial ATA hard disks 5-2 5.1.3 Setting the RAID item in BIOS 5-2 5.1.4 Intel® Rapid Storage ... cards 6-9 6.2.5 Installing the device drivers 6-10 6.2.6 Enabling the NVIDIA® SLI™ technology 6-10 Appendices Notices ...A-1 ASUS contact information A-5 v
4.4.2 USB 3.0 Boost 4-8 4.4.3 EZ Update 4-9 4.4.4 USB BIOS Flashback 4-11 4.4.5 USB Charger 4-13 4.4.6 Push Notice 4-14 4.4.7 System Information 4-17 4.5 Audio configurations 4-18 4.6 ASUS Dr. Power Utility 4-20 Chapter 5: RAID support 5.1 RAID configurations 5-1 5.1.1 RAID definitions 5-1 5.1.2 Installing Serial ATA hard disks 5-2 5.1.3 Setting the RAID item in BIOS 5-2 5.1.4 Intel® Rapid Storage ... cards 6-9 6.2.5 Installing the device drivers 6-10 6.2.6 Enabling the NVIDIA® SLI™ technology 6-10 Appendices Notices ...A-1 ASUS contact information A-5 v
User Guide
Page 7
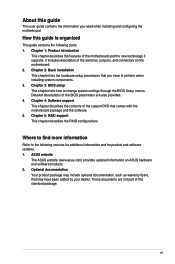
... documentation Your product package may have to change system settings through the BIOS Setup menus. vii Detailed descriptions of the standard package. ASUS website The ASUS website (www.asus.com) provides updated information on the motherboard. 2. These documents are not part of the BIOS parameters are also provided. 4. Chapter 2: Basic installation This chapter lists the hardware...
... documentation Your product package may have to change system settings through the BIOS Setup menus. vii Detailed descriptions of the standard package. ASUS website The ASUS website (www.asus.com) provides updated information on the motherboard. 2. These documents are not part of the BIOS parameters are also provided. 4. Chapter 2: Basic installation This chapter lists the hardware...
User Guide
Page 14
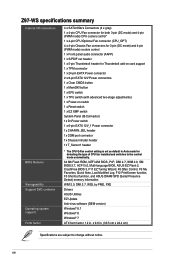
..., PXE Drivers ASUS Utilities EZ Update Anti-virus software (OEM version) Windows® 8.1 Windows® 8 Windows® 7 ATX form factor: 12 in Auto mode for Thunderbolt add-on card support 1 x TPM connector 1 x 24-pin EATX Power connector 2 x 8-pin EATX 12V Power connectors 1 x Clear CMOS button 1 x MemOK! Z97-WS specifications summary Internal I/O connectors BIOS features Manageability...
..., PXE Drivers ASUS Utilities EZ Update Anti-virus software (OEM version) Windows® 8.1 Windows® 8 Windows® 7 ATX form factor: 12 in Auto mode for Thunderbolt add-on card support 1 x TPM connector 1 x 24-pin EATX Power connector 2 x 8-pin EATX 12V Power connectors 1 x Clear CMOS button 1 x MemOK! Z97-WS specifications summary Internal I/O connectors BIOS features Manageability...
User Guide
Page 30
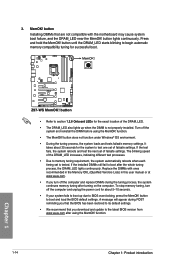
... memory tuning after the whole tuning process, the DRAM_LED lights continuously. Z97-WS Z97-WS MemOK! button • Refer to BIOS overclocking, press the MemOK! button until the DRAM_LED starts blinking to the latest BIOS version from www.asus.com after using the MemOK! To stop memory tuning, turn off the... you that the BIOS has been restored to its default settings. • We recommend that are not compatible with ones recommended in the Memory QVL (Qualified Vendors Lists) in this user manual or at www.asus.com. • If you download and update to begin automatic ...
... memory tuning after the whole tuning process, the DRAM_LED lights continuously. Z97-WS Z97-WS MemOK! button • Refer to BIOS overclocking, press the MemOK! button until the DRAM_LED starts blinking to the latest BIOS version from www.asus.com after using the MemOK! To stop memory tuning, turn off the... you that the BIOS has been restored to its default settings. • We recommend that are not compatible with ones recommended in the Memory QVL (Qualified Vendors Lists) in this user manual or at www.asus.com. • If you download and update to begin automatic ...
User Guide
Page 65
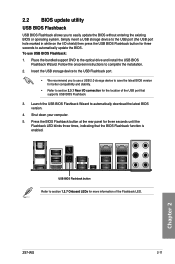
... update the BIOS. Simply insert a USB storage device to the USB port (the USB port hole marked in white on the I /O connection for three seconds to section 2.3.1 Rear I /O shield) then press the USB BIOS Flashback button for the location of the Flashback LED. Chapter 2 Z97-WS ...2-11 Insert the USB storage device to the USB Flashback port. • We recommend you to automatically download the latest BIOS version. 4.
... update the BIOS. Simply insert a USB storage device to the USB port (the USB port hole marked in white on the I /O connection for three seconds to section 2.3.1 Rear I /O shield) then press the USB BIOS Flashback button for the location of the Flashback LED. Chapter 2 Z97-WS ...2-11 Insert the USB storage device to the USB Flashback port. • We recommend you to automatically download the latest BIOS version. 4.

User Guide
Page 66
This may have risks. Q-Code Logger Q-Code Logger allows you to boot up, please contact your local ASUS Service Center. To use Q-Code Logger: 1. Press the Q-Code Logger button at the rear panel for three seconds to the Q-Code Logger port. 2. 6. ...and turns into a solid light, this scenario happens, please restart the system to the section 3.11 Updating BIOS in Chapter 3. • Do not unplug portable disk, power system, or press the CLR_CMOS button while BIOS update is completed. Insert the USB storage device to automatically store the Q-Code event logs. Wait until the...
This may have risks. Q-Code Logger Q-Code Logger allows you to boot up, please contact your local ASUS Service Center. To use Q-Code Logger: 1. Press the Q-Code Logger button at the rear panel for three seconds to the Q-Code Logger port. 2. 6. ...and turns into a solid light, this scenario happens, please restart the system to the section 3.11 Updating BIOS in Chapter 3. • Do not unplug portable disk, power system, or press the CLR_CMOS button while BIOS update is completed. Insert the USB storage device to automatically store the Q-Code event logs. Wait until the...
User Guide
Page 68
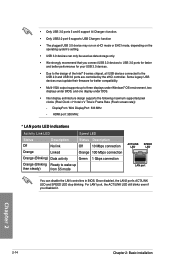
... 10 Mbps connection Orange 100 Mbps connection Green 1 Gbps connection Orange (Blinking Ready to three displays under Windows® OS environment, two displays under BIOS, and one display under DOS. • Intel display architecture design supports the following maximum supported pixel clocks (Pixel Clock = H total x V ... port You can only be used as data storage only. • We strongly recommend that you disabled it. Some legacy USB devices must update their firmware for your USB 3.0 devices. • Due to the design of the Intel® 9 series chipset, all USB devices connected...
... 10 Mbps connection Orange 100 Mbps connection Green 1 Gbps connection Orange (Blinking Ready to three displays under Windows® OS environment, two displays under BIOS, and one display under DOS. • Intel display architecture design supports the following maximum supported pixel clocks (Pixel Clock = H total x V ... port You can only be used as data storage only. • We strongly recommend that you disabled it. Some legacy USB devices must update their firmware for your USB 3.0 devices. • Due to the design of the Intel® 9 series chipset, all USB devices connected...

User Guide
Page 73
... personnel. Inappropriate BIOS settings may result to "UEFI BIOS" unless otherwise specified. We strongly recommend that requires further BIOS settings or update. When downloading or updating the BIOS file, rename it as your operating system. Chapter 3 Z97-WS 3-1 The term "BIOS" in the motherboard...circumstances, the default BIOS settings apply to most conditions to run the BIOS Setup. • You have installed a new system component that you to ensure optimal performance. Chapter 3: BIOS setup BIOS setup 3.1 Knowing BIOS 3 The new ASUS UEFI BIOS is a Unified ...
... personnel. Inappropriate BIOS settings may result to "UEFI BIOS" unless otherwise specified. We strongly recommend that requires further BIOS settings or update. When downloading or updating the BIOS file, rename it as your operating system. Chapter 3 Z97-WS 3-1 The term "BIOS" in the motherboard...circumstances, the default BIOS settings apply to most conditions to run the BIOS Setup. • You have installed a new system component that you to ensure optimal performance. Chapter 3: BIOS setup BIOS setup 3.1 Knowing BIOS 3 The new ASUS UEFI BIOS is a Unified ...

User Guide
Page 74
...under the Exit menu or press hotkey . Chapter 3 3-2 Chapter 3: BIOS setup 3.2 BIOS setup program Use the BIOS Setup to update the BIOS or configure its routines. Entering BIOS Setup after POST To enter BIOS Setup after changing any BIOS setting, load the default settings to erase the RTC RAM via the ...Clear CMOS button. • The BIOS setup program does not support the...
...under the Exit menu or press hotkey . Chapter 3 3-2 Chapter 3: BIOS setup 3.2 BIOS setup program Use the BIOS Setup to update the BIOS or configure its routines. Entering BIOS Setup after POST To enter BIOS Setup after changing any BIOS setting, load the default settings to erase the RTC RAM via the ...Clear CMOS button. • The BIOS setup program does not support the...
User Guide
Page 126
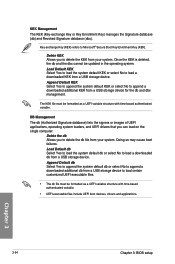
... applications, operating system loaders, and UEFI drivers that you to load certain customized UEFI executable files. • The db file must be updated in the operating system. KEK Management The KEK (Key-exchange Key or Key Enrollment Key) manages the Signature database (db) and Revoked Signature... Yes to load the system default KEK or select No to append a downloaded additional KEK from your system. Chapter 3 3-54 Chapter 3: BIOS setup Doing so may cause boot failures. Append Default KEK Select Yes to append the system default KEK or select No to load a downloaded...
... applications, operating system loaders, and UEFI drivers that you to load certain customized UEFI executable files. • The db file must be updated in the operating system. KEK Management The KEK (Key-exchange Key or Key Enrollment Key) manages the Signature database (db) and Revoked Signature... Yes to load the system default KEK or select No to append a downloaded additional KEK from your system. Chapter 3 3-54 Chapter 3: BIOS setup Doing so may cause boot failures. Append Default KEK Select Yes to append the system default KEK or select No to load a downloaded...

User Guide
Page 132
... to update your BIOS when necessary. ASUS CrashFree BIOS 3: Restores the BIOS using a USB flash drive. 3. Chapter 3 3-60 Chapter 3: BIOS setup If there is potentially risky. 3.11 Updating BIOS The ASUS website publishes the latest BIOS versions to manage and update the motherboard BIOS setup program. 1. Carefully follow the instructions in this chapter to section 4.4.3 EZ Update of BIOS, DO NOT manually update the BIOS. ASUS BIOS Updater: Updates the BIOS...
... to update your BIOS when necessary. ASUS CrashFree BIOS 3: Restores the BIOS using a USB flash drive. 3. Chapter 3 3-60 Chapter 3: BIOS setup If there is potentially risky. 3.11 Updating BIOS The ASUS website publishes the latest BIOS versions to manage and update the motherboard BIOS setup program. 1. Carefully follow the instructions in this chapter to section 4.4.3 EZ Update of BIOS, DO NOT manually update the BIOS. ASUS BIOS Updater: Updates the BIOS...

User Guide
Page 133
... then press . 5. Press to switch to the Drive field. 4. To update the BIOS using this utility, download the latest BIOS from the ASUS website at www.asus.com. Press to switch to the Folder Info field. 6. Z97-WS 3-61 3.11.2 ASUS EZ Flash 2 ASUS EZ Flash 2 allows you start using EZ Flash 2: 1. Go to the Tool menu to select...
... then press . 5. Press to switch to the Drive field. 4. To update the BIOS using this utility, download the latest BIOS from the ASUS website at www.asus.com. Press to switch to the Folder Info field. 6. Z97-WS 3-61 3.11.2 ASUS EZ Flash 2 ASUS EZ Flash 2 allows you start using EZ Flash 2: 1. Go to the Tool menu to select...

User Guide
Page 135
... be exactly the same as the boot device. The screen captures used in DOS environment. 3.11.4 ASUS BIOS Updater ASUS BIOS Updater allows you to boot using defaults Chapter 3 Z97-WS 3-63 Before updating BIOS • Prepare the motherboard support DVD and a USB flash drive. • Download the latest BIOS file and BIOS Updater from http://support.asus.com and save them in DOS: 1.
... be exactly the same as the boot device. The screen captures used in DOS environment. 3.11.4 ASUS BIOS Updater ASUS BIOS Updater allows you to boot using defaults Chapter 3 Z97-WS 3-63 Before updating BIOS • Prepare the motherboard support DVD and a USB flash drive. • Download the latest BIOS file and BIOS Updater from http://support.asus.com and save them in DOS: 1.

User Guide
Page 136
...FreeDOS prompt, type bupdater /pc /g and press . D:/> bupdater /pc /g 2. Press to switch from Files panel to select the BIOS file and press . On the BIOS Updater screen, press to switch from Drives panel to Files panel then press keys to Drives panel then select D:. ISOLINUX 3.20 2006-08... to enter FreeDOS prompt. Drives panel ASUSTeK BIOS Updater for DOS V1.30 [2014/01/01] Current ROM BOARD: Z97-DELUXE VER: 0210 (H :00 B :00) DATE: 02/12/2014 PATH: C:\ Update ROM BOARD: Unknown VER: Unknown DATE: Unknown C: FORMAN~1 D: Z97-DE~1.CAP 8390626 2014-02-10 21:14...
...FreeDOS prompt, type bupdater /pc /g and press . D:/> bupdater /pc /g 2. Press to switch from Files panel to select the BIOS file and press . On the BIOS Updater screen, press to switch from Drives panel to Files panel then press keys to Drives panel then select D:. ISOLINUX 3.20 2006-08... to enter FreeDOS prompt. Drives panel ASUSTeK BIOS Updater for DOS V1.30 [2014/01/01] Current ROM BOARD: Z97-DELUXE VER: 0210 (H :00 B :00) DATE: 02/12/2014 PATH: C:\ Update ROM BOARD: Unknown VER: Unknown DATE: Unknown C: FORMAN~1 D: Z97-DE~1.CAP 8390626 2014-02-10 21:14...
User Guide
Page 137
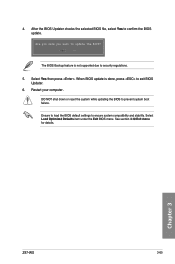
... to ensure system compatibility and stability. Restart your computer. When BIOS update is not supported due to exit BIOS Updater. 6. Select Load Optimized Defaults item under the Exit BIOS menu. Ensure to load the BIOS default settings to update the BIOS? 4. Chapter 3 Z97-WS 3-65 After the BIOS Updater checks the selected BIOS file, select Yes to prevent system boot failure. DO NOT...
... to ensure system compatibility and stability. Restart your computer. When BIOS update is not supported due to exit BIOS Updater. 6. Select Load Optimized Defaults item under the Exit BIOS menu. Ensure to load the BIOS default settings to update the BIOS? 4. Chapter 3 Z97-WS 3-65 After the BIOS Updater checks the selected BIOS file, select Yes to prevent system boot failure. DO NOT...
User Guide
Page 148
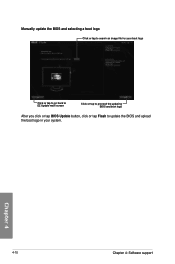
Manually update the BIOS and selecting a boot logo Click or tap to search an image file for your boot logo Click or tap to go back to EZ Update main screen Click or tap to proceed the updating BIOS and boot logo After you click or tap BIOS Update button, click or tap Flash to update the BIOS and upload the boot logo in your system. Chapter 4 4-10 Chapter 4: Software support
Manually update the BIOS and selecting a boot logo Click or tap to search an image file for your boot logo Click or tap to go back to EZ Update main screen Click or tap to proceed the updating BIOS and boot logo After you click or tap BIOS Update button, click or tap Flash to update the BIOS and upload the boot logo in your system. Chapter 4 4-10 Chapter 4: Software support

User Guide
Page 149
... to save the latest BIOS version to check for a new BIOS update available for the latest available BIOS and set the BIOS download schedule. on the top-right corner of days for the BIOS download schedule. 2. Using USB BIOS Flashback Set a schedule for the BIOS Update download Click or tap to a USB storage device. Chapter 4 Z97-WS 4-11 In the Download...
... to save the latest BIOS version to check for a new BIOS update available for the latest available BIOS and set the BIOS download schedule. on the top-right corner of days for the BIOS download schedule. 2. Using USB BIOS Flashback Set a schedule for the BIOS Update download Click or tap to a USB storage device. Chapter 4 Z97-WS 4-11 In the Download...
User Guide
Page 150
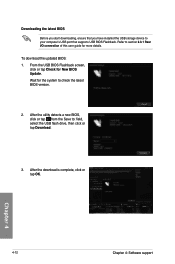
... utility detects a new BIOS, click or tap from the Save to your computer's USB port that you have installed the USB storage device to : field, select the USB flash drive, then click or tap Download. 3. From the USB BIOS Flashback screen, click or tap Check for New BIOS Update. To download the updated BIOS: 1. Chapter 4 4-12...
... utility detects a new BIOS, click or tap from the Save to your computer's USB port that you have installed the USB storage device to : field, select the USB flash drive, then click or tap Download. 3. From the USB BIOS Flashback screen, click or tap Check for New BIOS Update. To download the updated BIOS: 1. Chapter 4 4-12...
