

User Guide
Page 4
...Do not place the product in your retailer. iv Contact a qualified service technician or your area. If you need when installing and configuring the motherboard. How this guide This user guide contains the information you detect any area where it may be exposed... devices to or from connectors, slots, sockets and circuitry. • Avoid dust, humidity, and temperature extremes. Operation safety • Before installing the motherboard and adding components, carefully read all the manuals that came with the product, contact a qualified service technician or your dealer immediately....
...Do not place the product in your retailer. iv Contact a qualified service technician or your area. If you need when installing and configuring the motherboard. How this guide This user guide contains the information you detect any area where it may be exposed... devices to or from connectors, slots, sockets and circuitry. • Avoid dust, humidity, and temperature extremes. Operation safety • Before installing the motherboard and adding components, carefully read all the manuals that came with the product, contact a qualified service technician or your dealer immediately....

User Guide
Page 7
...electrical noise to the audio configuration - Absolute Pitch 192 khz/24-bit true BD lossless sound - Z97-AR specifications summary VGA Multi-GPU Support Storage LAN Audio USB ASUS Exclusive Features - Audio Amplifier to 3 displays. Premium Japan made audio capacitors provides warm, natural,... Express port (one at rear panel) High Performance 5-Way Optimization by Dual Intelligent Processors 5 - Maximum shared memory of CPU installed. Supports AMD® Quad-GPU CrossFireX™ Technology Supports NVIDIA® Quad-GPU SLI™ Technology (with 2 PCIe x16 graphics cards...
...electrical noise to the audio configuration - Absolute Pitch 192 khz/24-bit true BD lossless sound - Z97-AR specifications summary VGA Multi-GPU Support Storage LAN Audio USB ASUS Exclusive Features - Audio Amplifier to 3 displays. Premium Japan made audio capacitors provides warm, natural,... Express port (one at rear panel) High Performance 5-Way Optimization by Dual Intelligent Processors 5 - Maximum shared memory of CPU installed. Supports AMD® Quad-GPU CrossFireX™ Technology Supports NVIDIA® Quad-GPU SLI™ Technology (with 2 PCIe x16 graphics cards...
User Guide
Page 11
... can cause you install the motherboard, study the configuration of the chassis. 1.2.2 Screw holes Place six screws into the holes indicated by the edges to avoid touching the ICs on a grounded antistatic pad or in the correct orientation. ASUS Z97-AR 1-1 Failure to ... to the motherboard, peripherals, or components. 1.2 Motherboard overview Before you physical injury and damage to motherboard components. 1.2.1 Placement direction When installing the motherboard, place it on them. • Whenever you uninstall any component. • Before handling components, use a grounded wrist ...
... can cause you install the motherboard, study the configuration of the chassis. 1.2.2 Screw holes Place six screws into the holes indicated by the edges to avoid touching the ICs on a grounded antistatic pad or in the correct orientation. ASUS Z97-AR 1-1 Failure to ... to the motherboard, peripherals, or components. 1.2 Motherboard overview Before you physical injury and damage to motherboard components. 1.2.1 Placement direction When installing the motherboard, place it on them. • Whenever you uninstall any component. • Before handling components, use a grounded wrist ...

User Guide
Page 14
... socket. • Ensure that you see any damage to the socket contacts resulting from incorrect CPU installation/removal, or misplacement/loss/incorrect removal of the PnP cap. ASUS will process Return Merchandise Authorization (RMA) requests only if the motherboard comes with a surface mount LGA1150... not cover damage to the PnP cap/socket contacts/motherboard components. ASUS will shoulder the cost of the motherboard, ensure that the PnP cap is on the socket and the socket contacts are unplugged before installing the CPU. 1-4 Chapter 1: Product introduction Ensure that all power ...
... socket. • Ensure that you see any damage to the socket contacts resulting from incorrect CPU installation/removal, or misplacement/loss/incorrect removal of the PnP cap. ASUS will process Return Merchandise Authorization (RMA) requests only if the motherboard comes with a surface mount LGA1150... not cover damage to the PnP cap/socket contacts/motherboard components. ASUS will shoulder the cost of the motherboard, ensure that the PnP cap is on the socket and the socket contacts are unplugged before installing the CPU. 1-4 Chapter 1: Product introduction Ensure that all power ...

User Guide
Page 15
1.3.1 Installing the CPU ASUS Z97-AR 1-5
1.3.1 Installing the CPU ASUS Z97-AR 1-5

User Guide
Page 16
1.3.2 CPU heatsink and fan assembly installation Apply the Thermal Interface Material to the CPU heatsink and CPU before you install the heatsink and fan, if necessary. To install the CPU heatsink and fan assembly 1-6 Chapter 1: Product introduction
1.3.2 CPU heatsink and fan assembly installation Apply the Thermal Interface Material to the CPU heatsink and CPU before you install the heatsink and fan, if necessary. To install the CPU heatsink and fan assembly 1-6 Chapter 1: Product introduction

User Guide
Page 17
A DDR3 module is recommended to protect the CPU. According to the DDR3 slot. DO NOT install a DDR or DDR2 memory module to Intel® CPU spec, DIMM voltage below 1.65 V is notched differently from a DDR or DDR2 module. ASUS Z97-AR 1-7 To uninstall the CPU heatsink and fan assembly 1.4 System memory 1.4.1 Overview This motherboard comes with four Double Data Rate 3 (DDR3) Dual Inline Memory Module (DIMM) sockets.
A DDR3 module is recommended to protect the CPU. According to the DDR3 slot. DO NOT install a DDR or DDR2 memory module to Intel® CPU spec, DIMM voltage below 1.65 V is notched differently from a DDR or DDR2 module. ASUS Z97-AR 1-7 To uninstall the CPU heatsink and fan assembly 1.4 System memory 1.4.1 Overview This motherboard comes with four Double Data Rate 3 (DDR3) Dual Inline Memory Module (DIMM) sockets.

User Guide
Page 18
... modules. • Due to the recommended memory population below. • You may install varying memory sizes in Channel A and Channel B. To operate at the vendor-marked or at : www.asus.com for the dual-channel configuration. For effective use a more efficient memory cooling system...full memory load (4 DIMMs). • Visit the ASUS website at a higher frequency, refer to install 4GB or more memory on the CPU's capabilities and other installed devices. • For system stability, use of memory, we recommend that you install memory modules of the following: - The stability ...
... modules. • Due to the recommended memory population below. • You may install varying memory sizes in Channel A and Channel B. To operate at the vendor-marked or at : www.asus.com for the dual-channel configuration. For effective use a more efficient memory cooling system...full memory load (4 DIMMs). • Visit the ASUS website at a higher frequency, refer to install 4GB or more memory on the CPU's capabilities and other installed devices. • For system stability, use of memory, we recommend that you install memory modules of the following: - The stability ...

User Guide
Page 30
... on the slot. 5. Replace the system cover. 1-20 Chapter 1: Product introduction Failure to do so may need to install expansion cards. Secure the card to use . 4. Before installing the expansion card, read the documentation that they support. Keep the screw for the card. 2. Align the card connector ... the bracket opposite the slot that you intend to the chassis with the slot and press firmly until the card is already installed in a chassis). 3. To remove a DIMM 1.5 Expansion slots In the future, you may cause you physical injury and damage motherboard components...
... on the slot. 5. Replace the system cover. 1-20 Chapter 1: Product introduction Failure to do so may need to install expansion cards. Secure the card to use . 4. Before installing the expansion card, read the documentation that they support. Keep the screw for the card. 2. Align the card connector ... the bracket opposite the slot that you intend to the chassis with the slot and press firmly until the card is already installed in a chassis). 3. To remove a DIMM 1.5 Expansion slots In the future, you may cause you physical injury and damage motherboard components...
User Guide
Page 31
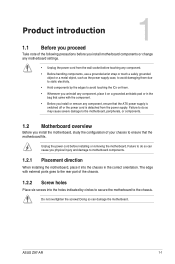
... x16_2 slot PCI_2 slot PCIe 2.0 x16_3 slot ASUS Z97-AR 1-21 When using PCI cards on the system and change the necessary BIOS settings, if any. Assign an IRQ to the card. 3. Slot No. See Chapter 2 for the expansion card. Install the software drivers for information on BIOS setup.... 2. 1.5.2 Configuring an expansion card After installing the expansion card, configure it by adjusting the software settings: 1. Turn on shared slots, ensure...
... x16_2 slot PCI_2 slot PCIe 2.0 x16_3 slot ASUS Z97-AR 1-21 When using PCI cards on the system and change the necessary BIOS settings, if any. Assign an IRQ to the card. 3. Slot No. See Chapter 2 for the expansion card. Install the software drivers for information on BIOS setup.... 2. 1.5.2 Configuring an expansion card After installing the expansion card, configure it by adjusting the software settings: 1. Turn on shared slots, ensure...

User Guide
Page 34
CPU Over Voltage jumper (3-pin CPU_OV) The CPU Over Voltage jumper allows you to pins 1-2. 1-24 Chapter 1: Product introduction To go back to its default CPU voltage setting, insert the jumper to set a higher CPU voltage for a flexible overclocking system, depending on the type of the installed CPU. 2. To gain more CPU voltage setting, insert the jumper to pins 2-3.
CPU Over Voltage jumper (3-pin CPU_OV) The CPU Over Voltage jumper allows you to pins 1-2. 1-24 Chapter 1: Product introduction To go back to its default CPU voltage setting, insert the jumper to set a higher CPU voltage for a flexible overclocking system, depending on the type of the installed CPU. 2. To gain more CPU voltage setting, insert the jumper to pins 2-3.
User Guide
Page 37
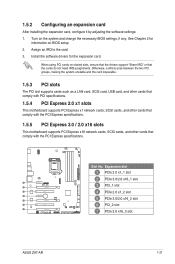
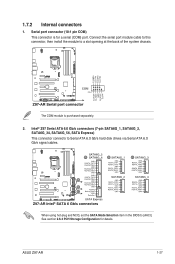
... install the module to Serial ATA 6.0 Gb/s hard disk drives via Serial ATA 6.0 Gb/s signal cables. See section 2.6.3 PCH Storage Configuration for a serial (COM) port. Intel® Z97 Serial ATA 6.0 Gb/s connectors (7-pin SATA6G_1, SATA6G_2, SATA6G_34, SATA6G_56, SATA Express) This connector connects to a slot opening at the back of the system chassis. ASUS Z97-AR...
... install the module to Serial ATA 6.0 Gb/s hard disk drives via Serial ATA 6.0 Gb/s signal cables. See section 2.6.3 PCH Storage Configuration for a serial (COM) port. Intel® Z97 Serial ATA 6.0 Gb/s connectors (7-pin SATA6G_1, SATA6G_2, SATA6G_34, SATA6G_56, SATA Express) This connector connects to a slot opening at the back of the system chassis. ASUS Z97-AR...

User Guide
Page 38
...wire of each cable matches the ground pin of maximum 1A (12 W) fan power. • The CPU_FAN connector and CHA_FAN connectors support the ASUS FAN Xpert 3 feature. 1-28 Chapter 1: Product introduction 3. Insufficient air flow inside the system may damage the motherboard components. These are not jumpers...chassis fan connectors (4-pin CPU_FAN, 4-pin CPU_OPT; Do not place jumper caps on the motherboard, ensuring that the CPU fan cable is securely installed to the CPU fan connector. • The CPU_FAN connector supports the CPU fan of the connector. • DO NOT forget to connect...
...wire of each cable matches the ground pin of maximum 1A (12 W) fan power. • The CPU_FAN connector and CHA_FAN connectors support the ASUS FAN Xpert 3 feature. 1-28 Chapter 1: Product introduction 3. Insufficient air flow inside the system may damage the motherboard components. These are not jumpers...chassis fan connectors (4-pin CPU_FAN, 4-pin CPU_OPT; Do not place jumper caps on the motherboard, ensuring that the CPU fan cable is securely installed to the CPU fan connector. • The CPU_FAN connector supports the CPU fan of the connector. • DO NOT forget to connect...

User Guide
Page 39
... W. • DO NOT forget to install additional devices. The power supply plugs are for ATX power supply plugs. The system may become unstable or may not boot up . • We recommend that complies with 1000W power or above to fit these connectors in only one orientation. ASUS Z97-AR 1-29 4. Otherwise, the system will...
... W. • DO NOT forget to install additional devices. The power supply plugs are for ATX power supply plugs. The system may become unstable or may not boot up . • We recommend that complies with 1000W power or above to fit these connectors in only one orientation. ASUS Z97-AR 1-29 4. Otherwise, the system will...

User Guide
Page 40
... to connect an AC'97 front panel audio module to this connector is for a chassis-mounted front panel audio I /O module cable to this connector, then install the module to [HD]. By default, this connector, set to [HD]. Digital audio connector (4-1 pin SPDIF_OUT) This connector is purchased separately. 1-30 Chapter 1: Product introduction...
... to connect an AC'97 front panel audio module to this connector is for a chassis-mounted front panel audio I /O module cable to this connector, then install the module to [HD]. By default, this connector, set to [HD]. Digital audio connector (4-1 pin SPDIF_OUT) This connector is purchased separately. 1-30 Chapter 1: Product introduction...

User Guide
Page 41
M.2 socket 3 This socket allows you to install an M.2 (NGFF) SSD module. • This socket supports M Key and type 2260/2280 storage devices. • The M.2 (NGFF) SSD module is for details. 8. DirectKey connector (2-... the button cable that supports DirectKey, from the chassis to the technical documentation that came with the extra button cable that supports the DirectKey function. ASUS Z97-AR 1-31 Ensure that your chassis comes with the chassis for the chassis-mounted button that supports the DirectKey feature. 7. Refer to this connector on the...
M.2 socket 3 This socket allows you to install an M.2 (NGFF) SSD module. • This socket supports M Key and type 2260/2280 storage devices. • The M.2 (NGFF) SSD module is for details. 8. DirectKey connector (2-... the button cable that supports DirectKey, from the chassis to the technical documentation that came with the extra button cable that supports the DirectKey function. ASUS Z97-AR 1-31 Ensure that your chassis comes with the chassis for the chassis-mounted button that supports the DirectKey feature. 7. Refer to this connector on the...

User Guide
Page 42
... separately. These connectors are for USB 2.0 ports. Never connect a 1394 cable to fully use the USB 2.0 ports under Windows® 7. 10. We recommend you to install the related driver to the USB connectors. Doing so will damage the motherboard! These USB connectors comply with USB 2.0 specifications and supports up to a slot... opening at the back of the system chassis. Connect the USB module cable to any of these connectors, then install the module to 480 Mb/s connection speed. 9.
... separately. These connectors are for USB 2.0 ports. Never connect a 1394 cable to fully use the USB 2.0 ports under Windows® 7. 10. We recommend you to install the related driver to the USB connectors. Doing so will damage the motherboard! These USB connectors comply with USB 2.0 specifications and supports up to a slot... opening at the back of the system chassis. Connect the USB module cable to any of these connectors, then install the module to 480 Mb/s connection speed. 9.

User Guide
Page 44
... use the USB 3.0 ports under Windows® 7. • The plugged USB 3.0 device may run on xHCI or EHCI mode depending on xHCI specification. With an installed USB 3.0 module, you to 5 Gb/s, faster charging time for additional USB 3.0 front or rear panel ports. USB 3.0 connector (20-1 pin USB3_12) This connector allows you...
... use the USB 3.0 ports under Windows® 7. • The plugged USB 3.0 device may run on xHCI or EHCI mode depending on xHCI specification. With an installed USB 3.0 module, you to 5 Gb/s, faster charging time for additional USB 3.0 front or rear panel ports. USB 3.0 connector (20-1 pin USB3_12) This connector allows you...
User Guide
Page 49
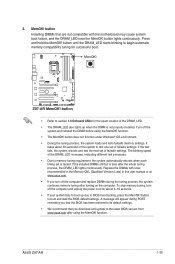
...you download and update to boot after turning on the computer. If the installed DIMMs still fail to the latest BIOS version from www.asus.com after using the MemOK! function. button Installing DIMMs that you turn off the computer and unplug the power cord for the...system and reinstall the DIMM before using the MemOK! If the test fails, the system reboots and test the next set is not properly installed. ASUS Z97-AR 1-39 function. • The MemOK! 2. button until the DRAM_LED starts blinking to begin automatic memory compatibility tuning for successful boot. &#...
...you download and update to boot after turning on the computer. If the installed DIMMs still fail to the latest BIOS version from www.asus.com after using the MemOK! function. button Installing DIMMs that you turn off the computer and unplug the power cord for the...system and reinstall the DIMM before using the MemOK! If the test fails, the system reboots and test the next set is not properly installed. ASUS Z97-AR 1-39 function. • The MemOK! 2. button until the DRAM_LED starts blinking to begin automatic memory compatibility tuning for successful boot. &#...
User Guide
Page 51
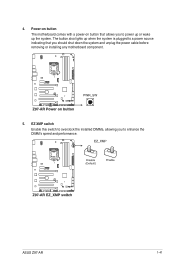
Power-on button The motherboard comes with a power-on button that allows you to power up or wake up when the system is plugged to a power source indicating that you to overclock the installed DIMMs, allowing you should shut down the system and unplug the power cable before removing or installing any motherboard component. 5. 4. EZ XMP switch Enable this switch to enhance the DIMM's speed and performance. The button also lights up the system. ASUS Z97-AR 1-41
Power-on button The motherboard comes with a power-on button that allows you to power up or wake up when the system is plugged to a power source indicating that you to overclock the installed DIMMs, allowing you should shut down the system and unplug the power cable before removing or installing any motherboard component. 5. 4. EZ XMP switch Enable this switch to enhance the DIMM's speed and performance. The button also lights up the system. ASUS Z97-AR 1-41


