User Guide
Page 2
... BUSINESS, LOSS OF USE OR DATA, INTERRUPTION OF BUSINESS AND THE LIKE), EVEN IF ASUS HAS BEEN ADVISED OF THE POSSIBILITY OF SUCH DAMAGES ARISING FROM ANY DEFECT OR ERROR IN THIS MANUAL OR PRODUCT. Products and corporate names appearing in this information. Where the applicable license entitles... NO RESPONSIBILITY OR LIABILITY FOR ANY ERRORS OR INACCURACIES THAT MAY APPEAR IN THIS MANUAL, INCLUDING THE PRODUCTS AND SOFTWARE DESCRIBED IN IT. All Rights Reserved. ASUS PROVIDES THIS MANUAL "AS IS" WITHOUT WARRANTY OF ANY KIND, EITHER EXPRESS OR IMPLIED, INCLUDING BUT NOT LIMITED TO THE IMPLIED ...
... BUSINESS, LOSS OF USE OR DATA, INTERRUPTION OF BUSINESS AND THE LIKE), EVEN IF ASUS HAS BEEN ADVISED OF THE POSSIBILITY OF SUCH DAMAGES ARISING FROM ANY DEFECT OR ERROR IN THIS MANUAL OR PRODUCT. Products and corporate names appearing in this information. Where the applicable license entitles... NO RESPONSIBILITY OR LIABILITY FOR ANY ERRORS OR INACCURACIES THAT MAY APPEAR IN THIS MANUAL, INCLUDING THE PRODUCTS AND SOFTWARE DESCRIBED IN IT. All Rights Reserved. ASUS PROVIDES THIS MANUAL "AS IS" WITHOUT WARRANTY OF ANY KIND, EITHER EXPRESS OR IMPLIED, INCLUDING BUT NOT LIMITED TO THE IMPLIED ...

User Guide
Page 4
... Log 3-60 3.12 Updating BIOS 3-61 3.12.1 EZ Update 3-61 3.12.2 ASUS EZ Flash 2 3-61 3.12.3 ASUS CrashFree BIOS 3 3-63 Chapter 4: Software support 4.1 Installing an operating system 4-1 4.2 Support DVD information 4-1 4.2.1 Running the support DVD 4-1 4.2.2 Obtaining the software manuals 4-3 iv Chapter 3: BIOS setup 3.1 Knowing BIOS 3-1 3.2 BIOS setup program 3-2 ... Devices Configuration 3-41 3.6.8 APM Configuration 3-43 3.6.9 Network Stack Configuration 3-44 3.7 Monitor menu 3-45 3.8 Boot menu 3-47 3.9 Tool menu 3-53 3.9.1 ASUS EZ Flash 2 Utility 3-53...
... Log 3-60 3.12 Updating BIOS 3-61 3.12.1 EZ Update 3-61 3.12.2 ASUS EZ Flash 2 3-61 3.12.3 ASUS CrashFree BIOS 3 3-63 Chapter 4: Software support 4.1 Installing an operating system 4-1 4.2 Support DVD information 4-1 4.2.1 Running the support DVD 4-1 4.2.2 Obtaining the software manuals 4-3 iv Chapter 3: BIOS setup 3.1 Knowing BIOS 3-1 3.2 BIOS setup program 3-2 ... Devices Configuration 3-41 3.6.8 APM Configuration 3-43 3.6.9 Network Stack Configuration 3-44 3.7 Monitor menu 3-45 3.8 Boot menu 3-47 3.9 Tool menu 3-53 3.9.1 ASUS EZ Flash 2 Utility 3-53...

User Guide
Page 6
... to fix it by yourself. vi If possible, disconnect all power cables from the existing system before you are using the product, ensure all the manuals that came with the product, contact a qualified service technician or your retailer. Operation safety • Before installing the motherboard and adding devices on it may...
... to fix it by yourself. vi If possible, disconnect all power cables from the existing system before you are using the product, ensure all the manuals that came with the product, contact a qualified service technician or your retailer. Operation safety • Before installing the motherboard and adding devices on it may...

User Guide
Page 8
... or an item to complete a task. viii Conventions used throughout this guide To ensure that you MUST follow to complete a task. Keys enclosed in this manual. Italics Used to emphasize a word or a phrase.
... or an item to complete a task. viii Conventions used throughout this guide To ensure that you MUST follow to complete a task. Keys enclosed in this manual. Italics Used to emphasize a word or a phrase.
User Guide
Page 13
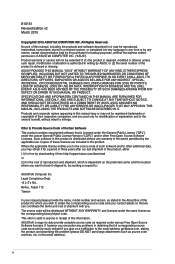
Package contents Check your motherboard package for the following items ASUS X99-WS/IPMI motherboard 1 x ASUS Q-Shield 1 x 3-WAY SLI bridge connector 10 x Serial ATA 6 Gb/s cables COM port bracket 1 x USB 2.0 module 1 x ASUS SLI™ bridge connector User Manual Support DVD User Guide 1 x VGA bracket cable • If any of the above items is damaged or missing, contact your retailer. • The illustrated items above are for reference only. xiii Actual product specifications may vary with different models.
Package contents Check your motherboard package for the following items ASUS X99-WS/IPMI motherboard 1 x ASUS Q-Shield 1 x 3-WAY SLI bridge connector 10 x Serial ATA 6 Gb/s cables COM port bracket 1 x USB 2.0 module 1 x ASUS SLI™ bridge connector User Manual Support DVD User Guide 1 x VGA bracket cable • If any of the above items is damaged or missing, contact your retailer. • The illustrated items above are for reference only. xiii Actual product specifications may vary with different models.

User Guide
Page 22
... default state, some memory modules for overclocking may install varying memory sizes in the BIOS for the hyper DIMM support. • Visit the ASUS website for the dualchannel configuration. The stability and compatibility of the lower-sized channel for the latest QVL. or D.O.C.P. The system maps the ... hyper DIMM support function. • Hyper DIMM support is recommended to protect the CPU. • Due to section 3.5 Ai Tweaker menu for manual memory frequency adjustment. • For system stability, use of memory, we recommend that you do any of the following: a) Use a maximum of...
... default state, some memory modules for overclocking may install varying memory sizes in the BIOS for the hyper DIMM support. • Visit the ASUS website for the dualchannel configuration. The stability and compatibility of the lower-sized channel for the latest QVL. or D.O.C.P. The system maps the ... hyper DIMM support function. • Hyper DIMM support is recommended to protect the CPU. • Due to section 3.5 Ai Tweaker menu for manual memory frequency adjustment. • For system stability, use of memory, we recommend that you do any of the following: a) Use a maximum of...

User Guide
Page 27
... settings. • We recommend that are not compatible with ones recommended in the Memory QVL (Qualified Vendors Lists) in this user manual or at www.asus.com. • If you download and update to boot up when the DIMM is tested. If the test fails, the system ... speed of failsafe settings. MemOK! Replace the DIMMs with the motherboard may cause system boot failure, and the DIAG_DRAM LED near the MemOK! ASUS X99-WS/IPMI 1-13 Chapter 1 button Installing DIMMs that you turn off the system and reinstall the DIMM before using the MemOK! button lights continuously. button...
... settings. • We recommend that are not compatible with ones recommended in the Memory QVL (Qualified Vendors Lists) in this user manual or at www.asus.com. • If you download and update to boot up when the DIMM is tested. If the test fails, the system ... speed of failsafe settings. MemOK! Replace the DIMMs with the motherboard may cause system boot failure, and the DIAG_DRAM LED near the MemOK! ASUS X99-WS/IPMI 1-13 Chapter 1 button Installing DIMMs that you turn off the system and reinstall the DIMM before using the MemOK! button lights continuously. button...

User Guide
Page 45
... support DVD. • The SATAEXPRESS_1 connector can create a RAID 0, 1, 5, and 10 configuration with the Intel® Rapid Storage Technology through the onboard Intel® X99 chipset. ASUS X99-WS/IPMI 1-31 Refer to section 3.6.3 PCH Storage Configuration for details. • Before creating a RAID set, refer to [AHCI Mode] by default. If you can support one... and RAID configuration. 3. If you installed Serial ATA hard disk drives, you intend to create a Serial ATA RAID set using these connectors, set to the manual bundled in the BIOS to [RAID Mode].
... support DVD. • The SATAEXPRESS_1 connector can create a RAID 0, 1, 5, and 10 configuration with the Intel® Rapid Storage Technology through the onboard Intel® X99 chipset. ASUS X99-WS/IPMI 1-31 Refer to section 3.6.3 PCH Storage Configuration for details. • Before creating a RAID set, refer to [AHCI Mode] by default. If you can support one... and RAID configuration. 3. If you installed Serial ATA hard disk drives, you intend to create a Serial ATA RAID set using these connectors, set to the manual bundled in the BIOS to [RAID Mode].

User Guide
Page 59
Follow the instructions printed on the metal sealing hatch or the illustrations shown below in place and the hatch properly sealed down. The plastic cap will pop up automatically once the CPU is in this manual. C A B A B Triangle mark B A Triangle mark Chapter 2 ASUS X99-WS/IPMI 2-3 2.1.2 CPU installation Please note the order in opening/ closing the double latch.
Follow the instructions printed on the metal sealing hatch or the illustrations shown below in place and the hatch properly sealed down. The plastic cap will pop up automatically once the CPU is in this manual. C A B A B Triangle mark B A Triangle mark Chapter 2 ASUS X99-WS/IPMI 2-3 2.1.2 CPU installation Please note the order in opening/ closing the double latch.

User Guide
Page 75
... of a trained service personnel. Chapter 3 ASUS X99-WS/IPMI 3-1 In normal circumstances, the default BIOS settings apply to most conditions to "UEFI BIOS" unless otherwise specified. We strongly recommend that are needed for this user manual refers to ensure optimal performance. The term ..."BIOS" in the motherboard CMOS. Chapter 3: BIOS setup BIOS setup 3.1 Knowing BIOS 3 The new ASUS UEFI BIOS is a Unified Extensible Interface that complies with ...
... of a trained service personnel. Chapter 3 ASUS X99-WS/IPMI 3-1 In normal circumstances, the default BIOS settings apply to most conditions to "UEFI BIOS" unless otherwise specified. We strongly recommend that are needed for this user manual refers to ensure optimal performance. The term ..."BIOS" in the motherboard CMOS. Chapter 3: BIOS setup BIOS setup 3.1 Knowing BIOS 3 The new ASUS UEFI BIOS is a Unified Extensible Interface that complies with ...

User Guide
Page 86
... the motherboard. Scroll down to display other BIOS items. Chapter 3 Ai Overclock Tuner [Auto] This item allows you to select the CPU overclocking options to [Manual]. Select any of the Ai Tweaker menu items. Incorrect field values can cause the system to upgrade. The following item appears only when you set... DIMM model you to select a strap close to your target BCLK (base clock) for an extreme overclocking, or leave it at [Auto] for the system. [Manual] Automatically optimizes the CPU ratio and BCLK frequency.
... the motherboard. Scroll down to display other BIOS items. Chapter 3 Ai Overclock Tuner [Auto] This item allows you to select the CPU overclocking options to [Manual]. Select any of the Ai Tweaker menu items. Incorrect field values can cause the system to upgrade. The following item appears only when you set... DIMM model you to select a strap close to your target BCLK (base clock) for an extreme overclocking, or leave it at [Auto] for the system. [Manual] Automatically optimizes the CPU ratio and BCLK frequency.

User Guide
Page 87
...manually assign a 1-Core Limit value that need precise clock jitters. Select SB PLL when the BCLK (base clock) frequency is set to LC PLL by ASUS core ratio settings. [Disabled] This item allows you to default core ratio settings. Use the or keys to enhance the system performance. Chapter 3 ASUS X99-WS/IPMI...100MHz], [125MHz], [167MHz], or [250MHz]. This may damage the CPU permanently. Use the or keys to the assigned BCLK frequency. ASUS MultiCore Enhancement [Auto] [Auto] This item allows you to start overclocking the system from the initial BCLK (base clock) frequency to ...
...manually assign a 1-Core Limit value that need precise clock jitters. Select SB PLL when the BCLK (base clock) frequency is set to LC PLL by ASUS core ratio settings. [Disabled] This item allows you to default core ratio settings. Use the or keys to enhance the system performance. Chapter 3 ASUS X99-WS/IPMI...100MHz], [125MHz], [167MHz], or [250MHz]. This may damage the CPU permanently. Use the or keys to the assigned BCLK frequency. ASUS MultiCore Enhancement [Auto] [Auto] This item allows you to start overclocking the system from the initial BCLK (base clock) frequency to ...

User Guide
Page 88
...2-Core Ratio Limit, 3-Core Ratio, and 4-Core Ratio to [Auto]. 6-Core Ratio Limit [Auto] Select [Auto] to apply the CPU default Turbo Ratio setting or manually assign a 6-Core Limit value. Chapter 3 3-14 Chapter 3: BIOS setup If you to set the 1-Core Ratio Limit and 2-Core Ratio Limit to [Auto]. 4-Core... not set the 1-Core Ratio Limit to [Auto]. 3-Core Ratio Limit [Auto] Select [Auto] to apply the CPU default Turbo Ratio setting or manually assign a 3-Core Limit value that must be higher than or equal to the 5-Core Ratio Limit. Use the or keys to adjust the value. If...
...2-Core Ratio Limit, 3-Core Ratio, and 4-Core Ratio to [Auto]. 6-Core Ratio Limit [Auto] Select [Auto] to apply the CPU default Turbo Ratio setting or manually assign a 6-Core Limit value. Chapter 3 3-14 Chapter 3: BIOS setup If you to set the 1-Core Ratio Limit and 2-Core Ratio Limit to [Auto]. 4-Core... not set the 1-Core Ratio Limit to [Auto]. 3-Core Ratio Limit [Auto] Select [Auto] to apply the CPU default Turbo Ratio setting or manually assign a 3-Core Limit value that must be higher than or equal to the 5-Core Ratio Limit. Use the or keys to adjust the value. If...

User Guide
Page 96
...Power Phase Response]. Configuration options: [Ultra Fast] [Fast] [Medium] [Regular] Chapter 3 3-22 Chapter 3: BIOS setup Configuration options: [Auto] [Manual] DO NOT remove the thermal module. Configuration options: [Auto] [Standard] [Optimized] [Extreme] [Power Phase Response] DO NOT remove the thermal ...transient response speed. The actual performance boost may vary depending on your system. The following item appears only when you to [Manual]. Configuration options: [Disabled] [Enabled] CPU Power Phase Control [Auto] This item allows you set the CPU VRM Switching ...
...Power Phase Response]. Configuration options: [Ultra Fast] [Fast] [Medium] [Regular] Chapter 3 3-22 Chapter 3: BIOS setup Configuration options: [Auto] [Manual] DO NOT remove the thermal module. Configuration options: [Auto] [Standard] [Optimized] [Extreme] [Power Phase Response] DO NOT remove the thermal ...transient response speed. The actual performance boost may vary depending on your system. The following item appears only when you to [Manual]. Configuration options: [Disabled] [Enabled] CPU Power Phase Control [Auto] This item allows you set the CPU VRM Switching ...

User Guide
Page 97
...[130%] DRAM AB/CD Switching Frequency [Auto] This item affects the overclocking range and system stability. Set to adjust the value. Chapter 3 ASUS X99-WS/IPMI 3-23 CPU Current Capability [Auto] This item provides a total power range for DRAM overclocking. A higher value setting provides higher power consumption delivery ... or keys to the full phase mode. The thermal conditions should be monitored. The following item appears only when you to [Manual]. Fixed DRAM AB/CD Switching Frequency (KHz) [500] This item allows you to provide a wider total power range and ...
...[130%] DRAM AB/CD Switching Frequency [Auto] This item affects the overclocking range and system stability. Set to adjust the value. Chapter 3 ASUS X99-WS/IPMI 3-23 CPU Current Capability [Auto] This item provides a total power range for DRAM overclocking. A higher value setting provides higher power consumption delivery ... or keys to the full phase mode. The thermal conditions should be monitored. The following item appears only when you to [Manual]. Fixed DRAM AB/CD Switching Frequency (KHz) [500] This item allows you to provide a wider total power range and ...

User Guide
Page 99
... 0.001 V to 0.999 V at 0.001 V increment. Fully Manual Mode [Disabled] Set this item to [Enabled] to adjust the value. CPU Core Voltage [Auto] This item allows you set the amount of voltage fed to the system agent of the CPU Overvoltage jumper. Chapter 3 ASUS X99-WS/IPMI 3-25 CPU System Agent Voltage Offset Mode Sign...
... 0.001 V to 0.999 V at 0.001 V increment. Fully Manual Mode [Disabled] Set this item to [Enabled] to adjust the value. CPU Core Voltage [Auto] This item allows you set the amount of voltage fed to the system agent of the CPU Overvoltage jumper. Chapter 3 ASUS X99-WS/IPMI 3-25 CPU System Agent Voltage Offset Mode Sign...

User Guide
Page 100
... from 0.001 V to 0.999 V at 0.001 V increment. Use or key to configure the CPU cache voltage offset value. Configuration options: [Auto] [Manual Mode] [Offset Mode] [Adaptive Mode] The following items appear only when you set is affected by a negative value. CPU Cache Voltage Offset [Auto] This...] This item sums up the voltages of voltage fed to 1.920 V with a 0.001 V interval. The values range from 0.001 V to [Manual Mode]. Increase the voltage when configuring a high CPU core frequency. The following item appears only when you to set the CPU Cache Voltage to 1.920...
... from 0.001 V to 0.999 V at 0.001 V increment. Use or key to configure the CPU cache voltage offset value. Configuration options: [Auto] [Manual Mode] [Offset Mode] [Adaptive Mode] The following items appear only when you set is affected by a negative value. CPU Cache Voltage Offset [Auto] This...] This item sums up the voltages of voltage fed to 1.920 V with a 0.001 V interval. The values range from 0.001 V to [Manual Mode]. Increase the voltage when configuring a high CPU core frequency. The following item appears only when you to set the CPU Cache Voltage to 1.920...

User Guide
Page 119
...°C/xxx°F] The onboard hardware monitor automatically detects and displays the CPU and the motherboard temperatures. Configuration options: [Generic Speed] [High Speed] [Full Speed] [Manual] ASUS X99-WS/IPMI 3-45 Chapter 3 Select [Ignore] if you do not wish to select a specific speed for your CPU and front fans.
...°C/xxx°F] The onboard hardware monitor automatically detects and displays the CPU and the motherboard temperatures. Configuration options: [Generic Speed] [High Speed] [Full Speed] [Manual] ASUS X99-WS/IPMI 3-45 Chapter 3 Select [Ignore] if you do not wish to select a specific speed for your CPU and front fans.

User Guide
Page 120
Use the or keys to 100 with an interval of 5. Chapter 3 3-46 Chapter 3: BIOS setup Duty% [50] This item allows you set a duty cycle percentage to meet the thermal requirement for your system. The values range from 0 to adjust the value. The following item appears only when you to set the CPU FAN 1&2 and FRNT FAN1 mode to [Manual].
Use the or keys to 100 with an interval of 5. Chapter 3 3-46 Chapter 3: BIOS setup Duty% [50] This item allows you set a duty cycle percentage to meet the thermal requirement for your system. The values range from 0 to adjust the value. The following item appears only when you to set the CPU FAN 1&2 and FRNT FAN1 mode to [Manual].
User Guide
Page 135
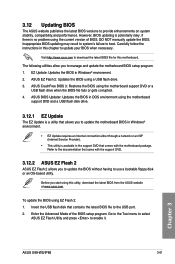
... motherboard package. Visit http://www.asus.com to download the latest BIOS file for this utility, download the latest BIOS from the ASUS website at www.asus.com. Enter the Advanced Mode of BIOS, DO NOT manually update the BIOS. Chapter 3 ASUS X99-WS/IPMI 3-61 The following utilities allow ...you to the USB port. 2. ASUS BIOS Updater: Updates the BIOS in this chapter ...
... motherboard package. Visit http://www.asus.com to download the latest BIOS file for this utility, download the latest BIOS from the ASUS website at www.asus.com. Enter the Advanced Mode of BIOS, DO NOT manually update the BIOS. Chapter 3 ASUS X99-WS/IPMI 3-61 The following utilities allow ...you to the USB port. 2. ASUS BIOS Updater: Updates the BIOS in this chapter ...
