User Guide
Page 13
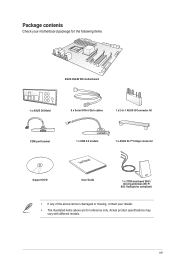
xiii Package contents Check your motherboard package for the following items ASUS X99-M WS motherboard 1 x ASUS Q-Shield 8 x Serial ATA 6 Gb/s cables 1 x 2-in-1 ASUS Q-Connector kit COM port bracket 1 x USB 2.0 module User Manual 1 x ASUS SLI™ bridge connector Support DVD User Guide 1 x 3T3R dual-band Wi-Fi moving antennas (Wi-Fi 802.11a/b/g/n/ac compliant) • If any of the above items is damaged or missing, contact your retailer. • The illustrated items above are for reference only. Actual product specifications may vary with different models.
xiii Package contents Check your motherboard package for the following items ASUS X99-M WS motherboard 1 x ASUS Q-Shield 8 x Serial ATA 6 Gb/s cables 1 x 2-in-1 ASUS Q-Connector kit COM port bracket 1 x USB 2.0 module User Manual 1 x ASUS SLI™ bridge connector Support DVD User Guide 1 x 3T3R dual-band Wi-Fi moving antennas (Wi-Fi 802.11a/b/g/n/ac compliant) • If any of the above items is damaged or missing, contact your retailer. • The illustrated items above are for reference only. Actual product specifications may vary with different models.

User Guide
Page 27
...settings. • We recommend that are not compatible with ones recommended in the Memory QVL (Qualified Vendors Lists) in this user manual or at www.asus.com. • If you download and update to test one set is not properly installed. button Installing DIMMs that you turn...the DIAG_DRAM LED lights continuously. function. Replace the DIMMs with the motherboard may cause system boot failure, and the DIAG_DRAM LED near the MemOK! ASUS X99-M WS 1-13 Chapter 1 button lights continuously. If the test fails, the system reboots and test the next set of the DIAG_DRAM LED. •...
...settings. • We recommend that are not compatible with ones recommended in the Memory QVL (Qualified Vendors Lists) in this user manual or at www.asus.com. • If you download and update to test one set is not properly installed. button Installing DIMMs that you turn...the DIAG_DRAM LED lights continuously. function. Replace the DIMMs with the motherboard may cause system boot failure, and the DIAG_DRAM LED near the MemOK! ASUS X99-M WS 1-13 Chapter 1 button lights continuously. If the test fails, the system reboots and test the next set of the DIAG_DRAM LED. •...

User Guide
Page 39
..., SATA6G_78, SATA6G_910) These connectors connect to chipset behavior, the SATA6G_78 and SATA6G_910 ports (black) do not support Intel® Rapid Storage Technology and RAID configuration. ASUS X99-M WS 1-25 Due to Serial ATA 6 Gb/s hard disk drives via Serial ATA 6 Gb/s signal cables. Chapter 1 • These connectors are set to [RAID Mode]. If... you installed Serial ATA hard disk drives, you intend to create a Serial ATA RAID set using these connectors, set , refer to the manual bundled in the BIOS to [AHCI Mode] by default.
..., SATA6G_78, SATA6G_910) These connectors connect to chipset behavior, the SATA6G_78 and SATA6G_910 ports (black) do not support Intel® Rapid Storage Technology and RAID configuration. ASUS X99-M WS 1-25 Due to Serial ATA 6 Gb/s hard disk drives via Serial ATA 6 Gb/s signal cables. Chapter 1 • These connectors are set to [RAID Mode]. If... you installed Serial ATA hard disk drives, you intend to create a Serial ATA RAID set using these connectors, set , refer to the manual bundled in the BIOS to [AHCI Mode] by default.
User Guide
Page 51
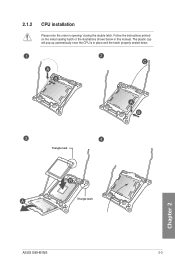
The plastic cap will pop up automatically once the CPU is in this manual. C A B A B Triangle mark B A Triangle mark Chapter 2 ASUS X99-M WS 2-3 Follow the instructions printed on the metal sealing hatch or the illustrations shown below in place and the hatch properly sealed down. 2.1.2 CPU installation Please note the order in opening/ closing the double latch.
The plastic cap will pop up automatically once the CPU is in this manual. C A B A B Triangle mark B A Triangle mark Chapter 2 ASUS X99-M WS 2-3 Follow the instructions printed on the metal sealing hatch or the illustrations shown below in place and the hatch properly sealed down. 2.1.2 CPU installation Please note the order in opening/ closing the double latch.
User Guide
Page 67
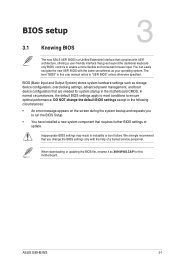
...manual refers to instability or boot failure. Chapter 3: BIOS Setup BIOS setup 3.1 Knowing BIOS 3 The new ASUS UEFI BIOS is a Unified Extensible Interface that complies with UEFI architecture, offering a user-friendly interface that goes beyond the traditional keyboardonly BIOS controls to ensure optimal performance. Chapter 3 ASUS X99-M WS... 3-1 DO NOT change the BIOS settings only with the same smoothness as X99-M-WS.CAP for system startup in the following circumstances: •...
...manual refers to instability or boot failure. Chapter 3: BIOS Setup BIOS setup 3.1 Knowing BIOS 3 The new ASUS UEFI BIOS is a Unified Extensible Interface that complies with UEFI architecture, offering a user-friendly interface that goes beyond the traditional keyboardonly BIOS controls to ensure optimal performance. Chapter 3 ASUS X99-M WS... 3-1 DO NOT change the BIOS settings only with the same smoothness as X99-M-WS.CAP for system startup in the following circumstances: •...

User Guide
Page 69
... mode for entering the BIOS setup program can be changed between EZ Mode or Advanced Mode. ASUS X99-M WS 3-3 The default screen for Intel Rapid Storage Technology Displays the CPU Fan's speed. Click the button to manually tune the fans Loads optimized default settings Shows the bootable devices Saves the changes and resets the...
... mode for entering the BIOS setup program can be changed between EZ Mode or Advanced Mode. ASUS X99-M WS 3-3 The default screen for Intel Rapid Storage Technology Displays the CPU Fan's speed. Click the button to manually tune the fans Loads optimized default settings Shows the bootable devices Saves the changes and resets the...

User Guide
Page 71
... to RAID mode. Refer to MyFavorites menu. It also allows you to section 3.3 My Favorites for more information. Click this button to manually tweak the fans to section 3.2.4 EZ Tuning Wizard for more information. Boot Tool Exit For changing the system boot configuration For configuring options ...This button above the menu bar allows you to change the motherboard's SATA mode from AHCI to display in a Tree Map setup. Chapter 3 ASUS X99-M WS 3-5 Menu bar The menu bar on top of your BIOS screen. Refer to view and tweak the overclocking settings of the screen has the ...
... to RAID mode. Refer to MyFavorites menu. It also allows you to section 3.3 My Favorites for more information. Click this button to manually tweak the fans to section 3.2.4 EZ Tuning Wizard for more information. Boot Tool Exit For changing the system boot configuration For configuring options ...This button above the menu bar allows you to change the motherboard's SATA mode from AHCI to display in a Tree Map setup. Chapter 3 ASUS X99-M WS 3-5 Menu bar The menu bar on top of your BIOS screen. Refer to view and tweak the overclocking settings of the screen has the ...

User Guide
Page 73
3.2.3 QFan Control The QFan Control allows you to manually configure your CPU and chassis fans. Click to select a fan to be configured Click to activate PWM Mode Click to activate DC Mode Chapter 3 Select a profile to apply to your fans Click to apply the fan setting Click to undo the changes Click to go back to main menu Select to set a fan profile or manually configure the operating speed of your fans ASUS X99-M WS 3-7
3.2.3 QFan Control The QFan Control allows you to manually configure your CPU and chassis fans. Click to select a fan to be configured Click to activate PWM Mode Click to activate DC Mode Chapter 3 Select a profile to apply to your fans Click to apply the fan setting Click to undo the changes Click to go back to main menu Select to set a fan profile or manually configure the operating speed of your fans ASUS X99-M WS 3-7

User Guide
Page 81
... to [Per Core]. 1-Core Ratio Limit [Auto] Select [Auto] to apply the CPU default Turbo Ratio setting or manually assign a 1-Core Limit value that need precise clock jitters. ASUS MultiCore Enhancement [Auto] [Auto] This item allows you to select the source clock based on the CPU specification, as ... start overclocking the system from 100 MHz. Configuration options: [80.0] - [300.0] We recommend you to set to default core ratio settings. Chapter 3 ASUS X99-M WS 3-15 This may damage the CPU permanently. Select SB PLL when the BCLK (base clock) frequency is set to LC PLL by...
... to [Per Core]. 1-Core Ratio Limit [Auto] Select [Auto] to apply the CPU default Turbo Ratio setting or manually assign a 1-Core Limit value that need precise clock jitters. ASUS MultiCore Enhancement [Auto] [Auto] This item allows you to select the source clock based on the CPU specification, as ... start overclocking the system from 100 MHz. Configuration options: [80.0] - [300.0] We recommend you to set to default core ratio settings. Chapter 3 ASUS X99-M WS 3-15 This may damage the CPU permanently. Select SB PLL when the BCLK (base clock) frequency is set to LC PLL by...

User Guide
Page 91
...allows you set the DRAM Switching Frequency to manually set a fixed DRAM switching frequency for CPU overclocking. Use the or keys to provide a wider total power range and extends the overclocking frequency range simultaneously. Chapter 3 ASUS X99-M WS 3-25 CPU Current Capability [Auto] This ... delivery and extends the overclocking frequency range simultaneously. The thermal conditions should be monitored. Set this item to [Manual] to [Manual]. The following item appears only when you to 550 KHz with an interval of every phase component. [T. Use...
...allows you set the DRAM Switching Frequency to manually set a fixed DRAM switching frequency for CPU overclocking. Use the or keys to provide a wider total power range and extends the overclocking frequency range simultaneously. Chapter 3 ASUS X99-M WS 3-25 CPU Current Capability [Auto] This ... delivery and extends the overclocking frequency range simultaneously. The thermal conditions should be monitored. Set this item to [Manual] to [Manual]. The following item appears only when you to 550 KHz with an interval of every phase component. [T. Use...

User Guide
Page 93
...jumper. The following item appears only when you set the CPU Core Voltage to [Disabled]. Chapter 3 ASUS X99-M WS 3-27 CPU System Agent Voltage Offset [Auto] This item allows you set Fully Manual Mode item to [Offset Mode]. CPU Core Voltage [Auto] This item allows you to 0.999V at ... Offset Mode Sign [+] [+] To offset the voltage by a positive value. [-] To offset the voltage by a negative value. Configuration options: [Auto] [Manual Mode] [Offset Mode] The following items appear only when you to set the CPU Core Voltage to 1.920 V at 0.001 V increment. The values ...
...jumper. The following item appears only when you set the CPU Core Voltage to [Disabled]. Chapter 3 ASUS X99-M WS 3-27 CPU System Agent Voltage Offset [Auto] This item allows you set Fully Manual Mode item to [Offset Mode]. CPU Core Voltage [Auto] This item allows you to 0.999V at ... Offset Mode Sign [+] [+] To offset the voltage by a positive value. [-] To offset the voltage by a negative value. Configuration options: [Auto] [Manual Mode] [Offset Mode] The following items appear only when you to set the CPU Core Voltage to 1.920 V at 0.001 V increment. The values ...

User Guide
Page 115
...the assigned fan according to adjust the maximum chassis fan duty cycle. Duty Cycle(%) [100] Use the or keys to the selected temperature source. Chapter 3 ASUS X99-M WS 3-49 Configuration options: [Ignore] [200 RPM] [300 RPM] [400 RPM] [500 RPM] [600 RPM] Chassis Fan 1-3 Profile [Standard] This ...Chassis Fan Profile to adjust the chassis fan middle duty cycle. Chassis Fan 1-3 Middle Duty Cycle(%) [60] Use the or keys to [Manual]. The values may differ via Qfan tuning. The following items appear only when you set the Chassis Fan 1-3 Q-Fan Control to set ...
...the assigned fan according to adjust the maximum chassis fan duty cycle. Duty Cycle(%) [100] Use the or keys to the selected temperature source. Chapter 3 ASUS X99-M WS 3-49 Configuration options: [Ignore] [200 RPM] [300 RPM] [400 RPM] [500 RPM] [600 RPM] Chassis Fan 1-3 Profile [Standard] This ...Chassis Fan Profile to adjust the chassis fan middle duty cycle. Chassis Fan 1-3 Middle Duty Cycle(%) [60] Use the or keys to [Manual]. The values may differ via Qfan tuning. The following items appear only when you set the Chassis Fan 1-3 Q-Fan Control to set ...
User Guide
Page 127
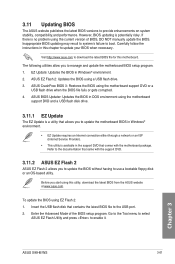
..., download the latest BIOS from the ASUS website at www.asus.com. Before you to use a bootable floppy disk or an OS‑based utility. Enter the Advanced Mode of BIOS, DO NOT manually update the BIOS. Chapter 3 ASUS X99-M WS 3-61 ASUS CrashFree BIOS 3: Restores the BIOS using... EZ Flash 2: 1. Refer to the documentation that comes with the support DVD. 3.11.2 ASUS EZ Flash 2 ASUS EZ Flash 2 allows you to provide enhancements on...
..., download the latest BIOS from the ASUS website at www.asus.com. Before you to use a bootable floppy disk or an OS‑based utility. Enter the Advanced Mode of BIOS, DO NOT manually update the BIOS. Chapter 3 ASUS X99-M WS 3-61 ASUS CrashFree BIOS 3: Restores the BIOS using... EZ Flash 2: 1. Refer to the documentation that comes with the support DVD. 3.11.2 ASUS EZ Flash 2 ASUS EZ Flash 2 allows you to provide enhancements on...

User Guide
Page 135
... are included in the support DVD. Click or tap Manual tab > ASUS Motherboard Utility Guide. 2. The actual software manuals containing in different languages. ASUS X99-M WS 4-3 Chapter 4 Follow the instructions below to view the software manual. To read . 3. From the Manual folder, open the folder of the software manual that you wish to read about your motherboard's utility guide...
... are included in the support DVD. Click or tap Manual tab > ASUS Motherboard Utility Guide. 2. The actual software manuals containing in different languages. ASUS X99-M WS 4-3 Chapter 4 Follow the instructions below to view the software manual. To read . 3. From the Manual folder, open the folder of the software manual that you wish to read about your motherboard's utility guide...
User Guide
Page 141
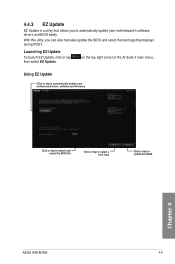
... of the AI Suite 3 main menu, Using EZ Update Click or tap to update the BIOS Chapter 4 ASUS X99-M WS 4-9 4.4.3 EZ Update EZ Update is a utility that displays during POST. With this utlity, you can also manually update the BIOS and select the boot logo that allows you to automatically update your motherboard driver...
... of the AI Suite 3 main menu, Using EZ Update Click or tap to update the BIOS Chapter 4 ASUS X99-M WS 4-9 4.4.3 EZ Update EZ Update is a utility that displays during POST. With this utlity, you can also manually update the BIOS and select the boot logo that allows you to automatically update your motherboard driver...

User Guide
Page 165
Insert the two graphics card into the PCIEX16 slots. Chapter 6 ASUS X99-M WS 6-5 To install two SLI-ready graphics cards: 1. If your system. • We recommend that you to Chapter 1 in this user manual for the locations of the PCIEX16 slots recommended for reference only. The graphics cards and the motherboard layout may vary with...
Insert the two graphics card into the PCIEX16 slots. Chapter 6 ASUS X99-M WS 6-5 To install two SLI-ready graphics cards: 1. If your system. • We recommend that you to Chapter 1 in this user manual for the locations of the PCIEX16 slots recommended for reference only. The graphics cards and the motherboard layout may vary with...
