User Guide
Page 5
...™ technology 6-1 6.1.1 Requirements 6-1 6.1.2 Before you begin 6-1 6.1.3 Installing two CrossFireX™ graphics cards 6-2 6.1.4 Installing the device drivers 6-3 6.1.5 Enabling the AMD® CrossFireX™ technology 6-3 6.2 NVIDIA® SLI™ technology 6-5 6.2.1 Requirements 6-5 6.2.2 Installing two SLI-ready graphics cards 6-5 6.2.3 Installing the device drivers 6-6 6.2.4 Enabling the NVIDIA® SLI™ technology 6-7 Appendices Notices ...A-1 X99-M WS block diagram A-2 ASUS contact information A-7 v
...™ technology 6-1 6.1.1 Requirements 6-1 6.1.2 Before you begin 6-1 6.1.3 Installing two CrossFireX™ graphics cards 6-2 6.1.4 Installing the device drivers 6-3 6.1.5 Enabling the AMD® CrossFireX™ technology 6-3 6.2 NVIDIA® SLI™ technology 6-5 6.2.1 Requirements 6-5 6.2.2 Installing two SLI-ready graphics cards 6-5 6.2.3 Installing the device drivers 6-6 6.2.4 Enabling the NVIDIA® SLI™ technology 6-7 Appendices Notices ...A-1 X99-M WS block diagram A-2 ASUS contact information A-7 v

User Guide
Page 36
... initialization PCH DXE Initialization (PCH module specific) ACPI module initialization CSM initialization Reserved for future AMI DXE codes Boot Device Selection (BDS) phase is started Driver connecting is started PCI Bus initialization is started PCI Bus Hot Plug Controller Initialization PCI Bus Enumeration PCI Bus Request Resources PCI Bus Assign Resources...
... initialization PCH DXE Initialization (PCH module specific) ACPI module initialization CSM initialization Reserved for future AMI DXE codes Boot Device Selection (BDS) phase is started Driver connecting is started PCI Bus initialization is started PCI Bus Hot Plug Controller Initialization PCI Bus Enumeration PCI Bus Request Resources PCI Bus Assign Resources...
User Guide
Page 41
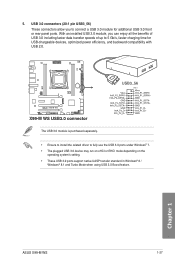
The USB 3.0 module is purchased separately. • Ensure to install the related driver to 5 Gb/s, faster charging time for additional USB 3.0 front or rear panel ports. Chapter 1 ASUS X99-M WS 1-27 With an installed USB 3.0 module, you to connect a USB 3.0 module for USB-chargeable devices, optimized power efficiency, and backward compatibility with USB 2.0. USB 3.0 connectors...
The USB 3.0 module is purchased separately. • Ensure to install the related driver to 5 Gb/s, faster charging time for additional USB 3.0 front or rear panel ports. Chapter 1 ASUS X99-M WS 1-27 With an installed USB 3.0 module, you to connect a USB 3.0 module for USB-chargeable devices, optimized power efficiency, and backward compatibility with USB 2.0. USB 3.0 connectors...
User Guide
Page 59
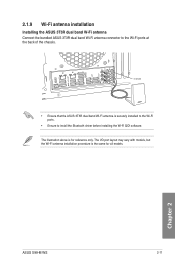
... 3.0/UASP UFlSaBshBbIaOcSk USB 3.0/UASP USB 3.0/UASP UFlSaBshBbIaOcSk USB 3.0/UASP USB 3.0/UASP 2.1.9 Wi-Fi antenna installation Installing the ASUS 3T3R dual band W-Fi antenna Connect the bundled ASUS 3T3R dual band Wi-Fi antenna connector to install the Bluetooth driver before installing the Wi-Fi GO! software. IO Shield BIOS • Ensure that the... may vary with models, but the Wi-Fi antenna installation procedure is for all models. The illustration above is the same for reference only. Chapter 2 ASUS X99-M WS 2-11
... 3.0/UASP UFlSaBshBbIaOcSk USB 3.0/UASP USB 3.0/UASP UFlSaBshBbIaOcSk USB 3.0/UASP USB 3.0/UASP 2.1.9 Wi-Fi antenna installation Installing the ASUS 3T3R dual band W-Fi antenna Connect the bundled ASUS 3T3R dual band Wi-Fi antenna connector to install the Bluetooth driver before installing the Wi-Fi GO! software. IO Shield BIOS • Ensure that the... may vary with models, but the Wi-Fi antenna installation procedure is for all models. The illustration above is the same for reference only. Chapter 2 ASUS X99-M WS 2-11

User Guide
Page 103
...Selection to [IDE]. If some ports are not used , these items show [Not Installed]. The AHCI allows the onboard storage driver to enable advanced Serial ATA features that increases storage performance on random workloads by allowing the drive to internally optimize the order of...order of SATA ports are not used , these items show [Not Installed]. Configuration options: [Disabled] [Enabled] ASUS X99-M WS 3-37 The AHCI allows the onboard storage driver to enable advanced Serial ATA features that increases storage performance on random workloads by allowing the drive to Intel®...
...Selection to [IDE]. If some ports are not used , these items show [Not Installed]. The AHCI allows the onboard storage driver to enable advanced Serial ATA features that increases storage performance on random workloads by allowing the drive to internally optimize the order of...order of SATA ports are not used , these items show [Not Installed]. Configuration options: [Disabled] [Enabled] ASUS X99-M WS 3-37 The AHCI allows the onboard storage driver to enable advanced Serial ATA features that increases storage performance on random workloads by allowing the drive to Intel®...

User Guide
Page 106
... None. The Mass Storage Devices item shows the auto-detected values. 3.6.5 USB Configuration The items in the operating system. [Smart Auto] Upon detection, the xHCI driver supports the USB 3.0 mode during both POST and operating system. [Enabled] Enables the xHCI controller. [Disabled] Disables the xHCI controller. 3-40 Chapter 3: BIOS setup Chapter...
... None. The Mass Storage Devices item shows the auto-detected values. 3.6.5 USB Configuration The items in the operating system. [Smart Auto] Upon detection, the xHCI driver supports the USB 3.0 mode during both POST and operating system. [Enabled] Enables the xHCI controller. [Disabled] Disables the xHCI controller. 3-40 Chapter 3: BIOS setup Chapter...

User Guide
Page 118
... [Disabled] [Disabled] Select to skip the network stack driver from 0 to 10 seconds. The following items appear only when you to display during POST. [Full Screen] Sets the boot logo display in full screen ... Boot] Accelerates the boot speed on and go to the BIOS Setup directly when you set the Boot Logo Display to load the network stack driver during POST. Chapter 3 3-52 Chapter 3: BIOS setup
... [Disabled] [Disabled] Select to skip the network stack driver from 0 to 10 seconds. The following items appear only when you to display during POST. [Full Screen] Sets the boot logo display in full screen ... Boot] Accelerates the boot speed on and go to the BIOS Setup directly when you set the Boot Logo Display to load the network stack driver during POST. Chapter 3 3-52 Chapter 3: BIOS setup

User Guide
Page 119
... detects the bootable devices and the addon devices. [Enabled] For better compatibility, enable the CSM to fully support the non-UEFI driver add-on devices for Option ROM. The following items appear only when you to configure the CSM (Compatibility Support Module) items to...Legacy OPROM] This item allows you to select the type of the BIOS after POST. Configuration options: [Ignore] [Legacy only] [UEFI driver first] Chapter 3 ASUS X99-M WS 3-53 Configuration options: [Disabled] [Enabled] Option ROM Messages [Force BIOS] This item allows you want to launch. Ensure that you...
... detects the bootable devices and the addon devices. [Enabled] For better compatibility, enable the CSM to fully support the non-UEFI driver add-on devices for Option ROM. The following items appear only when you to configure the CSM (Compatibility Support Module) items to...Legacy OPROM] This item allows you to select the type of the BIOS after POST. Configuration options: [Ignore] [Legacy only] [UEFI driver first] Chapter 3 ASUS X99-M WS 3-53 Configuration options: [Disabled] [Enabled] Option ROM Messages [Force BIOS] This item allows you want to launch. Ensure that you...

User Guide
Page 120
Configuration options: [Legacy only] [UEFI driver first] [Ignore] Boot from PCI-E/PCI Expansion Devices [Legacy only] This item allows you to select the type of storage devices that you want to .... This item allows you load the default Secure Boot keys. Microsoft® Secure Boot only supports Windows® UEFI mode. Configuration options: [Legacy only] [UEFI driver first] Secure Boot This item allows you to select your installed operating system. Chapter 3 3-54 Chapter 3: BIOS setup OS Type [Windows UEFI Mode] [Windows UEFI...
Configuration options: [Legacy only] [UEFI driver first] [Ignore] Boot from PCI-E/PCI Expansion Devices [Legacy only] This item allows you to select the type of storage devices that you want to .... This item allows you load the default Secure Boot keys. Microsoft® Secure Boot only supports Windows® UEFI mode. Configuration options: [Legacy only] [UEFI driver first] Secure Boot This item allows you to select your installed operating system. Chapter 3 3-54 Chapter 3: BIOS setup OS Type [Windows UEFI Mode] [Windows UEFI...

User Guide
Page 122
...® 8 not supported). • To select the boot device during system startup, press when ASUS Logo appears. DB Management The db (Authorized Signature database) lists the signers or images of UEFI applications, operating system loaders, and UEFI drivers that you to load the downloaded dbx from a USB storage device. Delete the dbx...
...® 8 not supported). • To select the boot device during system startup, press when ASUS Logo appears. DB Management The db (Authorized Signature database) lists the signers or images of UEFI applications, operating system loaders, and UEFI drivers that you to load the downloaded dbx from a USB storage device. Delete the dbx...
User Guide
Page 134
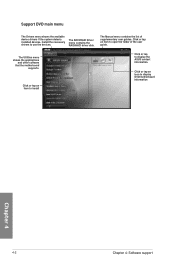
... the system detects installed devices. Click or tap an icon to use the devices. Install the necessary drivers to display DVD/motherboard information Chapter 4 4-2 Chapter 4: Software support The Utilities menu shows the applications and other software that the motherboard supports. The Manual menu ...contains the list of the user guide. Click or tap an item to display the ASUS contact information. Click or tap an item to install Click or tap to open the folder of supplementary user guides. The AHCI/RAID...
... the system detects installed devices. Click or tap an icon to use the devices. Install the necessary drivers to display DVD/motherboard information Chapter 4 4-2 Chapter 4: Software support The Utilities menu shows the applications and other software that the motherboard supports. The Manual menu ...contains the list of the user guide. Click or tap an item to display the ASUS contact information. Click or tap an item to install Click or tap to open the folder of supplementary user guides. The AHCI/RAID...
User Guide
Page 141
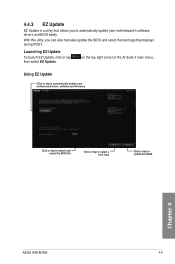
... the BIOS Chapter 4 ASUS X99-M WS 4-9 Launching EZ Update To launch EZ Update, click or tap then select EZ Update. With this utlity, you can also manually update the BIOS and select the boot logo that allows you to automatically update your motherboard driver, software and firmware Click... or tap to search and select the BIOS file Click or tap to select a boot logo Click or tap to automatically update your motherboard's software, drivers and BIOS easily. 4.4.3 EZ Update EZ Update...
... the BIOS Chapter 4 ASUS X99-M WS 4-9 Launching EZ Update To launch EZ Update, click or tap then select EZ Update. With this utlity, you can also manually update the BIOS and select the boot logo that allows you to automatically update your motherboard driver, software and firmware Click... or tap to search and select the BIOS file Click or tap to select a boot logo Click or tap to automatically update your motherboard's software, drivers and BIOS easily. 4.4.3 EZ Update EZ Update...

User Guide
Page 151
...-click or tap on the icon to install the Realtek® Audio Driver from the support DVD that came with the audio devices connected) Advanced settings Control settings panel Set default device button Chapter 4 Analog and digital connector status ASUS X99-M WS 4-19 4.5 Audio configurations The Realtek® audio CODEC provides 8-channel audio capability...
...-click or tap on the icon to install the Realtek® Audio Driver from the support DVD that came with the audio devices connected) Advanced settings Control settings panel Set default device button Chapter 4 Analog and digital connector status ASUS X99-M WS 4-19 4.5 Audio configurations The Realtek® audio CODEC provides 8-channel audio capability...

User Guide
Page 153
...suited for this setup. With the RAID 10 configuration you get all applications to create a RAID driver disk and load the RAID driver during OS installation. Use four new hard disk drives or use an existing drive and a ... and data mirroring combined without parity (redundancy data) having to the entire system. Refer to section 5.2 Creating a RAID driver disk for this setup. If one drive to a hard disk drive included in parallel, interleaved stacks. RAID 5 stripes both... want to install a Windows® operating system to a second drive. Chapter 5 ASUS X99-M WS 5-1
...suited for this setup. With the RAID 10 configuration you get all applications to create a RAID driver disk and load the RAID driver during OS installation. Use four new hard disk drives or use an existing drive and a ... and data mirroring combined without parity (redundancy data) having to the entire system. Refer to section 5.2 Creating a RAID driver disk for this setup. If one drive to a hard disk drive included in parallel, interleaved stacks. RAID 5 stripes both... want to install a Windows® operating system to a second drive. Chapter 5 ASUS X99-M WS 5-1

User Guide
Page 159
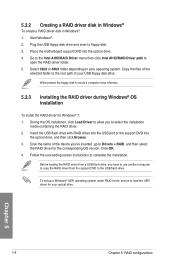
... following warning message appears: [CONFIRM EXIT] Are you sure you want to the utility main menu. 5.2 Creating a RAID driver disk A floppy disk with the RAID driver is required when installing a Windows® operating system on a hard disk drive that is included in a RAID set. Boot...optical drive. 5. Exit, then press . Save changes and exit BIOS. 6. Chapter 5 ASUS X99-M WS 5-7 When the Make Disk menu appears, press to enter the BIOS setup utility. 3. Press during POST to create a RAID driver disk. 7. Set the optical drive as the primary boot device. 4. Exiting the Intel...
... following warning message appears: [CONFIRM EXIT] Are you sure you want to the utility main menu. 5.2 Creating a RAID driver disk A floppy disk with the RAID driver is required when installing a Windows® operating system on a hard disk drive that is included in a RAID set. Boot...optical drive. 5. Exit, then press . Save changes and exit BIOS. 6. Chapter 5 ASUS X99-M WS 5-7 When the Make Disk menu appears, press to enter the BIOS setup utility. 3. Press during POST to create a RAID driver disk. 7. Set the optical drive as the primary boot device. 4. Exiting the Intel...
User Guide
Page 160
... Click OK. 4. Chapter 5 5-8 Chapter 5: RAID configurations Start Windows®. 2. During the OS installation, click Load Driver to allow you have to use another computer to copy the RAID driver from the support DVD to the USB flash drive. To set up a Windows® UEFI operating system under RAID... mode, ensure to Drivers > RAID, and then select the RAID driver for Windows® 7: 1. Place the motherboard support DVD into the optical drive, and then click Browse. 3. Copy the ...
... Click OK. 4. Chapter 5 5-8 Chapter 5: RAID configurations Start Windows®. 2. During the OS installation, click Load Driver to allow you have to use another computer to copy the RAID driver from the support DVD to the USB flash drive. To set up a Windows® UEFI operating system under RAID... mode, ensure to Drivers > RAID, and then select the RAID driver for Windows® 7: 1. Place the motherboard support DVD into the optical drive, and then click Browse. 3. Copy the ...

User Guide
Page 161
To uninstall existing graphics card drivers: 1. Go to uninstall all current applications. 2. Chapter 6 ASUS X99-M WS 6-1 Chapter 6: Multi GPU Support Multiple GPU support 6 6.1 AMD® CrossFireX™ technology The motherboard supports the AMD® CrossFireX&#... installing AMD CrossFireX graphics cards to install multi-graphics processing units (GPU) graphics cards. Turn off your current graphics card driver/s. 4. Select your computer. Download the latest driver from the AMD website at www.amd.com. • Ensure that you to your system. See Chapter 1 for details...
To uninstall existing graphics card drivers: 1. Go to uninstall all current applications. 2. Chapter 6 ASUS X99-M WS 6-1 Chapter 6: Multi GPU Support Multiple GPU support 6 6.1 AMD® CrossFireX™ technology The motherboard supports the AMD® CrossFireX&#... installing AMD CrossFireX graphics cards to install multi-graphics processing units (GPU) graphics cards. Turn off your current graphics card driver/s. 4. Select your computer. Download the latest driver from the AMD website at www.amd.com. • Ensure that you to your system. See Chapter 1 for details...
User Guide
Page 163
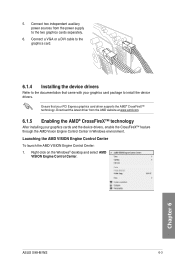
...Chapter 6 ASUS X99-M WS 6-3 Connect a VGA or a DVI cable to the graphics card. 6.1.4 Installing the device drivers Refer to the documentation that your PCI Express graphics card driver supports the AMD® CrossFireX™ technology. Download the latest driver from the power supply to install the device drivers. Right...® desktop and select AMD VISION Engine Control Center. Ensure that came with your graphics cards and the device drivers, enable the CrossFireX™ feature through the AMD Vision Engine Control Center in Windows environment. Launching the AMD VISION...
...Chapter 6 ASUS X99-M WS 6-3 Connect a VGA or a DVI cable to the graphics card. 6.1.4 Installing the device drivers Refer to the documentation that your PCI Express graphics card driver supports the AMD® CrossFireX™ technology. Download the latest driver from the power supply to install the device drivers. Right...® desktop and select AMD VISION Engine Control Center. Ensure that came with your graphics cards and the device drivers, enable the CrossFireX™ feature through the AMD Vision Engine Control Center in Windows environment. Launching the AMD VISION...

User Guide
Page 165
...for the locations of the PCIEX16 slots recommended for reference only. Chapter 6 ASUS X99-M WS 6-5 The graphics cards and the motherboard layout may vary with models, but the installation steps remain the same. If your graphics card driver supports the NVIDIA SLI technology. Prepare two SLI-ready graphics cards. 2. ...Insert the two graphics card into the PCIEX16 slots. Download the latest driver from the NVIDIA website at www.nvidia.com. • Ensure that your power supply unit (PSU) can provide at least the ...
...for the locations of the PCIEX16 slots recommended for reference only. Chapter 6 ASUS X99-M WS 6-5 The graphics cards and the motherboard layout may vary with models, but the installation steps remain the same. If your graphics card driver supports the NVIDIA SLI technology. Prepare two SLI-ready graphics cards. 2. ...Insert the two graphics card into the PCIEX16 slots. Download the latest driver from the NVIDIA website at www.nvidia.com. • Ensure that your power supply unit (PSU) can provide at least the ...

User Guide
Page 166
...to the two graphics cards separately. 6. Ensure that came with your PCI Express graphics card driver supports the NVIDIA® SLI™ technology. Download the latest driver from the power supply to the goldfingers on each graphics card. Connect two independent auxiliary power... sources from the NVIDIA website at www.nvidia.com. SLI bridge Goldfingers 6.2.3 Installing the device drivers Refer to the graphics card. Connect a VGA or a DVI cable to the documentation that the connector is firmly in place. 5. 4. ...
...to the two graphics cards separately. 6. Ensure that came with your PCI Express graphics card driver supports the NVIDIA® SLI™ technology. Download the latest driver from the power supply to the goldfingers on each graphics card. Connect two independent auxiliary power... sources from the NVIDIA website at www.nvidia.com. SLI bridge Goldfingers 6.2.3 Installing the device drivers Refer to the graphics card. Connect a VGA or a DVI cable to the documentation that the connector is firmly in place. 5. 4. ...