User Guide
Page 24
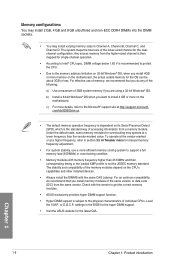
...; CPU spec, DIMM voltage below 1.65 V is subject to support a full memory load (8 DIMMs) or overclocking condition. • Memory modules with the same CAS Latency. Check with the vendor to get the correct memory modules. • ASUS exclusively provides hyper DIMM support function. • Hyper DIMM support is recommended to protect the...; OS, when you are using a 32-bit Windows® OS. com/kb/929605/en-us. • The default memory operation frequency is then mapped for overclocking may install varying memory sizes in the BIOS for the hyper DIMM support. • Visit the...
...; CPU spec, DIMM voltage below 1.65 V is subject to support a full memory load (8 DIMMs) or overclocking condition. • Memory modules with the same CAS Latency. Check with the vendor to get the correct memory modules. • ASUS exclusively provides hyper DIMM support function. • Hyper DIMM support is recommended to protect the...; OS, when you are using a 32-bit Windows® OS. com/kb/929605/en-us. • The default memory operation frequency is then mapped for overclocking may install varying memory sizes in the BIOS for the hyper DIMM support. • Visit the...

User Guide
Page 28
The button also lights up when the system is ideal for overclockers and gamers who continually change settings to power up or wake up the system. This is plugged to a power source indicating that allows you to ...
The button also lights up when the system is ideal for overclockers and gamers who continually change settings to power up or wake up the system. This is plugged to a power source indicating that allows you to ...
User Guide
Page 29
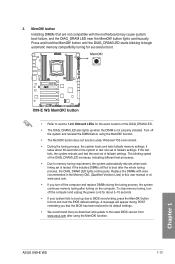
... hold the MemOK! button until the DIAG_DRAM LED starts blinking to begin automatic memory compatibility tuning for successful boot. • Refer to BIOS overclocking, press the MemOK! button does not function under Windows® OS environment. • During the tuning process, the system loads and tests... off the computer and replace DIMMs during POST reminding you that you turn off the system and reinstall the DIMM before using the MemOK! ASUS X99-E WS 1-13 Chapter 1 button lights continuously. It takes about 5-10 seconds. • If your system fails to boot up when the DIMM...
... hold the MemOK! button until the DIAG_DRAM LED starts blinking to begin automatic memory compatibility tuning for successful boot. • Refer to BIOS overclocking, press the MemOK! button does not function under Windows® OS environment. • During the tuning process, the system loads and tests... off the computer and replace DIMMs during POST reminding you that you turn off the system and reinstall the DIMM before using the MemOK! ASUS X99-E WS 1-13 Chapter 1 button lights continuously. It takes about 5-10 seconds. • If your system fails to boot up when the DIMM...

User Guide
Page 32
...if a problem is detected with your Power Supply Unit (PSU). The PGLED3 LED near the Dr. Power switch lights up when you to overclocking. 7. Install the bundled ASUS Dr. Power Utility then enable this button to clear the BIOS setup information only when the systems hangs due to enable or disable the... ASUS Dr. Power feature. Clear CMOS button (CLR_CMOS) Press this switch to allow the system to section 1.2.8 Onboard LEDs for the exact location of the ...
...if a problem is detected with your Power Supply Unit (PSU). The PGLED3 LED near the Dr. Power switch lights up when you to overclocking. 7. Install the bundled ASUS Dr. Power Utility then enable this button to clear the BIOS setup information only when the systems hangs due to enable or disable the... ASUS Dr. Power feature. Clear CMOS button (CLR_CMOS) Press this switch to allow the system to section 1.2.8 Onboard LEDs for the exact location of the ...

User Guide
Page 33
8. For the location of the EZ XMP LED, refer to enhance the DIMM's speed and performance. Chapter 1 ASUS X99-E WS 1-17 EZ XMP switch Enable this switch to overclock the installed DIMMs, allowing you enable the EZ XMP switch. The EZ XMP LED (XLED1) lights up when you to section 1.2.8 Onboard LEDs.
8. For the location of the EZ XMP LED, refer to enhance the DIMM's speed and performance. Chapter 1 ASUS X99-E WS 1-17 EZ XMP switch Enable this switch to overclock the installed DIMMs, allowing you enable the EZ XMP switch. The EZ XMP LED (XLED1) lights up when you to section 1.2.8 Onboard LEDs.

User Guide
Page 34
... of the installed CPU. Set pins 1-2 to set a higher CPU voltage for the front fans and rear fans control. The CHAFAN_SEL jumper is for a flexible overclocking system, depending on the type of the chassis fans. To go back to its default CPU voltage setting, insert the jumper to switch fan pin...
... of the installed CPU. Set pins 1-2 to set a higher CPU voltage for the front fans and rear fans control. The CHAFAN_SEL jumper is for a flexible overclocking system, depending on the type of the chassis fans. To go back to its default CPU voltage setting, insert the jumper to switch fan pin...

User Guide
Page 73
Chapter 3: BIOS setup BIOS setup 3.1 Knowing BIOS 3 The new ASUS UEFI BIOS is a Unified Extensible Interface that complies with the help of a trained service personnel. ...UEFI BIOS" unless otherwise specified. BIOS (Basic Input and Output System) stores system hardware settings such as storage device configuration, overclocking settings, advanced power management, and boot device configuration that are needed for this user manual refers to enable a more flexible ...boot failure. DO NOT change the default BIOS settings except in the motherboard CMOS. Chapter 3 ASUS X99-E WS 3-1
Chapter 3: BIOS setup BIOS setup 3.1 Knowing BIOS 3 The new ASUS UEFI BIOS is a Unified Extensible Interface that complies with the help of a trained service personnel. ...UEFI BIOS" unless otherwise specified. BIOS (Basic Input and Output System) stores system hardware settings such as storage device configuration, overclocking settings, advanced power management, and boot device configuration that are needed for this user manual refers to enable a more flexible ...boot failure. DO NOT change the default BIOS settings except in the motherboard CMOS. Chapter 3 ASUS X99-E WS 3-1

User Guide
Page 75
... switch EZ System Tuning modes Selects the display language Creates storage RAID and of the BIOS setup program configures system overclocking Chapter 3 Enables or disables the SATA RAID mode for details. ASUS X99-E WS 3-3 Click < or > to select the display language, system performance mode and boot device priority. The EZ Mode provides you an...
... switch EZ System Tuning modes Selects the display language Creates storage RAID and of the BIOS setup program configures system overclocking Chapter 3 Enables or disables the SATA RAID mode for details. ASUS X99-E WS 3-3 Click < or > to select the display language, system performance mode and boot device priority. The EZ Mode provides you an...

User Guide
Page 77
... information. Refer to select the the language that the item has a submenu. For changing the basic system configuration For changing the overclocking settings For changing the advanced system settings Monitor For displaying the system temperature, power status, and changing the fan settings. To display...a Tree Map setup. EZ Tuning Wizard (F11) This button above the menu bar shows all BIOS items in your BIOS screen. Chapter 3 ASUS X99-E WS 3-5 MyFavorites (F3) This button above the menu bar allows you to change the motherboard's SATA mode from AHCI to MyFavorites menu. Q-Fan ...
... information. Refer to select the the language that the item has a submenu. For changing the basic system configuration For changing the overclocking settings For changing the advanced system settings Monitor For displaying the system temperature, power status, and changing the fan settings. To display...a Tree Map setup. EZ Tuning Wizard (F11) This button above the menu bar shows all BIOS items in your BIOS screen. Chapter 3 ASUS X99-E WS 3-5 MyFavorites (F3) This button above the menu bar allows you to change the motherboard's SATA mode from AHCI to MyFavorites menu. Q-Fan ...

User Guide
Page 81
from the BIOS screen to their best settings. The system automatically detects the CPU fan type. 4. ASUS X99-E WS 3-9 Chapter 3 Select a PC scenario Daily Computing or Gaming/Media Editing, then click Next. 3. You can also easily set RAID in your settings: 1. If you installed ..., or Water cooler) that you are not sure of the CPU fan type, click I'm not sure. 3.2.4 EZ Tuning Wizard EZ Tuning Wizard allows you to overclock your CPU and DRAM, computer usage, and CPU fan to open 2. Click Next then click Yes to confirm auto-tuning.
from the BIOS screen to their best settings. The system automatically detects the CPU fan type. 4. ASUS X99-E WS 3-9 Chapter 3 Select a PC scenario Daily Computing or Gaming/Media Editing, then click Next. 3. You can also easily set RAID in your settings: 1. If you installed ..., or Water cooler) that you are not sure of the CPU fan type, click I'm not sure. 3.2.4 EZ Tuning Wizard EZ Tuning Wizard allows you to overclock your CPU and DRAM, computer usage, and CPU fan to open 2. Click Next then click Yes to confirm auto-tuning.

User Guide
Page 87
...cause the system to display other BIOS items. Chapter 3 Ai Overclock Tuner [Auto] This item allows you installed on the motherboard. Configuration options: [Auto] [100MHz] [125MHz] [166MHz] [250MHz] ASUS X99-E WS 3-15 Scroll down to malfunction. 3.5 Ai Tweaker menu The Ai... Tweaker menu items allow you to configure overclocking-related items. Be cautious when changing the settings of these preset overclocking configuration options: [Auto] Loads the optimal ...
...cause the system to display other BIOS items. Chapter 3 Ai Overclock Tuner [Auto] This item allows you installed on the motherboard. Configuration options: [Auto] [100MHz] [125MHz] [166MHz] [250MHz] ASUS X99-E WS 3-15 Scroll down to malfunction. 3.5 Ai Tweaker menu The Ai... Tweaker menu items allow you to configure overclocking-related items. Be cautious when changing the settings of these preset overclocking configuration options: [Auto] Loads the optimal ...

User Guide
Page 88
... clock) mode when using a very high BCLK to default core ratio settings. ASUS MultiCore Enhancement [Auto] [Auto] This item allows you to maximize the oveclocking performance optimized by default for a better overclocking capability. CPU Core Ratio [Per Core] This item allows you to set the... CPU core ratio limit per core or synchronize automatically to LC PLL by ASUS core ratio settings. [Disabled] This item allows you to set to improve overclocking capability. Chapter 3 3-16 Chapter 3: BIOS setup Configuration options: [8Ohm dbl] [7Ohm dbl] [6Ohm dbl] ...
... clock) mode when using a very high BCLK to default core ratio settings. ASUS MultiCore Enhancement [Auto] [Auto] This item allows you to maximize the oveclocking performance optimized by default for a better overclocking capability. CPU Core Ratio [Per Core] This item allows you to set the... CPU core ratio limit per core or synchronize automatically to LC PLL by ASUS core ratio settings. [Disabled] This item allows you to set to improve overclocking capability. Chapter 3 3-16 Chapter 3: BIOS setup Configuration options: [8Ohm dbl] [7Ohm dbl] [6Ohm dbl] ...

User Guide
Page 90
... options: [Disabled] [Enabled] DRAM Timing Control The subitems in this item to set the DRAM timing control features. To keep the current overclocking tuner status, select [Keep Current Settings]. Changing the values in its optimized settings. [100:100] The DRAM ratio is set to 100:100... voltages and achieve the best energy saving condition. EPU Power Saving Mode [Disabled] The ASUS EPU (Energy Processing Unit) sets the CPU in this happens, revert to get the extreme overclocking capability. If this menu may cause the system to the extreme depending on the CPU ...
... options: [Disabled] [Enabled] DRAM Timing Control The subitems in this item to set the DRAM timing control features. To keep the current overclocking tuner status, select [Keep Current Settings]. Changing the values in its optimized settings. [100:100] The DRAM ratio is set to 100:100... voltages and achieve the best energy saving condition. EPU Power Saving Mode [Disabled] The ASUS EPU (Energy Processing Unit) sets the CPU in this happens, revert to get the extreme overclocking capability. If this menu may cause the system to the extreme depending on the CPU ...

User Guide
Page 96
...Load-line is defined by Intel® specification and affects CPU power voltage. Higher load-line calibration could get higher voltage and good overclocking performance, but increases the CPU and VRM thermal conditions. Configuration options [Auto] [Level 1] - [Level 9] The actual performance boost...Disabled] External Digi+ Power Control CPU Input Boot Voltage [Auto] This item allows you to set a higher CPU input boot voltage for better overclocking capability. Configuration options: [Auto] [1] - [19] Memory optimize Control [Auto] This item allows you to enable or disable the memory testing....
...Load-line is defined by Intel® specification and affects CPU power voltage. Higher load-line calibration could get higher voltage and good overclocking performance, but increases the CPU and VRM thermal conditions. Configuration options [Auto] [Level 1] - [Level 9] The actual performance boost...Disabled] External Digi+ Power Control CPU Input Boot Voltage [Auto] This item allows you to set a higher CPU input boot voltage for better overclocking capability. Configuration options: [Auto] [1] - [19] Memory optimize Control [Auto] This item allows you to enable or disable the memory testing....

User Guide
Page 98
... fixed DRAM switching frequency for an enhanced system stability. A higher value setting provides higher power consumption delivery and extends the overclocking frequency range simultaneously. Set this menu allow you to [Manual]. Use the or to 550 KHz with an interval of ... adjust the processor voltage and cores frequency which decreases the average power consumption the average heat production. Set a higher value to enlarge the overclocking potential. Configuration options: [Auto] [100%] [110%] [120%] [130%] [140%] CPU Power Thermal Control [120] A higher temperature...
... fixed DRAM switching frequency for an enhanced system stability. A higher value setting provides higher power consumption delivery and extends the overclocking frequency range simultaneously. Set this menu allow you to [Manual]. Use the or to 550 KHz with an interval of ... adjust the processor voltage and cores frequency which decreases the average power consumption the average heat production. Set a higher value to enlarge the overclocking potential. Configuration options: [Auto] [100%] [110%] [120%] [130%] [140%] CPU Power Thermal Control [120] A higher temperature...

User Guide
Page 99
... over TDP (Thermal Design Power). Configuration options: [Auto] [High Performance] [Balanced] Fully Manual Mode [Disabled] Set this item when overclocking. Vcore item to adjust the value. Max Cache Voltage [Disabled] This item allows the CPU Core Voltage as close to CPU Input Voltage...Configuration CPU Integrated VR Efficiency Management [Auto] This item allows you set a higher current limit to prevent frequency and power throttling when overclocking. Chapter 3 ASUS X99-E WS 3-27 Use the or keys to [Enabled]. The values range from 0.125 to 1023.875 with a 0.125 interval. Use the...
... over TDP (Thermal Design Power). Configuration options: [Auto] [High Performance] [Balanced] Fully Manual Mode [Disabled] Set this item when overclocking. Vcore item to adjust the value. Max Cache Voltage [Disabled] This item allows the CPU Core Voltage as close to CPU Input Voltage...Configuration CPU Integrated VR Efficiency Management [Auto] This item allows you set a higher current limit to prevent frequency and power throttling when overclocking. Chapter 3 ASUS X99-E WS 3-27 Use the or keys to [Enabled]. The values range from 0.125 to 1023.875 with a 0.125 interval. Use the...

User Guide
Page 101
... cores when running in turbo mode. Total Adaptive Mode CPU Cache Voltage [Auto] This item sums up the voltages of voltage fed to [Enabled] when overclocking. Chapter 3 ASUS X99-E WS 3-29 Additional Turbo Mode CPU Cache Voltage [Auto] This item allows you to adjust the value. Offset Mode Sign [+] [+] To offset the voltage by...
... cores when running in turbo mode. Total Adaptive Mode CPU Cache Voltage [Auto] This item sums up the voltages of voltage fed to [Enabled] when overclocking. Chapter 3 ASUS X99-E WS 3-29 Additional Turbo Mode CPU Cache Voltage [Auto] This item allows you to adjust the value. Offset Mode Sign [+] [+] To offset the voltage by...

User Guide
Page 102
... or key to adjust the value. The values range from communicating with the external voltage regulator. DRAM SVID Support [Auto] Set this item when you overclock your system. Use the or key to adjust the value. Configuration options: [Auto] [Disabled] [Enabled] DRAM Voltage (CHA/CHB, CHC/CHD) [Auto] This item allows...
... or key to adjust the value. The values range from communicating with the external voltage regulator. DRAM SVID Support [Auto] Set this item when you overclock your system. Use the or key to adjust the value. Configuration options: [Auto] [Disabled] [Enabled] DRAM Voltage (CHA/CHB, CHC/CHD) [Auto] This item allows...

User Guide
Page 103
PLL Termination Voltage [Auto] This item allows you to enhance the BCLK overclocking capability or reduce the EMI (electromagnetic disturbance) generated by a negative value. PLL Reference Offset Mode Sign [+] [+] To offset the voltage by a positive value. .... You can use the or keys to enhance BCLK overclocking. You can use the or keys to adjust the value. PLL Reference Offset Value [Auto] This item allows you to terminate the PLL Voltage. Configuration options: [Auto] [Disabled] [Enabled] Chapter 3 ASUS X99-E WS 3-31 Set this item to [Enabled] for EMI ...
PLL Termination Voltage [Auto] This item allows you to enhance the BCLK overclocking capability or reduce the EMI (electromagnetic disturbance) generated by a negative value. PLL Reference Offset Mode Sign [+] [+] To offset the voltage by a positive value. .... You can use the or keys to enhance BCLK overclocking. You can use the or keys to adjust the value. PLL Reference Offset Value [Auto] This item allows you to terminate the PLL Voltage. Configuration options: [Auto] [Disabled] [Enabled] Chapter 3 ASUS X99-E WS 3-31 Set this item to [Enabled] for EMI ...