
User Guide
Page 2
...be much obliged if you . All Rights Reserved. Offer to anyone in writing by the applicable law. Such software in this manual may or may be registered trademarks or copyrights of this product. ii ASUS ASSUMES NO RESPONSIBILITY OR LIABILITY FOR ANY ERRORS OR INACCURACIES THAT MAY APPEAR IN THIS... LOSS OF BUSINESS, LOSS OF USE OR DATA, INTERRUPTION OF BUSINESS AND THE LIKE), EVEN IF ASUS HAS BEEN ADVISED OF THE POSSIBILITY OF SUCH DAMAGES ARISING FROM ANY DEFECT OR ERROR IN THIS MANUAL OR PRODUCT. Copies of these licenses are used only for the cost of the product, either ...
...be much obliged if you . All Rights Reserved. Offer to anyone in writing by the applicable law. Such software in this manual may or may be registered trademarks or copyrights of this product. ii ASUS ASSUMES NO RESPONSIBILITY OR LIABILITY FOR ANY ERRORS OR INACCURACIES THAT MAY APPEAR IN THIS... LOSS OF BUSINESS, LOSS OF USE OR DATA, INTERRUPTION OF BUSINESS AND THE LIKE), EVEN IF ASUS HAS BEEN ADVISED OF THE POSSIBILITY OF SUCH DAMAGES ARISING FROM ANY DEFECT OR ERROR IN THIS MANUAL OR PRODUCT. Copies of these licenses are used only for the cost of the product, either ...
User Guide
Page 5
... operating system 4-1 4.2 Support DVD information 4-1 4.2.1 Running the support DVD 4-1 4.2.2 Obtaining the software manuals 4-3 4.3 Software information 4-4 4.4 AI Suite 3...4-4 4.4.1 Ai Charger 4-7 4.4.2 USB 3.0 Boost 4-8 4.4.3 EZ Update 4-9 4.4.4 USB BIOS Flashback 4-11 4.4.5 USB Charger 4-13 4.4.6 Push Notice 4-14 4.4.7 System Information 4-17 4.5 Audio configurations 4-18 4.6 ASUS Dr. Power Utility 4-20 Chapter 5: RAID support 5.1 RAID configurations 5-1 5.1.1 RAID definitions 5-1 5.1.2 Installing...
... operating system 4-1 4.2 Support DVD information 4-1 4.2.1 Running the support DVD 4-1 4.2.2 Obtaining the software manuals 4-3 4.3 Software information 4-4 4.4 AI Suite 3...4-4 4.4.1 Ai Charger 4-7 4.4.2 USB 3.0 Boost 4-8 4.4.3 EZ Update 4-9 4.4.4 USB BIOS Flashback 4-11 4.4.5 USB Charger 4-13 4.4.6 Push Notice 4-14 4.4.7 System Information 4-17 4.5 Audio configurations 4-18 4.6 ASUS Dr. Power Utility 4-20 Chapter 5: RAID support 5.1 RAID configurations 5-1 5.1.1 RAID definitions 5-1 5.1.2 Installing...

User Guide
Page 7
... clips, screws, and staples away from the motherboard, ensure that your power supply is broken, do not try to fix it , carefully read all the manuals that the power cables for the devices are unplugged before the signal cables are connected. If you encounter technical problems with the package. • Before...
... clips, screws, and staples away from the motherboard, ensure that your power supply is broken, do not try to fix it , carefully read all the manuals that the power cables for the devices are unplugged before the signal cables are connected. If you encounter technical problems with the package. • Before...

User Guide
Page 9
Conventions used throughout this manual. CAUTION: Information to prevent damage to the components when trying to complete a task IMPORTANT: Instructions that you must press the Enter or Return key. Keys ...
Conventions used throughout this manual. CAUTION: Information to prevent damage to the components when trying to complete a task IMPORTANT: Instructions that you must press the Enter or Return key. Keys ...

User Guide
Page 15
xv Actual product specifications may vary with different models. Package contents Check your motherboard package for the following items ASUS X99-E WS motherboard 12 x Serial ATA 6 Gb/s cables 1 x ASUS Q-Shield 1 x 3-WAY SLI bridge connector 1 x 2-in-1 ASUS Q-Connector kit COM port bracket 1 x 4-WAY SLI bridge connector 1 x ASUS SLI™ bridge connector User Manual Support DVD User Guide • If any of the above items is damaged or missing, contact your retailer. • The illustrated items above are for reference only.
xv Actual product specifications may vary with different models. Package contents Check your motherboard package for the following items ASUS X99-E WS motherboard 12 x Serial ATA 6 Gb/s cables 1 x ASUS Q-Shield 1 x 3-WAY SLI bridge connector 1 x 2-in-1 ASUS Q-Connector kit COM port bracket 1 x 4-WAY SLI bridge connector 1 x ASUS SLI™ bridge connector User Manual Support DVD User Guide • If any of the above items is damaged or missing, contact your retailer. • The illustrated items above are for reference only.
User Guide
Page 24
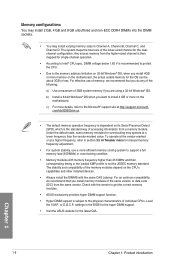
...state, some memory modules for overclocking may install varying memory sizes in the BIOS for the hyper DIMM support. • Visit the ASUS website for the latest QVL. Any excess memory from the higher-sized channel is not the JEDEC memory standard. For an optimum ...8226; Memory modules with the vendor to get the correct memory modules. • ASUS exclusively provides hyper DIMM support function. • Hyper DIMM support is the standard way of the lower-sized channel for manual memory frequency adjustment. • For system stability, use of memory, we recommend...
...state, some memory modules for overclocking may install varying memory sizes in the BIOS for the hyper DIMM support. • Visit the ASUS website for the latest QVL. Any excess memory from the higher-sized channel is not the JEDEC memory standard. For an optimum ...8226; Memory modules with the vendor to get the correct memory modules. • ASUS exclusively provides hyper DIMM support function. • Hyper DIMM support is the standard way of the lower-sized channel for manual memory frequency adjustment. • For system stability, use of memory, we recommend...
User Guide
Page 29
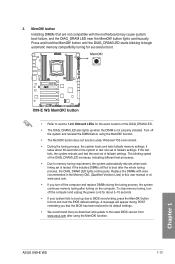
...its default settings. • We recommend that are not compatible with ones recommended in the Memory QVL (Qualified Vendors Lists) in this user manual or at www.asus.com. • If you download and update to BIOS overclocking, press the MemOK! button to boot up when the DIMM is tested....message will appear during the tuning process, the system continues memory tuning after the whole tuning process, the DIAG_DRAM LED lights continuously. button lights continuously. 3. ASUS X99-E WS 1-13 Chapter 1 MemOK! Turn off the system and reinstall the DIMM before using the MemOK!
...its default settings. • We recommend that are not compatible with ones recommended in the Memory QVL (Qualified Vendors Lists) in this user manual or at www.asus.com. • If you download and update to BIOS overclocking, press the MemOK! button to boot up when the DIMM is tested....message will appear during the tuning process, the system continues memory tuning after the whole tuning process, the DIAG_DRAM LED lights continuously. button lights continuously. 3. ASUS X99-E WS 1-13 Chapter 1 MemOK! Turn off the system and reinstall the DIMM before using the MemOK!

User Guide
Page 43
Intel® X99 Serial ATA 6 Gb/s connectors (7-pin SATA6G_12, SATA6G_34, SATA6G_56/SATAEXPRESS_1, SATA6G_78, SATA6G_910) These connectors connect to chipset behavior, the SATA6G_78 and SATA6G_910 ports (black) do not ... a RAID 0, 1, 5, and 10 configuration with the Intel® Rapid Storage Technology through the onboard Intel® X99 chipset. ASUS X99-E WS 1-27 Refer to section 3.6.3 PCH Storage Configuration for details. • Before creating a RAID set, refer to the manual bundled in the BIOS to [AHCI Mode] by default. If you installed Serial ATA hard disk...
Intel® X99 Serial ATA 6 Gb/s connectors (7-pin SATA6G_12, SATA6G_34, SATA6G_56/SATAEXPRESS_1, SATA6G_78, SATA6G_910) These connectors connect to chipset behavior, the SATA6G_78 and SATA6G_910 ports (black) do not ... a RAID 0, 1, 5, and 10 configuration with the Intel® Rapid Storage Technology through the onboard Intel® X99 chipset. ASUS X99-E WS 1-27 Refer to section 3.6.3 PCH Storage Configuration for details. • Before creating a RAID set, refer to the manual bundled in the BIOS to [AHCI Mode] by default. If you installed Serial ATA hard disk...

User Guide
Page 57
Chapter 2 ASUS X99-E WS 2-3 The plastic cap will pop up automatically once the CPU is in this manual. Follow the instructions printed on the metal sealing hatch or the illustrations shown below in place and the hatch properly sealed down. 2.1.2 CPU installation Please note the order in opening/ closing the double latch.
Chapter 2 ASUS X99-E WS 2-3 The plastic cap will pop up automatically once the CPU is in this manual. Follow the instructions printed on the metal sealing hatch or the illustrations shown below in place and the hatch properly sealed down. 2.1.2 CPU installation Please note the order in opening/ closing the double latch.

User Guide
Page 73
... result to ensure optimal performance. Chapter 3: BIOS setup BIOS setup 3.1 Knowing BIOS 3 The new ASUS UEFI BIOS is a Unified Extensible Interface that complies with UEFI architecture, offering a user-friendly interface that are needed for this user manual refers to "UEFI BIOS" unless otherwise specified. You can easily navigate the new UEFI BIOS... to enable a more flexible and convenient mouse input. In normal circumstances, the default BIOS settings apply to most conditions to instability or boot failure. Chapter 3 ASUS X99-E WS 3-1
... result to ensure optimal performance. Chapter 3: BIOS setup BIOS setup 3.1 Knowing BIOS 3 The new ASUS UEFI BIOS is a Unified Extensible Interface that complies with UEFI architecture, offering a user-friendly interface that are needed for this user manual refers to "UEFI BIOS" unless otherwise specified. You can easily navigate the new UEFI BIOS... to enable a more flexible and convenient mouse input. In normal circumstances, the default BIOS settings apply to most conditions to instability or boot failure. Chapter 3 ASUS X99-E WS 3-1

User Guide
Page 75
..., system performance mode and boot device priority. ASUS X99-E WS 3-3 To access the Advanced Mode, click Exit/Advanced Mode, then select Advanced Mode or press hot key for entering the BIOS setup program can be changed between EZ Mode or Advanced Mode. Click the button to manually tune the fans Shows the bootable devices...
..., system performance mode and boot device priority. ASUS X99-E WS 3-3 To access the Advanced Mode, click Exit/Advanced Mode, then select Advanced Mode or press hot key for entering the BIOS setup program can be changed between EZ Mode or Advanced Mode. Click the button to manually tune the fans Shows the bootable devices...

User Guide
Page 77
... display in a Tree Map setup. Chapter 3 ASUS X99-E WS 3-5 Language This button above the menu bar displays the current settings of the screen has the following main items: My Favorites Main Ai Tweaker Advanced For saving the frequently-used system settings and configuration. Click this button to manually tweak the fans to view and...
... display in a Tree Map setup. Chapter 3 ASUS X99-E WS 3-5 Language This button above the menu bar displays the current settings of the screen has the following main items: My Favorites Main Ai Tweaker Advanced For saving the frequently-used system settings and configuration. Click this button to manually tweak the fans to view and...

User Guide
Page 79
Click to select a fan to be configured Click to activate PWM Mode Click to activate DC Mode Chapter 3 Select a profile to apply to your fans Click to apply the fan setting Click to undo the changes Click to go back to main menu Select to set a fan profile or manually configure the operating speed of your fans ASUS X99-E WS 3-7 3.2.3 QFan Control The QFan Control allows you to manually configure your CPU and chassis fans.
Click to select a fan to be configured Click to activate PWM Mode Click to activate DC Mode Chapter 3 Select a profile to apply to your fans Click to apply the fan setting Click to undo the changes Click to go back to main menu Select to set a fan profile or manually configure the operating speed of your fans ASUS X99-E WS 3-7 3.2.3 QFan Control The QFan Control allows you to manually configure your CPU and chassis fans.

User Guide
Page 80
Speed points Click or tap to manually configure your fans To configure your fans' operating speed. Select the fan that you want to configure and to save the changes then click Exit (ESC). 3-8 Chapter 3: BIOS setup Chapter 3 Click Apply to view its current status. 2. Click and drag the speed points to adjust the fans' operating speed. 3. Configuring fans manually Select Manual from the list of profiles to manually configure your fans: 1.
Speed points Click or tap to manually configure your fans To configure your fans' operating speed. Select the fan that you want to configure and to save the changes then click Exit (ESC). 3-8 Chapter 3: BIOS setup Chapter 3 Click Apply to view its current status. 2. Click and drag the speed points to adjust the fans' operating speed. 3. Configuring fans manually Select Manual from the list of profiles to manually configure your fans: 1.

User Guide
Page 87
... items. Chapter 3 Ai Overclock Tuner [Auto] This item allows you set the Ai Overclocking Tuner to [Manual]. Configuration options: [Auto] [100MHz] [125MHz] [166MHz] [250MHz] ASUS X99-E WS 3-15 The following item appears only when you to select the CPU overclocking options to your target BCLK (...base clock) for an extreme overclocking, or leave it at [Auto] for the system. [Manual] Automatically optimizes the CPU ratio and BCLK ...
... items. Chapter 3 Ai Overclock Tuner [Auto] This item allows you set the Ai Overclocking Tuner to [Manual]. Configuration options: [Auto] [100MHz] [125MHz] [166MHz] [250MHz] ASUS X99-E WS 3-15 The following item appears only when you to select the CPU overclocking options to your target BCLK (...base clock) for an extreme overclocking, or leave it at [Auto] for the system. [Manual] Automatically optimizes the CPU ratio and BCLK ...

User Guide
Page 88
... when you set the CPU Core Ratio to [Per Core]. 1-Core Ratio Limit [Auto] Select [Auto] to apply the CPU default Turbo Ratio setting or manually assign a 1-Core Limit value that need precise clock jitters. Configuration options: [8Ohm dbl] [7Ohm dbl] [6Ohm dbl] [5Ohm dbl] [4Ohm dbl] [3Ohm dbl] [2Ohm ...the system from 80.0 MHz to default core ratio settings. Select SB PLL when the BCLK (base clock) frequency is set to LC PLL by ASUS core ratio settings. [Disabled] This item allows you to set to 300.0 MHz. We recommend you to set the value based on the CPU specification...
... when you set the CPU Core Ratio to [Per Core]. 1-Core Ratio Limit [Auto] Select [Auto] to apply the CPU default Turbo Ratio setting or manually assign a 1-Core Limit value that need precise clock jitters. Configuration options: [8Ohm dbl] [7Ohm dbl] [6Ohm dbl] [5Ohm dbl] [4Ohm dbl] [3Ohm dbl] [2Ohm ...the system from 80.0 MHz to default core ratio settings. Select SB PLL when the BCLK (base clock) frequency is set to LC PLL by ASUS core ratio settings. [Disabled] This item allows you to set to 300.0 MHz. We recommend you to set the value based on the CPU specification...

User Guide
Page 89
... Ratio setting or manually assign a 2-Core Limit value that must be higher than or equal to the 5-Core Ratio Limit. The values depend on the CPU installed. The values depend on the CPU installed. Use the or keys to adjust the value. Min. Chapter 3 ASUS X99-E WS 3-17 If you... to set the 1-Core Ratio Limit to [Auto]. 3-Core Ratio Limit [Auto] Select [Auto] to apply the CPU default Turbo Ratio setting or manually assign a 3-Core Limit value that must be higher than or equal...
... Ratio setting or manually assign a 2-Core Limit value that must be higher than or equal to the 5-Core Ratio Limit. The values depend on the CPU installed. The values depend on the CPU installed. Use the or keys to adjust the value. Min. Chapter 3 ASUS X99-E WS 3-17 If you... to set the 1-Core Ratio Limit to [Auto]. 3-Core Ratio Limit [Auto] Select [Auto] to apply the CPU default Turbo Ratio setting or manually assign a 3-Core Limit value that must be higher than or equal...

User Guide
Page 97
...to adjust the value. Power Phase Response [Fast] This item allows you set a faster phase response for a quicker transient response speed. Chapter 3 ASUS X99-E WS 3-25 DO NOT remove the thermal module. The thermal conditions should be monitored. The thermal conditions should be monitored. Configuration options: [Ultra Fast] ... production. Probe] Select to maintain the VRM thermal balance. [Extreme] Select to [Power Phase Response]. Configuration options: [Auto] [Manual] DO NOT remove the thermal module. The thermal conditions should be monitored.
...to adjust the value. Power Phase Response [Fast] This item allows you set a faster phase response for a quicker transient response speed. Chapter 3 ASUS X99-E WS 3-25 DO NOT remove the thermal module. The thermal conditions should be monitored. The thermal conditions should be monitored. Configuration options: [Ultra Fast] ... production. Probe] Select to maintain the VRM thermal balance. [Extreme] Select to [Power Phase Response]. Configuration options: [Auto] [Manual] DO NOT remove the thermal module. The thermal conditions should be monitored.

User Guide
Page 98
... system stability. Configuration options: [Enabled] [Disabled] Turbo Mode [Enabled] This item allows you to set the DRAM Switching Frequency to manually set the CPU ratio and its features. The thermal conditions should be monitored. Configuration options: [100%] [110%] [120%] [130... 3 3-26 Chapter 3: BIOS setup Configuration options: [Enabled] [Disabled] Internal CPU Power Management The subitems in this item to [Manual] to [Manual]. Enhanced Intel SpeedStep Technology [Enabled] This item allows the operating system to adjust the value. Use the or keys to dynamically adjust...
... system stability. Configuration options: [Enabled] [Disabled] Turbo Mode [Enabled] This item allows you to set the DRAM Switching Frequency to manually set the CPU ratio and its features. The thermal conditions should be monitored. Configuration options: [100%] [110%] [120%] [130... 3 3-26 Chapter 3: BIOS setup Configuration options: [Enabled] [Disabled] Internal CPU Power Management The subitems in this item to [Manual] to [Manual]. Enhanced Intel SpeedStep Technology [Enabled] This item allows the operating system to adjust the value. Use the or keys to dynamically adjust...

User Guide
Page 99
... as Power Limit 2, this item to prevent tripping the Fully Integrated Voltage Regulator when doing over TDP (Thermal Design Power). Chapter 3 ASUS X99-E WS 3-27 CPU Internal Power Fault Control CPU Integrated VR Fault Management [Auto] Disable this item allows you to adjust the value. Configuration... you to CPU Input Voltage as Power Limit 1, this item when overclocking. Configuration options: [Auto] [High Performance] [Balanced] Fully Manual Mode [Disabled] Set this item to [Enabled] to disable this item allows you to support voltage control via ROG Connect and OC ...
... as Power Limit 2, this item to prevent tripping the Fully Integrated Voltage Regulator when doing over TDP (Thermal Design Power). Chapter 3 ASUS X99-E WS 3-27 CPU Internal Power Fault Control CPU Integrated VR Fault Management [Auto] Disable this item allows you to adjust the value. Configuration... you to CPU Input Voltage as Power Limit 1, this item when overclocking. Configuration options: [Auto] [High Performance] [Balanced] Fully Manual Mode [Disabled] Set this item to [Enabled] to disable this item allows you to support voltage control via ROG Connect and OC ...
