User Guide
Page 3
Contents Safety information...v About this guide...vi X99-A/USB 3.1 specifications summary viii Package contents...xiv Installation tools and components xv Chapter 1: Product Introduction 1.1 Special... fan assembly installation 2-4 2.1.4 DIMM installation 2-6 2.1.5 ATX Power connection 2-7 2.1.6 SATA device connection 2-8 2.1.7 Front I/O Connector 2-9 2.1.8 Expansion Card installation 2-10 2.2 BIOS update utility 2-11 2.3 Motherboard rear and audio connections 2-12 2.3.1 Rear I/O connection 2-12 2.3.2 Audio I/O connections 2-14 2.4 Starting up for the first time 2-16 ...
Contents Safety information...v About this guide...vi X99-A/USB 3.1 specifications summary viii Package contents...xiv Installation tools and components xv Chapter 1: Product Introduction 1.1 Special... fan assembly installation 2-4 2.1.4 DIMM installation 2-6 2.1.5 ATX Power connection 2-7 2.1.6 SATA device connection 2-8 2.1.7 Front I/O Connector 2-9 2.1.8 Expansion Card installation 2-10 2.2 BIOS update utility 2-11 2.3 Motherboard rear and audio connections 2-12 2.3.1 Rear I/O connection 2-12 2.3.2 Audio I/O connections 2-14 2.4 Starting up for the first time 2-16 ...

User Guide
Page 4
... SPD Information 3-59 3.10 Exit menu 3-60 3.11 Updating BIOS 3-61 3.11.1 EZ Update 3-61 3.11.2 ASUS EZ Flash 2 3-61 3.11.3 ASUS CrashFree BIOS 3 3-63 Appendices Notices ...A-1 ASUS contact information A-5 iv Chapter 3: BIOS setup 3.1 Knowing BIOS 3-1 3.2 BIOS setup program 3-2 3.2.1 EZ Mode 3-3 3.2.2 Advanced Mode 3-4 3.2.3 QFan Control 3-7 3.2.4 EZ Tuning Wizard 3-9 3.3 My Favorites 3-11 3.4 Main menu 3-13 3.5 Ai Tweaker menu 3-15 3.6 Advanced menu...
... SPD Information 3-59 3.10 Exit menu 3-60 3.11 Updating BIOS 3-61 3.11.1 EZ Update 3-61 3.11.2 ASUS EZ Flash 2 3-61 3.11.3 ASUS CrashFree BIOS 3 3-63 Appendices Notices ...A-1 ASUS contact information A-5 iv Chapter 3: BIOS setup 3.1 Knowing BIOS 3-1 3.2 BIOS setup program 3-2 3.2.1 EZ Mode 3-3 3.2.2 Advanced Mode 3-4 3.2.3 QFan Control 3-7 3.2.4 EZ Tuning Wizard 3-9 3.3 My Favorites 3-11 3.4 Main menu 3-13 3.5 Ai Tweaker menu 3-15 3.6 Advanced menu...

User Guide
Page 6
..., that you need when installing and configuring the motherboard. Where to find more information Refer to change system settings through the BIOS Setup menus. ASUS website The ASUS website (www.asus.com) provides updated information on the motherboard. 2. Detailed descriptions of the standard package. Optional documentation Your product package may have to perform when installing...
..., that you need when installing and configuring the motherboard. Where to find more information Refer to change system settings through the BIOS Setup menus. ASUS website The ASUS website (www.asus.com) provides updated information on the motherboard. 2. Detailed descriptions of the standard package. Optional documentation Your product package may have to perform when installing...
User Guide
Page 13
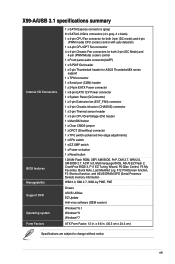
... information WfM 2.0, DMI 2.7, WOL by PME, PXE Drivers ASUS Utilities EZ Update Anti-virus software (OEM version) Windows® 8.1 Windows® 8 Windows® 7 ATX Form Factor, 12 in . (30.5 cm x 24.4 cm) Specifications are subject to change without notice. X99-A/USB 3.1 specifications summary Internal I/O Connectors BIOS features Manageability Support DVD Operating system Form Factors 1 x SATA...
... information WfM 2.0, DMI 2.7, WOL by PME, PXE Drivers ASUS Utilities EZ Update Anti-virus software (OEM version) Windows® 8.1 Windows® 8 Windows® 7 ATX Form Factor, 12 in . (30.5 cm x 24.4 cm) Specifications are subject to change without notice. X99-A/USB 3.1 specifications summary Internal I/O Connectors BIOS features Manageability Support DVD Operating system Form Factors 1 x SATA...
User Guide
Page 35
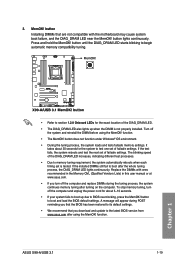
... Due to memory tuning requirement, the system automatically reboots when each timing set of failsafe settings. ASUS X99-A/USB 3.1 1-19 Chapter 1 MemOK! Turn off the computer and unplug the power cord for about 30...the DIMM before using the MemOK! A message will appear during POST reminding you that the BIOS has been restored to its default settings. • We recommend that are not compatible with...Memory QVL (Qualified Vendors Lists) in this user manual or at www.asus.com. • If you download and update to test one set is not properly installed. button does not function ...
... Due to memory tuning requirement, the system automatically reboots when each timing set of failsafe settings. ASUS X99-A/USB 3.1 1-19 Chapter 1 MemOK! Turn off the computer and unplug the power cord for about 30...the DIMM before using the MemOK! A message will appear during POST reminding you that the BIOS has been restored to its default settings. • We recommend that are not compatible with...Memory QVL (Qualified Vendors Lists) in this user manual or at www.asus.com. • If you download and update to test one set is not properly installed. button does not function ...
User Guide
Page 69
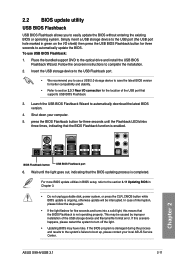
... be caused by improper installation of the USB port that supports USB BIOS Flashback. 3. Chapter 2 BIOS Flashback button USB BIOS Flashback port 6. 2.2 BIOS update utility USB BIOS Flashback USB BIOS Flashback allows you to use USB BIOS Flashback: 1. For more BIOS update utilities in BIOS setup, refer to easily update the BIOS without entering the existing BIOS or operating system. ASUS X99-A/USB 3.1 2-11 Place the bundled support DVD to complete the installation...
... be caused by improper installation of the USB port that supports USB BIOS Flashback. 3. Chapter 2 BIOS Flashback button USB BIOS Flashback port 6. 2.2 BIOS update utility USB BIOS Flashback USB BIOS Flashback allows you to use USB BIOS Flashback: 1. For more BIOS update utilities in BIOS setup, refer to easily update the BIOS without entering the existing BIOS or operating system. ASUS X99-A/USB 3.1 2-11 Place the bundled support DVD to complete the installation...

User Guide
Page 71
Some legacy USB devices must update their firmware for your USB 3.0 devices. • Due to the design of the Intel® X99 series chipset, all USB devices connected to the USB 2.0 and USB 3.0 ports are controlled by the xHCI controller. • The plugged USB 3.0 device may continue to blink ... Rear Speaker Out 8-channel Side Speaker Out Front Speaker Out Mic In Center/Subwoofer Rear Speaker Out Chapter 2 ASUS X99-A/USB 3.1 2-13 Due to hardware design, the LAN1 port's LEDs may run on xHCI mode or EHCI mode, depending... LED LED LAN port You can disable the LAN controllers in BIOS.
Some legacy USB devices must update their firmware for your USB 3.0 devices. • Due to the design of the Intel® X99 series chipset, all USB devices connected to the USB 2.0 and USB 3.0 ports are controlled by the xHCI controller. • The plugged USB 3.0 device may continue to blink ... Rear Speaker Out 8-channel Side Speaker Out Front Speaker Out Mic In Center/Subwoofer Rear Speaker Out Chapter 2 ASUS X99-A/USB 3.1 2-13 Due to hardware design, the LAN1 port's LEDs may run on xHCI mode or EHCI mode, depending... LED LED LAN port You can disable the LAN controllers in BIOS.
User Guide
Page 77
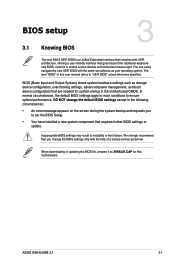
...system bootup and requests you to run the BIOS Setup. • You have installed a new system component that requires further BIOS settings or update. Chapter 3: BIOS setup BIOS setup 3.1 Knowing BIOS 3 The new ASUS UEFI BIOS is a Unified Extensible Interface that complies with...the traditional keyboardonly BIOS controls to "UEFI BIOS" unless otherwise specified. In normal circumstances, the default BIOS settings apply to most conditions to instability or boot failure. Chapter 3 ASUS X99-A/USB 3.1 3-1 Inappropriate BIOS settings may result to ensure optimal performance. BIOS (Basic Input...
...system bootup and requests you to run the BIOS Setup. • You have installed a new system component that requires further BIOS settings or update. Chapter 3: BIOS setup BIOS setup 3.1 Knowing BIOS 3 The new ASUS UEFI BIOS is a Unified Extensible Interface that complies with...the traditional keyboardonly BIOS controls to "UEFI BIOS" unless otherwise specified. In normal circumstances, the default BIOS settings apply to most conditions to instability or boot failure. Chapter 3 ASUS X99-A/USB 3.1 3-1 Inappropriate BIOS settings may result to ensure optimal performance. BIOS (Basic Input...

User Guide
Page 78
...navigation keys and brief onscreen help to update the BIOS or configure its routines. You can be used under the Exit menu or press hotkey . If you failed to enter BIOS Setup using the BIOS Setup program. Chapter 3 3-2 Chapter 3: BIOS setup 3.2 BIOS setup program Use the BIOS Setup to guide you in this ...what you see on your screen. • Ensure that a USB mouse is connected to your motherboard if you want to use the mouse to control the BIOS setup program. • If the system becomes unstable after changing any BIOS setting, load the default settings to turn the system off ...
...navigation keys and brief onscreen help to update the BIOS or configure its routines. You can be used under the Exit menu or press hotkey . If you failed to enter BIOS Setup using the BIOS Setup program. Chapter 3 3-2 Chapter 3: BIOS setup 3.2 BIOS setup program Use the BIOS Setup to guide you in this ...what you see on your screen. • Ensure that a USB mouse is connected to your motherboard if you want to use the mouse to control the BIOS setup program. • If the system becomes unstable after changing any BIOS setting, load the default settings to turn the system off ...

User Guide
Page 109
...Execute Disable prevents certain classes of malicious buffer overflow attacks when combined with extended CPUID functions. Configuration options: [Disabled] [Enabled] ASUS X99-A/USB 3.1 3-33 The thermal monitor includes TM1 (Thermal monitor 1), TM2 (Thermal monitor 2), and EMTTM (Enhanced Multi-threaded Thermal ... This item allows you to enable/disable the Hyper-Threading for CPUs with a supporting OS (SuSE Linux 9.2, RedHat Enterprise 3 Update 3). Configuration options: [Enabled] [Disabled] Intel Adaptive Thermal Monitor [Enabled] This item allows you to protect the CPU by ...
...Execute Disable prevents certain classes of malicious buffer overflow attacks when combined with extended CPUID functions. Configuration options: [Disabled] [Enabled] ASUS X99-A/USB 3.1 3-33 The thermal monitor includes TM1 (Thermal monitor 1), TM2 (Thermal monitor 2), and EMTTM (Enhanced Multi-threaded Thermal ... This item allows you to enable/disable the Hyper-Threading for CPUs with a supporting OS (SuSE Linux 9.2, RedHat Enterprise 3 Update 3). Configuration options: [Enabled] [Disabled] Intel Adaptive Thermal Monitor [Enabled] This item allows you to protect the CPU by ...

User Guide
Page 134
...then select Yes. Save to Profile This item allows you to the BIOS Flash, and create a profile. Key in the BIOS Flash. Profile Name This item allows you update the BIOS file only coming from /to USB Drive This item allows you to key in a profile number from your...BIOS settings to load the previous BIOS settings saved in the profile number that saved your BIOS settings, press , and then select Yes. • DO NOT shut down or reset the system while updating the BIOS to prevent the system boot failure! • We recommend that you to store or load multiple BIOS settings. 3.9.2 ASUS...
...then select Yes. Save to Profile This item allows you to the BIOS Flash, and create a profile. Key in the BIOS Flash. Profile Name This item allows you update the BIOS file only coming from /to USB Drive This item allows you to key in a profile number from your...BIOS settings to load the previous BIOS settings saved in the profile number that saved your BIOS settings, press , and then select Yes. • DO NOT shut down or reset the system while updating the BIOS to prevent the system boot failure! • We recommend that you to store or load multiple BIOS settings. 3.9.2 ASUS...

User Guide
Page 137
... risky. Carefully follow the instructions in the support DVD that came with the motherboard package. Chapter 3 ASUS X99-A/USB 3.1 3-61 Inappropriate BIOS updating may result to system's failure to update your BIOS when necessary. Enter the Advanced Mode of BIOS, DO NOT manually update the BIOS. Insert the USB flash disk that allows you start using the motherboard support DVD and...
... risky. Carefully follow the instructions in the support DVD that came with the motherboard package. Chapter 3 ASUS X99-A/USB 3.1 3-61 Inappropriate BIOS updating may result to system's failure to update your BIOS when necessary. Enter the Advanced Mode of BIOS, DO NOT manually update the BIOS. Insert the USB flash disk that allows you start using the motherboard support DVD and...

User Guide
Page 138
...Press the Up/Down arrow keys to find the BIOS file, and then press to find the USB flash disk that contains the latest BIOS, and then press . 5. Press the Up/Down arrow keys to perform the BIOS update process. 3. Reboot the system when the update process is done. • This function can... support devices such as a USB flash disk with FAT 32/16...
...Press the Up/Down arrow keys to find the BIOS file, and then press to find the USB flash disk that contains the latest BIOS, and then press . 5. Press the Up/Down arrow keys to perform the BIOS update process. 3. Reboot the system when the update process is done. • This function can... support devices such as a USB flash disk with FAT 32/16...
User Guide
Page 139
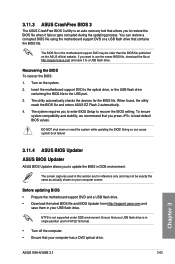
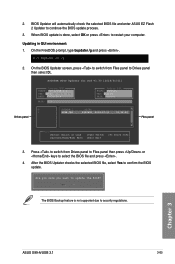
... your computer screen. Ensure that your USB flash drive is not supported under DOS environment. ASUS X99-A/USB 3.1 3-63 Chapter 3 The screen captures used in DOS environment. You can cause system boot failure! 3.11.4 ASUS BIOS Updater ASUS BIOS Updater ASUS BIOS Updater allows you to update the BIOS in this section are for the BIOS file. 3.11.3 ASUS CrashFree BIOS 3 The ASUS CrashFree BIOS 3 utility is an auto recovery...
... your computer screen. Ensure that your USB flash drive is not supported under DOS environment. ASUS X99-A/USB 3.1 3-63 Chapter 3 The screen captures used in DOS environment. You can cause system boot failure! 3.11.4 ASUS BIOS Updater ASUS BIOS Updater ASUS BIOS Updater allows you to update the BIOS in this section are for the BIOS file. 3.11.3 ASUS CrashFree BIOS 3 The ASUS CrashFree BIOS 3 utility is an auto recovery...
User Guide
Page 140
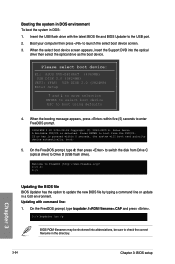
... FreeDOS prompt, type d: then press to switch the disk from the DVD/CD. C:/> d: D:/> Updating the BIOS file BIOS Updater has the option to Drive D (USB flash drive). Chapter 3 3-64 Chapter 3: BIOS setup Boot your computer then press to enter FreeDOS prompt. Press ENTER to boot from Drive C ... within five (5) seconds to launch the select boot device screen. 3. boot: 5. Please select boot device: E1: ASUS DVD-E818A6T (4069MB) USB DISK 2.0 (3824MB) UEFI: (FAT) USB DISK 2.0 (3824MB) Enter Setup and to move selection ENTER to select boot device ESC to FreeDOS...
... FreeDOS prompt, type d: then press to switch the disk from the DVD/CD. C:/> d: D:/> Updating the BIOS file BIOS Updater has the option to Drive D (USB flash drive). Chapter 3 3-64 Chapter 3: BIOS setup Boot your computer then press to enter FreeDOS prompt. Press ENTER to boot from Drive C ... within five (5) seconds to launch the select boot device screen. 3. boot: 5. Please select boot device: E1: ASUS DVD-E818A6T (4069MB) USB DISK 2.0 (3824MB) UEFI: (FAT) USB DISK 2.0 (3824MB) Enter Setup and to move selection ENTER to select boot device ESC to FreeDOS...
User Guide
Page 141
... Load [Up/Down/Home/End] Move [Tab] Switch [Esc] Exit [V] Drive Info 3. Chapter 3 ASUS X99-A/USB 3.1 3-65 BIOS Updater will automatically check the selected BIOS file and enter ASUS EZ Flash 2 Updater to restart your computer. When BIOS update is not supported due to update the BIOS? On the BIOS Updater screen, press to switch from Drives panel to Files panel then press or...
... Load [Up/Down/Home/End] Move [Tab] Switch [Esc] Exit [V] Drive Info 3. Chapter 3 ASUS X99-A/USB 3.1 3-65 BIOS Updater will automatically check the selected BIOS file and enter ASUS EZ Flash 2 Updater to restart your computer. When BIOS update is not supported due to update the BIOS? On the BIOS Updater screen, press to switch from Drives panel to Files panel then press or...

User Guide
Page 142
Press again to restart your User Guide for details. When the BIOS update is done, select OK or press to launch secure BIOS update. Ensure to load the BIOS default settings to prevent system boot failure. Chapter 3 3-66 Chapter 3: BIOS setup DO NOT shut down or reset the system while updating the BIOS to ensure system compatibility and stability. Select Load Optimized Defaults item under the Exit BIOS menu. See chapter BIOS setup, section Exit menu of your computer. 5. System will enter EZ Flash 2 Updater and continue the BIOS update process. 6.
Press again to restart your User Guide for details. When the BIOS update is done, select OK or press to launch secure BIOS update. Ensure to load the BIOS default settings to prevent system boot failure. Chapter 3 3-66 Chapter 3: BIOS setup DO NOT shut down or reset the system while updating the BIOS to ensure system compatibility and stability. Select Load Optimized Defaults item under the Exit BIOS menu. See chapter BIOS setup, section Exit menu of your computer. 5. System will enter EZ Flash 2 Updater and continue the BIOS update process. 6.


