
X79-DELUXE User's Manual
Page 7
... software. 5. ASUS website The ASUS website (www.asus.com) provides updated information on the motherboard. 2. These documents are also provided. 4. Chapter 1: Product introduction This chapter describes the features of the support DVD that may have to perform when installing system components. 3. Chapter 3: BIOS setup This chapter tells how to the following parts: 1. Chapter 5: RAID support...
... software. 5. ASUS website The ASUS website (www.asus.com) provides updated information on the motherboard. 2. These documents are also provided. 4. Chapter 1: Product introduction This chapter describes the features of the support DVD that may have to perform when installing system components. 3. Chapter 3: BIOS setup This chapter tells how to the following parts: 1. Chapter 5: RAID support...

X79-DELUXE User's Manual
Page 104
... items show Not Present if no SATA device is a monitor system. 3.6.4 SATA Configuration While entering Setup, the BIOS automatically detects the presence of your hard disk errors occur, this feature allows the hard disk to create a RAID configuration from the SATA hard disk drives. Scroll down to display the other BIOS items...
... items show Not Present if no SATA device is a monitor system. 3.6.4 SATA Configuration While entering Setup, the BIOS automatically detects the presence of your hard disk errors occur, this feature allows the hard disk to create a RAID configuration from the SATA hard disk drives. Scroll down to display the other BIOS items...

X79-DELUXE User's Manual
Page 105
... the support for the BIOS setup program. It cannot be used only for USB 3.0 devices. If no USB device is detected, the legacy USB support is disabled. ASUS X79-DELUXE 3-27 Chapter 3 SATA6G_6 [Black]) These items appear only when you set the SATA Mode Selection item to [AHCI] or [RAID], and allow you to change...
... the support for the BIOS setup program. It cannot be used only for USB 3.0 devices. If no USB device is detected, the legacy USB support is disabled. ASUS X79-DELUXE 3-27 Chapter 3 SATA6G_6 [Black]) These items appear only when you set the SATA Mode Selection item to [AHCI] or [RAID], and allow you to change...

X79-DELUXE User's Manual
Page 177
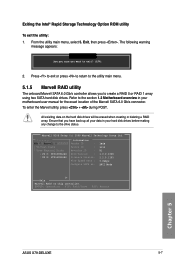
... without parity (redundancy data) having to create a RAID driver disk and load the RAID driver during OS installation. Chapter 5: RAID support RAID support 5.1 RAID configurations The motherboard supports the following SATA RAID solutions: 5 Intel® Rapid Storage Technology with RAID 0 and RAID 1 support. Chapter 5 ASUS X79-DELUXE 5-1 The RAID 5 configuration is required for this setup. If you want to install a Windows® operating...
... without parity (redundancy data) having to create a RAID driver disk and load the RAID driver during OS installation. Chapter 5: RAID support RAID support 5.1 RAID configurations The motherboard supports the following SATA RAID solutions: 5 Intel® Rapid Storage Technology with RAID 0 and RAID 1 support. Chapter 5 ASUS X79-DELUXE 5-1 The RAID 5 configuration is required for this setup. If you want to install a Windows® operating...
X79-DELUXE User's Manual
Page 178
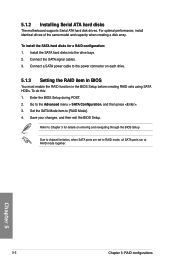
...limitation, when SATA ports are set to the power connector on each drive. 5.1.3 Setting the RAID item in BIOS You must enable the RAID function in the BIOS Setup before creating RAID sets using SATA HDDs. Go to [RAID Mode]. 4. To do this: 1. Set the SATA Mode item to the Advanced menu >... SATA Configuration, and then press . 3. Save your changes, and then exit the BIOS Setup. Enter the BIOS Setup during POST. 2. ...
...limitation, when SATA ports are set to the power connector on each drive. 5.1.3 Setting the RAID item in BIOS You must enable the RAID function in the BIOS Setup before creating RAID sets using SATA HDDs. Go to [RAID Mode]. 4. To do this: 1. Set the SATA Mode item to the Advanced menu >... SATA Configuration, and then press . 3. Save your changes, and then exit the BIOS Setup. Enter the BIOS Setup during POST. 2. ...

X79-DELUXE User's Manual
Page 179
Create RAID Volume 4. Chapter 5 ASUS X79-DELUXE 5-3 Option ROM - The RAID BIOS setup screens shown in this section are for RAID configuration. v10.5.1.1070 Copyright(C) 2003-10 Intel Corporation. Acceleration Options 3. All Rights Reserved. [ MAIN MENU ] 1. 5.1.4 Intel® ...ST3160812AS Serial # 9LS0HJA4 9LS0F4HL 3LS0JYL8 9LS0BJ5H Size 149.0GB 149.0GB 149.0GB 149.0GB Type/Status(Vol ID) Non-RAID Disk Non-RAID Disk Non-RAID Disk Non-RAID Disk [↑↓]-Select [ESC]-Exit [ENTER]-Select Menu The navigation keys at the bottom of the screen allow ...
Create RAID Volume 4. Chapter 5 ASUS X79-DELUXE 5-3 Option ROM - The RAID BIOS setup screens shown in this section are for RAID configuration. v10.5.1.1070 Copyright(C) 2003-10 Intel Corporation. Acceleration Options 3. All Rights Reserved. [ MAIN MENU ] 1. 5.1.4 Intel® ...ST3160812AS Serial # 9LS0HJA4 9LS0F4HL 3LS0JYL8 9LS0BJ5H Size 149.0GB 149.0GB 149.0GB 149.0GB Type/Status(Vol ID) Non-RAID Disk Non-RAID Disk Non-RAID Disk Non-RAID Disk [↑↓]-Select [ESC]-Exit [ENTER]-Select Menu The navigation keys at the bottom of the screen allow ...
X79-DELUXE User's Manual
Page 183
...change to the section 1.2 Motherboard overview in your motherboard user manual for the exact location of the Marvell SATA 6.0 Gb/s connector. Marvell BIOS Setup (c) 2009 Marvell Technology Group Ltd. Topology HBA 0: Marvell 0 ├ Virtual Disks └ Free Physical Disks ├ PD 0: ST3160812AS &#... 5.0Gbps AHCI Mode ▶ Help Marvell RAID on the hard disk drives will be erased when creating or deleting a RAID array. Exit, then press . From the utility main menu, select 5. ENTER: Operation F10: Exit/Save ESC: Return Chapter 5 ASUS X79-DELUXE 5-7 Refer to the drive status.
...change to the section 1.2 Motherboard overview in your motherboard user manual for the exact location of the Marvell SATA 6.0 Gb/s connector. Marvell BIOS Setup (c) 2009 Marvell Technology Group Ltd. Topology HBA 0: Marvell 0 ├ Virtual Disks └ Free Physical Disks ├ PD 0: ST3160812AS &#... 5.0Gbps AHCI Mode ▶ Help Marvell RAID on the hard disk drives will be erased when creating or deleting a RAID array. Exit, then press . From the utility main menu, select 5. ENTER: Operation F10: Exit/Save ESC: Return Chapter 5 ASUS X79-DELUXE 5-7 Refer to the drive status.

X79-DELUXE User's Manual
Page 184
...used in front of the selected hard drive. Press to select the hard drives to be included in the RAID array. Configure->Select free disksCreate Virtual Disk HBA 0: Marvell 0 RAID Level : RAID 0 ├ Virtual Disks Max Size(MB) : 305253 └ Free Physical Disks Stripe Size : 64KB...Operation SPACE:Select F10:Exit/Save ESC:Return 3. After selecting all the drives needed for the RAID array, press to HBA 0: Marvell 0 and press . 2. Create a RAID Array 1. Marvell BIOS Setup (c) 2009 Marvell Technology Group Ltd. An asterisk (*) appears in the array. ENTER: Select ...
...used in front of the selected hard drive. Press to select the hard drives to be included in the RAID array. Configure->Select free disksCreate Virtual Disk HBA 0: Marvell 0 RAID Level : RAID 0 ├ Virtual Disks Max Size(MB) : 305253 └ Free Physical Disks Stripe Size : 64KB...Operation SPACE:Select F10:Exit/Save ESC:Return 3. After selecting all the drives needed for the RAID array, press to HBA 0: Marvell 0 and press . 2. Create a RAID Array 1. Marvell BIOS Setup (c) 2009 Marvell Technology Group Ltd. An asterisk (*) appears in the array. ENTER: Select ...

X79-DELUXE User's Manual
Page 185
... : Firmware Version: PCIe Speed Rate : Configure SATA as audio, video, and graphics. ENTER: Operation F10: Exit/Save ESC: Return Chapter 5 ASUS X79-DELUXE 5-9 4. Use the up or down arrow key to move the selection bar and press to cancel. In general, a larger stripe size is better... large data transfers such as : 1B4B 9130 B1 1.0.0.1028 2.2.0.1105 5.0Gbps AHCI Mode ▶ ▶ Help Marvell RAID on the virtual disk. Yes No Press to create the RAID array, or press to configure further RAID settings. Marvell BIOS Setup (c) 2009 Marvell Technology Group Ltd.
... : Firmware Version: PCIe Speed Rate : Configure SATA as audio, video, and graphics. ENTER: Operation F10: Exit/Save ESC: Return Chapter 5 ASUS X79-DELUXE 5-9 4. Use the up or down arrow key to move the selection bar and press to cancel. In general, a larger stripe size is better... large data transfers such as : 1B4B 9130 B1 1.0.0.1028 2.2.0.1105 5.0Gbps AHCI Mode ▶ ▶ Help Marvell RAID on the virtual disk. Yes No Press to create the RAID array, or press to configure further RAID settings. Marvell BIOS Setup (c) 2009 Marvell Technology Group Ltd.

X79-DELUXE User's Manual
Page 186
... Group Ltd. Yes No Press to delete the Master Boot Record (MBR) from Marvell BIOS Setup? Yes No Press to delete the selected RAID array. Delete an existing RAID Array 1. Select the RAID array to exit from the selected RAID array. 3. Select Delete and press . ENTER: Operation F10: Exit/Save ESC: Return 2. 6. The following warning...
... Group Ltd. Yes No Press to delete the Master Boot Record (MBR) from Marvell BIOS Setup? Yes No Press to delete the selected RAID array. Delete an existing RAID Array 1. Select the RAID array to exit from the selected RAID array. 3. Select Delete and press . ENTER: Operation F10: Exit/Save ESC: Return 2. 6. The following warning...
X79-DELUXE User's Manual
Page 187
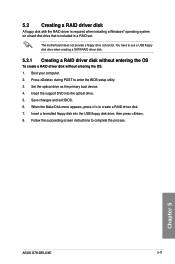
... press . 8. When the Make Disk menu appears, press to enter the BIOS setup utility. 3. Press during POST to create a RAID driver disk. 7. Follow the succeeding screen instructions to use a USB floppy disk drive when creating a...RAID driver disk without entering the OS To create a RAID driver disk without entering the OS: 1. Boot your computer. 2. You have to complete the process. Set the optical drive as the primary boot device. 4. Insert a formatted floppy disk into the optical drive. 5. The motherboard does not provide a floppy drive connector. Chapter 5 ASUS X79-DELUXE...
... press . 8. When the Make Disk menu appears, press to enter the BIOS setup utility. 3. Press during POST to create a RAID driver disk. 7. Follow the succeeding screen instructions to use a USB floppy disk drive when creating a...RAID driver disk without entering the OS To create a RAID driver disk without entering the OS: 1. Boot your computer. 2. You have to complete the process. Set the optical drive as the primary boot device. 4. Insert a formatted floppy disk into the optical drive. 5. The motherboard does not provide a floppy drive connector. Chapter 5 ASUS X79-DELUXE...


