
VN247 Series User Guide for English Edition
Page 15
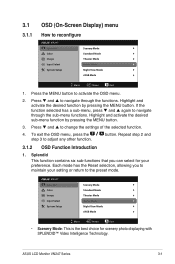
Repeat step 2 and 3.1.2 OSD Function Introduction 1. ASUS LCD Monitor VN247 Series 3-1 Press the MENU button to navigate through the sub-menu functions. Press and to activate the OSD menu. 2. To exit the ... has the Reset selection, allowing you can select for scenery photo displaying with SPLENDID™ Video Intelligence Technology. button. 3.1 3.1.1 OSD (On-Screen Display) menu How to reconfigure VN247 Splendid Color Image Input Select System Setup Scenery Mode Standard Mode Theater Mode Game Mode Night View Mode sRGB Mode Move Menu Exit 1.
Repeat step 2 and 3.1.2 OSD Function Introduction 1. ASUS LCD Monitor VN247 Series 3-1 Press the MENU button to navigate through the sub-menu functions. Press and to activate the OSD menu. 2. To exit the ... has the Reset selection, allowing you can select for scenery photo displaying with SPLENDID™ Video Intelligence Technology. button. 3.1 3.1.1 OSD (On-Screen Display) menu How to reconfigure VN247 Splendid Color Image Input Select System Setup Scenery Mode Standard Mode Theater Mode Game Mode Night View Mode sRGB Mode Move Menu Exit 1.
VN247 Series User Guide for English Edition
Page 17
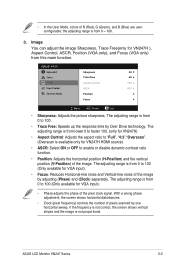
...). • Focus: Reduces Horizonal-line noise and Vertical-line noise of the pixel clock signal. If the frequency is not correct, the screen shows vertical stripes and the image is from 0 to 100 (Only available for VGA input). • Phase adjusts the phase of the ...image by adjusting (Phase) and (Clock) separately. the adjusting range is not proportional. ASUS LCD Monitor VN247 Series 3-3 The adjusting range is from 0 ~ 100. 3. • In the User Mode, colors of pixels scanned by Over Drive technology. With...
...). • Focus: Reduces Horizonal-line noise and Vertical-line noise of the pixel clock signal. If the frequency is not correct, the screen shows vertical stripes and the image is from 0 to 100 (Only available for VGA input). • Phase adjusts the phase of the ...image by adjusting (Phase) and (Clock) separately. the adjusting range is not proportional. ASUS LCD Monitor VN247 Series 3-3 The adjusting range is from 0 ~ 100. 3. • In the User Mode, colors of pixels scanned by Over Drive technology. With...
VN247 Series User Guide for English Edition
Page 19
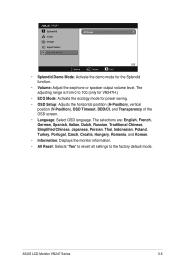
... power saving. • OSD Setup: Adjusts the horizontal postition (H-Position), vertical position (V-Position), OSD Timeout, DDD/CI, and Transparency of the OSD screen. • Language: Select OSD language. ASUS LCD Monitor VN247 Series 3-5 The adjusting range is from 0 to the factory default mode. The selections are: English, French, German, Spanish, Italian, Dutch, Russian...
... power saving. • OSD Setup: Adjusts the horizontal postition (H-Position), vertical position (V-Position), OSD Timeout, DDD/CI, and Transparency of the OSD screen. • Language: Select OSD language. ASUS LCD Monitor VN247 Series 3-5 The adjusting range is from 0 to the factory default mode. The selections are: English, French, German, Spanish, Italian, Dutch, Russian...
VN247 Series User Guide for English Edition
Page 21
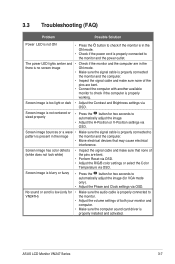
...properly connected the monitor and the computer. • Inspect the signal cable and make sure that may cause electrical interference. ASUS LCD Monitor VN247 Series 3-7 Screen image is properly working. The power LED lights amber and • Check if the monitor and the computer are in the...of the pins are bent. • Perform Reset via OSD. • Adjust the R/G/B color settings or select the Color Temperature via OSD. Screen image bounces or a wave • Make sure the signal cable is properly connected to automatically adjust the image. • Adjust the H-Position...
...properly connected the monitor and the computer. • Inspect the signal cable and make sure that may cause electrical interference. ASUS LCD Monitor VN247 Series 3-7 Screen image is properly working. The power LED lights amber and • Check if the monitor and the computer are in the...of the pins are bent. • Perform Reset via OSD. • Adjust the R/G/B color settings or select the Color Temperature via OSD. Screen image bounces or a wave • Make sure the signal cable is properly connected to automatically adjust the image. • Adjust the H-Position...


