User Manual
Page 13
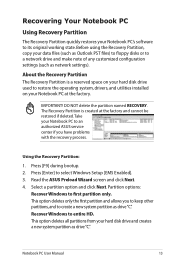
... authorized ASUS service center if you to keep other partitions,and to a network drive and make note of any customized configuration settings (such as drive"C". Recover Windows to its original working state. IMPORTANT! Read the ASUS Preload Wizard screen and click Next. 4. Press [F9] during bootup. 2. Recovering Your Notebook PC Using Recovery Partition The Recovery Partition quickly restores your Notebook PC's software to entire HD. Notebook PC User Manual 13 Before using the Recovery Partition, copy your hard disk drive and creates a new system partition as drive...
... authorized ASUS service center if you to keep other partitions,and to a network drive and make note of any customized configuration settings (such as drive"C". Recover Windows to its original working state. IMPORTANT! Read the ASUS Preload Wizard screen and click Next. 4. Press [F9] during bootup. 2. Recovering Your Notebook PC Using Recovery Partition The Recovery Partition quickly restores your Notebook PC's software to entire HD. Notebook PC User Manual 13 Before using the Recovery Partition, copy your hard disk drive and creates a new system partition as drive...
User Manual
Page 14
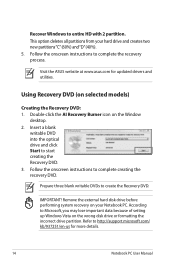
... data because of setting up Windows Vista on the Window desktop. 2. Double-click the AI Recovery Burner icon on the wrong disk drive or formatting the incorrect drive partition. Using Recovery DVD (on your hard drive and creates two new partitions"C"(60%) and"D"(40%). 5. This option deletes all partitions from your Notebook PC. Visit the ASUS website at www.asus.com for more details. 14 Notebook PC User Manual Remove the external hard disk drive before performing system recovery on selected models) Creating the Recovery DVD: 1.
... data because of setting up Windows Vista on the Window desktop. 2. Double-click the AI Recovery Burner icon on the wrong disk drive or formatting the incorrect drive partition. Using Recovery DVD (on your hard drive and creates two new partitions"C"(60%) and"D"(40%). 5. This option deletes all partitions from your Notebook PC. Visit the ASUS website at www.asus.com for more details. 14 Notebook PC User Manual Remove the external hard disk drive before performing system recovery on selected models) Creating the Recovery DVD: 1.
User Manual
Page 15
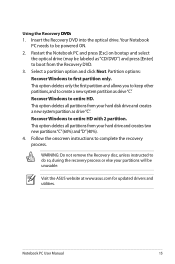
... your hard disk drive and creates a new system partition as "CD/DVD") and press [Enter] to create a new system partition as drive"C". Follow the onscreen instructions to do so, during the recovery process or else your hard drive and creates two new partitions"C"(60%) and"D"(40%). 4. Notebook PC User Manual 15 Partition options: Recover Windows to entire HD. Recover Windows to first partition only. Visit the ASUS website at www.asus.com for updated drivers and utilities. This option deletes all partitions from the Recovery DVD. 3. Insert the Recovery DVD...
... your hard disk drive and creates a new system partition as "CD/DVD") and press [Enter] to create a new system partition as drive"C". Follow the onscreen instructions to do so, during the recovery process or else your hard drive and creates two new partitions"C"(60%) and"D"(40%). 4. Notebook PC User Manual 15 Partition options: Recover Windows to entire HD. Recover Windows to first partition only. Visit the ASUS website at www.asus.com for updated drivers and utilities. This option deletes all partitions from the Recovery DVD. 3. Insert the Recovery DVD...
User Manual
Page 16
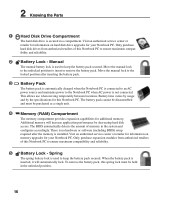
... configures accordingly. The battery pack cannot be disassembled and must be purchased as a single unit. 4 Memory (RAM) Compartment The memory compartment provides expansion capabilities for this spring lock must be held in a compartment. Visit an authorized service center or retailer for information on hard disk drive upgrades for your Notebook PC. 2 Knowing the Parts 1 Hard Disk Drive Compartment The hard disk drive is installed. Move the manual lock to the unlocked position to the Notebook...
... configures accordingly. The battery pack cannot be disassembled and must be purchased as a single unit. 4 Memory (RAM) Compartment The memory compartment provides expansion capabilities for this spring lock must be held in a compartment. Visit an authorized service center or retailer for information on hard disk drive upgrades for your Notebook PC. 2 Knowing the Parts 1 Hard Disk Drive Compartment The hard disk drive is installed. Move the manual lock to the unlocked position to the Notebook...

User Manual
Page 17
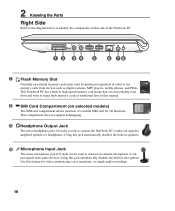
... (USB 1.1) and 480Mbits/sec (USB 2.0). USB supports hot-swapping of the Notebook PC. 1 2 34 1 Air Vents The air vents allow viewing on a larger external display. 3 HDMI HDMI Port HDMI (High-Definition Multimedia Interface) is compatible with some peripherals acting as a digital television (DTV). Supports standard, enhanced, or high-definition video, plus multichannel digital audio on a single computer, with USB 2.0 or USB 1.1 devices such as keyboards, pointing devices, cameras, hard disk drives, printers, and scanners connected...
... (USB 1.1) and 480Mbits/sec (USB 2.0). USB supports hot-swapping of the Notebook PC. 1 2 34 1 Air Vents The air vents allow viewing on a larger external display. 3 HDMI HDMI Port HDMI (High-Definition Multimedia Interface) is compatible with some peripherals acting as a digital television (DTV). Supports standard, enhanced, or high-definition video, plus multichannel digital audio on a single computer, with USB 2.0 or USB 1.1 devices such as keyboards, pointing devices, cameras, hard disk drives, printers, and scanners connected...
User Manual
Page 18
... mono microphone jack (1/8 inch) can conveniently read from devices such as digital cameras, MP3 players, mobile phones, and PDAs. Using this feature for 3G functions. 2 Knowing the Parts Right Side Refer to the diagram below to identify the components on selected models) The SIM card compartment allows insertion of the Notebook PC. 1 2 34 5 6 78 1 Flash Memory Slot Normally an external memory card reader must be used to connect the Notebook PC's audio...
... mono microphone jack (1/8 inch) can conveniently read from devices such as digital cameras, MP3 players, mobile phones, and PDAs. Using this feature for 3G functions. 2 Knowing the Parts Right Side Refer to the diagram below to identify the components on selected models) The SIM card compartment allows insertion of the Notebook PC. 1 2 34 5 6 78 1 Flash Memory Slot Normally an external memory card reader must be used to connect the Notebook PC's audio...

User Manual
Page 25
... a series of a new operating system. If you turn ON the Notebook PC, it ON. Before bootup, the display panel flashes when the power is created by running a software disk checking utility, you turn it will run Window's disk checking program: click Start > select Computer > right-click a hard disk drive icon > choose Properties > click the Tools tab > click Check Now > click Start. The POST includes a record of the Notebook PC's hardware configuration, which is used to boot...
... a series of a new operating system. If you turn ON the Notebook PC, it ON. Before bootup, the display panel flashes when the power is created by running a software disk checking utility, you turn it will run Window's disk checking program: click Start > select Computer > right-click a hard disk drive icon > choose Properties > click the Tools tab > click Check Now > click Start. The POST includes a record of the Notebook PC's hardware configuration, which is used to boot...

User Manual
Page 28
... the hard disk drive. You can also use the keyboard shortcut [Fn F1] to activate this , RAM does not have to be OFF in the Windows > Control Panel > Power Options. Recover by the user and should enter these features through the operating system. These power control cannot be configured by pressing the power button. (NOTE: The power indicator will blink in RAM while many components are three power control methods for closing the display panel or pressing the power button. This function...
... the hard disk drive. You can also use the keyboard shortcut [Fn F1] to activate this , RAM does not have to be OFF in the Windows > Control Panel > Power Options. Recover by the user and should enter these features through the operating system. These power control cannot be configured by pressing the power button. (NOTE: The power indicator will blink in RAM while many components are three power control methods for closing the display panel or pressing the power button. This function...

User Manual
Page 29
... the Notebook PC's keyboard. Crossed-out Touchpad (F9): Toggles the built-in power management setup). Sun Down Icon (F5): Decreases the display brightness Sun Up Icon (F6): Increases the display brightness LCD Icon (F7): Toggles the display panel ON and OFF. (On certain models; Windows software settings are necessary to -Disk depending on model but the functions should remain the same. The Hot Key locations on the function keys may vary depending on sleep button setting in touchpad LOCKED (disabled) and UNLOCKED (enabled).
... the Notebook PC's keyboard. Crossed-out Touchpad (F9): Toggles the built-in power management setup). Sun Down Icon (F5): Decreases the display brightness Sun Up Icon (F6): Increases the display brightness LCD Icon (F7): Toggles the display panel ON and OFF. (On certain models; Windows software settings are necessary to -Disk depending on model but the functions should remain the same. The Hot Key locations on the function keys may vary depending on sleep button setting in touchpad LOCKED (disabled) and UNLOCKED (enabled).
User Manual
Page 42
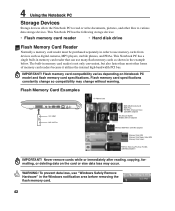
... Notebook PC to read or write documents, pictures, and other forms of memory card readers because it utilizes the internal high-bandwidth PCI bus. This Notebook PC has the following storage devices: • Flash memory card reader • Hard disk drive Flash Memory Card Reader Normally a memory card reader must be purchased separately in order to use "Windows Safely Remove Hardware" in the example below. Never remove cards while or immediately after reading, copying, formatting, or deleting data on Notebook PC model and flash memory card specifications...
... Notebook PC to read or write documents, pictures, and other forms of memory card readers because it utilizes the internal high-bandwidth PCI bus. This Notebook PC has the following storage devices: • Flash memory card reader • Hard disk drive Flash Memory Card Reader Normally a memory card reader must be purchased separately in order to use "Windows Safely Remove Hardware" in the example below. Never remove cards while or immediately after reading, copying, formatting, or deleting data on Notebook PC model and flash memory card specifications...
User Manual
Page 56
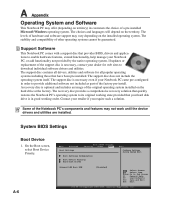
A recovery disc is necessary even if your Notebook PC, or add functionality not provided by the native operating system. Some of other operating systems cannot be guaranteed. Boot Settings Configuration Boot Device Priority Hard Disk Drives Onboard LAN Boot ROM [Disabled] Select Screen Select Item Enter Go to download individual software drivers and utilities. System BIOS Settings Boot Device 1. A-6 BIOS SETUP UTILITY Main Advanced Security Power Boot Exit Boot Settings Configure Settings during System Boot. Support Software This Notebook PC ...
A recovery disc is necessary even if your Notebook PC, or add functionality not provided by the native operating system. Some of other operating systems cannot be guaranteed. Boot Settings Configuration Boot Device Priority Hard Disk Drives Onboard LAN Boot ROM [Disabled] Select Screen Select Item Enter Go to download individual software drivers and utilities. System BIOS Settings Boot Device 1. A-6 BIOS SETUP UTILITY Main Advanced Security Power Boot Exit Boot Settings Configure Settings during System Boot. Support Software This Notebook PC ...
User Manual
Page 57
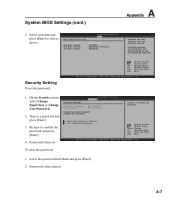
... disabled in a password and press [Enter]. 3. Password is then set the password: Select Screen Select Item +- Select each item and press [Enter] to confirm the password and press [Enter]. 4. BIOS SETUP UTILITY Security Security Settings Supervisor Password : Not Installed User Password : Not Installed Change Supervisor Password Change User Password Install or Change the password. System BIOS Settings (cont.) A Appendix 2. Boot Device Priority BIOS SETUP UTILITY Boot 1st Boot Device 2nd Boot Device 3rd Boot Device 4th Boot Device [Hard Drive] [CD/DVD] [Removable...
... disabled in a password and press [Enter]. 3. Password is then set the password: Select Screen Select Item +- Select each item and press [Enter] to confirm the password and press [Enter]. 4. BIOS SETUP UTILITY Security Security Settings Supervisor Password : Not Installed User Password : Not Installed Change Supervisor Password Change User Password Install or Change the password. System BIOS Settings (cont.) A Appendix 2. Boot Device Priority BIOS SETUP UTILITY Boot 1st Boot Device 2nd Boot Device 3rd Boot Device 4th Boot Device [Hard Drive] [CD/DVD] [Removable...

User Manual
Page 58
...boot. Load User Defaults Load Manufacture Defaults Select Screen Select Item Enter Go to have in the BIOS setup utility. BIOS SETUP UTILITY Security Security Settings Supervisor Password : Installed User Password : Installed Change Supervisor Password User Access Level [Full Access] Change User Password Clear User Password Password Check Options NVoieAwccO[enSslesytup] Limited Hard Disk Security SettiFnugll Access I /O Interface Security Setup: Check password while invoking setup. BIOS SETUP UTILITY Security Security Settings Supervisor Password : Installed...
...boot. Load User Defaults Load Manufacture Defaults Select Screen Select Item Enter Go to have in the BIOS setup utility. BIOS SETUP UTILITY Security Security Settings Supervisor Password : Installed User Password : Installed Change Supervisor Password User Access Level [Full Access] Change User Password Clear User Password Password Check Options NVoieAwccO[enSslesytup] Limited Hard Disk Security SettiFnugll Access I /O Interface Security Setup: Check password while invoking setup. BIOS SETUP UTILITY Security Security Settings Supervisor Password : Installed...
User Manual
Page 59
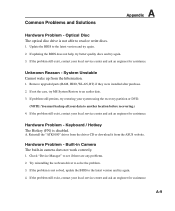
... updating the BIOS does not help, try better quality discs and try again. 4. Remove upgraded parts (RAM, HDD, WLAN, BT) if they were installed after purchase. 2. If not the case, try MS System Restore to solve the problem. 3. A. If problem still persists, try again. 2. Keyboard / Hotkey The Hotkey (FN) is not able to the latest version and try restoring your system using the recovery partition or DVD. (NOTE: You must backup...
... updating the BIOS does not help, try better quality discs and try again. 4. Remove upgraded parts (RAM, HDD, WLAN, BT) if they were installed after purchase. 2. If not the case, try MS System Restore to solve the problem. 3. A. If problem still persists, try again. 2. Keyboard / Hotkey The Hotkey (FN) is not able to the latest version and try restoring your system using the recovery partition or DVD. (NOTE: You must backup...

User Manual
Page 61
....) A Appendix Hardware Problem - Enter Control Panel -> Device Manager. Reinstall the latest version "Power4 Gear" utility to solve your data to another location before recovering.) (CAUTION: Do not connect to the Internet before you have installed an anti-virus software and Internet firewall to check whether a Notebook PC is air flow from viruses.) Software Problem - FAN / Thermal Why is available on the ASUS website. Make sure that the FAN works when the CPU temperature is...
....) A Appendix Hardware Problem - Enter Control Panel -> Device Manager. Reinstall the latest version "Power4 Gear" utility to solve your data to another location before recovering.) (CAUTION: Do not connect to the Internet before you have installed an anti-virus software and Internet firewall to check whether a Notebook PC is air flow from viruses.) Software Problem - FAN / Thermal Why is available on the ASUS website. Make sure that the FAN works when the CPU temperature is...

User Manual
Page 63
... disk drive. 2. Locate the latest BIOS file and start updating (flashing) the BIOS. Follow the instructions shown. CDROM 2. BIOS SETUP UTILITY Main Advanced Security Power Boot Exit Advanced Settings WARNING: Setting wrong values in your model from the ASUS website and save it in below sections may cause system to invoke the Utility. You must "Load Setup Defaults" on the Advanced page of the BIOS Setup Utility. IDE Configuration Start Easy Flash Start Easy Flash Utility? BIOS Updating the BIOS. 1. A Appendix Software Problem - USB HDD...
... disk drive. 2. Locate the latest BIOS file and start updating (flashing) the BIOS. Follow the instructions shown. CDROM 2. BIOS SETUP UTILITY Main Advanced Security Power Boot Exit Advanced Settings WARNING: Setting wrong values in your model from the ASUS website and save it in below sections may cause system to invoke the Utility. You must "Load Setup Defaults" on the Advanced page of the BIOS Setup Utility. IDE Configuration Start Easy Flash Start Easy Flash Utility? BIOS Updating the BIOS. 1. A Appendix Software Problem - USB HDD...
User Manual
Page 64
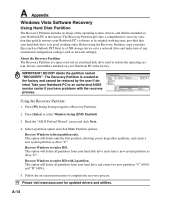
... a Recovery Partition) 2. DO NOT delete the partition named "RECOVERY". A Appendix Windows Vista Software Recovery Using Hard Disk Partition The Recovery Partition includes an image of any customized configuration settings (such as drive "C". The Recovery Partition is in good working order. Follow the on-screen instructions to first partition only. Recover Windows to select Windows Setup [EMS Enabled] 3. The Recovery Partition provides a comprehensive recovery solution that quickly restores your Notebook PC's software to entire HD with the recovery process. Press [Enter...
... a Recovery Partition) 2. DO NOT delete the partition named "RECOVERY". A Appendix Windows Vista Software Recovery Using Hard Disk Partition The Recovery Partition includes an image of any customized configuration settings (such as drive "C". The Recovery Partition is in good working order. Follow the on-screen instructions to first partition only. Recover Windows to select Windows Setup [EMS Enabled] 3. The Recovery Partition provides a comprehensive recovery solution that quickly restores your Notebook PC's software to entire HD with the recovery process. Press [Enter...
User Manual
Page 65
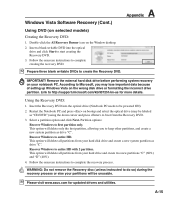
... for updated drivers and utilities. Partition options: Recover Windows to start creating the Recovery DVD. 3. This option will delete only the first partition, allowing you may be labeled as drive "C". Remove the external hard disk drive before performing system recovery on the wrong disk drive or formatting the incorrect drive partition. This option will delete all partitions from the Recovery DVD. 3. Recover Windows to boot from your partitions will delete all partitions from your notebook PC. Windows Vista Software Recovery (Cont.) Using DVD (on the Window desktop...
... for updated drivers and utilities. Partition options: Recover Windows to start creating the Recovery DVD. 3. This option will delete only the first partition, allowing you may be labeled as drive "C". Remove the external hard disk drive before performing system recovery on the wrong disk drive or formatting the incorrect drive partition. This option will delete all partitions from the Recovery DVD. 3. Recover Windows to boot from your partitions will delete all partitions from your notebook PC. Windows Vista Software Recovery (Cont.) Using DVD (on the Window desktop...

User Manual
Page 67
...-color, full-motion videos, better graphics, sharper pictures, and digital audio for a separate adapter card (in memory. With these capacities and access rates, DVD discs can hold video as well as VGA, audio, Ethernet, printer, or modem. A-17 Kensington® Locks Kensington® locks (or compatible) allow the Notebook PC to be removed from a fixed object. DVD aims to be secured usually using a serial bus supporting USB 2.0 and PCI Express...
...-color, full-motion videos, better graphics, sharper pictures, and digital audio for a separate adapter card (in memory. With these capacities and access rates, DVD discs can hold video as well as VGA, audio, Ethernet, printer, or modem. A-17 Kensington® Locks Kensington® locks (or compatible) allow the Notebook PC to be removed from a fixed object. DVD aims to be secured usually using a serial bus supporting USB 2.0 and PCI Express...

User Manual
Page 69
... new specifications to transfer data, UltraDMA/66 or 100 uses both Hard Disk and Video can be automatically configured when they are put in STR mode. If connecting two computers together without having to be eliminated. USB (Universal Serial Bus) A 4-pin serial peripheral bus that allows plug and play computer peripherals such as keyboard, mouse, joystick, scanner, printer and modem/ISDN to install drivers or reboot. System Disk...
... new specifications to transfer data, UltraDMA/66 or 100 uses both Hard Disk and Video can be automatically configured when they are put in STR mode. If connecting two computers together without having to be eliminated. USB (Universal Serial Bus) A 4-pin serial peripheral bus that allows plug and play computer peripherals such as keyboard, mouse, joystick, scanner, printer and modem/ISDN to install drivers or reboot. System Disk...


