
User Manual
Page 2
... Side...1-7 Left Side...1-8 Front Side...1-9 Rear Side...1-10 Keyboard Usage...1-11 Special Function Keys 1-11 Tablet PC Mode...1-13 Quick System Standby 1-14 Chapter 2: Getting Started Powering on your Eee PC...2-2 First-time Startup...2-3 Desktop...2-4 Touch Panel Calibration...2-5 ASUS EeePC Tray Utility...2-6 Enabling and Disabling Devices 2-6 Adjusting the display resolution 2-7 Network Connection...2-8 Configuring a wireless network...
... Side...1-7 Left Side...1-8 Front Side...1-9 Rear Side...1-10 Keyboard Usage...1-11 Special Function Keys 1-11 Tablet PC Mode...1-13 Quick System Standby 1-14 Chapter 2: Getting Started Powering on your Eee PC...2-2 First-time Startup...2-3 Desktop...2-4 Touch Panel Calibration...2-5 ASUS EeePC Tray Utility...2-6 Enabling and Disabling Devices 2-6 Adjusting the display resolution 2-7 Network Connection...2-8 Configuring a wireless network...
User Manual
Page 3
Super Hybrid Engine...3-6 Super Hybrid Engine Modes 3-6 Eee Storage...3-7 Eee Docking Touch Tool Bar 3-9 Fun Touch...3-9 Eee @Vibe...3-10 Eee Sharing...3-10 Eee Xperience...3-11 Eee Tools...3-11 Touch Gate Mode 3-11 Touch Gate Mode...3-12 Using Touch Gate Mode 3-12 Changing Function Shortcuts 3-13 Switching to Widgets Mode 3-14 Microsoft® Office Trial...3-15 Chapter 4: Support DVD ... Using the Support DVD 4-4 Boot Booster...4-6 Appendix Declarations and Safety Statements A-2 Copyright Information...A-11 Limitation of Liability...A-12 Service and Support...A-12 ASUS Eee PC iii
Super Hybrid Engine...3-6 Super Hybrid Engine Modes 3-6 Eee Storage...3-7 Eee Docking Touch Tool Bar 3-9 Fun Touch...3-9 Eee @Vibe...3-10 Eee Sharing...3-10 Eee Xperience...3-11 Eee Tools...3-11 Touch Gate Mode 3-11 Touch Gate Mode...3-12 Using Touch Gate Mode 3-12 Changing Function Shortcuts 3-13 Switching to Widgets Mode 3-14 Microsoft® Office Trial...3-15 Chapter 4: Support DVD ... Using the Support DVD 4-4 Boot Booster...4-6 Appendix Declarations and Safety Statements A-2 Copyright Information...A-11 Limitation of Liability...A-12 Service and Support...A-12 ASUS Eee PC iii
User Manual
Page 11
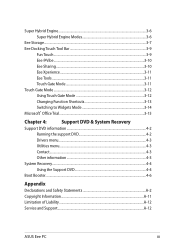
... Array Microphone (Built-in) The built-in the Save-to-RAM (Suspend) mode. Do not rest your finger or the touch screen pen. This indicator is OFF when the Eee PC is turned OFF. 5 / Home Key Shortly Press this key to preview desktop rotation, and then release the key to turn...indicator (LED) shows the battery charging status as follows: ASUS Eee PC 1-3 Press and hold it to turn ON, or slide and hold this key to ensure normal touch screen operation. 4 Power Switch The power switch allows powering ON and OFF the Eee PC and recovering from standby mode. Power Indicator The power ...
... Array Microphone (Built-in) The built-in the Save-to-RAM (Suspend) mode. Do not rest your finger or the touch screen pen. This indicator is OFF when the Eee PC is turned OFF. 5 / Home Key Shortly Press this key to preview desktop rotation, and then release the key to turn...indicator (LED) shows the battery charging status as follows: ASUS Eee PC 1-3 Press and hold it to turn ON, or slide and hold this key to ensure normal touch screen operation. 4 Power Switch The power switch allows powering ON and OFF the Eee PC and recovering from standby mode. Power Indicator The power ...
User Manual
Page 15
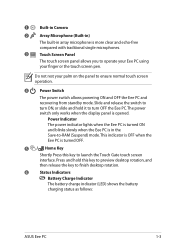
ASUS Eee PC 1-7 The built-in connector allows convenient use with USB 2.0 or USB 1.1 devices such as keyboards, pointing devices, cameras, and storage devices, connected in speakers. 4 Microphone Jack The microphone jack is designed to connect the microphone used on the touch screen panel. ... Output Jack The 1/8" stereo headphone jack (3.5mm) connects the Eee PC's audio out signal to amplified speakers or headphones. Using this side of the Eee PC. 1 23 4 56 1 Touch screen Pen Compartment The touch screen pen compartment allows storage of the pen used for Skype,...
ASUS Eee PC 1-7 The built-in connector allows convenient use with USB 2.0 or USB 1.1 devices such as keyboards, pointing devices, cameras, and storage devices, connected in speakers. 4 Microphone Jack The microphone jack is designed to connect the microphone used on the touch screen panel. ... Output Jack The 1/8" stereo headphone jack (3.5mm) connects the Eee PC's audio out signal to amplified speakers or headphones. Using this side of the Eee PC. 1 23 4 56 1 Touch screen Pen Compartment The touch screen pen compartment allows storage of the pen used for Skype,...
User Manual
Page 22
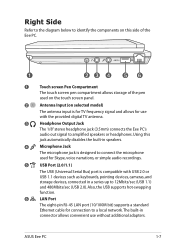
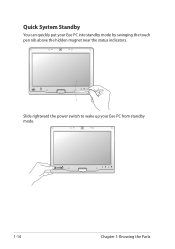
Shift PgUp Ctrl Fn Alt Alt Ctrl Home PgDn End Quick System Standby You can quickly put your Eee PC from standby mode. 1-14 Chapter 1: Knowing the Parts ESC F1 F2 F3 F4 F5 F6 F7 F8 F9 F10 F11 Num LK F12 Scr LK ... Y U I O P { 4 5 6 [ Caps Lock A S D F G H J 1 K 2 L 3 : ; } ] Enter Shift Z XCV B NM< > ? 0 , .. Shift PgUp Ctrl Fn Alt Alt Ctrl Home PgDn End Slide rightward the power switch to wake up your Eee PC into standby mode by swinging the touch pen nib above the hidden magnet near the status indicators.
Shift PgUp Ctrl Fn Alt Alt Ctrl Home PgDn End Quick System Standby You can quickly put your Eee PC from standby mode. 1-14 Chapter 1: Knowing the Parts ESC F1 F2 F3 F4 F5 F6 F7 F8 F9 F10 F11 Num LK F12 Scr LK ... Y U I O P { 4 5 6 [ Caps Lock A S D F G H J 1 K 2 L 3 : ; } ] Enter Shift Z XCV B NM< > ? 0 , .. Shift PgUp Ctrl Fn Alt Alt Ctrl Home PgDn End Slide rightward the power switch to wake up your Eee PC into standby mode by swinging the touch pen nib above the hidden magnet near the status indicators.

User Manual
Page 23
Powering on your Eee PC First-time Startup Desktop Touch Panel Calibration ASUS EeePC Tray Utility Network Connection 2 Getting Started
Powering on your Eee PC First-time Startup Desktop Touch Panel Calibration ASUS EeePC Tray Utility Network Connection 2 Getting Started
User Manual
Page 27
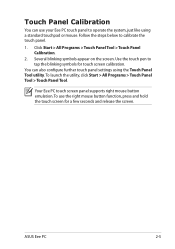
... screen. ASUS Eee PC 2-5 You can use the right mouse button function, press and hold the touch screen for touch screen calibration. Click Start > All Programs > Touch Panel Tool > Touch Panel Calibration. 2. Several blinking symbols appear on the screen. Touch Panel Calibration You can also configure further touch panel settings using a standard touchpad or mouse. To use your Eee PC touch panel...
... screen. ASUS Eee PC 2-5 You can use the right mouse button function, press and hold the touch screen for touch screen calibration. Click Start > All Programs > Touch Panel Tool > Touch Panel Calibration. 2. Several blinking symbols appear on the screen. Touch Panel Calibration You can also configure further touch panel settings using a standard touchpad or mouse. To use your Eee PC touch panel...
User Manual
Page 34
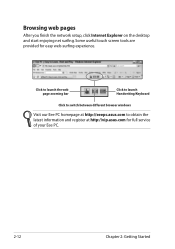
Click to launch the web page zooming bar Click to launch Handwriting/Keyboard Click to switch between different browser windows Visit our Eee PC homepage at http://eeepc.asus.com to obtain the latest information and register at http://vip.asus.com for easy web-surfing experience. Browsing web pages After you finish the network setup, click Internet Explorer on the desktop and start enjoying net surfing. Some useful touch screen tools are provided for full service of your Eee PC. 2-12 Chapter 2: Getting Started
Click to launch the web page zooming bar Click to launch Handwriting/Keyboard Click to switch between different browser windows Visit our Eee PC homepage at http://eeepc.asus.com to obtain the latest information and register at http://vip.asus.com for easy web-surfing experience. Browsing web pages After you finish the network setup, click Internet Explorer on the desktop and start enjoying net surfing. Some useful touch screen tools are provided for full service of your Eee PC. 2-12 Chapter 2: Getting Started

User Manual
Page 35
ASUS Update Bluetooth Connection Super Hybrid Engine Eee Storage Eee Docking Touch Tool Bar Touch Gate Mode Microsoft® Office Trial 3 Using the Eee PC
ASUS Update Bluetooth Connection Super Hybrid Engine Eee Storage Eee Docking Touch Tool Bar Touch Gate Mode Microsoft® Office Trial 3 Using the Eee PC
User Manual
Page 43
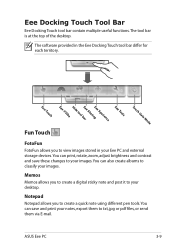
... pdf files, or send them via E-mail. Eee Docking Touch Tool Bar Eee Docking Touch tool bar contain multiple useful functions. You can print, rotate, zoom, adjust brightness and contrast and save and print your images. The tool bar is at the top of the desktop. ASUS Eee PC 3-9 You can also create albums to classify your...
... pdf files, or send them via E-mail. Eee Docking Touch Tool Bar Eee Docking Touch tool bar contain multiple useful functions. You can print, rotate, zoom, adjust brightness and contrast and save and print your images. The tool bar is at the top of the desktop. ASUS Eee PC 3-9 You can also create albums to classify your...
User Manual
Page 45
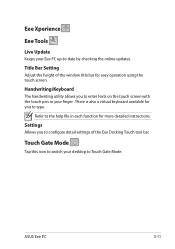
... also a virtual keyboard available for you to the help file in each function for easy operation using the touch screen. ASUS Eee PC 3-11 Eee Xperience Eee Tools Live Update Keeps your Eee PC up-to type. Title Bar Setting Adjust the height of the Eee Docking Touch tool bar. Touch Gate Mode Tap this icon to switch your desktop to...
... also a virtual keyboard available for you to the help file in each function for easy operation using the touch screen. ASUS Eee PC 3-11 Eee Xperience Eee Tools Live Update Keeps your Eee PC up-to type. Title Bar Setting Adjust the height of the Eee Docking Touch tool bar. Touch Gate Mode Tap this icon to switch your desktop to...

User Manual
Page 46
... match what you see on your screen. 3-12 Chapter 3: Using the Eee PC Using Touch Gate Mode Tap the on desktop Slide upward to show more functions The screen captures shown in two ways: • Tap the Touch Gate Mode icon ( ) from the Eee Docking Touch tool bar. • Press the Home Key ( ). Power switch Time...
... match what you see on your screen. 3-12 Chapter 3: Using the Eee PC Using Touch Gate Mode Tap the on desktop Slide upward to show more functions The screen captures shown in two ways: • Tap the Touch Gate Mode icon ( ) from the Eee Docking Touch tool bar. • Press the Home Key ( ). Power switch Time...
User Manual
Page 47
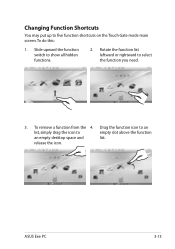
Rotate the function list leftward or rightward to empty slot above the function an empty desktop space and list. To remove a function from the 4. release the icon. ASUS Eee PC 3-13 Drag the function icon to an list, simply drag the icon to select the function you need. 3. Slide upward the function switch to five function shortcuts on the Touch Gate mode main screen. To do this: 1. Changing Function Shortcuts You may put up to show all hidden functions. 2.
Rotate the function list leftward or rightward to empty slot above the function an empty desktop space and list. To remove a function from the 4. release the icon. ASUS Eee PC 3-13 Drag the function icon to an list, simply drag the icon to select the function you need. 3. Slide upward the function switch to five function shortcuts on the Touch Gate mode main screen. To do this: 1. Changing Function Shortcuts You may put up to show all hidden functions. 2.
User Manual
Page 48
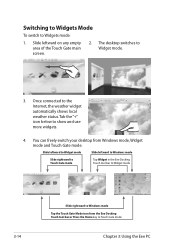
... weather status. Slide leftward to Widget mode Slide leftward to Windows mode Slide rightward to Touch Gate mode Tap Widget in the Eee Docking Touch tool bar to Widget mode 3-14 Slide rightward to Touch Gate mode Chapter 3: Using the Eee PC Once connected to Widget mode. 3. Tab the "+" icon below to Widgets mode: 1. Slide leftward...
... weather status. Slide leftward to Widget mode Slide leftward to Windows mode Slide rightward to Touch Gate mode Tap Widget in the Eee Docking Touch tool bar to Widget mode 3-14 Slide rightward to Touch Gate mode Chapter 3: Using the Eee PC Once connected to Widget mode. 3. Tab the "+" icon below to Widgets mode: 1. Slide leftward...


