Sabertooth X58 user's manual
Page 68
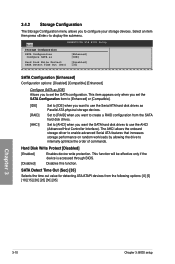
... storage performance on random workloads by allowing the drive to display the submenu. Set to [RAID] when you want the SATA hard disk drives to set the SATA Configuration item to [Enhanced] or [Compatible]. [IDE...Disables this function. 3.4.2 Storage Configuration The Storage Configuration menu allows you to create a RAID configuration from the following options: [0] [5] [10] [15] [20] [25] [30] [35] Chapter 3 3-10 Chapter 3: BIOS setup Main SABERTOOTH X58 BIOS Setup Storage Configuration SATA Configuration Configure SATA as [Enhanced] [IDE] Hard Disk Write Protect ...
... storage performance on random workloads by allowing the drive to display the submenu. Set to [RAID] when you want the SATA hard disk drives to set the SATA Configuration item to [Enhanced] or [Compatible]. [IDE...Disables this function. 3.4.2 Storage Configuration The Storage Configuration menu allows you to create a RAID configuration from the following options: [0] [5] [10] [15] [20] [25] [30] [35] Chapter 3 3-10 Chapter 3: BIOS setup Main SABERTOOTH X58 BIOS Setup Storage Configuration SATA Configuration Configure SATA as [Enhanced] [IDE] Hard Disk Write Protect ...
Sabertooth X58 user's manual
Page 99
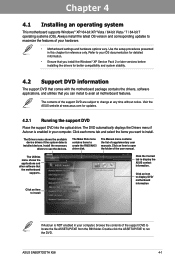
...RAID/AHCI driver disk. Click an item to open the folder of the support DVD are subject to install. Chapter 4: Chapter 4 Software support 4.1 Installing an operating system This motherboard supports Windows® XP/ 64-bit XP/ Vista / 64-bit Vista / 7 / 64-bit 7 operating systems (OS). The contents of the user manual. ASUS SABERTOOTH X58... 4-1 Visit the ASUS website at any time without notice. The Utilities menu shows the applications and other software that you want to change at www.asus.com for reference only. Use the setup procedures ...
...RAID/AHCI driver disk. Click an item to open the folder of the support DVD are subject to install. Chapter 4: Chapter 4 Software support 4.1 Installing an operating system This motherboard supports Windows® XP/ 64-bit XP/ Vista / 64-bit Vista / 7 / 64-bit 7 operating systems (OS). The contents of the user manual. ASUS SABERTOOTH X58... 4-1 Visit the ASUS website at any time without notice. The Utilities menu shows the applications and other software that you want to change at www.asus.com for reference only. Use the setup procedures ...
Sabertooth X58 user's manual
Page 104
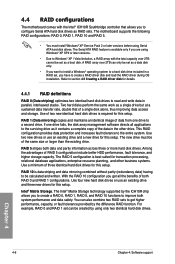
... than the existing drive. Use two new drives or use an existing drive and three new drives for this setup. The motherboard supports the following RAID configurations: RAID 0, RAID 1, RAID 10 and RAID 5. • You must be set as RAID sets. RAID 1 (Data mirroring) copies and maintains an identical image of three identical hard disk drives for details...
... than the existing drive. Use two new drives or use an existing drive and three new drives for this setup. The motherboard supports the following RAID configurations: RAID 0, RAID 1, RAID 10 and RAID 5. • You must be set as RAID sets. RAID 1 (Data mirroring) copies and maintains an identical image of three identical hard disk drives for details...
Sabertooth X58 user's manual
Page 105
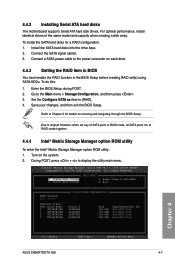
...into the drive bays. 2. Save your changes, and then exit the BIOS Setup. Turn on each drive. 4.4.3 Setting the RAID item in BIOS You must enable the RAID function in the BIOS Setup before creating RAID set any of the same model and capacity when creating a disk array....ID) Non-RAID Disk Non-RAID Disk Non-RAID Disk Non-RAID Disk Chapter 4 [↑↓]-Select [ESC]-Exit [ENTER]-Select Menu ASUS SABERTOOTH X58 4-7 Connect a SATA power cable to Chapter 3 for a RAID configuration: 1. To install the SATA hard disks for details on entering and navigating through the BIOS Setup. Set ...
...into the drive bays. 2. Save your changes, and then exit the BIOS Setup. Turn on each drive. 4.4.3 Setting the RAID item in BIOS You must enable the RAID function in the BIOS Setup before creating RAID set any of the same model and capacity when creating a disk array....ID) Non-RAID Disk Non-RAID Disk Non-RAID Disk Non-RAID Disk Chapter 4 [↑↓]-Select [ESC]-Exit [ENTER]-Select Menu ASUS SABERTOOTH X58 4-7 Connect a SATA power cable to Chapter 3 for a RAID configuration: 1. To install the SATA hard disks for details on entering and navigating through the BIOS Setup. Set ...

Sabertooth X58 user's manual
Page 106
... appears: Intel(R) Matrix Storage Manager option ROM v8.0.0.1038 ICH10R wRAID5 Copyright(C) 2003-08 Intel Corporation. The RAID BIOS setup screens shown in creating the volume. [↑↓]-Prev/Next [SPACE]-SelectDisk [ENTER]-Done Chapter 4 4-8 Chapter 4: Software support When the RAID Level item is selected, press the up/down arrow key to select...
... appears: Intel(R) Matrix Storage Manager option ROM v8.0.0.1038 ICH10R wRAID5 Copyright(C) 2003-08 Intel Corporation. The RAID BIOS setup screens shown in creating the volume. [↑↓]-Prev/Next [SPACE]-SelectDisk [ENTER]-Done Chapter 4 4-8 Chapter 4: Software support When the RAID Level item is selected, press the up/down arrow key to select...
Sabertooth X58 user's manual
Page 109
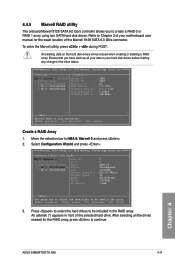
... two SATA hard disk drives. Refer to be erased when creating or deleting a RAID array. Marvell BIOS Setup (c) 2009 Marvell Technology Group Ltd. After selecting all your data in front of the Marvell 9128 SATA 6.0 Gb/s connector. Chapter 4 ASUS SABERTOOTH X58 4-11 4.4.5 Marvell RAID utility The onboard Marvell 9128 SATA 6.0 Gb/s controller allows you have back...
... two SATA hard disk drives. Refer to be erased when creating or deleting a RAID array. Marvell BIOS Setup (c) 2009 Marvell Technology Group Ltd. After selecting all your data in front of the Marvell 9128 SATA 6.0 Gb/s connector. Chapter 4 ASUS SABERTOOTH X58 4-11 4.4.5 Marvell RAID utility The onboard Marvell 9128 SATA 6.0 Gb/s controller allows you have back...
Sabertooth X58 user's manual
Page 110
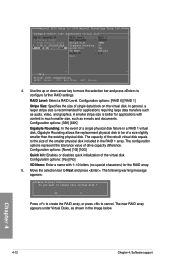
... down arrow key to move the selection bar and press to Next and press . The new RAID array appears under Virtual Disks, as e-mails and documents. Marvell BIOS Setup (c) 2009 Marvell Technology Group Ltd. Configuration options: [RAID 0] [RAID 1] Stripe Size: Specifies the size of a size slightly smaller than the existing physical disk. The configuration...
... down arrow key to move the selection bar and press to Next and press . The new RAID array appears under Virtual Disks, as e-mails and documents. Marvell BIOS Setup (c) 2009 Marvell Technology Group Ltd. Configuration options: [RAID 0] [RAID 1] Stripe Size: Specifies the size of a size slightly smaller than the existing physical disk. The configuration...
Sabertooth X58 user's manual
Page 111
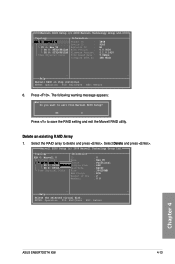
... exit from Marvell BIOS Setup? Marvell BIOS Setup (c) 2009 Marvell Technology Group Ltd. ENTER: Operation F10: Exit/Save ESC: Return Chapter 4 ASUS SABERTOOTH X58 4-13 ENTER: Operation F10: Exit/Save ESC: Return 6. The following warning message appears: Exit Do you want to save the RAID setting and exit the Marvell RAID utility. Select the RAID array to delete...
... exit from Marvell BIOS Setup? Marvell BIOS Setup (c) 2009 Marvell Technology Group Ltd. ENTER: Operation F10: Exit/Save ESC: Return Chapter 4 ASUS SABERTOOTH X58 4-13 ENTER: Operation F10: Exit/Save ESC: Return 6. The following warning message appears: Exit Do you want to save the RAID setting and exit the Marvell RAID utility. Select the RAID array to delete...
Sabertooth X58 user's manual
Page 112
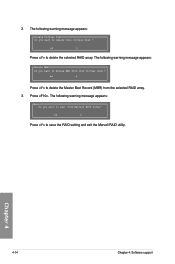
... warning message appears: Delete MBR Do you want to exit from this virtual disk ? Yes No Press to save the RAID setting and exit the Marvell RAID utility. Press . The following warning message appears: Delete Virtual Disk Do you want to delete the Master Boot Record (...MBR) from the selected RAID array. 3. Chapter 4 4-14 Chapter 4: Software support The following warning message appears: Exit Do you want to delete MBR from Marvell BIOS Setup? 2. Yes No Press to delete this virtual disk ?
... warning message appears: Delete MBR Do you want to exit from this virtual disk ? Yes No Press to save the RAID setting and exit the Marvell RAID utility. Press . The following warning message appears: Delete Virtual Disk Do you want to delete the Master Boot Record (...MBR) from the selected RAID array. 3. Chapter 4 4-14 Chapter 4: Software support The following warning message appears: Exit Do you want to delete MBR from Marvell BIOS Setup? 2. Yes No Press to delete this virtual disk ?
Sabertooth X58 user's manual
Page 113
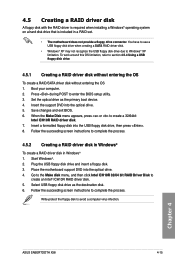
... disk. 6. Insert a formatted floppy disk into the optical drive. 4. Chapter 4 ASUS SABERTOOTH X58 4-15 Select USB floppy disk drive as the primary boot device. 4. Write-protect the floppy disk to enter the BIOS setup utility. 3. Press during POST to avoid a computer virus infection. Follow the succeeding ... . 8. Insert the support DVD into the optical drive. 5. You have to use a USB floppy disk drive when creating a SATA RAID driver disk. • Windows® XP may not recognize the USB floppy disk drive due to section 4.5.4 Using a USB floppy disk drive. ...
... disk. 6. Insert a formatted floppy disk into the optical drive. 4. Chapter 4 ASUS SABERTOOTH X58 4-15 Select USB floppy disk drive as the primary boot device. 4. Write-protect the floppy disk to enter the BIOS setup utility. 3. Press during POST to avoid a computer virus infection. Follow the succeeding ... . 8. Insert the support DVD into the optical drive. 5. You have to use a USB floppy disk drive when creating a SATA RAID driver disk. • Windows® XP may not recognize the USB floppy disk drive due to section 4.5.4 Using a USB floppy disk drive. ...


