Spresso Hardware User Manual
Page 8
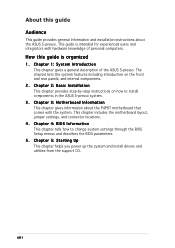
... instructions on the front and rear panels, and internal components. 2. Chapter 3: Motherboard Information This chapter gives information about the ASUS S-presso. This chapter includes the motherboard layout, jumper settings, and connector locations. 4. Chapter 1: System Introduction This chapter gives a general...This guide provides general information and installation instructions about the P4P8T motherboard that comes with hardware knowledge of the ASUS S-presso. The chapter lists the system features including introduction on how to change system settings through the BIOS Setup ...
... instructions on the front and rear panels, and internal components. 2. Chapter 3: Motherboard Information This chapter gives information about the ASUS S-presso. This chapter includes the motherboard layout, jumper settings, and connector locations. 4. Chapter 1: System Introduction This chapter gives a general...This guide provides general information and installation instructions about the P4P8T motherboard that comes with hardware knowledge of the ASUS S-presso. The chapter lists the system features including introduction on how to change system settings through the BIOS Setup ...
Spresso Hardware User Manual
Page 10
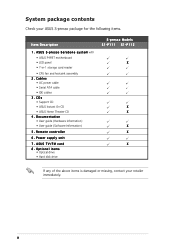
... and heatsink assembly 2 . CDs • Support CD • ASUS Instant On CD • ASUS Home Theater CD 4 . x Remote controller 6 . ASUS TV/FM card 8 . Documentation • User guide (Hardware Information) • User guide (Software Information) 5 . Optional items • Optical drive • Hard disk drive S-presso Models S1-P111 S1-P112 X X X X X X If any of the above items is damaged...
... and heatsink assembly 2 . CDs • Support CD • ASUS Instant On CD • ASUS Home Theater CD 4 . x Remote controller 6 . ASUS TV/FM card 8 . Documentation • User guide (Hardware Information) • User guide (Software Information) 5 . Optional items • Optical drive • Hard disk drive S-presso Models S1-P111 S1-P112 X X X X X X If any of the above items is damaged...
Spresso Hardware User Manual
Page 11
The chapter lists the system features including introduction on the front and rear panels, and internal components. ASUS S-presso System Introduction Chapter 1 This chapter gives a general description of the ASUS S-presso.
The chapter lists the system features including introduction on the front and rear panels, and internal components. ASUS S-presso System Introduction Chapter 1 This chapter gives a general description of the ASUS S-presso.
Spresso Hardware User Manual
Page 12
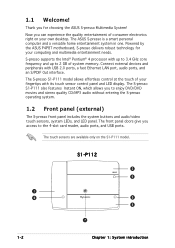
...can experience the quality entertainment of consumer electronics right on the S1-P111 model. 1.1 Welcome! The ASUS S-presso is a smart personal computer and a versatile home entertainment system in one. S-presso supports the Intel® Pentium® 4 processor with up ...your own desktop. The S-presso S1-P111 model allows effortless control at the touch of system memory. S1-P112 3 4 1 2 5 6 7 1-2 Chapter 1: System introduction Powered by the ASUS P4P8T motherboard, S-presso delivers robust technology for choosing the ASUS S-presso Multimedia System! The touch sensors...
...can experience the quality entertainment of consumer electronics right on the S1-P111 model. 1.1 Welcome! The ASUS S-presso is a smart personal computer and a versatile home entertainment system in one. S-presso supports the Intel® Pentium® 4 processor with up ...your own desktop. The S-presso S1-P111 model allows effortless control at the touch of system memory. S1-P112 3 4 1 2 5 6 7 1-2 Chapter 1: System introduction Powered by the ASUS P4P8T motherboard, S-presso delivers robust technology for choosing the ASUS S-presso Multimedia System! The touch sensors...
Spresso Hardware User Manual
Page 13
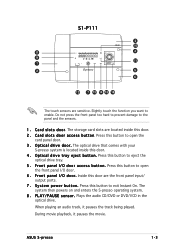
... s l o t s d o o r. Press this door are the front panel input/ output ports. 7 . The system then powers on and enters the S-presso operating system. 8 . When playing an audio track, it pauses the movie. ASUS S-presso 1-3 C a r d s l o t s d o o r a c c e s s b u t t o n. Press this button to exit ...Instant On. Press this button to open the front panel I/O door. 6 . F r o n t p a n e l I / O d o o r a c c e s s b u t t o n . S1-P111 3 10 8 4 ...
... s l o t s d o o r. Press this door are the front panel input/ output ports. 7 . The system then powers on and enters the S-presso operating system. 8 . When playing an audio track, it pauses the movie. ASUS S-presso 1-3 C a r d s l o t s d o o r a c c e s s b u t t o n. Press this button to exit ...Instant On. Press this button to open the front panel I/O door. 6 . F r o n t p a n e l I / O d o o r a c c e s s b u t t o n . S1-P111 3 10 8 4 ...
Spresso Hardware User Manual
Page 14
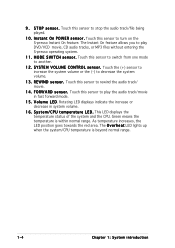
Touch this sensor to turn on the S-presso Instant On feature. S Y S T E M V O L U M E C O N T R O L s e n s o r . F O R W A R D s e n s o r . Rotating LED displays indicate the increase or decrease in fast forward mode. 1 5 . The O v e r h e a t LED lights up ... the LED position goes towards the red area. I N D s e n s o r . Touch this sensor to play DVD/VCD movie, CD audio tracks, or MP3 files without entering the S-presso operating system. 1 1 . Touch this sensor to play the audio track/movie in system volume. 1 6 . S T O P s e n s o r . The Instant On feature allows you...
Touch this sensor to turn on the S-presso Instant On feature. S Y S T E M V O L U M E C O N T R O L s e n s o r . F O R W A R D s e n s o r . Rotating LED displays indicate the increase or decrease in fast forward mode. 1 5 . The O v e r h e a t LED lights up ... the LED position goes towards the red area. I N D s e n s o r . Touch this sensor to play DVD/VCD movie, CD audio tracks, or MP3 files without entering the S-presso operating system. 1 1 . Touch this sensor to play the audio track/movie in system volume. 1 6 . S T O P s e n s o r . The Instant On feature allows you...
Spresso Hardware User Manual
Page 15
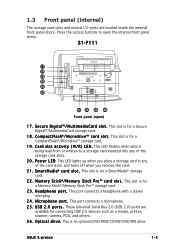
S1-P111 17 18 19 20 21 22 23 24 25 26 Front panel (open the internal front panel doors. This slot is for a SmartMedia® ... is an optional DVD-ROM/CD-RW/DVD-RW drive. These Universal Serial Bus 2.0 (USB 2.0) ports are located inside the internal front panel doors. S m a r t M e d i a® c a r d s l o t . ASUS S-presso 1-5 C o m p a c t F l a s h®/ M i c r o d r i v e ™ c a r d s l o t .
S1-P111 17 18 19 20 21 22 23 24 25 26 Front panel (open the internal front panel doors. This slot is for a SmartMedia® ... is an optional DVD-ROM/CD-RW/DVD-RW drive. These Universal Serial Bus 2.0 (USB 2.0) ports are located inside the internal front panel doors. S m a r t M e d i a® c a r d s l o t . ASUS S-presso 1-5 C o m p a c t F l a s h®/ M i c r o d r i v e ™ c a r d s l o t .
Spresso Hardware User Manual
Page 16
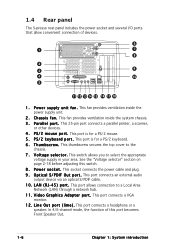
... selector" section on page 2-18 before adjusting this port becomes Front Speaker Out. 1-6 Chapter 1: System introduction L i n e O u t p o r t ( l i m e ) . This port connects a headphone or a speaker. 1.4 Rear panel The S-presso rear panel includes the power socket and several I F O u t p o r t . This 25-pin port connects a parallel printer, a scanner, or other devices. 4 . This socket connects the power cable...
... selector" section on page 2-18 before adjusting this port becomes Front Speaker Out. 1-6 Chapter 1: System introduction L i n e O u t p o r t ( l i m e ) . This port connects a headphone or a speaker. 1.4 Rear panel The S-presso rear panel includes the power socket and several I F O u t p o r t . This 25-pin port connects a parallel printer, a scanner, or other devices. 4 . This socket connects the power cable...
Spresso Hardware User Manual
Page 17
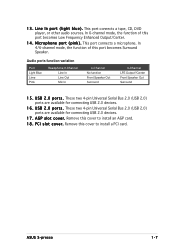
... Speaker Out Surround 6-Channel LFE Output*/Center Front Speaker Out Surround 1 5 . These two 4-pin Universal Serial Bus 2.0 (USB 2.0) ports are available for connecting USB 2.0 devices. 1 7 . ASUS S-presso 1-7 U S B 2 . 0 p o r t s . In 4/6-channel mode, the function of this port becomes Surround Speaker. A G P s l o t c o v e r . In 6-channel mode, the function of this port becomes Low Frequency Enhanced Output/Center...
... Speaker Out Surround 6-Channel LFE Output*/Center Front Speaker Out Surround 1 5 . These two 4-pin Universal Serial Bus 2.0 (USB 2.0) ports are available for connecting USB 2.0 devices. 1 7 . ASUS S-presso 1-7 U S B 2 . 0 p o r t s . In 4/6-channel mode, the function of this port becomes Surround Speaker. A G P s l o t c o v e r . In 6-channel mode, the function of this port becomes Low Frequency Enhanced Output/Center...
Spresso Hardware User Manual
Page 19
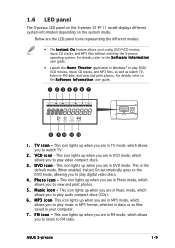
D V D i c o n - M u s i c i c o n - M P 3 i c o n- ASUS S-presso 1-9 This is the default mode. This icon lights up when you are the LED panel icons representing the different modes: • The I n s t a n t O n feature ...to play DVD/VCD movies, music CD tracks, and MP3 files without entering the S-presso operating system. F M i c o n - This icon lights up when you to view and print photos. 5 . P h o t o i c o n - 1.6 LED panel The S-presso LED panel on the S-presso S1-P111 model displays different system information depending on the system mode. This icon lights ...
D V D i c o n - M u s i c i c o n - M P 3 i c o n- ASUS S-presso 1-9 This is the default mode. This icon lights up when you are the LED panel icons representing the different modes: • The I n s t a n t O n feature ...to play DVD/VCD movies, music CD tracks, and MP3 files without entering the S-presso operating system. F M i c o n - This icon lights up when you to view and print photos. 5 . P h o t o i c o n - 1.6 LED panel The S-presso LED panel on the S-presso S1-P111 model displays different system information depending on the system mode. This icon lights ...
Spresso Hardware User Manual
Page 20
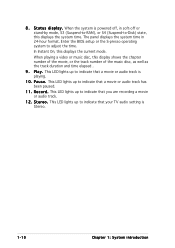
..., this displays the current mode. This LED lights up to indicate that you are recording a movie or audio track. 1 2 . S t e r e o . Enter the BIOS setup or the S-presso operating system to indicate that a movie or audio track is playing. 1 0 . R e c o r d . This LED lights up to adjust the time. The panel displays the system time... displays the system time. This LED lights up to indicate that your TV audio setting is powered off or stand-by mode, S3 (Suspend-to-RAM), or S4 (Suspend-to indicate that a movie or audio track has been paused. 1 1 .
..., this displays the current mode. This LED lights up to indicate that you are recording a movie or audio track. 1 2 . S t e r e o . Enter the BIOS setup or the S-presso operating system to indicate that a movie or audio track is playing. 1 0 . R e c o r d . This LED lights up to adjust the time. The panel displays the system time... displays the system time. This LED lights up to indicate that your TV audio setting is powered off or stand-by mode, S3 (Suspend-to-RAM), or S4 (Suspend-to indicate that a movie or audio track has been paused. 1 1 .
Spresso Hardware User Manual
Page 21
Basic installation Chapter 2 This chapter provides step-by-step instructions on how to install components in the system. ASUS S-presso
Basic installation Chapter 2 This chapter provides step-by-step instructions on how to install components in the system. ASUS S-presso
Spresso Hardware User Manual
Page 23
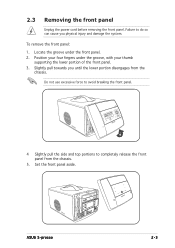
... breaking the front panel. 4 Slightly pull the side and top portions to do so can cause you until the lower portion disengages from the chassis. 5. ASUS S-presso 2-3 Failure to completely release the front panel from the chassis. To remove the front panel: 1. Set the front panel aside. 2.3 Removing the front panel Unplug...
... breaking the front panel. 4 Slightly pull the side and top portions to do so can cause you until the lower portion disengages from the chassis. 5. ASUS S-presso 2-3 Failure to completely release the front panel from the chassis. To remove the front panel: 1. Set the front panel aside. 2.3 Removing the front panel Unplug...
Spresso Hardware User Manual
Page 25
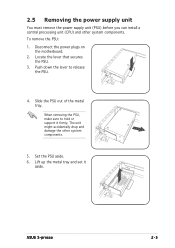
... might accidentally drop and damage the other system components. Lift up the metal tray and set it firmly. Locate the lever that secures the PSU. 3. ASUS S-presso 2-5 2.5 Removing the power supply unit You must remove the power supply unit (PSU) before you can install a central processing unit (CPU) and other system components...
... might accidentally drop and damage the other system components. Lift up the metal tray and set it firmly. Locate the lever that secures the PSU. 3. ASUS S-presso 2-5 2.5 Removing the power supply unit You must remove the power supply unit (PSU) before you can install a central processing unit (CPU) and other system components...
Spresso Hardware User Manual
Page 27
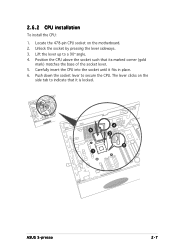
Locate the 478-pin CPU socket on the side tab to indicate that its marked corner (gold mark) matches the base of the socket lever. 5. Unlock the socket by pressing the lever sideways. 3. Push down the socket lever to a 90° angle. 4. The lever clicks on the motherboard. 2. Position the CPU above the socket such that it fits in place. 6. Carefully insert the CPU into the socket until it is locked. 4 5 3 2 1 ASUS S-presso 2-7 Lift the lever up to secure the CPU. 2.6.2 CPU installation To install the CPU: 1.
Locate the 478-pin CPU socket on the side tab to indicate that its marked corner (gold mark) matches the base of the socket lever. 5. Unlock the socket by pressing the lever sideways. 3. Push down the socket lever to a 90° angle. 4. The lever clicks on the motherboard. 2. Position the CPU above the socket such that it fits in place. 6. Carefully insert the CPU into the socket until it is locked. 4 5 3 2 1 ASUS S-presso 2-7 Lift the lever up to secure the CPU. 2.6.2 CPU installation To install the CPU: 1.
Spresso Hardware User Manual
Page 29
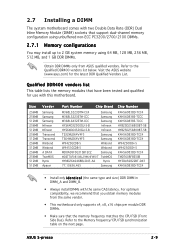
... dual-channel memory configuration using unbuffered non-ECC PC3200/2700/2100 DIMMs. 2.7.1 Memory configurations You may install up to 2 GB system memory using 64 MB, 128 MB, 256 MB, 512 MB, and 1 GB DDR DIMMs. Obtain DDR DIMMs only from the same vendor. • This motherboard only supports x4, x8, x16 chips per module... DDR Qualified Vendors List. Qualified DDR400 vendors list This table lists the memory modules that the memory frequency matches the CPU FSB (Front Side Bus). ASUS S-presso 2-9
... dual-channel memory configuration using unbuffered non-ECC PC3200/2700/2100 DIMMs. 2.7.1 Memory configurations You may install up to 2 GB system memory using 64 MB, 128 MB, 256 MB, 512 MB, and 1 GB DDR DIMMs. Obtain DDR DIMMs only from the same vendor. • This motherboard only supports x4, x8, x16 chips per module... DDR Qualified Vendors List. Qualified DDR400 vendors list This table lists the memory modules that the memory frequency matches the CPU FSB (Front Side Bus). ASUS S-presso 2-9
Spresso Hardware User Manual
Page 31
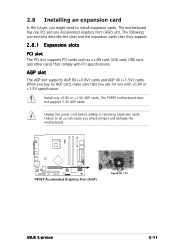
... slots PCI slot The PCI slot supports PCI cards such as a LAN card, SCSI card, USB card, and other cards that you ask for 1.5v ASUS S-presso 2-11 The P4P8T motherboard does not support 3.3V AGP cards. 2.8 Installing an expansion card In the future, you physical injury and damage the motherboard. Unplug...
... slots PCI slot The PCI slot supports PCI cards such as a LAN card, SCSI card, USB card, and other cards that you ask for 1.5v ASUS S-presso 2-11 The P4P8T motherboard does not support 3.3V AGP cards. 2.8 Installing an expansion card In the future, you physical injury and damage the motherboard. Unplug...
Spresso Hardware User Manual
Page 33
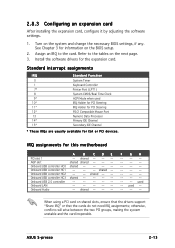
... motherboard A B CDE PCI slot 1 -- Onboard USB controller HC1 -- -- -- IRQ assignments for the expansion card. Onboard Audio -- used -- -- -- -- Onboard USB controller HC0 shared -- -- -- -- Onboard USB 2.0 controller -- -- -- -- -- ASUS S-presso 2-13 2.8.3 Configuring an expansion card After installing the expansion card, configure it by adjusting the software settings. 1. Onboard USB controller HC3 shared -- -- -- -- shared -- -- Standard interrupt...
... motherboard A B CDE PCI slot 1 -- Onboard USB controller HC1 -- -- -- IRQ assignments for the expansion card. Onboard Audio -- used -- -- -- -- Onboard USB controller HC0 shared -- -- -- -- Onboard USB 2.0 controller -- -- -- -- -- ASUS S-presso 2-13 2.8.3 Configuring an expansion card After installing the expansion card, configure it by adjusting the software settings. 1. Onboard USB controller HC3 shared -- -- -- -- shared -- -- Standard interrupt...
Spresso Hardware User Manual
Page 34
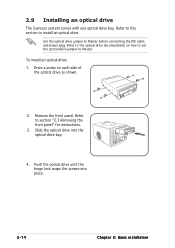
... to Master before connecting the IDE cable and power plug. Remove the front panel. Refer to install an optical drive. 2.9 Installing an optical drive The S-presso system comes with one optical drive bay. Set the optical drive jumper to Master.
... to Master before connecting the IDE cable and power plug. Remove the front panel. Refer to install an optical drive. 2.9 Installing an optical drive The S-presso system comes with one optical drive bay. Set the optical drive jumper to Master.
Spresso Hardware User Manual
Page 35
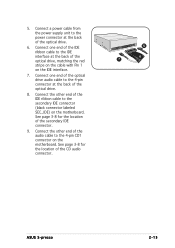
See page 3-8 for the location of the secondary IDE connector. 9. See page 3-8 for the location of the CD audio connector. 5 6 7 ASUS S-presso 2-15 Connect the other end of the IDE ribbon cable to the 4-pin CD1 connector on the motherboard. Connect the other end of the optical ...
See page 3-8 for the location of the secondary IDE connector. 9. See page 3-8 for the location of the CD audio connector. 5 6 7 ASUS S-presso 2-15 Connect the other end of the IDE ribbon cable to the 4-pin CD1 connector on the motherboard. Connect the other end of the optical ...