English Version E-Manual
Page 4
... Home features...19 Home screen...19 Quick settings...20 Notifications...21 Personalizing your Home screen 22 Widgets ...22 Wallpapers...23 Easy Mode...24 Kids Mode...27 Setting up the date and time...29 Setting up your ringtone and alert sounds 29 Lock Screen...30 Customizing your lock screen...30 Fingerprint ID sensor 31 Starting your ROG Phone for the first time 31 Setting up fingerprint ID from Settings 32 Face Unlock...33 Setting up face unlock from Settings 33 3 Work hard, play...
... Home features...19 Home screen...19 Quick settings...20 Notifications...21 Personalizing your Home screen 22 Widgets ...22 Wallpapers...23 Easy Mode...24 Kids Mode...27 Setting up the date and time...29 Setting up your ringtone and alert sounds 29 Lock Screen...30 Customizing your lock screen...30 Fingerprint ID sensor 31 Starting your ROG Phone for the first time 31 Setting up fingerprint ID from Settings 32 Face Unlock...33 Setting up face unlock from Settings 33 3 Work hard, play...

English Version E-Manual
Page 5
... Recording calls...49 Managing contacts...50 Contacts Settings...50 Setting up your profile...50 Adding contacts...51 Marking your favorite contacts...52 Social networking with your contacts 53 Send messages and more 54 Google Messenger...54 5 Fun and entertainment Using a headset...55 Connecting the audio jack...55 Google Play Music...56 6 Your precious moments Capture moments...57 Launching the Camera app...57 Using the Gallery...61 Viewing the photo location...61 Sharing files...
... Recording calls...49 Managing contacts...50 Contacts Settings...50 Setting up your profile...50 Adding contacts...51 Marking your favorite contacts...52 Social networking with your contacts 53 Send messages and more 54 Google Messenger...54 5 Fun and entertainment Using a headset...55 Connecting the audio jack...55 Google Play Music...56 6 Your precious moments Capture moments...57 Launching the Camera app...57 Using the Gallery...61 Viewing the photo location...61 Sharing files...
English Version E-Manual
Page 7
...-quality photos and videos. It provides you with special apps, which are designed to check the apps available on the internal storage of your ROG Phone. Mobile Manager Mobile Manager provides an integrated interface for ROG Phones. Chapter 1: Basics 7 1 Basics Basics 1 Welcome! NOTE: Availability of ASUS ZenUI! Swipe up from the lower part of your Home screen to optimize device performance, manage the phone power, storage usage and system notifications. Explore...
...-quality photos and videos. It provides you with special apps, which are designed to check the apps available on the internal storage of your ROG Phone. Mobile Manager Mobile Manager provides an integrated interface for ROG Phones. Chapter 1: Basics 7 1 Basics Basics 1 Welcome! NOTE: Availability of ASUS ZenUI! Swipe up from the lower part of your Home screen to optimize device performance, manage the phone power, storage usage and system notifications. Explore...
English Version E-Manual
Page 8
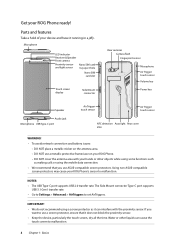
... mobile data connection. • We recommend that it does not block the proximity sensor. • Keep the device, particularly the touch screen, dry all the time. Get your ROG Phone's sensor to malfunction. IMPORTANT! • We do not recommend using a screen protector as making calls or using some functions such as it running in a jiffy. The Side Mount connector Type-C port supports USB 3.1 Gen1 transfer rate. • Go to Settings...
... mobile data connection. • We recommend that it does not block the proximity sensor. • Keep the device, particularly the touch screen, dry all the time. Get your ROG Phone's sensor to malfunction. IMPORTANT! • We do not recommend using a screen protector as making calls or using some functions such as it running in a jiffy. The Side Mount connector Type-C port supports USB 3.1 Gen1 transfer rate. • Go to Settings...

English Version E-Manual
Page 14
... accessible. • When charging your ROG Phone through your computer, ensure that you plug the USB Type-C cable to your computer's USB port. • Avoid charging your ROG Phone in battery mode for the first time. • The status of battery charge is indicated by the following icons: Low Not Charging Charging Full NOTES: • For safety purposes, use ONLY the bundled power adapter and cable to avoid damaging your device...
... accessible. • When charging your ROG Phone through your computer, ensure that you plug the USB Type-C cable to your computer's USB port. • Avoid charging your ROG Phone in battery mode for the first time. • The status of battery charge is indicated by the following icons: Low Not Charging Charging Full NOTES: • For safety purposes, use ONLY the bundled power adapter and cable to avoid damaging your device...

English Version E-Manual
Page 17
... latest device and firmware updates. Disable Wi-Fi feature. - Disable all running apps that are some battery power conservation tips that helps preserve the power of your ROG Phone battery. - Disable Bluetooth feature. - Starting for the first time When you turn your mobile network, WiFi and security features, and sync accounts. Keep the speaker volume to select your language, set up your ROG Phone on for the first time, Setup Wizard will guide you through the setup process. Chapter 1: Basics 17 Follow the onscreen instructions...
... latest device and firmware updates. Disable Wi-Fi feature. - Disable all running apps that are some battery power conservation tips that helps preserve the power of your ROG Phone battery. - Disable Bluetooth feature. - Starting for the first time When you turn your mobile network, WiFi and security features, and sync accounts. Keep the speaker volume to select your language, set up your ROG Phone on for the first time, Setup Wizard will guide you through the setup process. Chapter 1: Basics 17 Follow the onscreen instructions...

English Version E-Manual
Page 26
... your screen. 1. Adjust the date and time. 5. NOTE: See also Clock. You can also choose to enable or disable the dial pad touch tones, touch sounds, screen lock sound, or you can opt to have your ROG Phone vibrate when you prefer. Launch the Settings screen by doing any of your Home screen then tap Settings. 2. Tap a feature to OFF. 4. Setting up from the lower part of the following : •• Launch Quick Settings then...
... your screen. 1. Adjust the date and time. 5. NOTE: See also Clock. You can also choose to enable or disable the dial pad touch tones, touch sounds, screen lock sound, or you can opt to have your ROG Phone vibrate when you prefer. Launch the Settings screen by doing any of your Home screen then tap Settings. 2. Tap a feature to OFF. 4. Setting up from the lower part of the following : •• Launch Quick Settings then...

English Version E-Manual
Page 27
... Quick Settings then tap . 2. NOTE: For more details, see Securing your lock screen settings from sleep mode. Customizing your lock screen If you want to your mobile data and apps. Tap the screen lock option you can also be customized to regulate access to change your ROG Phone. Select Security & lock screen. 3. In the next screen, tap Lock screen. 4. Chapter 2: There's no place like to the following steps: 1. Lock Screen By default, the lock screen appears after turning on your device...
... Quick Settings then tap . 2. NOTE: For more details, see Securing your lock screen settings from sleep mode. Customizing your lock screen If you want to your mobile data and apps. Tap the screen lock option you can also be customized to regulate access to change your ROG Phone. Select Security & lock screen. 3. In the next screen, tap Lock screen. 4. Chapter 2: There's no place like to the following steps: 1. Lock Screen By default, the lock screen appears after turning on your device...

English Version E-Manual
Page 28
... module and your phone calls and data. When you set up your screen lock method for device startup. Starting your ROG Phone for the first time To set up your fingerprint ID, you also need to complete the setup. 28 Chapter 2: There's no place like Home Fingerprint ID sensor Fingerprint ID sensor prevents others from using your ROG Phone for the first time: 1. Tap Continue to set up fingerprint. 3. From...
... module and your phone calls and data. When you set up your screen lock method for device startup. Starting your ROG Phone for the first time To set up your fingerprint ID, you also need to complete the setup. 28 Chapter 2: There's no place like Home Fingerprint ID sensor Fingerprint ID sensor prevents others from using your ROG Phone for the first time: 1. Tap Continue to set up fingerprint. 3. From...

English Version E-Manual
Page 29
... complete the setup. Tap Add fingerprint. 6. Chapter 2: There's no place like Home 29 Tap Done to set up from Settings: 1. Scroll down the Settings screen and select Security & lock screen > Fingerprint. 4. Unlock your ROG Phone. 5. NOTE: For more details, see Securing your phone if it's secured. Launch the Settings screen by doing any of the following: •• Launch Quick Settings then tap . •• Swipe up your backup screen lock method. Repeatedly...
... complete the setup. Tap Add fingerprint. 6. Chapter 2: There's no place like Home 29 Tap Done to set up from Settings: 1. Scroll down the Settings screen and select Security & lock screen > Fingerprint. 4. Unlock your ROG Phone. 5. NOTE: For more details, see Securing your phone if it's secured. Launch the Settings screen by doing any of the following: •• Launch Quick Settings then tap . •• Swipe up your backup screen lock method. Repeatedly...

English Version E-Manual
Page 41
... different mobile service providers, we recommend you can enable/disable Nano SIM cards, assign SIM names, or set one as a preferred network. Chapter 4: Keeping in the names for your SIM names. NOTE: If your SIMs have the same mobile service provider, we recommend you to use the names of your Nano SIM cards on your ROG Phone so that you to use the mobile numbers for your Nano SIM cards. Renaming your Nano SIM cards Change...
... different mobile service providers, we recommend you can enable/disable Nano SIM cards, assign SIM names, or set one as a preferred network. Chapter 4: Keeping in the names for your SIM names. NOTE: If your SIMs have the same mobile service provider, we recommend you to use the names of your Nano SIM cards on your ROG Phone so that you to use the mobile numbers for your Nano SIM cards. Renaming your Nano SIM cards Change...

English Version E-Manual
Page 42
... ROG Phone automatically uses the preferred SIM card to use. SIM card for SMS messages, tap SMS messages then select from your contacts list. You can only use this feature if you make a call then tap the SIM that you make a call from SIM 1 or SIM 2. IMPORTANT! SIM card for SMS messages To assign a SIM card for voice calls When you want to connect the call. SIM card for data service To assign a SIM card for voice calls, SMS messages, and data services. To assign a SIM card for voice calls, tap Voice call , your preferred SIM for data service, tap Data service network...
... ROG Phone automatically uses the preferred SIM card to use. SIM card for SMS messages, tap SMS messages then select from your contacts list. You can only use this feature if you make a call then tap the SIM that you make a call from SIM 1 or SIM 2. IMPORTANT! SIM card for SMS messages To assign a SIM card for voice calls When you want to connect the call. SIM card for data service To assign a SIM card for voice calls, SMS messages, and data services. To assign a SIM card for voice calls, tap Voice call , your preferred SIM for data service, tap Data service network...

English Version E-Manual
Page 47
... to receive an incoming call . Call a contact or dial a number. 2. IMPORTANT! Tap Answer on the touch screen to record a conversation for permission from the top of another incoming call . Tap to view the recorded conversation. This icon appears on an active call while on the system notification bar. 4. Chapter 4: Keeping in touch 47 Swipe down from the other party or parties. 3. To stop recording, tap . Answering another call While you are talking on your ROG Phone, you...
... to receive an incoming call . Call a contact or dial a number. 2. IMPORTANT! Tap Answer on the touch screen to record a conversation for permission from the top of another incoming call . Tap to view the recorded conversation. This icon appears on an active call while on the system notification bar. 4. Chapter 4: Keeping in touch 47 Swipe down from the other party or parties. 3. To stop recording, tap . Answering another call While you are talking on your ROG Phone, you...
English Version E-Manual
Page 48
..., or group them as VIPs to keep in touch with them via calls, SMS messages, emails, or social networks. When you 've set up your Google account on your ROG Phone. 2. Contacts Settings Select how you want to display your contacts from the Contacts settings. Launch the Contacts app then tap Set up your Contacts settings, tap > Settings from the lower part of your Home screen then tap ASUS > Contacts. Fill in your info such as first...
..., or group them as VIPs to keep in touch with them via calls, SMS messages, emails, or social networks. When you 've set up your Google account on your ROG Phone. 2. Contacts Settings Select how you want to display your contacts from the Contacts settings. Launch the Contacts app then tap Set up your Contacts settings, tap > Settings from the lower part of your Home screen then tap ASUS > Contacts. Fill in your info such as first...

English Version E-Manual
Page 49
... such as contact numbers, email addresses, special events for VIPs, and more contact numbers or email addresses, tap Add new. 5. Fill in . 4. When you 've completed the info, tap . Launch the Contacts app then tap . 2. Adding an extension number to a contact number You can also save the contact to skip the voice prompts when making a call. 1. Select Device. Adding contacts Add contacts to your SIM card or an email account. • If you don't have an email account, tap Add account then...
... such as contact numbers, email addresses, special events for VIPs, and more contact numbers or email addresses, tap Add new. 5. Fill in . 4. When you 've completed the info, tap . Launch the Contacts app then tap . 2. Adding an extension number to a contact number You can also save the contact to skip the voice prompts when making a call. 1. Select Device. Adding contacts Add contacts to your SIM card or an email account. • If you don't have an email account, tap Add account then...

English Version E-Manual
Page 56
...Camera home screen Your ROG Phone's camera is equipped with auto-scene detection and auto-image stabilizer features. Turn on the location access from Settings > Security & lock screen > Location > App-level permissions. 2. Adjust settings Enable or disable the flash function Set the time (in second) delay before you have shared your ROG Phone. and activate Location services before capturing photos Switch between Normal mode and Portrait mode Switch between screen modes Enable or disable HDR Swipe to the right to use advanced camera settings Swipe to the left to use effects Touch...
...Camera home screen Your ROG Phone's camera is equipped with auto-scene detection and auto-image stabilizer features. Turn on the location access from Settings > Security & lock screen > Location > App-level permissions. 2. Adjust settings Enable or disable the flash function Set the time (in second) delay before you have shared your ROG Phone. and activate Location services before capturing photos Switch between Normal mode and Portrait mode Switch between screen modes Enable or disable HDR Swipe to the right to use advanced camera settings Swipe to the left to use effects Touch...

English Version E-Manual
Page 61
... Quick Settings then tap > Connections. •• Swipe up from the lower part of your ROG Phone. Tap Connections > Mobile network. 3. Enabling Wi-Fi 1. Update your social media accounts, browse the Internet, or exchange data and messages wirelessly from your Home screen then tap Settings. 2. Slide the Wi-Fi switch to the right to launch the Settings screen: •• Launch Quick Settings then tap . •• Swipe up from the lower part of your mobile network's data access for Internet connection...
... Quick Settings then tap > Connections. •• Swipe up from the lower part of your ROG Phone. Tap Connections > Mobile network. 3. Enabling Wi-Fi 1. Update your social media accounts, browse the Internet, or exchange data and messages wirelessly from your Home screen then tap Settings. 2. Slide the Wi-Fi switch to the right to launch the Settings screen: •• Launch Quick Settings then tap . •• Swipe up from the lower part of your mobile network's data access for Internet connection...

English Version E-Manual
Page 64
... mobile connection. • Only a limited number of mobile devices can use the tethering function. Connect other devices. 1. Do any of the following to launch the Settings screen: •• Launch Quick Settings then tap > Connections. •• Swipe up from the lower part of your Wi-Fi hotspot. Most mobile service providers may be able to use your ROG Phone as a modem or turn it to help save battery power. Wi-Fi Hotspot Turn your ROG Phone...
... mobile connection. • Only a limited number of mobile devices can use the tethering function. Connect other devices. 1. Do any of the following to launch the Settings screen: •• Launch Quick Settings then tap > Connections. •• Swipe up from the lower part of your Wi-Fi hotspot. Most mobile service providers may be able to use your ROG Phone as a modem or turn it to help save battery power. Wi-Fi Hotspot Turn your ROG Phone...

English Version E-Manual
Page 89
... Mode 24 - auto dialing 46 - accessing the internal storage 41 Fingerprint 31 - Starting your favorite contacts 47 - locate finger print scanner 31 - removing 22 ROG Phone 8 - blocking 53 - answering 47 - calling your ROG Phone for the first time 31 - receiving 47 - recording 49 - see also Block list 53 - Camera home screen 58 - stopwatch 71 - setting up fingerprint ID from Contacts...
... Mode 24 - auto dialing 46 - accessing the internal storage 41 Fingerprint 31 - Starting your favorite contacts 47 - locate finger print scanner 31 - removing 22 ROG Phone 8 - blocking 53 - answering 47 - calling your ROG Phone for the first time 31 - receiving 47 - recording 49 - see also Block list 53 - Camera home screen 58 - stopwatch 71 - setting up fingerprint ID from Contacts...

English Version E-Manual
Page 90
... files 61 - renaming 43 - updating 77 System notifications 21 T Tethering - moving through pages or screens 17 - animated wallpaper 23 - see also Easy Mode 24 - Editing or removing events 39 - connecting 55 Home screen 19 - blocking 47 - Redialing your Google Play Music 56 H Headset 55 - assigning a preferred micro SIM card 44 - enabling...
... files 61 - renaming 43 - updating 77 System notifications 21 T Tethering - moving through pages or screens 17 - animated wallpaper 23 - see also Easy Mode 24 - Editing or removing events 39 - connecting 55 Home screen 19 - blocking 47 - Redialing your Google Play Music 56 H Headset 55 - assigning a preferred micro SIM card 44 - enabling...


