
series AI2205 English Version E-manual
Page 4
... Setting up face unlock from Settings 28 3 Work hard, play harder Chrome...31 Launching Chrome...31 Sharing pages...32 Bookmarking pages...32 Clearing the browsing data...32 Gmail...33 Google Calendar...34 Creating events...34 Editing or removing events...34 Creating reminders...35 Editing or removing reminders...35 File Manager...36 ASUS Data Transfer...37 4 Keeping in touch Call in style...38 Dual SIM feature...38 Making calls...40 Calling your favorite contacts...
... Setting up face unlock from Settings 28 3 Work hard, play harder Chrome...31 Launching Chrome...31 Sharing pages...32 Bookmarking pages...32 Clearing the browsing data...32 Gmail...33 Google Calendar...34 Creating events...34 Editing or removing events...34 Creating reminders...35 Editing or removing reminders...35 File Manager...36 ASUS Data Transfer...37 4 Keeping in touch Call in style...38 Dual SIM feature...38 Making calls...40 Calling your favorite contacts...
series AI2205 English Version E-manual
Page 5
... contacts 48 Send messages and more 49 Messages...49 5 Fun and entertainment Using a headset...50 Connecting the audio jack...50 YT Music...51 Armoury Crate...52 6 Your precious moments Capture moments...53 Launching the Camera app...53 Photo Locations...54 Advanced camera features...54 Using the Gallery...56 Viewing the photo location...56 Editing images...56 Sharing files from the Gallery...56 Deleting files from the Gallery...57 7 Staying connected Mobile network...58 Enabling...
... contacts 48 Send messages and more 49 Messages...49 5 Fun and entertainment Using a headset...50 Connecting the audio jack...50 YT Music...51 Armoury Crate...52 6 Your precious moments Capture moments...53 Launching the Camera app...53 Photo Locations...54 Advanced camera features...54 Using the Gallery...56 Viewing the photo location...56 Editing images...56 Sharing files from the Gallery...56 Deleting files from the Gallery...57 7 Staying connected Mobile network...58 Enabling...
series AI2205 English Version E-manual
Page 7
... connected external storage devices. 1 Basics Basics 1 Welcome! You can add emojis or stickers to fit your unique individual needs and make your life easier while letting you to check the apps available on the internal storage of your ROG Phone. Swipe up on your Home screen to easily locate and manage your data on your messages, and easily block SMS senders. It provides you send/receive SMS/MMS messages, as well as send group texts, photos...
... connected external storage devices. 1 Basics Basics 1 Welcome! You can add emojis or stickers to fit your unique individual needs and make your life easier while letting you to check the apps available on the internal storage of your ROG Phone. Swipe up on your Home screen to easily locate and manage your data on your messages, and easily block SMS senders. It provides you send/receive SMS/MMS messages, as well as send group texts, photos...
series AI2205 English Version E-manual
Page 12
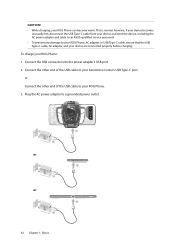
... end of the USB cable to your device are connected properly before charging. This is normal, however, if your device becomes unusually hot, disconnect the USB Type-C cable from your ROG Phone. 3. To charge your ROG Phone can become warm. Connect the other end of the USB cable to your device and send the device, including the AC power adapter and cable to an ASUS-qualified service personnel. • To...
... end of the USB cable to your device are connected properly before charging. This is normal, however, if your device becomes unusually hot, disconnect the USB Type-C cable from your ROG Phone. 3. To charge your ROG Phone can become warm. Connect the other end of the USB cable to your device and send the device, including the AC power adapter and cable to an ASUS-qualified service personnel. • To...

series AI2205 English Version E-manual
Page 13
... that you connect USB Type-C OTG or charging devices to both of the USB Type-C ports on your ROG Phone, the USB Type-C port on the left side of your ROG Phone will become the master and the charging current or OTG device on the bottom port will be near to the unit and easily accessible. • When charging your ROG Phone through one USB Type-C port at a time. • Only the USB Type-C port...
... that you connect USB Type-C OTG or charging devices to both of the USB Type-C ports on your ROG Phone, the USB Type-C port on the left side of your ROG Phone will become the master and the charging current or OTG device on the bottom port will be near to the unit and easily accessible. • When charging your ROG Phone through one USB Type-C port at a time. • Only the USB Type-C port...

series AI2205 English Version E-manual
Page 14
Turning your device off To turn your device in sleep mode, press the power button once until your screen is locked, unlock the device screen. 2. Press and hold the power button until the screen turns off. Sleep mode To put your device off: 1. Turning your ROG Phone on or off Turning your device on To turn your device on . If this doesn't work, try again by pressing and holding the keys again for 8 seconds to turn it on , press...
Turning your device off To turn your device in sleep mode, press the power button once until your screen is locked, unlock the device screen. 2. Press and hold the power button until the screen turns off. Sleep mode To put your device off: 1. Turning your ROG Phone on or off Turning your device on To turn your device on . If this doesn't work, try again by pressing and holding the keys again for 8 seconds to turn it on , press...
series AI2205 English Version E-manual
Page 15
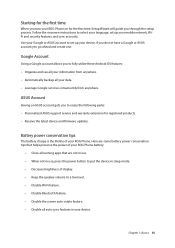
...; Automatically backup all auto-sync features in use , press the power button to a low level. - When not in use . - Disable Bluetooth feature. - Chapter 1: Basics 15 Starting for the first time When you turn your ROG Phone on for the first time, Setup Wizard will guide you to enjoy the following perks: • Personalized ASUS support service and warranty extension for registered products. • Receive the latest device and firmware updates. ASUS Account Having an ASUS account gets you...
...; Automatically backup all auto-sync features in use , press the power button to a low level. - When not in use . - Disable Bluetooth feature. - Chapter 1: Basics 15 Starting for the first time When you turn your ROG Phone on for the first time, Setup Wizard will guide you to enjoy the following perks: • Personalized ASUS support service and warranty extension for registered products. • Receive the latest device and firmware updates. ASUS Account Having an ASUS account gets you...

series AI2205 English Version E-manual
Page 24
... your ROG Phone vibrate when you prefer. Select Sound & vibration and set up on your Home screen then tap Settings. 2. Editing your Home screen You can extend your Home screen, select a scroll effect, change the date and time settings: 1. Tap a feature to use the 24-hour format, if you tap on your mobile provider's settings. Setting up the sound for your Home screen. Setting up your ringtone and alert sounds Set up the date and time By default, the date and time displayed...
... your ROG Phone vibrate when you prefer. Select Sound & vibration and set up on your Home screen then tap Settings. 2. Editing your Home screen You can extend your Home screen, select a scroll effect, change the date and time settings: 1. Tap a feature to use the 24-hour format, if you tap on your mobile provider's settings. Setting up the sound for your Home screen. Setting up your ringtone and alert sounds Set up the date and time By default, the date and time displayed...

series AI2205 English Version E-manual
Page 25
... : • Launch Quick Settings then tap . • Swipe up from the default Swipe option, refer to your device's Android® system by doing either of the following steps: 1. Lock Screen By default, the lock screen appears after turning on your ROG Phone. Launch the Settings screen by swiping on your mobile data and apps. Customizing your lock screen If you would like Home 25 Tap the screen lock option you want to use.
... : • Launch Quick Settings then tap . • Swipe up from the default Swipe option, refer to your device's Android® system by doing either of the following steps: 1. Lock Screen By default, the lock screen appears after turning on your ROG Phone. Launch the Settings screen by swiping on your mobile data and apps. Customizing your lock screen If you would like Home 25 Tap the screen lock option you want to use.

series AI2205 English Version E-manual
Page 26
...phone page and tap Set up your fingerprint ID when using your ROG Phone without your ROG Phone for the first time To set up your phone calls and data. When you set up your fingerprint ID, you also need to unlock your device, access your screen lock method for device startup. From the Welcome page, follow the instructions... using your permission. Starting your ROG Phone for the first time: 1. Tap Continue to choose a screen lock method, and then follow the on the front of your device, adjust your finger and try to complete the setup. 26 Chapter 2: There's no place like Home...
...phone page and tap Set up your fingerprint ID when using your ROG Phone without your ROG Phone for the first time To set up your phone calls and data. When you set up your fingerprint ID, you also need to unlock your device, access your screen lock method for device startup. From the Welcome page, follow the instructions... using your permission. Starting your ROG Phone for the first time: 1. Tap Continue to choose a screen lock method, and then follow the on the front of your device, adjust your finger and try to complete the setup. 26 Chapter 2: There's no place like Home...

series AI2205 English Version E-manual
Page 38
... you can enable/disable Nano SIM cards, assign SIM names, or set one as a preferred network. Renaming your Nano SIM cards Change the names of your Nano SIM cards on your Nano SIM cards. If both SIMs have different mobile service providers, we recommend you to use the names of these providers for your ROG Phone so that you to use the mobile numbers for your SIM names. 38 Chapter 4: Keeping in touch With this...
... you can enable/disable Nano SIM cards, assign SIM names, or set one as a preferred network. Renaming your Nano SIM cards Change the names of your Nano SIM cards on your Nano SIM cards. If both SIMs have different mobile service providers, we recommend you to use the names of these providers for your ROG Phone so that you to use the mobile numbers for your SIM names. 38 Chapter 4: Keeping in touch With this...

series AI2205 English Version E-manual
Page 39
...messages To assign a SIM card for data service, tap Data service network then select from SIM 1 or SIM 2. SIM card for data service To assign a SIM card for SMS messages, tap SMS messages then select from your contacts list. SIM card for voice calls, tap Voice call then tap the SIM that you want to connect the call from SIM 1 or SIM 2. To assign a SIM card for voice calls When you make a call, your preferred SIM for voice calls, SMS messages, and data services. Chapter 4: Keeping in touch 39 You can only use . Assigning a preferred SIM card Assign a SIM card as your ROG Phone...
...messages To assign a SIM card for data service, tap Data service network then select from SIM 1 or SIM 2. SIM card for data service To assign a SIM card for SMS messages, tap SMS messages then select from your contacts list. SIM card for voice calls, tap Voice call then tap the SIM that you want to connect the call from SIM 1 or SIM 2. To assign a SIM card for voice calls When you make a call, your preferred SIM for voice calls, SMS messages, and data services. Chapter 4: Keeping in touch 39 You can only use . Assigning a preferred SIM card Assign a SIM card as your ROG Phone...

series AI2205 English Version E-manual
Page 45
.... 1. Setting up your profile Make your ROG Phone truly your own and set up your Google account on your Contacts settings, tap > Settings from the Contacts settings. Managing contacts Organize your info such as mobile or home number. Such display options include displaying only those contacts with phones, sorting list by first/last name, or viewing contact names as Favorites to quickly get notified about any upcoming events, missed calls, or unread messages. Launch the Contacts app...
.... 1. Setting up your profile Make your ROG Phone truly your own and set up your Google account on your Contacts settings, tap > Settings from the Contacts settings. Managing contacts Organize your info such as mobile or home number. Such display options include displaying only those contacts with phones, sorting list by first/last name, or viewing contact names as Favorites to quickly get notified about any upcoming events, missed calls, or unread messages. Launch the Contacts app...

series AI2205 English Version E-manual
Page 46
... voice prompts when making a call. 1. When you 've completed the info, tap . 46 Chapter 4: Keeping in the necessary information such as contact numbers, email addresses, special events for VIPs, and more important contact information such as name, mobile or home number, and email address. 4. When you 've completed the info, tap . Adding contacts Add contacts to your SIM card or an email account. • If you don't have an email account, tap Add account...
... voice prompts when making a call. 1. When you 've completed the info, tap . 46 Chapter 4: Keeping in the necessary information such as contact numbers, email addresses, special events for VIPs, and more important contact information such as name, mobile or home number, and email address. 4. When you 've completed the info, tap . Adding contacts Add contacts to your SIM card or an email account. • If you don't have an email account, tap Add account...

series AI2205 English Version E-manual
Page 49
... SIM account where you're going to your messages, share your location, archive your reply from your reply in the message field. 4. When you send/receive SMS/MMS messages, as well as send group texts, photos, or audio messages. Tap your message alert from . 3. Start composing your Home screen or Lock screen. 2. You can also take photos or record videos and easily share these files. You can add emojis or stickers to send your messages, and easily block SMS...
... SIM account where you're going to your messages, share your location, archive your reply from your reply in the message field. 4. When you send/receive SMS/MMS messages, as well as send group texts, photos, or audio messages. Tap your message alert from . 3. Start composing your Home screen or Lock screen. 2. You can also take photos or record videos and easily share these files. You can add emojis or stickers to send your messages, and easily block SMS...

series AI2205 English Version E-manual
Page 54
From the Camera app's home screen, tap > and activate Location services before taking images. Apply the settings first before taking photos See the Gallery Photo Locations To enable the location tagging feature, refer to start using the advanced camera features of your ROG Phone. Turn on the location access from Settings > Location and slide Use location to Google Maps. 3. Advanced camera features Explore new ways of capturing images or videos and make captured extra special moments using your camera and explore the...
From the Camera app's home screen, tap > and activate Location services before taking images. Apply the settings first before taking photos See the Gallery Photo Locations To enable the location tagging feature, refer to start using the advanced camera features of your ROG Phone. Turn on the location access from Settings > Location and slide Use location to Google Maps. 3. Advanced camera features Explore new ways of capturing images or videos and make captured extra special moments using your camera and explore the...

series AI2205 English Version E-manual
Page 58
Update your social media accounts, browse the Internet, or exchange data and messages wirelessly from Quick Settings screen. Launch the Settings screen by doing either of the following : • Launch Quick Settings then tap > Network & internet > Internet. • Swipe up on your mobile network charges/fees and setttings, contact your mobile service provider. NOTE: You can enable your mobile network's data access for Internet connection. Tap Network & internet > Data usage. 3. Wi-Fi The Wi-Fi technology of the following to launch the Settings screen: • Launch...
Update your social media accounts, browse the Internet, or exchange data and messages wirelessly from Quick Settings screen. Launch the Settings screen by doing either of the following : • Launch Quick Settings then tap > Network & internet > Internet. • Swipe up on your mobile network charges/fees and setttings, contact your mobile service provider. NOTE: You can enable your mobile network's data access for Internet connection. Tap Network & internet > Data usage. 3. Wi-Fi The Wi-Fi technology of the following to launch the Settings screen: • Launch...

series AI2205 English Version E-manual
Page 61
... connection the same way you connect to a Wi-Fi network. When done, tap OK. 4. IMPORTANT! Most mobile service providers may be able to use your ROG Phone as a modem or turn it to help save battery power. Do either of this data plan. Connect other devices. 1. Contact your Home screen then tap Settings > Network & internet. 2. Tap Hotspot & tethering then slide on your mobile service provider about availing of the following: • Launch Quick Settings then tap > Network & internet...
... connection the same way you connect to a Wi-Fi network. When done, tap OK. 4. IMPORTANT! Most mobile service providers may be able to use your ROG Phone as a modem or turn it to help save battery power. Do either of this data plan. Connect other devices. 1. Contact your Home screen then tap Settings > Network & internet. 2. Tap Hotspot & tethering then slide on your mobile service provider about availing of the following: • Launch Quick Settings then tap > Network & internet...

series AI2205 English Version E-manual
Page 86
... - viewing the photo location 56 Gmail 33 Google Calendar 34 - charging 12 - see also Social networking 48 - stopwatch 66 - world clock 66 Contacts 45 - enabling 59 - customizing your phone 26 G Gallery 56 - SIM card for data service 39 - deleting files 57 - sharing files 56 - camera home screen 54 - SIM card for voice calls 39 E Extension number 40 - turning...
... - viewing the photo location 56 Gmail 33 Google Calendar 34 - charging 12 - see also Social networking 48 - stopwatch 66 - world clock 66 Contacts 45 - enabling 59 - customizing your phone 26 G Gallery 56 - SIM card for data service 39 - deleting files 57 - sharing files 56 - camera home screen 54 - SIM card for voice calls 39 E Extension number 40 - turning...

series AI2205 English Version E-manual
Page 87
... Q Quick settings 20 - enabling 58 Y YT Music 51 - - see also Securing your ASUS phone 73 M Managing your last-called number 43 - customizing 25 - SMS messages 39 Night 55 P Panorama - removing features 20 R Ringtone 24 - recording List 70 Storage 72 System 72 - updating 72 System notifications 21 T Tethering 61 - moving through pages or screens...
... Q Quick settings 20 - enabling 58 Y YT Music 51 - - see also Securing your ASUS phone 73 M Managing your last-called number 43 - customizing 25 - SMS messages 39 Night 55 P Panorama - removing features 20 R Ringtone 24 - recording List 70 Storage 72 System 72 - updating 72 System notifications 21 T Tethering 61 - moving through pages or screens...


