
User Guide
Page 3
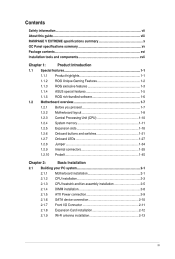
... information vii About this guide viii RAMPAGE V EXTREME specifications summary OC Panel specifications summary xv Package contents xvi Installation tools and components xvii Chapter 1: Product Introduction 1.1 Special features 1-1 1.1.1 Product highlights 1-1 1.1.2 ROG Unique Gaming Features 1-2 1.1.3 ROG exclusive features 1-3 1.1.4 ASUS special features 1-5 1.1.5 ROG rich-bundled software 1-6 1.2 Motherboard overview 1-7 1.2.1 Before you proceed 1-7 1.2.2 Motherboard layout 1-8 1.2.3 Central Processing Unit (CPU...
... information vii About this guide viii RAMPAGE V EXTREME specifications summary OC Panel specifications summary xv Package contents xvi Installation tools and components xvii Chapter 1: Product Introduction 1.1 Special features 1-1 1.1.1 Product highlights 1-1 1.1.2 ROG Unique Gaming Features 1-2 1.1.3 ROG exclusive features 1-3 1.1.4 ASUS special features 1-5 1.1.5 ROG rich-bundled software 1-6 1.2 Motherboard overview 1-7 1.2.1 Before you proceed 1-7 1.2.2 Motherboard layout 1-8 1.2.3 Central Processing Unit (CPU...
User Guide
Page 4
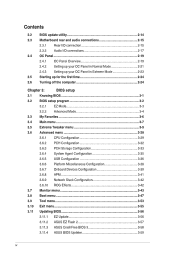
Contents 2.2 BIOS update utility 2-14 2.3 Motherboard rear and audio connections 2-15 2.3.1 Rear I/O connection 2-15 2.3.2 Audio I/O connections 2-17 2.4 OC Panel 2-19 2.4.1 OC Panel Overview 2-19 2.4.2 Setting up your OC Panel in Normal Mode 2-21 2.4.3 Setting up your OC Panel in Extreme Mode 2-23 2.5 Starting up for the first time 2-24 2.6...3.7 Monitor menu 3-43 3.8 Boot menu 3-47 3.9 Tool menu 3-53 3.10 Exit menu 3-55 3.11 Updating BIOS 3-56 3.11.1 EZ Update 3-56 3.11.2 ASUS EZ Flash 2 3-57 3.11.3 ASUS CrashFree BIOS 3 3-58 3.11.4 ASUS BIOS Updater 3-59 iv
Contents 2.2 BIOS update utility 2-14 2.3 Motherboard rear and audio connections 2-15 2.3.1 Rear I/O connection 2-15 2.3.2 Audio I/O connections 2-17 2.4 OC Panel 2-19 2.4.1 OC Panel Overview 2-19 2.4.2 Setting up your OC Panel in Normal Mode 2-21 2.4.3 Setting up your OC Panel in Extreme Mode 2-23 2.5 Starting up for the first time 2-24 2.6...3.7 Monitor menu 3-43 3.8 Boot menu 3-47 3.9 Tool menu 3-53 3.10 Exit menu 3-55 3.11 Updating BIOS 3-56 3.11.1 EZ Update 3-56 3.11.2 ASUS EZ Flash 2 3-57 3.11.3 ASUS CrashFree BIOS 3 3-58 3.11.4 ASUS BIOS Updater 3-59 iv
User Guide
Page 7
... adding devices on a stable surface. • If you add a device. • Before connecting or removing signal cables from the motherboard, ensure that all the manuals that came with the product, contact a qualified service technician or your dealer immediately. • To avoid short circuits, keep paper ... outlet before relocating the system. • When adding or removing devices to or from connectors, slots, sockets, and circuitry. • Avoid dust, humidity, and temperature extremes. If you detect any area where it by yourself.
... adding devices on a stable surface. • If you add a device. • Before connecting or removing signal cables from the motherboard, ensure that all the manuals that came with the product, contact a qualified service technician or your dealer immediately. • To avoid short circuits, keep paper ... outlet before relocating the system. • When adding or removing devices to or from connectors, slots, sockets, and circuitry. • Avoid dust, humidity, and temperature extremes. If you detect any area where it by yourself.
User Guide
Page 8
... also provided. 4. Chapter 2: Basic Installation This chapter lists the hardware setup procedures that you need when installing and configuring the motherboard. Where to find more information Refer to perform when installing system components. 3. viii Chapter 3: BIOS setup This chapter explains how... by your dealer. Chapter 1: Product introduction This chapter describes the features of the switches, jumpers, and connectors on ASUS hardware and software products. 2. About this guide is organized This guide contains the following sources for additional information and for ...
... also provided. 4. Chapter 2: Basic Installation This chapter lists the hardware setup procedures that you need when installing and configuring the motherboard. Where to find more information Refer to perform when installing system components. 3. viii Chapter 3: BIOS setup This chapter explains how... by your dealer. Chapter 1: Product introduction This chapter describes the features of the switches, jumpers, and connectors on ASUS hardware and software products. 2. About this guide is organized This guide contains the following sources for additional information and for ...
User Guide
Page 15
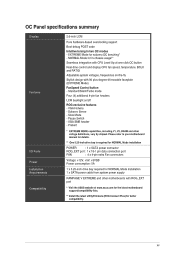
... motherboards with 90 plus-degree-tilt movable faceplate (EXTREME Mode) FanSpeed Control button - $tandard/Silent/Turto mode Four (4) additional 4-pin fan headers LCM backlight on -the-fly Stylish design with ROG_EXT port * Visit the ASUS websfte at www.asus.com for the latest motherboard...5.25-inch drive bay required for NORMAL Mode installation 1 x SATA power cable from system power supply RAMPAGE V EXTREME and other voltage definitions, vary by chipset. Slow Mode - VGA SMB header - EXTREME Mode for in two OC modes - VGA Hotwire - NORMAL Mode for subzero OC benching* -
... motherboards with 90 plus-degree-tilt movable faceplate (EXTREME Mode) FanSpeed Control button - $tandard/Silent/Turto mode Four (4) additional 4-pin fan headers LCM backlight on -the-fly Stylish design with ROG_EXT port * Visit the ASUS websfte at www.asus.com for the latest motherboard...5.25-inch drive bay required for NORMAL Mode installation 1 x SATA power cable from system power supply RAMPAGE V EXTREME and other voltage definitions, vary by chipset. Slow Mode - VGA SMB header - EXTREME Mode for in two OC modes - VGA Hotwire - NORMAL Mode for subzero OC benching* -
User Guide
Page 16
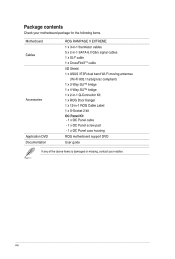
Package contents Check your motherboard package for the following items. Motherboard Cables Accessories Application DVD Documentation ROG RAMPAGE V EXTREME 1 x 3-in-1 thermistor cables 5 x 2-in-1 SATA 6.0 Gb/s signal cables 1 x SLI® cable 1 x CrossFireXJM cable I/O Shield 1 x ASUS 3T3R dual band Wi-Fi moving antennas (Wi-Fi 802.11a/b/g/n/ac compliant) 1 x 3-Way SLITM bridge 1 x 4-Way SLITM bridge 1 x 2-in-1 Q-Connector Kit...
Package contents Check your motherboard package for the following items. Motherboard Cables Accessories Application DVD Documentation ROG RAMPAGE V EXTREME 1 x 3-in-1 thermistor cables 5 x 2-in-1 SATA 6.0 Gb/s signal cables 1 x SLI® cable 1 x CrossFireXJM cable I/O Shield 1 x ASUS 3T3R dual band Wi-Fi moving antennas (Wi-Fi 802.11a/b/g/n/ac compliant) 1 x 3-Way SLITM bridge 1 x 4-Way SLITM bridge 1 x 2-in-1 Q-Connector Kit...

User Guide
Page 17
xvii Installation tools and components (q( x 1 set of screws N Philips (cross) screwdriver PC chassis Power supply unit Intel LGA 2011-3 CPU 0 0 E DDR4 DIMM ii 0° Intel LGA 2011.3 compatible CPU Fan SATA hard disk drive Graphics card SATA optical disc drive (optional) The tools and components in the table above are not included in the motherboard package.
xvii Installation tools and components (q( x 1 set of screws N Philips (cross) screwdriver PC chassis Power supply unit Intel LGA 2011-3 CPU 0 0 E DDR4 DIMM ii 0° Intel LGA 2011.3 compatible CPU Fan SATA hard disk drive Graphics card SATA optical disc drive (optional) The tools and components in the table above are not included in the motherboard package.

User Guide
Page 19
... It also enables the iGPU function for faster data retrieval. Refer to www.asus.com for updated details. 3-Way/4-way/Quad-GPU SLITM and CrossFireXTM Support This motherboard features Intel's powerful new X99 platform and optimizes PCIe allocation in multi-GPU SLI...and PCIe 2.0 devices, and improves and optimizes graphics performance. * This motherboard is ready to 32Gbit/s data-transfer speeds. It is a single chipset that supports memory frequencies of PCIe 2.0 in the LGA2011-v3 package. ASUS RAMPAGE V EXTREME 1-1 Total bandwidth for a x16 link reaches a maximum of 32Gb/s, ...
... It also enables the iGPU function for faster data retrieval. Refer to www.asus.com for updated details. 3-Way/4-way/Quad-GPU SLITM and CrossFireXTM Support This motherboard features Intel's powerful new X99 platform and optimizes PCIe allocation in multi-GPU SLI...and PCIe 2.0 devices, and improves and optimizes graphics performance. * This motherboard is ready to 32Gbit/s data-transfer speeds. It is a single chipset that supports memory frequencies of PCIe 2.0 in the LGA2011-v3 package. ASUS RAMPAGE V EXTREME 1-1 Total bandwidth for a x16 link reaches a maximum of 32Gb/s, ...
User Guide
Page 20
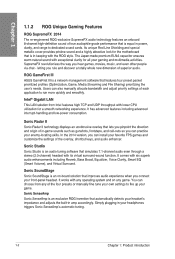
... in your favorite FPS games and customize the settings of in keeping with its virtual surround-sound function. ROG GameFirst III ASUS GameFirst III is an on any operating system and on -board solution that lets you can also manually allocate bandwidth and adjust... of superior audio. It has advanced features including advanced interrupt-handling and low-power consumption. It works with exceptional clarity for the motherboard that is an audio tuning software that features four preset packet prioritized profiles (Optimization, Game, Media Streaming and File Sharing) prioritizing ...
... in your favorite FPS games and customize the settings of in keeping with its virtual surround-sound function. ROG GameFirst III ASUS GameFirst III is an on any operating system and on -board solution that lets you can also manually allocate bandwidth and adjust... of superior audio. It has advanced features including advanced interrupt-handling and low-power consumption. It works with exceptional clarity for the motherboard that is an audio tuning software that features four preset packet prioritized profiles (Optimization, Game, Media Streaming and File Sharing) prioritizing ...
User Guide
Page 21
... fully maximizes ROG's unique functions, providing you to extend SSD lifespan and keeps your keyboard to attain and the motherboard will do the rest. To protect your motherboard at the same time. This feature supports USB keyboards only. ROG Connect links your main system to a notebook ... notebook as well as make on your main storage optimized for each processor, simply select the profile you to the system as needed. ASUS RAMPAGE V EXTREME 1-3 IROG The iROG is a built-in it can configure and assign macros to specific keys on -the-fly parameter adjustments at a...
... fully maximizes ROG's unique functions, providing you to extend SSD lifespan and keeps your keyboard to attain and the motherboard will do the rest. To protect your motherboard at the same time. This feature supports USB keyboards only. ROG Connect links your main system to a notebook ... notebook as well as make on your main storage optimized for each processor, simply select the profile you to the system as needed. ASUS RAMPAGE V EXTREME 1-3 IROG The iROG is a built-in it can configure and assign macros to specific keys on -the-fly parameter adjustments at a...
User Guide
Page 22
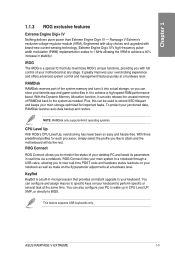
...Extreme Tweaker is the one press of the CPU Level Up button, you can instantly apply custom profiles calibrated by the world's leading overclockers. It can help measure your system's important system voltages. These features gives you can quickly and easily check your system to optimal performance. Probelt This motherboard... that allows you to easily share your system's current voltage. It helps overclockers utilize the motherboard's OC capabilities and benchmark scores. The motherboard features ROG BIOS Print that helps you detect your BIOS settings to others with the press of...
...Extreme Tweaker is the one press of the CPU Level Up button, you can instantly apply custom profiles calibrated by the world's leading overclockers. It can help measure your system's important system voltages. These features gives you can quickly and easily check your system to optimal performance. Probelt This motherboard... that allows you to easily share your system's current voltage. It helps overclockers utilize the motherboard's OC capabilities and benchmark scores. The motherboard features ROG BIOS Print that helps you detect your BIOS settings to others with the press of...

User Guide
Page 24
... organizes data, music, video, and photo collections on personal computers, and sending encoded bitstreams out of a digital audio connection (such as 7.1 channels of the CPU, motherboard, memory, and other main components. 1.1.5 ROG rich-bundled software fy rt. It gives current information and status of incredible surround sound. MemTweakIt MemTweakIt is a customized...
... organizes data, music, video, and photo collections on personal computers, and sending encoded bitstreams out of a digital audio connection (such as 7.1 channels of the CPU, motherboard, memory, and other main components. 1.1.5 ROG rich-bundled software fy rt. It gives current information and status of incredible surround sound. MemTweakIt MemTweakIt is a customized...
User Guide
Page 25
ASUS RAMPAGE V EXTREME 1-7 Its .0 U • Unplug the power cord from the wall socket before you install or remove any component, ensure that the ATX power supply is switched off or the power cord is detached from the power supply. 1.2 Motherboard overview 1.2.1 Before you proceed IcLu Take note of the..., place it on a grounded antistatic pad or in the bag that came with the component. • Before you install motherboard components or change any motherboard settings. Failure to do so may cause severe damage to avoid touching the ICs on them due to static electricity. •...
ASUS RAMPAGE V EXTREME 1-7 Its .0 U • Unplug the power cord from the wall socket before you install or remove any component, ensure that the ATX power supply is switched off or the power cord is detached from the power supply. 1.2 Motherboard overview 1.2.1 Before you proceed IcLu Take note of the..., place it on a grounded antistatic pad or in the bag that came with the component. • Before you install motherboard components or change any motherboard settings. Failure to do so may cause severe damage to avoid touching the ICs on them due to static electricity. •...

User Guide
Page 26
... to the Internal connectors and the Rear I/O Connection section on Chapter 2 for more information about the internal connectors and rear panel connectors. 1-8 Chapter 1: Product introduction 1.2.2 Motherboard layout rt.
... to the Internal connectors and the Rear I/O Connection section on Chapter 2 for more information about the internal connectors and rear panel connectors. 1-8 Chapter 1: Product introduction 1.2.2 Motherboard layout rt.
User Guide
Page 28
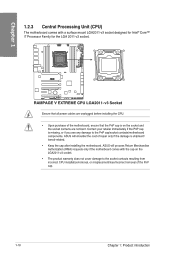
...RD '1::1:1' 0 AMC I=C 0 w I 'DO L ED uu Eno LEEEEnfo°591M__ImmEmEol =not RAMPAGE V EXTREME CPU LGA2011-v3 Socket Ensure that all power cables are not bent. 1.2.3 Central Processing Unit (CPU) The motherboard comes with the cap on the socket and the socket contacts are unplugged before installing the CPU....LGA2011-v3 socket. • The product warranty does not cover damage to the PnP cap/socket contacts/motherboard components. ASUS will shoulder the cost of the motherboard, ensure that the PnP cap is missing, or if you see any damage to the socket contacts resulting...
...RD '1::1:1' 0 AMC I=C 0 w I 'DO L ED uu Eno LEEEEnfo°591M__ImmEmEol =not RAMPAGE V EXTREME CPU LGA2011-v3 Socket Ensure that all power cables are not bent. 1.2.3 Central Processing Unit (CPU) The motherboard comes with the cap on the socket and the socket contacts are unplugged before installing the CPU....LGA2011-v3 socket. • The product warranty does not cover damage to the PnP cap/socket contacts/motherboard components. ASUS will shoulder the cost of the motherboard, ensure that the PnP cap is missing, or if you see any damage to the socket contacts resulting...
User Guide
Page 29
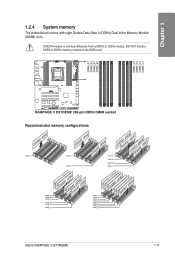
... DIMALC1 z DIMM_A1 DIMM_A2 DIMM_B1 DIMM_D2 DIMNLD1 DIMM_C1 • ~ ~`/~~ DIMM_A1 DIMM_B1 DIMMJ)1 DIMM_C1 DEG DIMM_A1 DIMM_A2 DIMI D1 DIMMJE12 DIMILD2 DIMILD1 DIMILC2 DIMM_C1 O oo ASUS RAMPAGE V EXTREME 1-11 1.2.4 System memory The motherboard comes with eight Double Data Rate 4 (DDR4) Dual Inline Memory Module CO (DIMM) slots. U )- a IQ .0 (!\ A DDR4 module is notched differently from a DDR3 or...
... DIMALC1 z DIMM_A1 DIMM_A2 DIMM_B1 DIMM_D2 DIMNLD1 DIMM_C1 • ~ ~`/~~ DIMM_A1 DIMM_B1 DIMMJ)1 DIMM_C1 DEG DIMM_A1 DIMM_A2 DIMI D1 DIMMJE12 DIMILD2 DIMILD1 DIMILC2 DIMM_C1 O oo ASUS RAMPAGE V EXTREME 1-11 1.2.4 System memory The motherboard comes with eight Double Data Rate 4 (DDR4) Dual Inline Memory Module CO (DIMM) slots. U )- a IQ .0 (!\ A DDR4 module is notched differently from a DDR3 or...
User Guide
Page 30
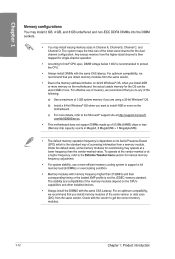
... Due to the memory address limitation on 32-bit Windows® OS, when you install memory modules of the memory modules depend on the motherboard, the actual usable memory for the dualchannel configuration. To operate at the vendor-marked or at a higher frequency, refer to the Microsoft®... you obtain memory modules from a memory module. For an optimum compatibility, we recommend that you install 4GB or more details, refer to the Extreme Tweaker menu section for manual memory frequency adjustment. • For system stability, use of memory, we recommend that you do any of the ...
... Due to the memory address limitation on 32-bit Windows® OS, when you install memory modules of the memory modules depend on the motherboard, the actual usable memory for the dualchannel configuration. To operate at the vendor-marked or at a higher frequency, refer to the Microsoft®... you obtain memory modules from a memory module. For an optimum compatibility, we recommend that you install 4GB or more details, refer to the Extreme Tweaker menu section for manual memory frequency adjustment. • For system stability, use of memory, we recommend that you do any of the ...
User Guide
Page 31
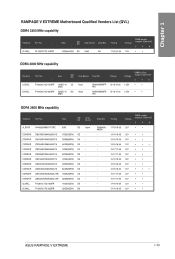
... Hynix H5AN4GBNMFR- 16-16-16-36 1.35V • TFC DDR4 2800 MHz capability Vendors Part No. H5AN4G8 NMFR - - - - - - RAMPAGE V EXTREME Motherboard Qualified Vendors List (QVL) DDR4 3300 MHz capability Vendors Part No. Timing Voltage DIMM socket support (Optional) 2 4 8 17-18-18-36 ...2V • • 17-18-18-35 1.2V • • 17-18-18-35 1.2V • • ASUS RAMPAGE V EXTREME 1-13 SS/ DS A_DATA AX4U2800W8G17-DRZ 8GB DS CORSAIR CORSAIR CORSAIR CORSAIR CORSAIR CORSAIR CORSAIR CORSAIR CORSAIR CORSAIR G.SKILL G.SKILL CMD16GX4M4A2800C16 ...
... Hynix H5AN4GBNMFR- 16-16-16-36 1.35V • TFC DDR4 2800 MHz capability Vendors Part No. H5AN4G8 NMFR - - - - - - RAMPAGE V EXTREME Motherboard Qualified Vendors List (QVL) DDR4 3300 MHz capability Vendors Part No. Timing Voltage DIMM socket support (Optional) 2 4 8 17-18-18-36 ...2V • • 17-18-18-35 1.2V • • 17-18-18-35 1.2V • • ASUS RAMPAGE V EXTREME 1-13 SS/ DS A_DATA AX4U2800W8G17-DRZ 8GB DS CORSAIR CORSAIR CORSAIR CORSAIR CORSAIR CORSAIR CORSAIR CORSAIR CORSAIR CORSAIR G.SKILL G.SKILL CMD16GX4M4A2800C16 ...

User Guide
Page 36
O O PCIE,_X8_2 PCIE,_X4 1 PCIE X16/%8_9 FtpivipRGE V EXTREME PCIE_Xl 1 HRH i PCIEJO 4 ]BeeeeeeZig= Slot No. Slot Description 1 PCIe 3.0 x16_1 slot 2 PCIe 3.0 x8_2 slot 3 PCIe 2.0 x4_1 slot 4 PCIe 3.0 x16/8_3 slot 5 PCIe 2.0 x1_1 slot 6 PCIe 3.0 x8_4 slot HEE BEER AMPERE 1-18 Chapter 1: Product introduction DO am DO 0 O O 0 PCIE-X16_1 DO 17 DO El DO E DO E D DDD00OO OOOOO00OiEEo ii 0- 1.2.5 Expansion slots RD Ensure to do so may cause you physical injury and damage motherboard components. Failure to unplug the power cord before adding or removing expansion cards.
O O PCIE,_X8_2 PCIE,_X4 1 PCIE X16/%8_9 FtpivipRGE V EXTREME PCIE_Xl 1 HRH i PCIEJO 4 ]BeeeeeeZig= Slot No. Slot Description 1 PCIe 3.0 x16_1 slot 2 PCIe 3.0 x8_2 slot 3 PCIe 2.0 x4_1 slot 4 PCIe 3.0 x16/8_3 slot 5 PCIe 2.0 x1_1 slot 6 PCIe 3.0 x8_4 slot HEE BEER AMPERE 1-18 Chapter 1: Product introduction DO am DO 0 O O 0 PCIE-X16_1 DO 17 DO El DO E DO E D DDD00OO OOOOO00OiEEo ii 0- 1.2.5 Expansion slots RD Ensure to do so may cause you physical injury and damage motherboard components. Failure to unplug the power cord before adding or removing expansion cards.

User Guide
Page 38
IRQ assignments for this motherboard PCIE_X16_1 PCIE_X8_2 PCIE_x4_1 PCIE_X16/X8_3 PCIE_X8_4 PCIE_X1_1 Intel LAN controller SATA #0 SATA #1 HD Audio EHCI #0 (USB 2.0) EHCI #1 (USB 2.0) XHCI (USB 3.0) A shared shared shared shared shared - shared - - - C shared - - shared 1-20 Chapter 1: Product introduction D E F G H - - - - - - - - - - - - - - - - - - - - - - - - - - - - - - - shared - - - - - - - - - - B shared shared shared - shared - - - - - - - - - - - - - - -
IRQ assignments for this motherboard PCIE_X16_1 PCIE_X8_2 PCIE_x4_1 PCIE_X16/X8_3 PCIE_X8_4 PCIE_X1_1 Intel LAN controller SATA #0 SATA #1 HD Audio EHCI #0 (USB 2.0) EHCI #1 (USB 2.0) XHCI (USB 3.0) A shared shared shared shared shared - shared - - - C shared - - shared 1-20 Chapter 1: Product introduction D E F G H - - - - - - - - - - - - - - - - - - - - - - - - - - - - - - - shared - - - - - - - - - - B shared shared shared - shared - - - - - - - - - - - - - - -


