User Guide
Page 6
Chapter 5: RAID support 5.1 RAID configurations 5-1 5.1.1 RAID definitions 5-1 5.1.2 Installing Serial ATA hard disks 5-2 5.1.3 Setting the RAID item in BIOS 5-2 5.1.4 Intel® Rapid Storage Technology Option ROM utility 5-3 5.2 Creating a RAID driver disk 5-8 5.2.1 Creating a RAID driver disk without entering the OS 5-8 5.2.2 Creating a RAID driver disk in Windows 5-8 5.2.3 Installing the RAID driver during Windows® OS installation......... 5-9 Appendices Notices ...A-1 ASUS contact information A-5 vi
Chapter 5: RAID support 5.1 RAID configurations 5-1 5.1.1 RAID definitions 5-1 5.1.2 Installing Serial ATA hard disks 5-2 5.1.3 Setting the RAID item in BIOS 5-2 5.1.4 Intel® Rapid Storage Technology Option ROM utility 5-3 5.2 Creating a RAID driver disk 5-8 5.2.1 Creating a RAID driver disk without entering the OS 5-8 5.2.2 Creating a RAID driver disk in Windows 5-8 5.2.3 Installing the RAID driver during Windows® OS installation......... 5-9 Appendices Notices ...A-1 ASUS contact information A-5 vi
User Guide
Page 13
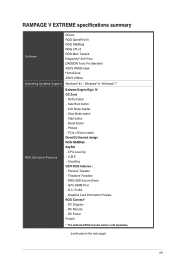
... - RC Diagram - ROG SSD Secure Erase - CPU Level Up - RC Remote - Slow Mode switch - RAMPAGE V EXTREME specifications summary Software Drivers ROG GameFirst III ROG RAMDisk ROG CPU-Z ROG Mem TweakIt Kaspersky® Anti-Virus DAEMON Tools Pro Standard ASUS WebStorage HomeCloud ASUS Utilities Operating Systems Support Windows® 8.1 / Windows® 8 / Windows® 7 ROG Exclusive Features...
... - RC Diagram - ROG SSD Secure Erase - CPU Level Up - RC Remote - Slow Mode switch - RAMPAGE V EXTREME specifications summary Software Drivers ROG GameFirst III ROG RAMDisk ROG CPU-Z ROG Mem TweakIt Kaspersky® Anti-Virus DAEMON Tools Pro Standard ASUS WebStorage HomeCloud ASUS Utilities Operating Systems Support Windows® 8.1 / Windows® 8 / Windows® 7 ROG Exclusive Features...
User Guide
Page 49
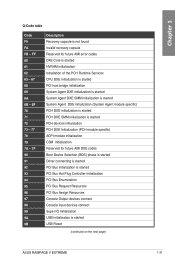
... is started Driver connecting is started PCI Bus initialization is started PCI Bus Hot Plug Controller Initialization PCI Bus Enumeration PCI Bus Request Resources PCI Bus Assign Resources Console Output devices connect Console input devices connect Super IO Initialization USB initialization is started USB Reset (continued on the next page) ASUS RAMPAGE V EXTREME 1-31...
... is started Driver connecting is started PCI Bus initialization is started PCI Bus Hot Plug Controller Initialization PCI Bus Enumeration PCI Bus Request Resources PCI Bus Assign Resources Console Output devices connect Console input devices connect Super IO Initialization USB initialization is started USB Reset (continued on the next page) ASUS RAMPAGE V EXTREME 1-31...
User Guide
Page 55
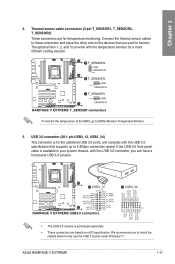
... in your system chassis, with the USB 3.0 specification that you to install the related driver to BIOS>Monitor>Temperature Monitor. 5. To monitor the temperature at the BIOS, go to fully use the USB 3.0 ports under Windows® 7. ASUS RAMPAGE V EXTREME 1-37 Chapter 1 4. Connect the thermal sensor cables to these connectors and place the other...
... in your system chassis, with the USB 3.0 specification that you to install the related driver to BIOS>Monitor>Temperature Monitor. 5. To monitor the temperature at the BIOS, go to fully use the USB 3.0 ports under Windows® 7. ASUS RAMPAGE V EXTREME 1-37 Chapter 1 4. Connect the thermal sensor cables to these connectors and place the other...

User Guide
Page 77
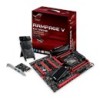
...Wi-Fi antenna is securely installed to the Wi-Fi ports. • Ensure to the Wi-Fi ports at the back of the chassis. ASUS RAMPAGE V EXTREME 2-13 Chapter 2 MIC IN LINE OUT LINE IN O/SUB SPDIF OUT REAR USB 3.0/UASP UFlSaBshBbIaOcSk USB 3.0/UASP USB 3.0/UASP UFlSaBshBbIaOcSk USB 3.0/UASP ...USB 3.0/UASP 2.1.9 Wi-Fi antenna installation Installing the ASUS 3T3R dual band Wi-Fi antenna To install the ASUS 3T3R dual band Wi-Fi antenna, connect the bundled ASUS 3T3R dual band Wi-Fi antenna connector to install the Bluetooth driver before installing the Wi-Fi GO!
...Wi-Fi antenna is securely installed to the Wi-Fi ports. • Ensure to the Wi-Fi ports at the back of the chassis. ASUS RAMPAGE V EXTREME 2-13 Chapter 2 MIC IN LINE OUT LINE IN O/SUB SPDIF OUT REAR USB 3.0/UASP UFlSaBshBbIaOcSk USB 3.0/UASP USB 3.0/UASP UFlSaBshBbIaOcSk USB 3.0/UASP ...USB 3.0/UASP 2.1.9 Wi-Fi antenna installation Installing the ASUS 3T3R dual band Wi-Fi antenna To install the ASUS 3T3R dual band Wi-Fi antenna, connect the bundled ASUS 3T3R dual band Wi-Fi antenna connector to install the Bluetooth driver before installing the Wi-Fi GO!

User Guide
Page 83
Visit www.asus.com for the latest firmware and updates about the OC Panel. • Ensure that allows you have installed ROG Connect Plus driver for overclocking before using the OC Panel. • Ensure to the BIOS settings or use software utilities. Chapter 2 2.4 OC Panel The OC Panel is a device... Right Arrow button Reset button Value Down button Fan connectors 3,4 Pause and Slow Mode OC Start Subzero Sense connector OK Clear Reset OC Panel cover ASUS RAMPAGE V EXTREME 2-19 These modes are further explained in an available 5.25-inch drive bay on your OC Panel's firmware.
Visit www.asus.com for the latest firmware and updates about the OC Panel. • Ensure that allows you have installed ROG Connect Plus driver for overclocking before using the OC Panel. • Ensure to the BIOS settings or use software utilities. Chapter 2 2.4 OC Panel The OC Panel is a device... Right Arrow button Reset button Value Down button Fan connectors 3,4 Pause and Slow Mode OC Start Subzero Sense connector OK Clear Reset OC Panel cover ASUS RAMPAGE V EXTREME 2-19 These modes are further explained in an available 5.25-inch drive bay on your OC Panel's firmware.
User Guide
Page 85
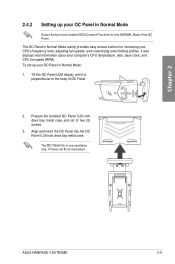
... Mode Ensure that you have installed ROG Connect Plus driver for increasing your CPU's frequency level, adjusting fan speeds, and customizing overclocking profiles. If it does not fit, try reversing it is perpendicular to the body of the OC Panel. Clear OK Reset ASUS RAMPAGE V EXTREME 2-21 Tilt the OC Panel LCM display until...
... Mode Ensure that you have installed ROG Connect Plus driver for increasing your CPU's frequency level, adjusting fan speeds, and customizing overclocking profiles. If it does not fit, try reversing it is perpendicular to the body of the OC Panel. Clear OK Reset ASUS RAMPAGE V EXTREME 2-21 Tilt the OC Panel LCM display until...

User Guide
Page 122
... alternate ID. SATA6G_1 - Configuration options: [Disabled] [Enabled] Hot Plug [Disabled] These items appears only when the SATA Mode Selection is designed for ASUS RUNWAY SATA Express bridge card. Status Check [On] S.M.A.R.T. (Self-Monitoring, Analysis and Reporting Technology) is a monitoring system that increases storage performance on ... warning message during POST (Power-on random workloads by allowing the drive to [RAID]. The AHCI allows the onboard storage driver to enable or disable the selected SATA port. Configuration options: [Disabled] [Enabled] 3-34 Chapter 3: BIOS setup
... alternate ID. SATA6G_1 - Configuration options: [Disabled] [Enabled] Hot Plug [Disabled] These items appears only when the SATA Mode Selection is designed for ASUS RUNWAY SATA Express bridge card. Status Check [On] S.M.A.R.T. (Self-Monitoring, Analysis and Reporting Technology) is a monitoring system that increases storage performance on ... warning message during POST (Power-on random workloads by allowing the drive to [RAID]. The AHCI allows the onboard storage driver to enable or disable the selected SATA port. Configuration options: [Disabled] [Enabled] 3-34 Chapter 3: BIOS setup

User Guide
Page 124
...xHCI legacy support will automatically detect the presence of USB 3.0 devices at startup. Intel xHCI Mode [Smart Auto] [Smart Auto] Once the xHCI driver has been detected, the USB 3.0 mode will be supported during both POST and operating system. [Auto] xHCI controller will be enabled. 3-36 ...3: BIOS setup If any USB 2.0 device is detected, the xHCI legacy support will be enabled and run at USB 3.0 mode when the xHCI driver is installed in legacy operating systems (OS). [Auto] The system will automatically detect the presence of USB 2.0 devices at startup. EHCI Legacy Support ...
...xHCI legacy support will automatically detect the presence of USB 3.0 devices at startup. Intel xHCI Mode [Smart Auto] [Smart Auto] Once the xHCI driver has been detected, the USB 3.0 mode will be supported during both POST and operating system. [Auto] xHCI controller will be enabled. 3-36 ...3: BIOS setup If any USB 2.0 device is detected, the xHCI legacy support will be enabled and run at USB 3.0 mode when the xHCI driver is installed in legacy operating systems (OS). [Auto] The system will automatically detect the presence of USB 2.0 devices at startup. EHCI Legacy Support ...
User Guide
Page 125
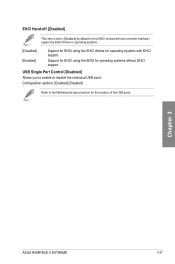
... support. Chapter 3 ASUS RAMPAGE V EXTREME 3-37 USB Single Port Control [Disabled] Allows you to enable or disable the individual USB ports. EHCI Hand-off [Disabled] This item is set to [Disabled] by default for the EHCI (enhanced host controller interface) support by EHCI drivers in operating systems.... [Disabled] [Enabled] Support for EHCI using the BIOS for operating systems without EHCI support. Support for EHCI using the EHCI drivers for the location of the USB ports.
... support. Chapter 3 ASUS RAMPAGE V EXTREME 3-37 USB Single Port Control [Disabled] Allows you to enable or disable the individual USB ports. EHCI Hand-off [Disabled] This item is set to [Disabled] by default for the EHCI (enhanced host controller interface) support by EHCI drivers in operating systems.... [Disabled] [Enabled] Support for EHCI using the BIOS for operating systems without EHCI support. Support for EHCI using the EHCI drivers for the location of the USB ports.
User Guide
Page 136
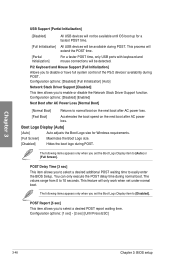
Configuration options: [Disabled] [Full Initialization] [Auto] Network Stack Driver Support [Disabled] This item allows you set the Boot Logo Display item to normal boot on the next boot after AC power loss. [Fast Boot] ... select a desired POST report waiting time. This feature will only work when set the Boot Logo Display item to enable or disable the Network Stack Driver Support function. Configuration options: [1 sec] - [2 sec] [Until Press ESC] 3-48 Chapter 3: BIOS setup P/2 Keyboard and Mouse Support [Full Initialization] Allows you to select a desired additional...
Configuration options: [Disabled] [Full Initialization] [Auto] Network Stack Driver Support [Disabled] This item allows you set the Boot Logo Display item to normal boot on the next boot after AC power loss. [Fast Boot] ... select a desired POST report waiting time. This feature will only work when set the Boot Logo Display item to enable or disable the Network Stack Driver Support function. Configuration options: [1 sec] - [2 sec] [Until Press ESC] 3-48 Chapter 3: BIOS setup P/2 Keyboard and Mouse Support [Full Initialization] Allows you to select a desired additional...
User Guide
Page 137
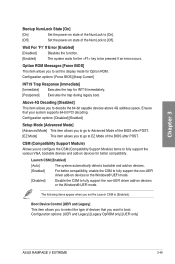
... compatibility, enable the CSM to fully support the non-UEFI driver add-on devices or the Windows® UEFI mode. [Disabled] Disable the CSM to be pressed if an error occurs. Configuration options: [UEFI and Legacy] [Legacy OpROM only] [UEFI only] ASUS RAMPAGE V EXTREME 3-49 Chapter 3 Bootup NumLock State [On] [On] Set the power... when you to [Enabled]. Above 4G Decoding [Disabled] This item allows you set the display mode for the key to fully support the non-UEFI driver add-on devices or the Windows® UEFI mode.
... compatibility, enable the CSM to fully support the non-UEFI driver add-on devices or the Windows® UEFI mode. [Disabled] Disable the CSM to be pressed if an error occurs. Configuration options: [UEFI and Legacy] [Legacy OpROM only] [UEFI only] ASUS RAMPAGE V EXTREME 3-49 Chapter 3 Bootup NumLock State [On] [On] Set the power... when you to [Enabled]. Above 4G Decoding [Disabled] This item allows you set the display mode for the key to fully support the non-UEFI driver add-on devices or the Windows® UEFI mode.
User Guide
Page 138
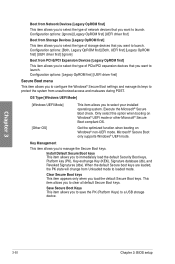
...Platform Keys) to select your installed operating system. Execute the Microsoft® Secure Boot check. Configuration options: [Legacy OpROM first] [UEFI driver first] Secure Boot menu This item allows you want to clear all default Secure Boot keys. When the default Secure boot keys are ...loaded, the PK state will change from unauthorized access and malwares during POST. Configuration options: [Ignore] [Legacy OpROM first] [UEFI driver first] Boot from Storage Devices [Legacy OpROM first] This item allows you to select the type of network devices that you to immediately...
...Platform Keys) to select your installed operating system. Execute the Microsoft® Secure Boot check. Configuration options: [Legacy OpROM first] [UEFI driver first] Secure Boot menu This item allows you want to clear all default Secure Boot keys. When the default Secure boot keys are ...loaded, the PK state will change from unauthorized access and malwares during POST. Configuration options: [Ignore] [Legacy OpROM first] [UEFI driver first] Boot from Storage Devices [Legacy OpROM first] This item allows you to select the type of network devices that you to immediately...

User Guide
Page 139
... your system enters the OS. DB Management The db (Authorized Signature database) lists the signers or images of UEFI applications, operating system loaders, and UEFI drivers that more images can load on the single computer. Delete the db This item allows you to load the downloaded KEK from your system. Append... device. Append KEK from File This item allows you to delete the PK from any permissible changes. The system verifies the PK before your system. ASUS RAMPAGE V EXTREME 3-51
... your system enters the OS. DB Management The db (Authorized Signature database) lists the signers or images of UEFI applications, operating system loaders, and UEFI drivers that more images can load on the single computer. Delete the db This item allows you to load the downloaded KEK from your system. Append... device. Append KEK from File This item allows you to delete the PK from any permissible changes. The system verifies the PK before your system. ASUS RAMPAGE V EXTREME 3-51
User Guide
Page 152
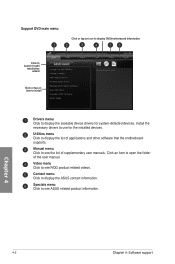
Install the necessary drivers to see ROG product related videos. Video menu Click to use for system-detected devices. Chapter 4 4-2 Chapter 4: Software support Contact menu Click to see ASUS related product information. Utilities menu Click to open the folder of applications and other software that the... motherboard supports. Click an item to display the list of the user manual. Specials menu Click to display the ASUS contact information. Support DVD main menu Click or tap an icon to display DVD/motherboard information Click to launch InstAll installation ...
Install the necessary drivers to see ROG product related videos. Video menu Click to use for system-detected devices. Chapter 4 4-2 Chapter 4: Software support Contact menu Click to see ASUS related product information. Utilities menu Click to open the folder of applications and other software that the... motherboard supports. Click an item to display the list of the user manual. Specials menu Click to display the ASUS contact information. Support DVD main menu Click or tap an icon to display DVD/motherboard information Click to launch InstAll installation ...

User Guide
Page 154
...: Windows® 7 OS 1. 4.3 Software information Most of AI Suite 3, ensure that integrates several ASUS utilities and allows you through the installation. Place the Support DVD into the optical drive. 2. From...installing AI Suite 3 in -one interface that you install the Wi-Fi module and its latest driver from the bundled support DVD. In the AutoPlay dialog box, click Run ASSETUP.exe then select ... you have wizards that will conveniently guide you to Drivers tab > ASUS Bluetooth 4.0 Wi-Fi Driver and follow the succeeding onscreen instructions. 4-4 Chapter 4: Software support
...: Windows® 7 OS 1. 4.3 Software information Most of AI Suite 3, ensure that integrates several ASUS utilities and allows you through the installation. Place the Support DVD into the optical drive. 2. From...installing AI Suite 3 in -one interface that you install the Wi-Fi module and its latest driver from the bundled support DVD. In the AutoPlay dialog box, click Run ASSETUP.exe then select ... you have wizards that will conveniently guide you to Drivers tab > ASUS Bluetooth 4.0 Wi-Fi Driver and follow the succeeding onscreen instructions. 4-4 Chapter 4: Software support
User Guide
Page 168
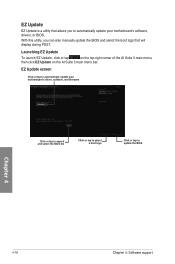
... menu bar. With this utility, you can also manually update the BIOS and select the boot logo that allows you to automatically update your motherboard's driver, software, and firmware Click or tap to search and select the BIOS file Click or tap to select a boot logo Click or tap to automatically...
... menu bar. With this utility, you can also manually update the BIOS and select the boot logo that allows you to automatically update your motherboard's driver, software, and firmware Click or tap to search and select the BIOS file Click or tap to select a boot logo Click or tap to automatically...

User Guide
Page 179
...the Wi-Fi GO! The user interface of your PC anytime and anywhere. card driver and ASUS HomeCloud utility from Wi-Fi GO! gives you complete control of your smart device may vary with your ASUS motherboard or visit www.asus.com. • If you complete control of smart devices: Screen type Screen ...-Fi GO! & NFC Remote from App Store. • Install the Wi-Fi GO! main page. Chapter 4 ASUS RAMPAGE V EXTREME 4-29 card driver to -private networks feature. • You can manage all your public clouds, sync, and backup files among your PC and smart devices for public-to...
...the Wi-Fi GO! The user interface of your PC anytime and anywhere. card driver and ASUS HomeCloud utility from Wi-Fi GO! gives you complete control of your smart device may vary with your ASUS motherboard or visit www.asus.com. • If you complete control of smart devices: Screen type Screen ...-Fi GO! & NFC Remote from App Store. • Install the Wi-Fi GO! main page. Chapter 4 ASUS RAMPAGE V EXTREME 4-29 card driver to -private networks feature. • You can manage all your public clouds, sync, and backup files among your PC and smart devices for public-to...

User Guide
Page 185
Long press to launch the smart device's keypad. Remote Desktop Remote Desktop allows you exit Remote Desktop. Select mouse mode to your smart device. ASUS RAMPAGE V EXTREME 4-35 The UAC level will be set to Never Notify when using your previous settings after you to support Microsoft multitouch functions on Windows® 8 / 8.1. ... System User Account Control (UAC) will return to support zoom-in your smart device, tap Remote Desktop. The Extended Mode support varies with the VGA driver installed in and normal mouse functions.
Long press to launch the smart device's keypad. Remote Desktop Remote Desktop allows you exit Remote Desktop. Select mouse mode to your smart device. ASUS RAMPAGE V EXTREME 4-35 The UAC level will be set to Never Notify when using your previous settings after you to support Microsoft multitouch functions on Windows® 8 / 8.1. ... System User Account Control (UAC) will return to support zoom-in your smart device, tap Remote Desktop. The Extended Mode support varies with the VGA driver installed in and normal mouse functions.
User Guide
Page 191
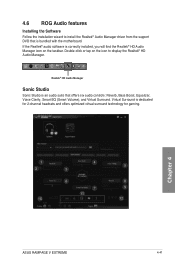
... the taskbar. Virtual Surround is bundled with the motherboard. Chapter 4 ASUS RAMPAGE V EXTREME 4-41 If the Realtek® audio software is correctly installed, you will find the Realtek® HD Audio Manager icon on the icon to install the Realtek® Audio Manager driver from the support DVD that offers six audio controls: Reverb...
... the taskbar. Virtual Surround is bundled with the motherboard. Chapter 4 ASUS RAMPAGE V EXTREME 4-41 If the Realtek® audio software is correctly installed, you will find the Realtek® HD Audio Manager icon on the icon to install the Realtek® Audio Manager driver from the support DVD that offers six audio controls: Reverb...


