
P8Z77-V User's Manual
Page 115
... Click the Contact tab to run the DVD. The contents of the support DVD to avail all motherboard features. Visit the ASUS website at any time without notice. Click each menu tab and select the items you can install to locate the file ASSETUP...Support DVD information The support DVD that comes with the motherboard package contains the drivers, software applications, and utilities that the motherboard supports. ASUS P8Z77-V PRO 4-1 Click an icon to install. Use the setup procedures presented in this chapter for updates. 4.2.1 Running the support DVD Place the support...
... Click the Contact tab to run the DVD. The contents of the support DVD to avail all motherboard features. Visit the ASUS website at any time without notice. Click each menu tab and select the items you can install to locate the file ASSETUP...Support DVD information The support DVD that comes with the motherboard package contains the drivers, software applications, and utilities that the motherboard supports. ASUS P8Z77-V PRO 4-1 Click an icon to install. Use the setup procedures presented in this chapter for updates. 4.2.1 Running the support DVD Place the support...
P8Z77-V User's Manual
Page 117
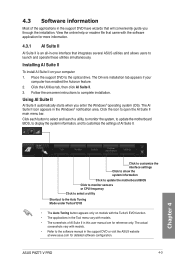
...vary with models. • The screeshots of AI Suite II. The AI Suite II icon appears in the support DVD or visit the ASUS website at www.asus.com for reference only. Chapter 4 Click to customize the interface settings Click to show the system information Click to update the motherboard BIOS...button appears only on your computer has enabled the Autorun feature. 2. Follow the onscreen instructions to open the AI Suite II main menu bar. ASUS P8Z77-V PRO 4-3 The actual screenshots vary with models. • Refer to the software manual in the Windows® notification area.
...vary with models. • The screeshots of AI Suite II. The AI Suite II icon appears in the support DVD or visit the ASUS website at www.asus.com for reference only. Chapter 4 Click to customize the interface settings Click to show the system information Click to update the motherboard BIOS...button appears only on your computer has enabled the Autorun feature. 2. Follow the onscreen instructions to open the AI Suite II main menu bar. ASUS P8Z77-V PRO 4-3 The actual screenshots vary with models. • Refer to the software manual in the Windows® notification area.
P8Z77-V User's Manual
Page 119
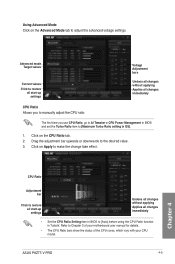
Refer to the desired value. 3. ASUS P8Z77-V PRO 4-5 Chapter 4 Drag the adjustment bar upwards or downwards to Chapter 3 of your motherboard user manual for details. • The CPU Ratio bars show the status ...
Refer to the desired value. 3. ASUS P8Z77-V PRO 4-5 Chapter 4 Drag the adjustment bar upwards or downwards to Chapter 3 of your motherboard user manual for details. • The CPU Ratio bars show the status ...
P8Z77-V User's Manual
Page 121
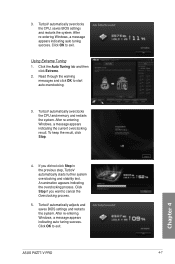
... restarts the system. Chapter 4 4. Click Stop if you did not click Stop in the previous step, TurboV automatically starts further system overclocking and stability test. ASUS P8Z77-V PRO 4-7 TurboV automatically adjusts and saves BIOS settings and restarts the system. If you want to start auto-overclocking. 3. After re-entering Windows, a message appears indicating...
... restarts the system. Chapter 4 4. Click Stop if you did not click Stop in the previous step, TurboV automatically starts further system overclocking and stability test. ASUS P8Z77-V PRO 4-7 TurboV automatically adjusts and saves BIOS settings and restarts the system. If you want to start auto-overclocking. 3. After re-entering Windows, a message appears indicating...
P8Z77-V User's Manual
Page 123
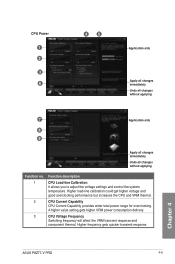
... you to adjust the voltage settings and control the system temperature. CPU Current Capability CPU Current Capability provides wider total power range for overclocking. Chapter 4 ASUS P8Z77-V PRO 4-9
... you to adjust the voltage settings and control the system temperature. CPU Current Capability CPU Current Capability provides wider total power range for overclocking. Chapter 4 ASUS P8Z77-V PRO 4-9
P8Z77-V User's Manual
Page 125
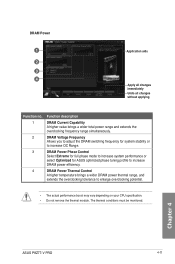
...power thermal range, and extends the overclocking tolerance to increase DRAM power efficiency. DRAM Voltage Frequency Allows you to adjust the DRAM switching frequency for ASUS optimized phase tuning profile to enlarge overclocking potential. • The actual performance boost may vary depending on your CPU specification. • Do ... Function no. 1 2 3 4 Function description DRAM Current Capability A higher value brings a wider total power range and extends the overclocking frequency range simultaneously. Chapter 4 ASUS P8Z77-V PRO 4-11 The thermal conditions must be monitored.
...power thermal range, and extends the overclocking tolerance to increase DRAM power efficiency. DRAM Voltage Frequency Allows you to adjust the DRAM switching frequency for ASUS optimized phase tuning profile to enlarge overclocking potential. • The actual performance boost may vary depending on your CPU specification. • Do ... Function no. 1 2 3 4 Function description DRAM Current Capability A higher value brings a wider total power range and extends the overclocking frequency range simultaneously. Chapter 4 ASUS P8Z77-V PRO 4-11 The thermal conditions must be monitored.
P8Z77-V User's Manual
Page 127
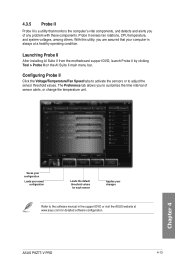
...temperature unit. Chapter 4 Saves your configuration Loads your changes Refer to the software manual in the support DVD or visit the ASUS website at a healthy operating condition. ASUS P8Z77-V PRO 4-13 Probe II senses fan rotations, CPU temperature, and system voltages, among others. Launching Probe II After installing AI ... you to adjust the sensor threshold values. 4.3.5 Probe II Probe II is a utility that your computer is always at www.asus.com for each sensor Applies your saved configuration Loads the default threshold values for detailed software configuration.
...temperature unit. Chapter 4 Saves your configuration Loads your changes Refer to the software manual in the support DVD or visit the ASUS website at a healthy operating condition. ASUS P8Z77-V PRO 4-13 Probe II senses fan rotations, CPU temperature, and system voltages, among others. Launching Probe II After installing AI ... you to adjust the sensor threshold values. 4.3.5 Probe II Probe II is a utility that your computer is always at www.asus.com for each sensor Applies your saved configuration Loads the default threshold values for detailed software configuration.
P8Z77-V User's Manual
Page 129
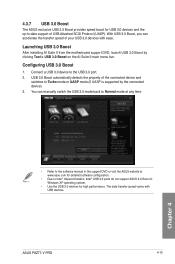
... 3. You can accelerate the transfer speed of your USB 3.0 devices with USB devices. Connect a USB 3.0 device to Normal mode at www.asus.com for detailed software configuration. • Due to -date support of the connected device and switches to Turbo mode or UASP mode (if ...; USB 3.0 ports do not support ASUS 3.0 Boost in the support DVD or visit the ASUS website at any time. With USB 3.0 Boost, you can manually switch the USB 3.0 mode back to the USB 3.0 port. 2. USB 3.0 Boost automatically detects the property of USB Attached SCSI Protocol (UASP). ASUS P8Z77-V PRO 4-15
... 3. You can accelerate the transfer speed of your USB 3.0 devices with USB devices. Connect a USB 3.0 device to Normal mode at www.asus.com for detailed software configuration. • Due to -date support of the connected device and switches to Turbo mode or UASP mode (if ...; USB 3.0 ports do not support ASUS 3.0 Boost in the support DVD or visit the ASUS website at any time. With USB 3.0 Boost, you can manually switch the USB 3.0 mode back to the USB 3.0 port. 2. USB 3.0 Boost automatically detects the property of USB Attached SCSI Protocol (UASP). ASUS P8Z77-V PRO 4-15
P8Z77-V User's Manual
Page 131
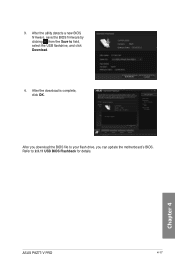
After the utility detects a new BIOS firmware, save the BIOS firmware by clicking from the Save to your flash drive, you can update the motherboard's BIOS. After you download the BIOS file to field, select the USB flashdrive, and click Download. 4. After the download is complete, click OK. Chapter 4 ASUS P8Z77-V PRO 4-17 Refer to 2.3.11 USB BIOS Flashback for details. 3.
After the utility detects a new BIOS firmware, save the BIOS firmware by clicking from the Save to your flash drive, you can update the motherboard's BIOS. After you download the BIOS file to field, select the USB flashdrive, and click Download. 4. After the download is complete, click OK. Chapter 4 ASUS P8Z77-V PRO 4-17 Refer to 2.3.11 USB BIOS Flashback for details. 3.

P8Z77-V User's Manual
Page 133
... Update> MyLogo on the AI Suite II main menu bar. Under Current BIOS, click Browse and choose the desired image for your boot logo. Chapter 4 ASUS P8Z77-V PRO 4-19 Then click on screen during the Power‑On‑Self-Tests (POST). Then click Next and follow the given instructions. The boot logo... the image that appears on Next. Change the BIOS boot logo of my motherboard 1. Using MyLogo Select the way you customize the boot logo. Launching ASUS Update After installing AI Suite II from the very beginning!
... Update> MyLogo on the AI Suite II main menu bar. Under Current BIOS, click Browse and choose the desired image for your boot logo. Chapter 4 ASUS P8Z77-V PRO 4-19 Then click on screen during the Power‑On‑Self-Tests (POST). Then click Next and follow the given instructions. The boot logo... the image that appears on Next. Change the BIOS boot logo of my motherboard 1. Using MyLogo Select the way you customize the boot logo. Launching ASUS Update After installing AI Suite II from the very beginning!
P8Z77-V User's Manual
Page 135
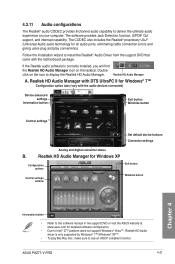
...button Minimize button Control settings Set default device buttons Connector settings Analog and digital connector status B. Realtek HD Audio Manager A. ASUS P8Z77-V PRO 4-21 Follow the installation wizard to display the Realtek HD Audio Manager. Realtek HD Audio Manager for Windows XP Configuration options...button Minimize button Chapter 4 Information button • Refer to the software manual in the support DVD or visit the ASUS website at www.asus.com for detailed software configuration. • Due to Intel® Z77 platform does not support Windows® Vista™...
...button Minimize button Control settings Set default device buttons Connector settings Analog and digital connector status B. Realtek HD Audio Manager A. ASUS P8Z77-V PRO 4-21 Follow the installation wizard to display the Realtek HD Audio Manager. Realtek HD Audio Manager for Windows XP Configuration options...button Minimize button Chapter 4 Information button • Refer to the software manual in the support DVD or visit the ASUS website at www.asus.com for detailed software configuration. • Due to Intel® Z77 platform does not support Windows® Vista™...
P8Z77-V User's Manual
Page 137
... Type/Status(Vol ID) Non-RAID Disk Non-RAID Disk Non-RAID Disk Non-RAID Disk Chapter 4 [↑↓]-Select [ESC]-Exit [ENTER]-Select Menu ASUS P8Z77-V PRO 4-23 All Rights Reserved. [ MAIN MENU ] 1.
... Type/Status(Vol ID) Non-RAID Disk Non-RAID Disk Non-RAID Disk Non-RAID Disk Chapter 4 [↑↓]-Select [ESC]-Exit [ENTER]-Select Menu ASUS P8Z77-V PRO 4-23 All Rights Reserved. [ MAIN MENU ] 1.
P8Z77-V User's Manual
Page 139
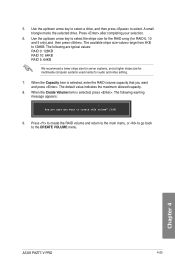
... this volume? (Y/N): 9. The following warning message appears: WARNING: ALL DATA ON SELECTED DISKS WILL BE LOST. The default value indicates the maximum allowed capacity. 8. Chapter 4 ASUS P8Z77-V PRO 4-25 The available stripe size values range from 4KB to the CREATE VOLUME menu. Use the up /down arrow key to select a drive, and then...
... this volume? (Y/N): 9. The following warning message appears: WARNING: ALL DATA ON SELECTED DISKS WILL BE LOST. The default value indicates the maximum allowed capacity. 8. Chapter 4 ASUS P8Z77-V PRO 4-25 The available stripe size values range from 4KB to the CREATE VOLUME menu. Use the up /down arrow key to select a drive, and then...
P8Z77-V User's Manual
Page 141
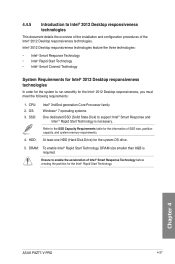
...® 2012 Desktop responsiveness technologies In order for the system to support Intel® Smart Response and Intel ® Rapid Start Technology is required. Chapter 4 ASUS P8Z77-V PRO 4-27 DRAM: To enable Intel® Rapid Start Technology, DRAM size smaller than 8GB is necessary.
...® 2012 Desktop responsiveness technologies In order for the system to support Intel® Smart Response and Intel ® Rapid Start Technology is required. Chapter 4 ASUS P8Z77-V PRO 4-27 DRAM: To enable Intel® Rapid Start Technology, DRAM size smaller than 8GB is necessary.
P8Z77-V User's Manual
Page 143
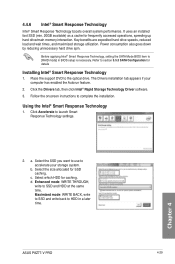
.... Click the Drivers tab, then click Intel® Rapid Storage Technology Driver software. 3. Select which HDD for details Installing Intel® Smart Response Technology 1. Chapter 4 ASUS P8Z77-V PRO 4-29 Key benefits are expedited hard drive speeds, reduced load and wait times, and maximized storage utilization. Before applying Intel® Smart Response Technology, setting...
.... Click the Drivers tab, then click Intel® Rapid Storage Technology Driver software. 3. Select which HDD for details Installing Intel® Smart Response Technology 1. Chapter 4 ASUS P8Z77-V PRO 4-29 Key benefits are expedited hard drive speeds, reduced load and wait times, and maximized storage utilization. Before applying Intel® Smart Response Technology, setting...
P8Z77-V User's Manual
Page 145
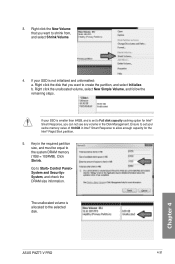
... and Security> System, and check the DRAM size information. b. Click Shrink. Right click the unallocated volume, select New Simple Volume, and follow the remaining steps. ASUS P8Z77-V PRO 4-31 Chapter 4 Right click the disk that you want to the system DRAM memory (1GB = 1024MB). 3. Go to the selected disk. If your cache memory...
... and Security> System, and check the DRAM size information. b. Click Shrink. Right click the unallocated volume, select New Simple Volume, and follow the remaining steps. ASUS P8Z77-V PRO 4-31 Chapter 4 Right click the disk that you want to the system DRAM memory (1GB = 1024MB). 3. Go to the selected disk. If your cache memory...
P8Z77-V User's Manual
Page 147
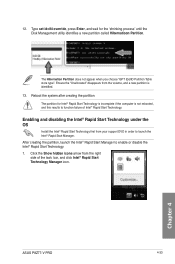
... Intel® Rapid Start Technology. After creating the partition, launch the Intel® Rapid Start Manager to launch the Intel® Rapid Start Manager. Chapter 4 ASUS P8Z77-V PRO 4-33 Enabling and disabling the Intel® Rapid Start Technology under the OS Install the Intel® Rapid Start Technology first from the volume, and...
... Intel® Rapid Start Technology. After creating the partition, launch the Intel® Rapid Start Manager to launch the Intel® Rapid Start Manager. Chapter 4 ASUS P8Z77-V PRO 4-33 Enabling and disabling the Intel® Rapid Start Technology under the OS Install the Intel® Rapid Start Technology first from the volume, and...
P8Z77-V User's Manual
Page 149
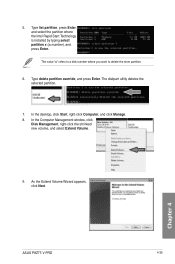
... appears, click Next. The value "x" refers to a disk number where you want to delete the store partition. 6. The diskpart utility deletes the selected partition. 7. Chapter 4 ASUS P8Z77-V PRO 4-35
... appears, click Next. The value "x" refers to a disk number where you want to delete the store partition. 6. The diskpart utility deletes the selected partition. 7. Chapter 4 ASUS P8Z77-V PRO 4-35
P8Z77-V User's Manual
Page 151
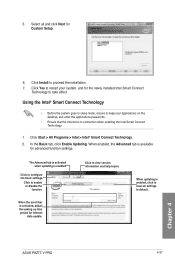
... configure the basic settings Click to take effect. The Advanced tab is activated when updating is in connection when enabling the Intel Smart Connect Technology. 1. ASUS P8Z77-V PRO 4-37 Chapter 4 Using the Intel® Smart Connect Technology • Before the system goes to sleep mode, ensure to proceed the installation. 7. 5. Select all settings...
... configure the basic settings Click to take effect. The Advanced tab is activated when updating is in connection when enabling the Intel Smart Connect Technology. 1. ASUS P8Z77-V PRO 4-37 Chapter 4 Using the Intel® Smart Connect Technology • Before the system goes to sleep mode, ensure to proceed the installation. 7. 5. Select all settings...
P8Z77-V User's Manual
Page 153
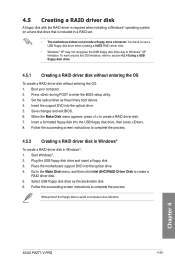
...® operating system on a hard disk drive that is included in Windows®: 1. Boot your computer. 2. Insert a formatted floppy disk into the optical drive. 5. Chapter 4 ASUS P8Z77-V PRO 4-39 You have to use a USB floppy disk drive when creating a SATA RAID driver disk. • Windows® XP may not recognize the USB floppy...
...® operating system on a hard disk drive that is included in Windows®: 1. Boot your computer. 2. Insert a formatted floppy disk into the optical drive. 5. Chapter 4 ASUS P8Z77-V PRO 4-39 You have to use a USB floppy disk drive when creating a SATA RAID driver disk. • Windows® XP may not recognize the USB floppy...


