
User Manual
Page 6
... • When adding or removing devices to or from the system, ensure that the power cables for the devices are unplugged before the signal cables are using, contact your local power company. • If the power supply is broken, do not try to the correct voltage in any damage, contact your... power supply is set to fix it , carefully read all the manuals that came with the product, ...
... • When adding or removing devices to or from the system, ensure that the power cables for the devices are unplugged before the signal cables are using, contact your local power company. • If the power supply is broken, do not try to the correct voltage in any damage, contact your... power supply is set to fix it , carefully read all the manuals that came with the product, ...

User Manual
Page 20
... a grounded wrist strap or touch a safely grounded object or a metal object, such as the power supply case, to avoid damaging them due to static electricity. • Hold components by the edges to the motherboard, peripherals, or components. Chapter 2 ASUS P8Z77-V LX 2-1 Chapter 2: Chapter 2 Hardware information 2.1 Before you proceed Take note of the following precautions before...
... a grounded wrist strap or touch a safely grounded object or a metal object, such as the power supply case, to avoid damaging them due to static electricity. • Hold components by the edges to the motherboard, peripherals, or components. Chapter 2 ASUS P8Z77-V LX 2-1 Chapter 2: Chapter 2 Hardware information 2.1 Before you proceed Take note of the following precautions before...
User Manual
Page 42
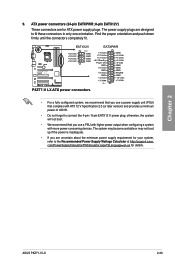
...; Find the proper orientation and push down firmly until the connectors completely fit. Chapter 2 ASUS P8Z77-V LX 2-23 The power supply plugs are uncertain about the minimum power supply requirement for your system, refer to the Recommended Power Supply Wattage Calculator at http://support.asus. P8Z77-V LX EATX12V +12V DC +12V DC +12V DC +12V DC PIN 1 GND GND GND GND EATXPWR...
...; Find the proper orientation and push down firmly until the connectors completely fit. Chapter 2 ASUS P8Z77-V LX 2-23 The power supply plugs are uncertain about the minimum power supply requirement for your system, refer to the Recommended Power Supply Wattage Calculator at http://support.asus. P8Z77-V LX EATX12V +12V DC +12V DC +12V DC +12V DC PIN 1 GND GND GND GND EATXPWR...
User Manual
Page 43
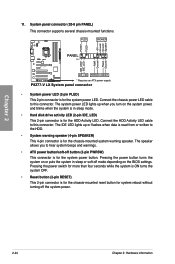
... BIOS settings. PLED SPEAKER PLED+ PLED+5V Ground Ground Speaker P8Z77-V LX PANEL PIN 1 IDE_LED+ IDE_LED- PWR Ground Reset Ground IDE_LED PWRSW RESET * Requires an ATX power supply P8Z77-V LX System panel connector • System power LED (2-pin PLED) This 2-pin connector is in sleep or... soft-off the system power. 2-24 Chapter 2: Hardware information Connect the HDD Activity LED cable to...
... BIOS settings. PLED SPEAKER PLED+ PLED+5V Ground Ground Speaker P8Z77-V LX PANEL PIN 1 IDE_LED+ IDE_LED- PWR Ground Reset Ground IDE_LED PWRSW RESET * Requires an ATX power supply P8Z77-V LX System panel connector • System power LED (2-pin PLED) This 2-pin connector is in sleep or... soft-off the system power. 2-24 Chapter 2: Hardware information Connect the HDD Activity LED cable to...
User Manual
Page 44
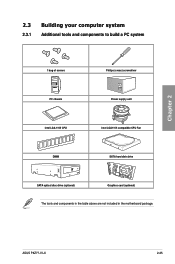
ASUS P8Z77-V LX 2-25 Chapter 2 2.3 Building your computer system 2.3.1 Additional tools and components to build a PC system 1 bag of screws Philips (cross) screwdriver PC chassis Power supply unit Intel LGA 1155 CPU Intel LGA1155 compatible CPU Fan DIMM SATA hard disk drive SATA optical disc drive (optional) Graphics card (optional) The tools and components in the table above are not included in the motherboard package.
ASUS P8Z77-V LX 2-25 Chapter 2 2.3 Building your computer system 2.3.1 Additional tools and components to build a PC system 1 bag of screws Philips (cross) screwdriver PC chassis Power supply unit Intel LGA 1155 CPU Intel LGA1155 compatible CPU Fan DIMM SATA hard disk drive SATA optical disc drive (optional) Graphics card (optional) The tools and components in the table above are not included in the motherboard package.
User Manual
Page 60
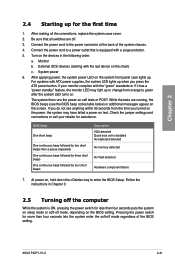
... below) or additional messages appear on the BIOS setting. Follow the instructions in the following order: a. ASUS P8Z77-V LX 2-41 Check the jumper settings and connections or call your monitor complies with ATX power supplies, the system LED lights up . Connect the power cord to a power outlet that all the connections, replace the system case cover. 2. System...
... below) or additional messages appear on the BIOS setting. Follow the instructions in the following order: a. ASUS P8Z77-V LX 2-41 Check the jumper settings and connections or call your monitor complies with ATX power supplies, the system LED lights up . Connect the power cord to a power outlet that all the connections, replace the system case cover. 2. System...

User Manual
Page 83
...Alarm Date (Days) This item appears only when you set the previous item to [Enabled] and allows you set to turn on the +5VSB lead. Power On By Ring [Disabled] [Disabled] Disables Ring to generate a wake event. [Enabled] Enables Ring to select RTC alarm time (days). Chapter 3...When you to generate a wake event. This feature requires an ATX power supply that provides at S5 to get the system ready for ErP requirement. 3.5.7 APM EFI BIOS Utility - Power On By PS/2 Keyboard [Disabled] [Disabled] Disables the Power On by a PS/2 keyboard. [Space Bar] Sets the Space Bar...
...Alarm Date (Days) This item appears only when you set the previous item to [Enabled] and allows you set to turn on the +5VSB lead. Power On By Ring [Disabled] [Disabled] Disables Ring to generate a wake event. [Enabled] Enables Ring to select RTC alarm time (days). Chapter 3...When you to generate a wake event. This feature requires an ATX power supply that provides at S5 to get the system ready for ErP requirement. 3.5.7 APM EFI BIOS Utility - Power On By PS/2 Keyboard [Disabled] [Disabled] Disables the Power On by a PS/2 keyboard. [Space Bar] Sets the Space Bar...
User Manual
Page 134
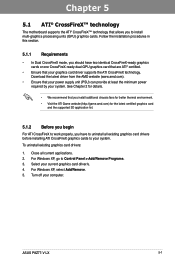
.... 5. Download the latest driver from the AMD website (www.amd.com). • Ensure that your power supply unit (PSU) can provide at least the minimum power required by your system. See Chapter 2 for details. • We recommend that you install additional chassis... graphics card driver supports the ATI CrossFireX technology. For Windows XP, go to install multi-graphics processing units (GPU) graphics cards. ASUS P8Z77-V LX 5-1 Chapter 5: Chapter 5 Multiple GPU technology support 5.1 ATI® CrossFireX™ technology The motherboard supports the ATI® CrossFireX&#...
.... 5. Download the latest driver from the AMD website (www.amd.com). • Ensure that your power supply unit (PSU) can provide at least the minimum power required by your system. See Chapter 2 for details. • We recommend that you install additional chassis... graphics card driver supports the ATI CrossFireX technology. For Windows XP, go to install multi-graphics processing units (GPU) graphics cards. ASUS P8Z77-V LX 5-1 Chapter 5: Chapter 5 Multiple GPU technology support 5.1 ATI® CrossFireX™ technology The motherboard supports the ATI® CrossFireX&#...

User Manual
Page 135
... separately. 6. goldfingers 5-2 Chapter 5: Multiple GPU technology support CrossFireX bridge (bundled with models, but the installation steps remain the same. 1. Connect two independent auxiliary power sources from the power supply to the graphics card. Ensure that the connector is firmly in this user manual for the locations of the PCIEX16 slots recommended for reference...
... separately. 6. goldfingers 5-2 Chapter 5: Multiple GPU technology support CrossFireX bridge (bundled with models, but the installation steps remain the same. 1. Connect two independent auxiliary power sources from the power supply to the graphics card. Ensure that the connector is firmly in this user manual for the locations of the PCIEX16 slots recommended for reference...


