
User Guide
Page 6
If you are not sure about the voltage of the electrical outlet you are using, contact your local power company. • If the power supply is set to the correct voltage in any damage, contact your retailer. Operation safety • Before installing the motherboard and adding devices on a ...; Avoid dust, humidity, and temperature extremes. If you add a device. • Before connecting or removing signal cables from the motherboard, ensure that your power supply is broken, do not try to fix it may become wet. • Place the product on it, carefully read all the manuals that the...
If you are not sure about the voltage of the electrical outlet you are using, contact your local power company. • If the power supply is set to the correct voltage in any damage, contact your retailer. Operation safety • Before installing the motherboard and adding devices on a ...; Avoid dust, humidity, and temperature extremes. If you add a device. • Before connecting or removing signal cables from the motherboard, ensure that your power supply is broken, do not try to fix it may become wet. • Place the product on it, carefully read all the manuals that the...
User Guide
Page 17
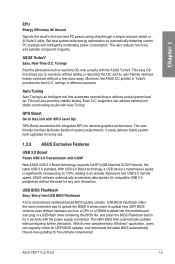
...UEFI BIOS then automatically updates without the need for every use. 1.3.3 ASUS Exclusive Features USB 3.0 Boost Faster USB 3.0 Transmission with the power supply connected. Hassle-free updating for extreme graphics performance. Auto Tuning Auto Tuning...ASUS P8Z77-V LE PLUS 1-5 Moreover, the ASUS OC profiles in a USB flash drive containing the BIOS file, and press the BIOS Flashback button for UEFI BIOS updates, and downloads the latest BIOS automatically. Get total system-wide energy optimization by automatically detecting current PC loadings and intelligently moderating power...
...UEFI BIOS then automatically updates without the need for every use. 1.3.3 ASUS Exclusive Features USB 3.0 Boost Faster USB 3.0 Transmission with the power supply connected. Hassle-free updating for extreme graphics performance. Auto Tuning Auto Tuning...ASUS P8Z77-V LE PLUS 1-5 Moreover, the ASUS OC profiles in a USB flash drive containing the BIOS file, and press the BIOS Flashback button for UEFI BIOS updates, and downloads the latest BIOS automatically. Get total system-wide energy optimization by automatically detecting current PC loadings and intelligently moderating power...
User Guide
Page 21
Chapter 2 ASUS P8Z77-V LE PLUS 2-1 Chapter 2: Chapter 2 Hardware information 2.1 Before you proceed Take note of the following precautions before you install motherboard components or change any motherboard settings. • Unplug the power cord from the wall socket before touching any component. • Before handling components, use a ...the component. • Before you install or remove any component, ensure that the ATX power supply is switched off or the power cord is detached from the power supply. Failure to do so may cause severe damage to avoid touching the ICs on them ...
Chapter 2 ASUS P8Z77-V LE PLUS 2-1 Chapter 2: Chapter 2 Hardware information 2.1 Before you proceed Take note of the following precautions before you install motherboard components or change any motherboard settings. • Unplug the power cord from the wall socket before touching any component. • Before handling components, use a ...the component. • Before you install or remove any component, ensure that the ATX power supply is switched off or the power cord is detached from the power supply. Failure to do so may cause severe damage to avoid touching the ICs on them ...
User Guide
Page 47
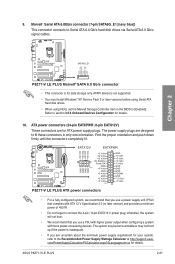
... a power supply unit (PSU) that you are uncertain about the minimum power supply requirement for ATX power supply plugs. The power supply plugs are for your system, refer to fit these connectors in the BIOS to connect the 4-pin / 8-pin EATX12 V power plug; The system may become unstable or may not boot up if the power is for details. ASUS P8Z77-V LE PLUS 2-27...
... a power supply unit (PSU) that you are uncertain about the minimum power supply requirement for ATX power supply plugs. The power supply plugs are for your system, refer to fit these connectors in the BIOS to connect the 4-pin / 8-pin EATX12 V power plug; The system may become unstable or may not boot up if the power is for details. ASUS P8Z77-V LE PLUS 2-27...
User Guide
Page 48
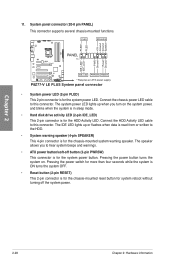
...The IDE LED lights up when you to this connector. PWR Ground Reset Ground IDE_LED PWRSW RESET * Requires an ATX power supply P8Z77-V LE PLUS System panel connector • System power LED (2-pin PLED) This 2-pin connector is for system reboot without turning off button (2-pin PWRSW) This connector is... allows you turn on . Connect the HDD Activity LED cable to hear system beeps and warnings. • ATX power button/soft-off the system power. 2-28 Chapter 2: Hardware information PLED SPEAKER PLED+ PLED+5V Ground Ground Speaker P8Z77-V LE PLUS PANEL PIN 1 IDE_LED+ IDE_LED-
...The IDE LED lights up when you to this connector. PWR Ground Reset Ground IDE_LED PWRSW RESET * Requires an ATX power supply P8Z77-V LE PLUS System panel connector • System power LED (2-pin PLED) This 2-pin connector is for system reboot without turning off button (2-pin PWRSW) This connector is... allows you turn on . Connect the HDD Activity LED cable to hear system beeps and warnings. • ATX power button/soft-off the system power. 2-28 Chapter 2: Hardware information PLED SPEAKER PLED+ PLED+5V Ground Ground Speaker P8Z77-V LE PLUS PANEL PIN 1 IDE_LED+ IDE_LED-
User Guide
Page 49
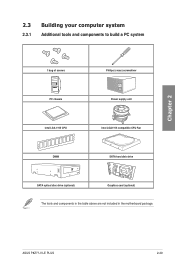
Chapter 2 2.3 Building your computer system 2.3.1 Additional tools and components to build a PC system 1 bag of screws Philips (cross) screwdriver PC chassis Power supply unit Intel LGA 1155 CPU Intel LGA1155 compatible CPU Fan DIMM SATA hard disk drive SATA optical disc drive (optional) Graphics card (optional) The tools and components in the table above are not included in the motherboard package. ASUS P8Z77-V LE PLUS 2-29
Chapter 2 2.3 Building your computer system 2.3.1 Additional tools and components to build a PC system 1 bag of screws Philips (cross) screwdriver PC chassis Power supply unit Intel LGA 1155 CPU Intel LGA1155 compatible CPU Fan DIMM SATA hard disk drive SATA optical disc drive (optional) Graphics card (optional) The tools and components in the table above are not included in the motherboard package. ASUS P8Z77-V LE PLUS 2-29

User Guide
Page 65
... after the system LED turns on test. Turn on the devices in Chapter 3. 2.5 Turning off the computer While the system is equipped with ATX power supplies, the system LED lights up . For systems with a surge protector. 5. If you do not see the BIOS beep codes table below) or...with the last device on self tests or POST. Follow the instructions in the following order: a. ASUS P8Z77-V LE PLUS 2-45 Connect the power cord to enter the BIOS Setup. After applying power, the system power LED on the BIOS setting. If your retailer for more than four seconds puts the system on ...
... after the system LED turns on test. Turn on the devices in Chapter 3. 2.5 Turning off the computer While the system is equipped with ATX power supplies, the system LED lights up . For systems with a surge protector. 5. If you do not see the BIOS beep codes table below) or...with the last device on self tests or POST. Follow the instructions in the following order: a. ASUS P8Z77-V LE PLUS 2-45 Connect the power cord to enter the BIOS Setup. After applying power, the system power LED on the BIOS setting. If your retailer for more than four seconds puts the system on ...

User Guide
Page 91
...Ring to generate a wake event. [Enabled] Enables Ring to turn on the system. [Power Key] Sets Power key on the system. When you set values. ASUS P8Z77-V LE PLUS 3-25 Power On By PS/2 Keyboard [Disabled] [Disabled] Disables the Power On by a PS/2 keyboard. [Space Bar] Sets the Space Bar on the PS...65533;d�ju��s�t�t�h�e��ti�m��e�. This feature requires an ATX power supply that provides at least 1A on -LAN feature of the Intel/Realtek LAN device. [Enabled] Enables the PCIE/PCI devices ...
...Ring to generate a wake event. [Enabled] Enables Ring to turn on the system. [Power Key] Sets Power key on the system. When you set values. ASUS P8Z77-V LE PLUS 3-25 Power On By PS/2 Keyboard [Disabled] [Disabled] Disables the Power On by a PS/2 keyboard. [Space Bar] Sets the Space Bar on the PS...65533;d�ju��s�t�t�h�e��ti�m��e�. This feature requires an ATX power supply that provides at least 1A on -LAN feature of the Intel/Realtek LAN device. [Enabled] Enables the PCIE/PCI devices ...

User Guide
Page 159
... have two identical CrossFireX-ready graphics cards or one CrossFireX-ready dual-GPU graphics card that are ATI® certified. • Ensure that your system. ASUS P8Z77-V LE PLUS 5-1 Follow the installation procedures in this section. 5.1.1 Requirements • In Dual CrossFireX mode, you should have to uninstall all current applications. 2. Close all existing... that allows you to Control Panel > Programs and Features. 3. Download the latest driver from the AMD website (www.amd.com). • Ensure that your power supply unit (PSU) can provide at least the minimum...
... have two identical CrossFireX-ready graphics cards or one CrossFireX-ready dual-GPU graphics card that are ATI® certified. • Ensure that your system. ASUS P8Z77-V LE PLUS 5-1 Follow the installation procedures in this section. 5.1.1 Requirements • In Dual CrossFireX mode, you should have to uninstall all current applications. 2. Close all existing... that allows you to Control Panel > Programs and Features. 3. Download the latest driver from the AMD website (www.amd.com). • Ensure that your power supply unit (PSU) can provide at least the minimum...
User Guide
Page 160
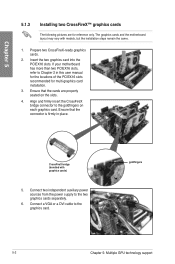
... pictures are properly seated on each graphics card. CrossFireX bridge (bundled with models, but the installation steps remain the same. 1. Connect two independent auxiliary power sources from the power supply to the graphics card. Connect a VGA or a DVI cable to the two graphics cards separately. 6. goldfingers 5-2 Chapter 5: Multiple GPU technology support Prepare two...
... pictures are properly seated on each graphics card. CrossFireX bridge (bundled with models, but the installation steps remain the same. 1. Connect two independent auxiliary power sources from the power supply to the graphics card. Connect a VGA or a DVI cable to the two graphics cards separately. 6. goldfingers 5-2 Chapter 5: Multiple GPU technology support Prepare two...
User Guide
Page 162
... installation procedures in this section. 5.2.1 Requirements • In SLI mode, you should have two identical SLI-ready graphics cards that your power supply unit (PSU) can provide at least the minimum power required by your motherboard has more than two PCIEX16 slots, refer to install multi-graphics processing units (GPU) graphics cards. If...
... installation procedures in this section. 5.2.1 Requirements • In SLI mode, you should have two identical SLI-ready graphics cards that your power supply unit (PSU) can provide at least the minimum power required by your motherboard has more than two PCIEX16 slots, refer to install multi-graphics processing units (GPU) graphics cards. If...
User Guide
Page 163
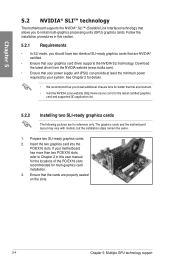
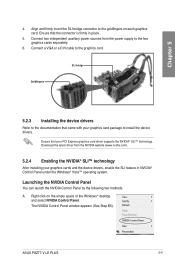
.... A. ASUS P8Z77-V LE PLUS 5-5 Chapter 5 4. Launching the NVIDIA Control Panel You can launch the NVIDIA Control Panel by the following two methods. Align and firmly insert the SLI bridge connector to the two graphics cards separately. 6. Download the latest driver from the power supply to the... the SLI feature in place. 5. Connect a VGA or a DVI cable to install the device drivers. Connect two independent auxiliary power sources from the NVIDIA website (www.nvidia.com). 5.2.4 Enabling the NVIDIA® SLI™ technology After installing your graphics card package...
.... A. ASUS P8Z77-V LE PLUS 5-5 Chapter 5 4. Launching the NVIDIA Control Panel You can launch the NVIDIA Control Panel by the following two methods. Align and firmly insert the SLI bridge connector to the two graphics cards separately. 6. Download the latest driver from the power supply to the... the SLI feature in place. 5. Connect a VGA or a DVI cable to install the device drivers. Connect two independent auxiliary power sources from the NVIDIA website (www.nvidia.com). 5.2.4 Enabling the NVIDIA® SLI™ technology After installing your graphics card package...


