
User Guide
Page 4
... Information 3-33 3.9 Exit menu...3-34 3.10 Updating BIOS 3-35 3.10.1 ASUS Update utility 3-35 3.10.2 ASUS EZ Flash 2 utility 3-38 3.10.3 ASUS CrashFree BIOS 3 utility 3-39 3.10.4 ASUS BIOS Updater 3-40 Chapter 4: Software support 4.1 Installing an operating system 4-1 4.2 Support DVD information 4-1 4.2.1 Running the support DVD 4-1 ...Configuration 3-21 3.5.5 USB Configuration 3-22 3.5.6 Onboard Devices Configuration 3-23 3.5.7 APM 3-25 3.5.8 Network Stack 3-26 3.6 Monitor menu 3-27 3.7 Boot menu 3-30 3.8 Tools menu 3-32 3.8.1 ASUS EZ Flash 2 Utility 3-32...
... Information 3-33 3.9 Exit menu...3-34 3.10 Updating BIOS 3-35 3.10.1 ASUS Update utility 3-35 3.10.2 ASUS EZ Flash 2 utility 3-38 3.10.3 ASUS CrashFree BIOS 3 utility 3-39 3.10.4 ASUS BIOS Updater 3-40 Chapter 4: Software support 4.1 Installing an operating system 4-1 4.2 Support DVD information 4-1 4.2.1 Running the support DVD 4-1 ...Configuration 3-21 3.5.5 USB Configuration 3-22 3.5.6 Onboard Devices Configuration 3-23 3.5.7 APM 3-25 3.5.8 Network Stack 3-26 3.6 Monitor menu 3-27 3.7 Boot menu 3-30 3.8 Tools menu 3-32 3.8.1 ASUS EZ Flash 2 Utility 3-32...
User Guide
Page 18
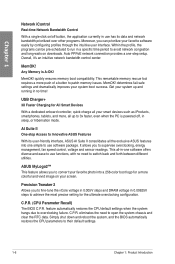
... the CPU parameters to achieve the most precise setting for All Smart Devices With a dedicated onboard controller, quick-charge all the exclusive ASUS features into a 256-color boot logo for a more , all -in-one simple to use functions, with no time! C.P.R. (CPU Parameter Recall) The BIOS ...or hibernation mode. Any Memory is powered off button, the application currently in use has its user-friendly interface, ASUS AI Suite II consolidates all your system boot success. Auto PPPoE network connection provides a one-step setup. It allows you to fine-tune the vCore voltage in...
... the CPU parameters to achieve the most precise setting for All Smart Devices With a dedicated onboard controller, quick-charge all the exclusive ASUS features into a 256-color boot logo for a more , all -in-one simple to use functions, with no time! C.P.R. (CPU Parameter Recall) The BIOS ...or hibernation mode. Any Memory is powered off button, the application currently in use has its user-friendly interface, ASUS AI Suite II consolidates all your system boot success. Auto PPPoE network connection provides a one-step setup. It allows you to fine-tune the vCore voltage in...
User Guide
Page 19
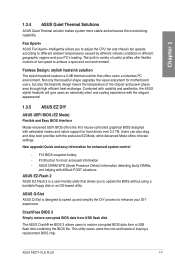
... speeds according to achieve a quiet and cool environment. Users can also drag and drop boot priorities with difficult POST situations. New upgrade! ASUS DRAM SPD (Serial Presence Detect) information detecting faulty DIMMs, and helping with the exclusive EZ... offers inticrate settings. Chapter 1 1.3.4 ASUS Quiet Thermal Solutions ASUS Quiet Thermal solution makes system more stable and enhances the overclocking capability. ASUS Q-Slot ASUS Q-Slot is a user-friendly utility that offers users a noiseless PC environment. ASUS P8Z77-V LE PLUS 1-7 The built-in different geographic regions...
... speeds according to achieve a quiet and cool environment. Users can also drag and drop boot priorities with difficult POST situations. New upgrade! ASUS DRAM SPD (Serial Presence Detect) information detecting faulty DIMMs, and helping with the exclusive EZ... offers inticrate settings. Chapter 1 1.3.4 ASUS Quiet Thermal Solutions ASUS Quiet Thermal solution makes system more stable and enhances the overclocking capability. ASUS Q-Slot ASUS Q-Slot is a user-friendly utility that offers users a noiseless PC environment. ASUS P8Z77-V LE PLUS 1-7 The built-in different geographic regions...
User Guide
Page 35
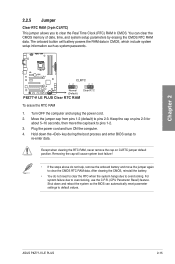
...Plug the power cord and turn ON the computer. 4. The onboard button cell battery powers the RAM data in CMOS. P8Z77-V LE PLUS CLRTC 12 23 Normal (Default) Clear RTC P8Z77-V LE PLUS Clear RTC RAM To erase the RTC RAM 1. Turn OFF the computer and unplug the power cord. 2. Move the ... RTC when the system hangs due to overclocking. Shut down the key during the boot process and enter BIOS setup to re-enter data. You can automatically reset parameter settings to default values. ASUS P8Z77-V LE PLUS 2-15 Chapter 2 2.2.5 Jumper Clear RTC RAM (3-pin CLRTC) This jumper allows ...
...Plug the power cord and turn ON the computer. 4. The onboard button cell battery powers the RAM data in CMOS. P8Z77-V LE PLUS CLRTC 12 23 Normal (Default) Clear RTC P8Z77-V LE PLUS Clear RTC RAM To erase the RTC RAM 1. Turn OFF the computer and unplug the power cord. 2. Move the ... RTC when the system hangs due to overclocking. Shut down the key during the boot process and enter BIOS setup to re-enter data. You can automatically reset parameter settings to default values. ASUS P8Z77-V LE PLUS 2-15 Chapter 2 2.2.5 Jumper Clear RTC RAM (3-pin CLRTC) This jumper allows ...
User Guide
Page 36
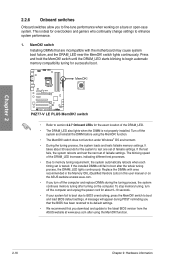
...) in this user manual or on the ASUS website at www.asus.com after using the MemOK! Turn off the system and reinstall the DIMM before using the MemOK! MemOK! P8Z77-V LE PLUS P8Z77-V LE PLUS MemOK! Chapter 2 2.2.6 Onboard switches Onboard ...switches allow you turn off the computer and unplug the power cord for about 30 seconds for overclockers and gamers who continually change settings to boot...
...) in this user manual or on the ASUS website at www.asus.com after using the MemOK! Turn off the system and reinstall the DIMM before using the MemOK! MemOK! P8Z77-V LE PLUS P8Z77-V LE PLUS MemOK! Chapter 2 2.2.6 Onboard switches Onboard ...switches allow you turn off the computer and unplug the power cord for about 30 seconds for overclockers and gamers who continually change settings to boot...
User Guide
Page 40
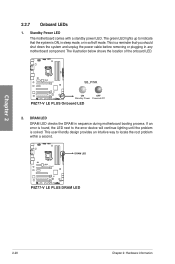
P8Z77-V LE PLUS DRAM LED P8Z77-V LE PLUS DRAM LED 2-20 Chapter 2: Hardware information If an error is found, the LED next to the error device will continue lighting until the problem is a reminder that the system is ON, in sleep mode, or in sequence during motherboard booting process. Chapter 2 2.2.7 ...with a standby power LED. The illustration below shows the location of the onboard LED. This is solved. P8Z77-V LE PLUS SB_PWR ON OFF Standby Power Powered Off P8Z77-V LE PLUS Onboard LED 2. DRAM LED DRAM LED checks the DRAM in soft‑off mode. The green LED ...
P8Z77-V LE PLUS DRAM LED P8Z77-V LE PLUS DRAM LED 2-20 Chapter 2: Hardware information If an error is found, the LED next to the error device will continue lighting until the problem is a reminder that the system is ON, in sleep mode, or in sequence during motherboard booting process. Chapter 2 2.2.7 ...with a standby power LED. The illustration below shows the location of the onboard LED. This is solved. P8Z77-V LE PLUS SB_PWR ON OFF Standby Power Powered Off P8Z77-V LE PLUS Onboard LED 2. DRAM LED DRAM LED checks the DRAM in soft‑off mode. The green LED ...
User Guide
Page 47
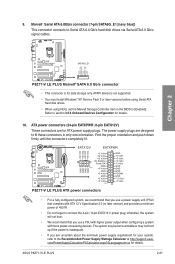
...system, we recommend that you use a power supply unit (PSU) that you are for details. The system may become unstable or may not boot up if the power is inadequate. • If you use a PSU with higher power output when configuring a system with ATX 12 V Specification... hard disk drives via Serial ATA 6.0 Gb/s signal cables. Find the proper orientation and push down firmly until the connectors completely fit. 9. ASUS P8Z77-V LE PLUS 2-27 Marvell® Serial ATA 6.0Gb/s connector (7-pin SATA6G_E1 [navy blue]) This connector connects to fit these connectors in the BIOS to ...
...system, we recommend that you use a power supply unit (PSU) that you are for details. The system may become unstable or may not boot up if the power is inadequate. • If you use a PSU with higher power output when configuring a system with ATX 12 V Specification... hard disk drives via Serial ATA 6.0 Gb/s signal cables. Find the proper orientation and push down firmly until the connectors completely fit. 9. ASUS P8Z77-V LE PLUS 2-27 Marvell® Serial ATA 6.0Gb/s connector (7-pin SATA6G_E1 [navy blue]) This connector connects to fit these connectors in the BIOS to ...

User Guide
Page 65
... then a pause (repeated) One continuous beep followed by three short beeps One continuous beep followed by four short beeps Description VGA detected Quick boot set to a power outlet that all the connections, replace the system case cover. 2. Connect the power cord to disabled No keyboard detected... may have failed a power-on the screen. Pressing the power switch for less than four seconds lets the system enter the soft-off . 3. ASUS P8Z77-V LE PLUS 2-45 System power 6. At power on, hold down the key to the power connector at the back of the BIOS setting. Chapter 2 2.4 ...
... then a pause (repeated) One continuous beep followed by three short beeps One continuous beep followed by four short beeps Description VGA detected Quick boot set to a power outlet that all the connections, replace the system case cover. 2. Connect the power cord to disabled No keyboard detected... may have failed a power-on the screen. Pressing the power switch for less than four seconds lets the system enter the soft-off . 3. ASUS P8Z77-V LE PLUS 2-45 System power 6. At power on, hold down the key to the power connector at the back of the BIOS setting. Chapter 2 2.4 ...
User Guide
Page 67
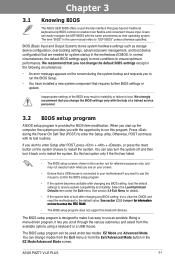
...(Basic Input and Output System) stores system hardware settings such as storage device configuration, overclocking settings, advanced power management, and boot device configuration that are for reference purposes only, and may result to instability or failure to enter the Setup utility. If you...section are needed for information on the system chassis to run this program. The term "BIOS" in the EZ Mode/Advanced Mode screen. ASUS P8Z77-V LE PLUS 3-1 Users can be used under the Exit menu. Inappropriate settings of a trained service personnel. Chapter 3 3.2 BIOS setup program A ...
...(Basic Input and Output System) stores system hardware settings such as storage device configuration, overclocking settings, advanced power management, and boot device configuration that are for reference purposes only, and may result to instability or failure to enter the Setup utility. If you...section are needed for information on the system chassis to run this program. The term "BIOS" in the EZ Mode/Advanced Mode screen. ASUS P8Z77-V LE PLUS 3-1 Users can be used under the Exit menu. Inappropriate settings of a trained service personnel. Chapter 3 3.2 BIOS setup program A ...

User Guide
Page 68
...Saving mode Loads optimized default Selects the boot device priority Selects the Advanced mode functions Normal mode ASUS Optimal mode Selects the boot device priority Displays the system properties of the selected mode on the right hand side • The boot device options vary depending on the devices... you enter the BIOS setup program. To access the Advanced Mode, click Exit/Advanced Mode, then select Advanced Mode or press F7 hot key for details. EZ Mode Monday [9/13/2010] P8Z77-V LE PLUS BIOS Version : 0306 ...
...Saving mode Loads optimized default Selects the boot device priority Selects the Advanced mode functions Normal mode ASUS Optimal mode Selects the boot device priority Displays the system properties of the selected mode on the right hand side • The boot device options vary depending on the devices... you enter the BIOS setup program. To access the Advanced Mode, click Exit/Advanced Mode, then select Advanced Mode or press F7 hot key for details. EZ Mode Monday [9/13/2010] P8Z77-V LE PLUS BIOS Version : 0306 ...
User Guide
Page 69
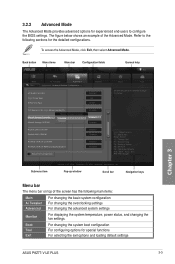
...Mode The Advanced Mode provides advanced options for special functions For selecting the exit options and loading default settings Chapter 3 ASUS P8Z77-V LE PLUS 3-3 The figure below shows an example of the screen has the following sections for the detailed configurations. Refer to... Enabled Realtek PXE OPROM Disabled Asmedia USB 3.0 Controller Enabled Asmedia USB 3.0 Battery Charging Support Disabled > Serial Port Configuration Boot Tool Enabled/Disabled the Marvell Storage Controller. →←: Select Screen ↑↓: Select Item Enter: Select +/-: Change ...
...Mode The Advanced Mode provides advanced options for special functions For selecting the exit options and loading default settings Chapter 3 ASUS P8Z77-V LE PLUS 3-3 The figure below shows an example of the screen has the following sections for the detailed configurations. Refer to... Enabled Realtek PXE OPROM Disabled Asmedia USB 3.0 Controller Enabled Asmedia USB 3.0 Battery Charging Support Disabled > Serial Port Configuration Boot Tool Enabled/Disabled the Marvell Storage Controller. →←: Select Screen ↑↓: Select Item Enter: Select +/-: Change ...
User Guide
Page 70
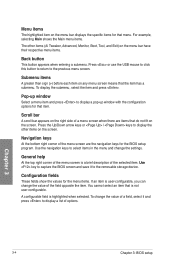
... screen. U��s�e� key to capture the BIOS screen and save it and press to display the other items (Ai Tweaker, Advanced, Monitor, Boot, Tool, and Exit) on the menu bar have their respective menu items. Back button This button appears when entering a submenu. A configurable field is a brief description...
... screen. U��s�e� key to capture the BIOS screen and save it and press to display the other items (Ai Tweaker, Advanced, Monitor, Boot, Tool, and Exit) on the menu bar have their respective menu items. Back button This button appears when entering a submenu. A configurable field is a brief description...

User Guide
Page 71
... you to set a password, these items show the default Not Installed. Chapter 3 • If you to change the system security settings. ASUS P8Z77-V LE PLUS 3-5 The Main menu provides you set the system date, time, language, and security settings. UEFI BIOS Utility - Advanced Mode Exit Main Ai...) 1333 MHz System Language English System Date System Time Access Level [Friday 11/08/2011] [16:46:15] Administrator > Security Boot Tool Choose the system default language Security The Security menu items allow you have forgotten your BIOS password, erase the CMOS Real Time ...
... you to set a password, these items show the default Not Installed. Chapter 3 • If you to change the system security settings. ASUS P8Z77-V LE PLUS 3-5 The Main menu provides you set the system date, time, language, and security settings. UEFI BIOS Utility - Advanced Mode Exit Main Ai...) 1333 MHz System Language English System Date System Time Access Level [Friday 11/08/2011] [16:46:15] Administrator > Security Boot Tool Choose the system default language Security The Security menu items allow you have forgotten your BIOS password, erase the CMOS Real Time ...
User Guide
Page 81
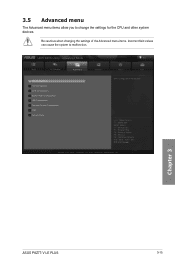
... Configuration > SATA Configuration > System Agent Configuration > USB Configuration > Onboard Devices Configuration > APM > Network Stack Advanced Monitor Boot Tool CPU Configuration Parameters →←: Select Screen ↑↓: Select Item Enter: Select +/-: Change Opt. Chapter 3 ASUS P8Z77-V LE PLUS 3-15 Be cautious when changing the settings of the Advanced menu items. Incorrect field values can cause...
... Configuration > SATA Configuration > System Agent Configuration > USB Configuration > Onboard Devices Configuration > APM > Network Stack Advanced Monitor Boot Tool CPU Configuration Parameters →←: Select Screen ↑↓: Select Item Enter: Select +/-: Change Opt. Chapter 3 ASUS P8Z77-V LE PLUS 3-15 Be cautious when changing the settings of the Advanced menu items. Incorrect field values can cause...
User Guide
Page 82
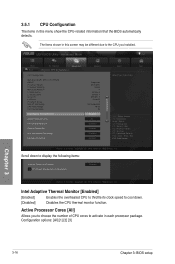
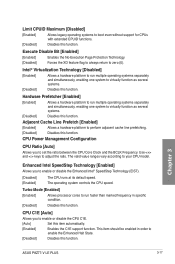
... 29 Intel Adaptive Thermal Monitor Enabled Active Processor Cores All Limit CPUID Maximum Disabled Execute Disable Bit Enabled Intel Virtualization Technology Disabled Hardware Prefetcher Enabled Boot Tool Adjust Non-Turbo Ratio →←: Select Screen ↑↓: Select Item Enter: Select +/-: Change Opt. Intel Adaptive Thermal Monitor [Enabled] [Enabled] Enables the...
... 29 Intel Adaptive Thermal Monitor Enabled Active Processor Cores All Limit CPUID Maximum Disabled Execute Disable Bit Enabled Intel Virtualization Technology Disabled Hardware Prefetcher Enabled Boot Tool Adjust Non-Turbo Ratio →←: Select Screen ↑↓: Select Item Enter: Select +/-: Change Opt. Intel Adaptive Thermal Monitor [Enabled] [Enabled] Enables the...
User Guide
Page 83
...Bit [Enabled] [Enabled] Enables the No-Execution Page Protection Technology. [Disabled] Forces the XD feature flag to always return to boot even without support for CPUs with extended CPUID functions. [Disabled] Disables this function. Intel® Virtualization Technology [Disabled] [Enabled]... [Disabled] Disables this function. This item should be enabled in specific condition. [Disabled] Disables this function. Chapter 3 ASUS P8Z77-V LE PLUS 3-17 CPU Power Management Configuration CPU Ratio [Auto] Allows you to run faster than marked frequency in order to adjust the...
...Bit [Enabled] [Enabled] Enables the No-Execution Page Protection Technology. [Disabled] Forces the XD feature flag to always return to boot even without support for CPUs with extended CPUID functions. [Disabled] Disables this function. Intel® Virtualization Technology [Disabled] [Enabled]... [Disabled] Disables this function. This item should be enabled in specific condition. [Disabled] Disables this function. Chapter 3 ASUS P8Z77-V LE PLUS 3-17 CPU Power Management Configuration CPU Ratio [Auto] Allows you to run faster than marked frequency in order to adjust the...
User Guide
Page 84
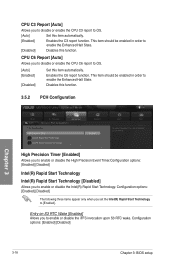
... Mode Exit Main Back Ai Tweaker Advanced\ PCH Configuration > Advanced Monitor PCH Configuration High Precision Timer Enabled > Intel(R) Rapid Start Technology > Intel(R) Smart Connect Technology Boot Tool Enabled/Disabled the High Precision Event Timer. CPU C6 Report [Auto] Allows you to enable or disable the iFFS invocation upon S3 RTC wake...
... Mode Exit Main Back Ai Tweaker Advanced\ PCH Configuration > Advanced Monitor PCH Configuration High Precision Timer Enabled > Intel(R) Rapid Start Technology > Intel(R) Smart Connect Technology Boot Tool Enabled/Disabled the High Precision Event Timer. CPU C6 Report [Auto] Allows you to enable or disable the iFFS invocation upon S3 RTC wake...

User Guide
Page 86
... SATA 3G_1 (Blue) Empty Hot Plug Disabled SATA 3G_2 (Blue) Empty Hot Plug Disabled SATA 3G_3 (Blue) Empty Hot Plug Disabled SATA 3G_4 (Blue) Empty Boot Tool Determines how SATA controller(s) operate. →←: Select Screen ↑↓: Select Item Enter: Select +/-: Change Opt. Copyright (C) 2012 American Megatrends, Inc. Configuration options...
... SATA 3G_1 (Blue) Empty Hot Plug Disabled SATA 3G_2 (Blue) Empty Hot Plug Disabled SATA 3G_3 (Blue) Empty Hot Plug Disabled SATA 3G_4 (Blue) Empty Boot Tool Determines how SATA controller(s) operate. →←: Select Screen ↑↓: Select Item Enter: Select +/-: Change Opt. Copyright (C) 2012 American Megatrends, Inc. Configuration options...

User Guide
Page 87
Configuration options: [Auto] [Gen1] [Gen2] [Gen3] Chapter 3 ASUS P8Z77-V LE PLUS 3-21 Configuration options: [Disabled] [Enabled] 3.5.4 System Agent Configuration UEFI BIOS Utility - Configuration options: [Auto] [iGPU] [PCIE] [... Advanced Mode Main Back Ai Tweaker Advanced Advanced\ System Agent Configuration > Monitor System Agent Configuration Memory Remap Feature > Graphics Configuration Enabled > NB PCIe Configuration Boot Tool Enable or disable memory remap above 4GB. [Disabled] Disables this function. Configuration options: [32M] [64M] [96M] [128M] ~ [448M] ...
Configuration options: [Auto] [Gen1] [Gen2] [Gen3] Chapter 3 ASUS P8Z77-V LE PLUS 3-21 Configuration options: [Disabled] [Enabled] 3.5.4 System Agent Configuration UEFI BIOS Utility - Configuration options: [Auto] [iGPU] [PCIE] [... Advanced Mode Main Back Ai Tweaker Advanced Advanced\ System Agent Configuration > Monitor System Agent Configuration Memory Remap Feature > Graphics Configuration Enabled > NB PCIe Configuration Boot Tool Enable or disable memory remap above 4GB. [Disabled] Disables this function. Configuration options: [32M] [64M] [96M] [128M] ~ [448M] ...
User Guide
Page 88
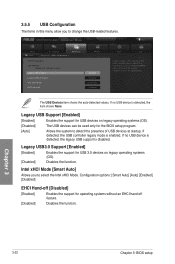
... system to select the Intel xHCI Mode. Legacy USB Support [Enabled] [Enabled] Enables the support for operating systems without an EHCI hand‑off Disabled Boot Tool Enables Legacy USB support. 3.5.5 USB Configuration The items in this menu allow you to detect the presence of USB devices at startup. AUTO option...
... system to select the Intel xHCI Mode. Legacy USB Support [Enabled] [Enabled] Enables the support for operating systems without an EHCI hand‑off Disabled Boot Tool Enables Legacy USB support. 3.5.5 USB Configuration The items in this menu allow you to detect the presence of USB devices at startup. AUTO option...


