User Manual
Page 38
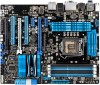
...system hangs due to re-enter data. function. You must turn ON the computer. 4. Shut down the key during the boot process and enter BIOS setup to overclocking. The onboard button cell battery powers the RAM data in CMOS. Keep the cap on CLRTC jumper default position. Hold down and...8226; You do not help, remove the onboard battery and move the cap back to enable C.P.R. For system failure due to pins 2-3. You can automatically reset parameter settings to default values. • Due to the chipset behavior, AC power off and on the power supply or unplug and plug the power...
...system hangs due to re-enter data. function. You must turn ON the computer. 4. Shut down the key during the boot process and enter BIOS setup to overclocking. The onboard button cell battery powers the RAM data in CMOS. Keep the cap on CLRTC jumper default position. Hold down and...8226; You do not help, remove the onboard battery and move the cap back to enable C.P.R. For system failure due to pins 2-3. You can automatically reset parameter settings to default values. • Due to the chipset behavior, AC power off and on the power supply or unplug and plug the power...
User Manual
Page 47
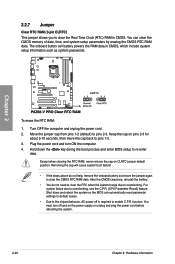
... LED cable to this connector. System panel connector (20-8 pin PANEL) This connector supports several chassis-mounted functions. ASUS P8Z68-V PRO 2-29 The speaker allows you turn on the BIOS settings. The system power LED lights up or flashes when data is read from or written to hear system beeps ...cable to this connector. Pressing the power switch for more than four seconds while the system is ON turns the system OFF. • Reset button (2-pin RESET) This 2-pin connector is for the system power LED. The IDE LED lights up when you to the HDD. • System warning ...
... LED cable to this connector. System panel connector (20-8 pin PANEL) This connector supports several chassis-mounted functions. ASUS P8Z68-V PRO 2-29 The speaker allows you turn on the BIOS settings. The system power LED lights up or flashes when data is read from or written to hear system beeps ...cable to this connector. Pressing the power switch for more than four seconds while the system is ON turns the system OFF. • Reset button (2-pin RESET) This 2-pin connector is for the system power LED. The IDE LED lights up when you to the HDD. • System warning ...
User Manual
Page 67
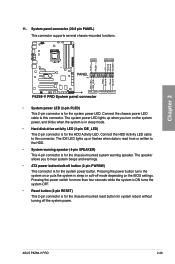
If you wish to enter Setup after POST, press + + , or press the reset button on to restart the system. Select the Load Optimized Defaults item under two modes: EZ Mode and Advanced Mode. Chapter 3 ASUS P8Z68-V PRO 3-1 The term "BIOS" in the motherboard CMOS. We strongly recommend that a USB mouse is connected to your screen. •...
If you wish to enter Setup after POST, press + + , or press the reset button on to restart the system. Select the Load Optimized Defaults item under two modes: EZ Mode and Advanced Mode. Chapter 3 ASUS P8Z68-V PRO 3-1 The term "BIOS" in the motherboard CMOS. We strongly recommend that a USB mouse is connected to your screen. •...

User Manual
Page 68
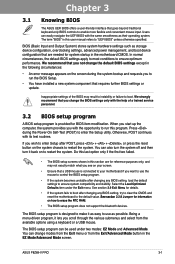
... program without saving the changes, saves the changes and resets the system, or enters the Advanced Mode EFI BIOS Utility - Selects the display language of the selected mode on the right hand side Normal mode ASUS Optimal mode Selects the boot device priority • The boot ... default, the EZ Mode screen appears when you to select the display language, system performance mode and boot device priority. EZ Mode Monday [9/13/2010] P8Z68-V PRO BIOS Version : 0209 CPU Type : Genuine Intel(R) CPU 0 @ 3.10GHz Total Memory : 512 MB (DDR3 1066MHz) Exit/Advanced Mode Build Date : 03...
... program without saving the changes, saves the changes and resets the system, or enters the Advanced Mode EFI BIOS Utility - Selects the display language of the selected mode on the right hand side Normal mode ASUS Optimal mode Selects the boot device priority • The boot ... default, the EZ Mode screen appears when you to select the display language, system performance mode and boot device priority. EZ Mode Monday [9/13/2010] P8Z68-V PRO BIOS Version : 0209 CPU Type : Genuine Intel(R) CPU 0 @ 3.10GHz Total Memory : 512 MB (DDR3 1066MHz) Exit/Advanced Mode Build Date : 03...

User Manual
Page 96
... , and then select Yes. Load from Profile Allows you update the BIOS file only coming from the same memory/CPU configuration and BIOS version. Advanced Mode Exit Main Back Ai Tweaker Tool\ ASUS O.C. Key in ��t�h�e���p�r�o�...;f�i�le� number that saved your BIOS settings, press , and then select Yes. • DO NOT shut down or reset the system while updating the BIOS to prevent the ...
... , and then select Yes. Load from Profile Allows you update the BIOS file only coming from the same memory/CPU configuration and BIOS version. Advanced Mode Exit Main Back Ai Tweaker Tool\ ASUS O.C. Key in ��t�h�e���p�r�o�...;f�i�le� number that saved your BIOS settings, press , and then select Yes. • DO NOT shut down or reset the system while updating the BIOS to prevent the ...

User Manual
Page 97
... option from the Exit menu. Save Changes & Reset Once you selected are finished making your selections, choose this option or if you press , a confirmation window appears. Select Yes to discard changes and exit�. Chapter 3 ASUS P8Z68-V PRO 3-31 When you select this option or if you...Exit menu to load the default values for the BIOS items, and save changes and exit. ASUS EZ Mode This option allows you press , a confirmation window appears. Exit Load Optimized Defaults Save Changes & Reset Discard Changes & Exit ASUS EZ Mode Launch EFI Shell from one of ...
... option from the Exit menu. Save Changes & Reset Once you selected are finished making your selections, choose this option or if you press , a confirmation window appears. Select Yes to discard changes and exit�. Chapter 3 ASUS P8Z68-V PRO 3-31 When you select this option or if you...Exit menu to load the default values for the BIOS items, and save changes and exit. ASUS EZ Mode This option allows you press , a confirmation window appears. Exit Load Optimized Defaults Save Changes & Reset Discard Changes & Exit ASUS EZ Mode Launch EFI Shell from one of ...
User Manual
Page 102
...support DVD may be older than the BIOS file published on the system. 2. DO NOT shut down or reset the system while updating the BIOS to prevent system boot failure! When found, the utility reads the BIOS file and enters ASUS EZ Flash 2 utility automatically. 4. ...or reset the system while updating the BIOS! • This function can cause system boot failure! Ensure to load the BIOS default settings to the USB port. 3. Recovering the BIOS To recover the BIOS: 1. The utility automatically checks the devices for details. 3.10.3 ASUS CrashFree BIOS 3 utility The ASUS CrashFree BIOS ...
...support DVD may be older than the BIOS file published on the system. 2. DO NOT shut down or reset the system while updating the BIOS to prevent system boot failure! When found, the utility reads the BIOS file and enters ASUS EZ Flash 2 utility automatically. 4. ...or reset the system while updating the BIOS! • This function can cause system boot failure! Ensure to load the BIOS default settings to the USB port. 3. Recovering the BIOS To recover the BIOS: 1. The utility automatically checks the devices for details. 3.10.3 ASUS CrashFree BIOS 3 utility The ASUS CrashFree BIOS ...
User Manual
Page 105
... . DO NOT shut down or reset the system while updating the BIOS to prevent system boot failure! • For BIOS Updater version 1.04 or later, the utility automatically exits to ensure system compatibility and stability. ASUS P8Z68-V PRO 3-39 Press to switch between screen fields and use the keys to exit BIOS Updater. Select the Load Optimized...
... . DO NOT shut down or reset the system while updating the BIOS to prevent system boot failure! • For BIOS Updater version 1.04 or later, the utility automatically exits to ensure system compatibility and stability. ASUS P8Z68-V PRO 3-39 Press to switch between screen fields and use the keys to exit BIOS Updater. Select the Load Optimized...
User Manual
Page 124
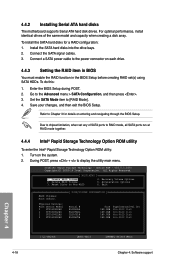
...hard disk drives. Acceleration Options 6. Refer to the power connector on each drive. 4.4.3 Setting the RAID item in BIOS You must enable the RAID function in the BIOS Setup before creating RAID set any of the same model and capacity when creating a disk array. Intel(R) Rapid ...install identical drives of SATA ports to chipset limitation, when set (s) using SATA HDDs. Enter the BIOS Setup during POST. 2. Go to [RAID Mode]. 4. During POST, press + to Non-RAID 4. Reset Disks to display the utility main menu. Install the SATA hard disks into the drive bays. 2. ...
...hard disk drives. Acceleration Options 6. Refer to the power connector on each drive. 4.4.3 Setting the RAID item in BIOS You must enable the RAID function in the BIOS Setup before creating RAID set any of the same model and capacity when creating a disk array. Intel(R) Rapid ...install identical drives of SATA ports to chipset limitation, when set (s) using SATA HDDs. Enter the BIOS Setup during POST. 2. Go to [RAID Mode]. 4. During POST, press + to Non-RAID 4. Reset Disks to display the utility main menu. Install the SATA hard disks into the drive bays. 2. ...


