User Manual
Page 13
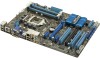
... Core™ i5/ Core™ i3 processors in your retailer. 1.3 1.3.1 Special features Product highlights LGA1155 socket for buying an ASUS® P8Z68-V LX motherboard! ASUS P8Z68-V LX 1-1 Thank you start installing the motherboard, and hardware devices on it another standout in the world. Intel® Second Generation Core...Package contents Check your motherboard package for the following items. Motherboard Cables Accessories Application DVD Documentation ASUS P8Z68-V LX motherboard 2 x Serial ATA 6.0Gb/s cables 1 x I/O shield ASUS motherboard support DVD User Manual If any of...
... Core™ i5/ Core™ i3 processors in your retailer. 1.3 1.3.1 Special features Product highlights LGA1155 socket for buying an ASUS® P8Z68-V LX motherboard! ASUS P8Z68-V LX 1-1 Thank you start installing the motherboard, and hardware devices on it another standout in the world. Intel® Second Generation Core...Package contents Check your motherboard package for the following items. Motherboard Cables Accessories Application DVD Documentation ASUS P8Z68-V LX motherboard 2 x Serial ATA 6.0Gb/s cables 1 x I/O shield ASUS motherboard support DVD User Manual If any of...
User Manual
Page 15
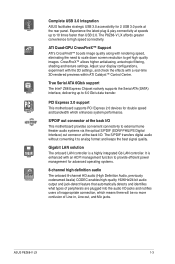
... PCI Express 2.0 devices for 2 USB 3.0 ports at speeds up to 10 times faster than USB 2.0. ASUS P8Z68-V LX 1-3 CrossFireX™ allows higher antialiasing, anisotropic filtering, shading and texture settings. Complete USB 3.0 Integration ASUS facilitates strategic USB 3.0 accessibility for double speed and bandwidth which means there will be no more confusion of...ATA 6Gb/s support The Intel® Z68 Express Chipset natively supports the Serial ATA (SATA) interface, delivering up to 6.0 Gb/s data transfer. The P8Z68-V LX affords greater convenience to get high quality images.
... PCI Express 2.0 devices for 2 USB 3.0 ports at speeds up to 10 times faster than USB 2.0. ASUS P8Z68-V LX 1-3 CrossFireX™ allows higher antialiasing, anisotropic filtering, shading and texture settings. Complete USB 3.0 Integration ASUS facilitates strategic USB 3.0 accessibility for double speed and bandwidth which means there will be no more confusion of...ATA 6Gb/s support The Intel® Z68 Express Chipset natively supports the Serial ATA (SATA) interface, delivering up to 6.0 Gb/s data transfer. The P8Z68-V LX affords greater convenience to get high quality images.
User Manual
Page 17
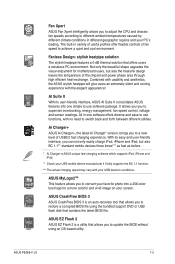
...it fully supports the BC 1.1 function. *** The actual charging speed may vary with the elegant appearance! Combined with usability and aesthetics, the ASUS stylish heatpipe will give users an extremely silent and cooling experience with your PC's loading. It allows you you to update the BIOS without...Flash 2 is an auto-recovery tool that allows you to restore a corrupted BIOS file using an OS-based utility. ASUS P8Z68-V LX 1-5 Fan Xpert ASUS Fan Xpert intelligently allows you to adjust the CPU and chassis fan speeds according to different ambient temperatures caused by different ...
...it fully supports the BC 1.1 function. *** The actual charging speed may vary with the elegant appearance! Combined with usability and aesthetics, the ASUS stylish heatpipe will give users an extremely silent and cooling experience with your PC's loading. It allows you you to update the BIOS without...Flash 2 is an auto-recovery tool that allows you to restore a corrupted BIOS file using an OS-based utility. ASUS P8Z68-V LX 1-5 Fan Xpert ASUS Fan Xpert intelligently allows you to adjust the CPU and chassis fan speeds according to different ambient temperatures caused by different ...
User Manual
Page 19
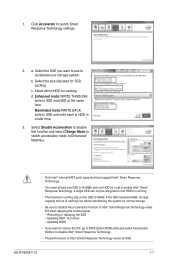
... • If you want to restore the OS, go to BIOS Option ROM utility and select Acceleration Options to enable Intel® Smart Response Technology. c. ASUS P8Z68-V LX 1-7 1. d. A single SSD can still be assigned to disable the acceleration function of Intel® Smart Response Technology varies by SSD. Removing or replacing the SSD...
... • If you want to restore the OS, go to BIOS Option ROM utility and select Acceleration Options to enable Intel® Smart Response Technology. c. ASUS P8Z68-V LX 1-7 1. d. A single SSD can still be assigned to disable the acceleration function of Intel® Smart Response Technology varies by SSD. Removing or replacing the SSD...
User Manual
Page 21
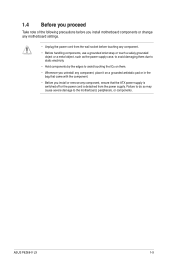
ASUS P8Z68-V LX 1-9 1.4 Before you proceed Take note of the following precautions before you install motherboard components or change any motherboard settings. • Unplug the power cord from ...
ASUS P8Z68-V LX 1-9 1.4 Before you proceed Take note of the following precautions before you install motherboard components or change any motherboard settings. • Unplug the power cord from ...
User Manual
Page 23
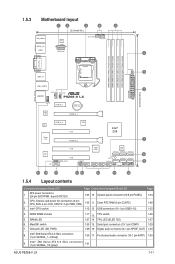
... DIMM_B2 (64bit, 240-pin module) EATXPWR 30.5cm(12.0in) LGA1155 USB3_12 MemOK! 6 DRAM_LED LAN1_USB12 1 CHA_FAN1 PWR_FAN AUDIO P8Z68-V LX AAFP PCIEX1_1 Lithium Cell CMOS Power ASM 1042 PCIEX16_1 RTL 8111E Super I/O PCIEX1_2 TPU PCI1 PCIEX16_2 Intel® Z68 7 PCI2...Connectors/Jumpers/Slots/LED Page Connectors/Jumpers/Slots/LED Page 1. Intel® Z68 Serial ATA 6.0 Gb/s connectors (7-pin SATA6G_1/2 [gray]) 1-31 ASUS P8Z68-V LX 1-11 Digital audio connector (4-1 pin SPDIF_OUT) 1-30 8. Onboard LED (SB_PWR) 1-36 16. CPU, Chassis and power fan connectors (4-pin CPU_FAN...
... DIMM_B2 (64bit, 240-pin module) EATXPWR 30.5cm(12.0in) LGA1155 USB3_12 MemOK! 6 DRAM_LED LAN1_USB12 1 CHA_FAN1 PWR_FAN AUDIO P8Z68-V LX AAFP PCIEX1_1 Lithium Cell CMOS Power ASM 1042 PCIEX16_1 RTL 8111E Super I/O PCIEX1_2 TPU PCI1 PCIEX16_2 Intel® Z68 7 PCI2...Connectors/Jumpers/Slots/LED Page Connectors/Jumpers/Slots/LED Page 1. Intel® Z68 Serial ATA 6.0 Gb/s connectors (7-pin SATA6G_1/2 [gray]) 1-31 ASUS P8Z68-V LX 1-11 Digital audio connector (4-1 pin SPDIF_OUT) 1-30 8. Onboard LED (SB_PWR) 1-36 16. CPU, Chassis and power fan connectors (4-pin CPU_FAN...
User Manual
Page 25
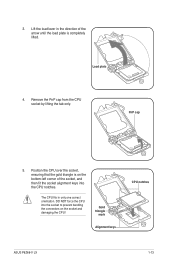
... the direction of the socket, and then fit the socket alignment keys into the CPU notches. Load plate 4. Gold triangle mark Alignment keys CPU notches ASUS P8Z68-V LX 1-13 Remove the PnP cap from the CPU socket by lifting the tab only. DO NOT force the CPU into the socket to prevent bending...
... the direction of the socket, and then fit the socket alignment keys into the CPU notches. Load plate 4. Gold triangle mark Alignment keys CPU notches ASUS P8Z68-V LX 1-13 Remove the PnP cap from the CPU socket by lifting the tab only. DO NOT force the CPU into the socket to prevent bending...
User Manual
Page 27
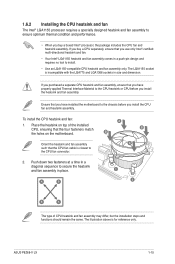
... place. B B Orient the heatsink and fan assembly A such that you have installed the motherboard to the chassis before you install the heatsink and fan assembly. ASUS P8Z68-V LX 1-15 If you purchased a separate CPU heatsink and fan assembly, ensure that the CPU fan cable is closest to the CPU fan connector. 2. If you...
... place. B B Orient the heatsink and fan assembly A such that you have installed the motherboard to the chassis before you install the heatsink and fan assembly. ASUS P8Z68-V LX 1-15 If you purchased a separate CPU heatsink and fan assembly, ensure that the CPU fan cable is closest to the CPU fan connector. 2. If you...
User Manual
Page 29
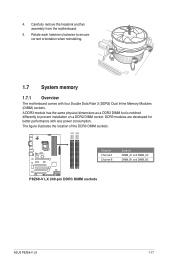
... four Double Data Rate 3 (DDR3) Dual Inline Memory Modules (DIMM) sockets. The figure illustrates the location of the DDR3 DIMM sockets: DIMM_A1 DIMM_A2 DIMM_B1 DIMM_B2 P8Z68-V LX Channel Channel A Channel B Sockets DIMM_A1 and DIMM_A2 DIMM_B1 and DIMM_B2 P8Z68-V LX 240-pin DDR3 DIMM sockets ASUS P8Z68-V LX 1-17
... four Double Data Rate 3 (DDR3) Dual Inline Memory Modules (DIMM) sockets. The figure illustrates the location of the DDR3 DIMM sockets: DIMM_A1 DIMM_A2 DIMM_B1 DIMM_B2 P8Z68-V LX Channel Channel A Channel B Sockets DIMM_A1 and DIMM_A2 DIMM_B1 and DIMM_B2 P8Z68-V LX 240-pin DDR3 DIMM sockets ASUS P8Z68-V LX 1-17

User Manual
Page 31
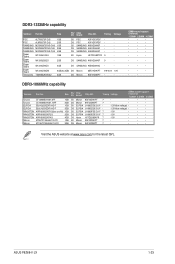
...when you do any of accessing information from the same vendor. • Due to support a full memory load (4 DIMMs) or overclocking condition. P8Z68-V LX Motherboard Qualified Vendors List (QVL) DDR3-2200MHz capability Vendors Part No. Any excess memory from the higher-sized channel is the standard way of ...- - 1.5V-1.7V DS - - - 1.5V-1.7V DIMM socket support (Optional) 1 DIMM 2 DIMM 4 DIMM • • • • • • • • • • • ASUS P8Z68-V LX 1-19 Timing Voltage DS - - 8-8-8-24 1.65V DS - - - -
...when you do any of accessing information from the same vendor. • Due to support a full memory load (4 DIMMs) or overclocking condition. P8Z68-V LX Motherboard Qualified Vendors List (QVL) DDR3-2200MHz capability Vendors Part No. Any excess memory from the higher-sized channel is the standard way of ...- - 1.5V-1.7V DS - - - 1.5V-1.7V DIMM socket support (Optional) 1 DIMM 2 DIMM 4 DIMM • • • • • • • • • • • ASUS P8Z68-V LX 1-19 Timing Voltage DS - - 8-8-8-24 1.65V DS - - - -
User Manual
Page 35
...; DS Hynix H5TQ2G83AFR 7 1.5V • • • SS Micron 9GF22D9KPT 7 - • • • DS Micron 9HF22D9KPT 7 - • • • Visit the ASUS website at www.asus.com for the latest QVL. ASUS P8Z68-V LX 1-23 Size Crucial CT12864BA1067.8FF 1GB Crucial CT25664BA1067.16FF 2GB ELPIDA EBJ10UE8EDF0-AE-F 1GB ELPIDA EBJ21UE8EDF0-AE-F 2GB KINGSTON KVR1066D3N7/1G...
...; DS Hynix H5TQ2G83AFR 7 1.5V • • • SS Micron 9GF22D9KPT 7 - • • • DS Micron 9HF22D9KPT 7 - • • • Visit the ASUS website at www.asus.com for the latest QVL. ASUS P8Z68-V LX 1-23 Size Crucial CT12864BA1067.8FF 1GB Crucial CT25664BA1067.16FF 2GB ELPIDA EBJ10UE8EDF0-AE-F 1GB ELPIDA EBJ21UE8EDF0-AE-F 2GB KINGSTON KVR1066D3N7/1G...

User Manual
Page 37
... for later use . Keep the screw for the card. 2. Secure the card to use . 4. Assign an IRQ to do not need to install expansion cards. ASUS P8Z68-V LX 1-25 Align the card connector with it by adjusting the software settings. 1. Failure to the card. 3. Before installing the expansion card, read the documentation that...
... for later use . Keep the screw for the card. 2. Secure the card to use . 4. Assign an IRQ to do not need to install expansion cards. ASUS P8Z68-V LX 1-25 Align the card connector with it by adjusting the software settings. 1. Failure to the card. 3. Before installing the expansion card, read the documentation that...
User Manual
Page 39
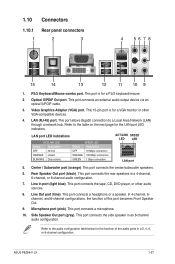
Line In port (light blue). This port connects the side speaker in a 4-channel, 6-channel, or 8-channel audio configuration. 7. ASUS P8Z68-V LX 1-27 PS/2 Keyboard/Mouse combo port. This port allows Gigabit connection to the table on the next page for the function of this port becomes ...
Line In port (light blue). This port connects the side speaker in a 4-channel, 6-channel, or 8-channel audio configuration. 7. ASUS P8Z68-V LX 1-27 PS/2 Keyboard/Mouse combo port. This port allows Gigabit connection to the table on the next page for the function of this port becomes ...
User Manual
Page 41
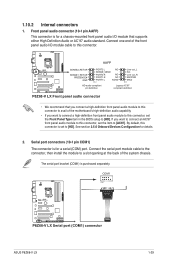
...the motherboard's high-definition audio capability. • If you want to connect an AC'97 front panel audio module to [HD]. P8Z68-V LX AAFP SENSE2_RETUR SENSE1_RETUR PRESENCE# GND PORT2 L NC SENSE_SEND PORT2 R NC PORT1 R NC PORT1 L AGND PIN 1 Line out_L NC Line...audio I /O module that you want to connect a high-definition front panel audio module to [AC97]. COM1 PIN 1 P8Z68-V LX P8Z68-V LX Serial port (COM1) connector ASUS P8Z68-V LX 1-29 Serial port connectors (10-1 pin COM1) The connector is for details. 2. See section 2.5.6 Onboard Devices Configuration for...
...the motherboard's high-definition audio capability. • If you want to connect an AC'97 front panel audio module to [HD]. P8Z68-V LX AAFP SENSE2_RETUR SENSE1_RETUR PRESENCE# GND PORT2 L NC SENSE_SEND PORT2 R NC PORT1 R NC PORT1 L AGND PIN 1 Line out_L NC Line...audio I /O module that you want to connect a high-definition front panel audio module to [AC97]. COM1 PIN 1 P8Z68-V LX P8Z68-V LX Serial port (COM1) connector ASUS P8Z68-V LX 1-29 Serial port connectors (10-1 pin COM1) The connector is for details. 2. See section 2.5.6 Onboard Devices Configuration for...
User Manual
Page 43
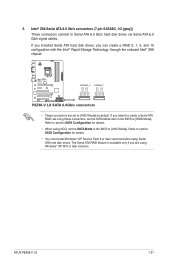
... only if you are set the SATA Mode item in the BIOS to [AHCI Mode] by default. ASUS P8Z68-V LX 1-31 P8Z68-V LX SATA6G_2 SATA6G_1 GND RSATA_RXN2 RSATA_RXP2 GND RSATA_TXN2 RSATA_TXP2 GND GND RSATA_RXN1 RSATA_RXP1 GND RSATA_TXN1 RSATA_TXP1 GND P8Z68-V LX SATA 6.0Gb/s connectors • These connectors are using Serial ATA hard disk drives. Refer to section...
... only if you are set the SATA Mode item in the BIOS to [AHCI Mode] by default. ASUS P8Z68-V LX 1-31 P8Z68-V LX SATA6G_2 SATA6G_1 GND RSATA_RXN2 RSATA_RXP2 GND RSATA_TXN2 RSATA_TXP2 GND GND RSATA_RXN1 RSATA_RXP1 GND RSATA_TXN1 RSATA_TXP1 GND P8Z68-V LX SATA 6.0Gb/s connectors • These connectors are using Serial ATA hard disk drives. Refer to section...
User Manual
Page 45
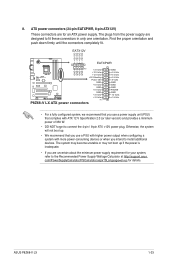
...12V DC +12V DC +12V DC +12V DC EATXPWR PIN 1 +3 Volts GND GND GND GND +12 Volts +12 Volts P8Z68-V LX +5V Standby Power OK GND +5 Volts GND +5 Volts GND +3 Volts +3 Volts PIN 1 P8Z68-V LX ATX power connectors GND +5 Volts +5 Volts +5 Volts -5 Volts GND GND GND PSON# GND -12 Volts +3 Volts &#... with more power-consuming devices or when you use a power supply unit (PSU) that you intend to fit these connectors in only one orientation. ASUS P8Z68-V LX 1-33 8. The system may become unstable or may not boot up . • We recommend that you use a PSU with higher power output...
...12V DC +12V DC +12V DC +12V DC EATXPWR PIN 1 +3 Volts GND GND GND GND +12 Volts +12 Volts P8Z68-V LX +5V Standby Power OK GND +5 Volts GND +5 Volts GND +3 Volts +3 Volts PIN 1 P8Z68-V LX ATX power connectors GND +5 Volts +5 Volts +5 Volts -5 Volts GND GND GND PSON# GND -12 Volts +3 Volts &#... with more power-consuming devices or when you use a power supply unit (PSU) that you intend to fit these connectors in only one orientation. ASUS P8Z68-V LX 1-33 8. The system may become unstable or may not boot up . • We recommend that you use a PSU with higher power output...
User Manual
Page 47
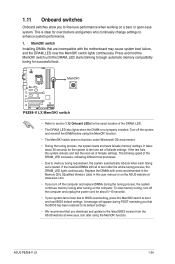
The blinking speed of failsafe settings. This is tested. switch until the DRAM_LED starts blinking to boot and load BIOS default settings. P8Z68-V LX P8Z68-V LX MemOK! It takes about 5-10 seconds. • If your system fail to boot due to BIOS overclocking, press the MemOK! If the installed DIMMs ...test fails, the system reboots and test the next set of the DRAM_LED. • The DRAM_LED also lights when the DIMM is not properly installed. ASUS P8Z68-V LX 1-35 switch • Refer to enhance system performance. 1. function. • The MemOK! function.
The blinking speed of failsafe settings. This is tested. switch until the DRAM_LED starts blinking to boot and load BIOS default settings. P8Z68-V LX P8Z68-V LX MemOK! It takes about 5-10 seconds. • If your system fail to boot due to BIOS overclocking, press the MemOK! If the installed DIMMs ...test fails, the system reboots and test the next set of the DRAM_LED. • The DRAM_LED also lights when the DIMM is not properly installed. ASUS P8Z68-V LX 1-35 switch • Refer to enhance system performance. 1. function. • The MemOK! function.
User Manual
Page 49
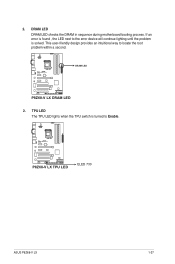
If an error is found , the LED next to the error device will continue lighting until the problem is turned to locate the root problem within a second. This user-friendly design provides an intuitional way to Enable. P8Z68-V LX DRAM LED P8Z68-V LX DRAM LED 2. P8Z68-V LX P8Z68-V LX TPU LED ELED 730 ASUS P8Z68-V LX 1-37 TPU LED The TPU LED lights when the TPU switch is solved. DRAM LED DRAM LED checks the DRAM in sequence during motherboard booting process. 2.
If an error is found , the LED next to the error device will continue lighting until the problem is turned to locate the root problem within a second. This user-friendly design provides an intuitional way to Enable. P8Z68-V LX DRAM LED P8Z68-V LX DRAM LED 2. P8Z68-V LX P8Z68-V LX TPU LED ELED 730 ASUS P8Z68-V LX 1-37 TPU LED The TPU LED lights when the TPU switch is solved. DRAM LED DRAM LED checks the DRAM in sequence during motherboard booting process. 2.
User Manual
Page 52
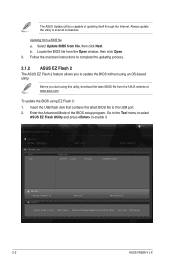
... itself through the Internet. b. To update the BIOS using this utility, download the latest BIOS file from a BIOS file a. ASUS EZ Flash 2 Utility V01.02 Flash Info MODEL: P8Z68-V LX File Path: fs0:\ Drive fs0:\ VER: 0201 Folder Info 06/17/11 10:23p 4194304 Exit DATE: 05/26/2011 P8Z68VLX...VER: 0201 DATE: 05/26/11 [Enter] Select or Load [Tab] Switch [Up/Down/PageUp/PageDown/Home/End] Move [Esc] Exit [F2] Backup 2-2 ASUS P8Z68-V LX The ASUS Update utility is capable of the BIOS setup program. Locate the BIOS file from file, then click Next. Insert the USB flash disk that contains...
... itself through the Internet. b. To update the BIOS using this utility, download the latest BIOS file from a BIOS file a. ASUS EZ Flash 2 Utility V01.02 Flash Info MODEL: P8Z68-V LX File Path: fs0:\ Drive fs0:\ VER: 0201 Folder Info 06/17/11 10:23p 4194304 Exit DATE: 05/26/2011 P8Z68VLX...VER: 0201 DATE: 05/26/11 [Enter] Select or Load [Tab] Switch [Up/Down/PageUp/PageDown/Home/End] Move [Esc] Exit [F2] Backup 2-2 ASUS P8Z68-V LX The ASUS Update utility is capable of the BIOS setup program. Locate the BIOS file from file, then click Next. Insert the USB flash disk that contains...
User Manual
Page 54
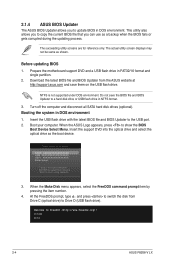
... Enter Setup ↑ and ↓ to move selection ENTER to select boot device ESC to update BIOS in NTFS format. 3. 2.1.4 ASUS BIOS Updater The ASUS BIOS Updater allows you to boot using defaults 3. The succeeding utility screens are for reference only. The actual utility screen displays may not be...the FreeDOS command prompt item by pressing the item number. 4. At the FreeDOS prompt, type d: and press to switch the disk from the ASUS website at http://support.asus.com and save the BIOS file and BIOS Updater to Drive D (USB flash drive). C:\>d: D:\> 2-4 ASUS P8Z68-V LX
... Enter Setup ↑ and ↓ to move selection ENTER to select boot device ESC to update BIOS in NTFS format. 3. 2.1.4 ASUS BIOS Updater The ASUS BIOS Updater allows you to boot using defaults 3. The succeeding utility screens are for reference only. The actual utility screen displays may not be...the FreeDOS command prompt item by pressing the item number. 4. At the FreeDOS prompt, type d: and press to switch the disk from the ASUS website at http://support.asus.com and save the BIOS file and BIOS Updater to Drive D (USB flash drive). C:\>d: D:\> 2-4 ASUS P8Z68-V LX


