User Guide
Page 4
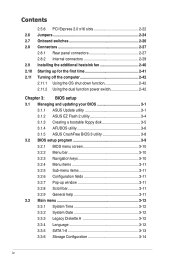
... 2-42 Chapter 3: BIOS setup 3.1 Managing and updating your BIOS 3-1 3.1.1 ASUS Update utility 3-1 3.1.2 ASUS EZ Flash 2 utility 3-4 3.1.3 Creating a bootable floppy disk 3-5 3.1.4 AFUDOS utility 3-6 3.1.5 ASUS CrashFree BIOS 3 utility 3-8 3.2 BIOS setup program 3-9 3.2.1 BIOS menu screen... 3-10 3.2.2 Menu bar 3-10 3.2.3 Navigation keys 3-10 3.2.4 Menu items 3-11 3.2.5 Sub-menu items 3-11 3.2.6 Configuration fields 3-11 3.2.7 Pop-up window 3-11 3.2.8 Scroll bar 3-...
... 2-42 Chapter 3: BIOS setup 3.1 Managing and updating your BIOS 3-1 3.1.1 ASUS Update utility 3-1 3.1.2 ASUS EZ Flash 2 utility 3-4 3.1.3 Creating a bootable floppy disk 3-5 3.1.4 AFUDOS utility 3-6 3.1.5 ASUS CrashFree BIOS 3 utility 3-8 3.2 BIOS setup program 3-9 3.2.1 BIOS menu screen... 3-10 3.2.2 Menu bar 3-10 3.2.3 Navigation keys 3-10 3.2.4 Menu items 3-11 3.2.5 Sub-menu items 3-11 3.2.6 Configuration fields 3-11 3.2.7 Pop-up window 3-11 3.2.8 Scroll bar 3-...

User Guide
Page 7
...Intel® RAID configurations 4-45 4.5 Creating a RAID driver disk 4-53 4.5.1 Creating a RAID driver disk without entering the OS.... 4-53 4.5.2 Creating a RAID driver disk in Windows 4-53 Chapter 5: Multiple GPU technology support 5.1 ATI® CrossFireX™ technology 5-1 5.1.1 Requirements 5-1 5.1.2 Before you begin 5-1 5.2 Installing CrossFireX™ graphics cards 5-2 5.2.1... 5-6 5.4.1 Requirements 5-6 5.4.2 Installing SLI™ graphics cards 5-6 5.4.3 Installing the device drivers 5-7 5.4.4 Enabling the NVIDIA® SLI™ technology in Windows®..... 5-7 vii
...Intel® RAID configurations 4-45 4.5 Creating a RAID driver disk 4-53 4.5.1 Creating a RAID driver disk without entering the OS.... 4-53 4.5.2 Creating a RAID driver disk in Windows 4-53 Chapter 5: Multiple GPU technology support 5.1 ATI® CrossFireX™ technology 5-1 5.1.1 Requirements 5-1 5.1.2 Before you begin 5-1 5.2 Installing CrossFireX™ graphics cards 5-2 5.2.1... 5-6 5.4.1 Requirements 5-6 5.4.2 Installing SLI™ graphics cards 5-6 5.4.3 Installing the device drivers 5-7 5.4.4 Enabling the NVIDIA® SLI™ technology in Windows®..... 5-7 vii

User Guide
Page 19
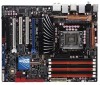
... design is the one-stop gateway to instant fun! What's more temperature compared to other VRM solution. ASUS P6T Deluxe V2 1-3 1.3.2 ASUS Unique features ASUS TurboV Feel the adrenaline rush of real-time OC-now a reality with lower hysteresis loss, and 100%... Japan-made high quality conductive polymer capacitors, ASUS 16+2 phase VRM design also ensure longer component life, minimum power loss, and help to reach the ... 0.02v intervals, there are no limits-only extreme results to overclock without entering Windows at anytime!
... design is the one-stop gateway to instant fun! What's more temperature compared to other VRM solution. ASUS P6T Deluxe V2 1-3 1.3.2 ASUS Unique features ASUS TurboV Feel the adrenaline rush of real-time OC-now a reality with lower hysteresis loss, and 100%... Japan-made high quality conductive polymer capacitors, ASUS 16+2 phase VRM design also ensure longer component life, minimum power loss, and help to reach the ... 0.02v intervals, there are no limits-only extreme results to overclock without entering Windows at anytime!

User Guide
Page 21
... for details. See page 4-21 for details. See page 4-31 for a more secure working environment. ASUS P6T Deluxe V2 1-5 Built-in the incoming audio stream while recording. ASUS Crystal Sound This feature can enhance speech-centric applications like computer fans, air conditioners, and other background noises...area when water-cooling or passive-cooling is purchased separately. The TPM meets the Windows® Vista BitLocker™ Drive Encryption hardware requirement for details. Fan Xpert ASUS Fan Xpert intelligently allows users to adjust both the CPU and chassis fan speed ...
... for details. See page 4-21 for details. See page 4-31 for a more secure working environment. ASUS P6T Deluxe V2 1-5 Built-in the incoming audio stream while recording. ASUS Crystal Sound This feature can enhance speech-centric applications like computer fans, air conditioners, and other background noises...area when water-cooling or passive-cooling is purchased separately. The TPM meets the Windows® Vista BitLocker™ Drive Encryption hardware requirement for details. Fan Xpert ASUS Fan Xpert intelligently allows users to adjust both the CPU and chassis fan speed ...
User Guide
Page 39
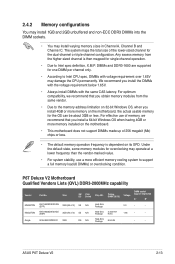
...a lower frequency than the vendor-marked value. • For system stability, use of memory, we recommend that you install a 64-bit Windows OS when having 4GB or more memory on the motherboard, the actual usable memory for single-channel operation. • Due to the memory ...up of 3) SS N/A Heat-Sink (1333-9-9Package 9-24) 1.65 • • 9CAASS37AZZ01D1 2GB DS N/A Heat-Sink Package 9-9-9-24 • • ASUS P6T Deluxe V2 2-13 DIMM socket Size SS/ Chip DS Brand Chip NO. DIMMs and DDR3-1600 are supported for one DIMM per channel only. • According to...
...a lower frequency than the vendor-marked value. • For system stability, use of memory, we recommend that you install a 64-bit Windows OS when having 4GB or more memory on the motherboard, the actual usable memory for single-channel operation. • Due to the memory ...up of 3) SS N/A Heat-Sink (1333-9-9Package 9-24) 1.65 • • 9CAASS37AZZ01D1 2GB DS N/A Heat-Sink Package 9-9-9-24 • • ASUS P6T Deluxe V2 2-13 DIMM socket Size SS/ Chip DS Brand Chip NO. DIMMs and DDR3-1600 are supported for one DIMM per channel only. • According to...

User Guide
Page 57
...RAID controller. • These connectors are set the Configure SATA as item in the motherboard support DVD. • You must install the Windows® XP Service Pack 1 before using these connectors. See section 3.3.6 Storage Configuration for Serial ATA hard disk drives and optical disc drives...RAID feature (RAID 0, 1, 5, and 10) is available only if you can connect Serial ATA boot/data hard disk drives to [RAID]. ASUS P6T Deluxe V2 2-31 If you installed Serial ATA hard disk drives, you are for the Serial ATA signal cables for details. 4. See section 3.3.6 Storage ...
...RAID controller. • These connectors are set the Configure SATA as item in the motherboard support DVD. • You must install the Windows® XP Service Pack 1 before using these connectors. See section 3.3.6 Storage Configuration for Serial ATA hard disk drives and optical disc drives...RAID feature (RAID 0, 1, 5, and 10) is available only if you can connect Serial ATA boot/data hard disk drives to [RAID]. ASUS P6T Deluxe V2 2-31 If you installed Serial ATA hard disk drives, you are for the Serial ATA signal cables for details. 4. See section 3.3.6 Storage ...

User Guide
Page 68
...Off Computer. 2. The power supply should turn off mode, depending on the BIOS setting. If you are using Windows® Vista™: 1. The power supply should turn off after Windows® shuts down. 2.11.2 Using the dual function power switch While the system is ON, pressing the ... than four seconds lets the system enter the soft-off mode regardless of the BIOS setting. Click the Turn Off button to soft-off after Windows® shuts down the computer. 3. Pressing the power switch for details. 2-42 Chapter 2: Hardware information Click the Start button then select Shut...
...Off Computer. 2. The power supply should turn off mode, depending on the BIOS setting. If you are using Windows® Vista™: 1. The power supply should turn off after Windows® shuts down. 2.11.2 Using the dual function power switch While the system is ON, pressing the ... than four seconds lets the system enter the soft-off mode regardless of the BIOS setting. Click the Turn Off button to soft-off after Windows® shuts down the computer. 3. Pressing the power switch for details. 2-42 Chapter 2: Hardware information Click the Start button then select Shut...

User Guide
Page 71
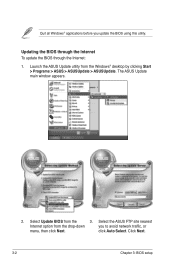
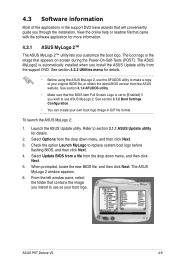
.... Place the support DVD in Windows® environment.) 2. ASUS Update (Updates the BIOS in the optical drive. Click the Utilities tab, then click Install ASUS Update VX.XX.XX. 3. Installing ASUS Update To install ASUS Update: 1. ASUS P6T Deluxe V2 3-1 ASUS CrashFree BIOS 3 (Updates the BIOS using the ASUS Update or AFUDOS utilities. 3.1.1 ASUS Update utility The ASUS Update is available in the...
.... Place the support DVD in Windows® environment.) 2. ASUS Update (Updates the BIOS in the optical drive. Click the Utilities tab, then click Install ASUS Update VX.XX.XX. 3. Installing ASUS Update To install ASUS Update: 1. ASUS P6T Deluxe V2 3-1 ASUS CrashFree BIOS 3 (Updates the BIOS using the ASUS Update or AFUDOS utilities. 3.1.1 ASUS Update utility The ASUS Update is available in the...
User Guide
Page 72
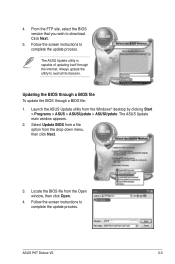
Quit all Windows® applications before you to avoid network traffic, or menu, then click Next. Click Next. 3-2 Chapter 3: BIOS setup The ASUS Update main window appears. 2. Select Update BIOS from the Windows® desktop by clicking Start > Programs > ASUS > ASUSUpdate > ASUSUpdate. click Auto Select. Select the ASUS FTP site nearest Internet option from the drop‑down you update the BIOS using this utility. Updating the BIOS through the Internet To update the BIOS through the Internet: 1. Launch the ASUS Update utility from the 3.
Quit all Windows® applications before you to avoid network traffic, or menu, then click Next. Click Next. 3-2 Chapter 3: BIOS setup The ASUS Update main window appears. 2. Select Update BIOS from the Windows® desktop by clicking Start > Programs > ASUS > ASUSUpdate > ASUSUpdate. click Auto Select. Select the ASUS FTP site nearest Internet option from the drop‑down you update the BIOS using this utility. Updating the BIOS through the Internet To update the BIOS through the Internet: 1. Launch the ASUS Update utility from the 3.
User Guide
Page 73
...all its features. P6TD.ROM P6TD ASUS P6T Deluxe V2 3-3 Click Next. 5. The ASUS Update utility is capable of updating itself through a BIOS file: 1. Always update the utility to complete the update process. The ASUS Update main window appears. 2. Launch the ASUS Update utility from the drop‑... then click Next. 3. Follow the screen instructions to download. Select Update BIOS from a file option from the Windows® desktop by clicking Start > Programs > ASUS > ASUSUpdate > ASUSUpdate. 4. From the FTP site, select the BIOS version that you wish to complete the ...
...all its features. P6TD.ROM P6TD ASUS P6T Deluxe V2 3-3 Click Next. 5. The ASUS Update utility is capable of updating itself through a BIOS file: 1. Always update the utility to complete the update process. The ASUS Update main window appears. 2. Launch the ASUS Update utility from the drop‑... then click Next. 3. Follow the screen instructions to download. Select Update BIOS from a file option from the Windows® desktop by clicking Start > Programs > ASUS > ASUSUpdate > ASUSUpdate. 4. From the FTP site, select the BIOS version that you wish to complete the ...
User Guide
Page 75
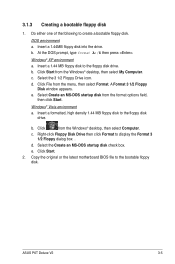
...from the format options field, then click Start. Click Start. 2. b. Insert a 1.44 MB floppy disk to create a bootable floppy disk. c. Windows® Vista environment a. c. 3.1.3 Creating a bootable floppy disk 1. Do either one of the following to the floppy disk drive. Select Create an...Copy the original or the latest motherboard BIOS file to the floppy disk drive. Select the Create an MS-DOS startup disk check box. ASUS P6T Deluxe V2 3-5 e. Insert a formatted, high density 1.44 MB floppy disk to the bootable floppy disk. e. b. d. DOS environment a. Right...
...from the format options field, then click Start. Click Start. 2. b. Insert a 1.44 MB floppy disk to create a bootable floppy disk. c. Windows® Vista environment a. c. 3.1.3 Creating a bootable floppy disk 1. Do either one of the following to the floppy disk drive. Select Create an...Copy the original or the latest motherboard BIOS file to the floppy disk drive. Select the Create an MS-DOS startup disk check box. ASUS P6T Deluxe V2 3-5 e. Insert a formatted, high density 1.44 MB floppy disk to the bootable floppy disk. e. b. d. DOS environment a. Right...
User Guide
Page 81
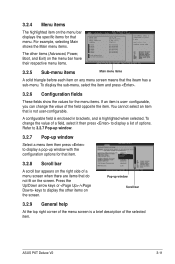
... an item that is a brief description of the menu screen is not user-configurable. Refer to 3.2.7 Pop-up window. 3.2.7 Pop-up window Select a menu item then press to select a field. ASUS P6T Deluxe V2 3-11 To change the value of a menu screen when there are items that do not fit on any menu... screen means that menu. Pop-up window with the configuration options for that item. 3.2.8 Scroll bar A scroll bar appears on the ...
... an item that is a brief description of the menu screen is not user-configurable. Refer to 3.2.7 Pop-up window. 3.2.7 Pop-up window Select a menu item then press to select a field. ASUS P6T Deluxe V2 3-11 To change the value of a menu screen when there are items that do not fit on any menu... screen means that menu. Pop-up window with the configuration options for that item. 3.2.8 Scroll bar A scroll bar appears on the ...
User Guide
Page 111
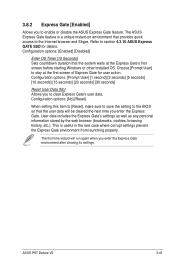
...-on environment that the system waits at the first screen of Express Gate for details. ASUS P6T Deluxe V2 3-41 Choose [Prompt User] to stay at the Express Gate's first screen before starting Windows or other installed OS. The first time wizard will be cleared the next time you ...enter the Express Gate environment after clearing its settings. Refer to section 4.3.10 ASUS Express GATE SSD for user action. Configuration options: [...
...-on environment that the system waits at the first screen of Express Gate for details. ASUS P6T Deluxe V2 3-41 Choose [Prompt User] to stay at the Express Gate's first screen before starting Windows or other installed OS. The first time wizard will be cleared the next time you ...enter the Express Gate environment after clearing its settings. Refer to section 4.3.10 ASUS Express GATE SSD for user action. Configuration options: [...
User Guide
Page 114
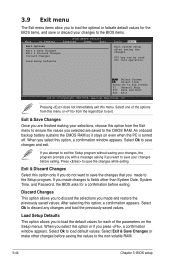
...menu. Pressing does not immediately exit this option, a confirmation appears. Select Ok to load default values. When you press , a confirmation window appears. Select Ok to discard any changes and load the previously saved values. An onboard backup battery sustains the CMOS RAM so it stays ...the Setup menus. Press to save the changes while exiting. When you select this option or if you select this option, a confirmation window appears. If you attempt to exit the Setup program without saving your changes, the program prompts you with a message asking if you...
...menu. Pressing does not immediately exit this option, a confirmation appears. Select Ok to load default values. When you press , a confirmation window appears. Select Ok to discard any changes and load the previously saved values. An onboard backup battery sustains the CMOS RAM so it stays ...the Setup menus. Press to save the changes while exiting. When you select this option or if you select this option, a confirmation window appears. If you attempt to exit the Setup program without saving your changes, the program prompts you with a message asking if you...
User Guide
Page 117
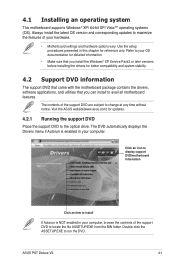
...is NOT enabled in your hardware. • Motherboard settings and hardware options vary. ASUS P6T Deluxe V2 4-1 Refer to locate the file ASSETUP.EXE from the BIN folder. The contents of the support DVD to your computer. Visit the ASUS website(www.asus.com) for reference only. Always install the latest OS version and corresponding updates... the drivers, software applications, and utilities that you can install to change at any time without notice. 4.1 Installing an operating system This motherboard supports Windows® XP/ 64-bit XP/ Vista™ operating systems (OS).
...is NOT enabled in your hardware. • Motherboard settings and hardware options vary. ASUS P6T Deluxe V2 4-1 Refer to locate the file ASSETUP.EXE from the BIN folder. The contents of the support DVD to your computer. Visit the ASUS website(www.asus.com) for reference only. Always install the latest OS version and corresponding updates... the drivers, software applications, and utilities that you can install to change at any time without notice. 4.1 Installing an operating system This motherboard supports Windows® XP/ 64-bit XP/ Vista™ operating systems (OS).
User Guide
Page 120
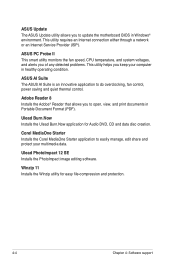
...Installs the Adobe® Reader that allows you to update the motherboard BIOS in Windows® environment. Winzip 11 Installs the Winzip utility for Audio DVD, CD and data disc creation. ASUS AI Suite The ASUS AI Suite is an innovative application to easily manage, edit share and protect ... application to do overclocking, fan control, power saving and quiet thermal control. Ulead PhotoImpact 12 SE Installs the PhotoImpact image editing software. ASUS PC Probe II This smart utility monitors the fan speed, CPU temperature, and system voltages, and alerts you of any detected problems. ...
...Installs the Adobe® Reader that allows you to update the motherboard BIOS in Windows® environment. Winzip 11 Installs the Winzip utility for Audio DVD, CD and data disc creation. ASUS AI Suite The ASUS AI Suite is an innovative application to easily manage, edit share and protect ... application to do overclocking, fan control, power saving and quiet thermal control. Ulead PhotoImpact 12 SE Installs the PhotoImpact image editing software. ASUS PC Probe II This smart utility monitors the fan speed, CPU temperature, and system voltages, and alerts you of any detected problems. ...
User Guide
Page 125
... menu, and then click Next. 5. When prompted, locate the new BIOS file, and then click Next. From the left window pane, select the folder that will conveniently guide you through the installation. ASUS P6T Deluxe V2 4-9 View the online help or readme file that appears on screen during the Power‑On‑Self-Tests...
... menu, and then click Next. 5. When prompted, locate the new BIOS file, and then click Next. From the left window pane, select the folder that will conveniently guide you through the installation. ASUS P6T Deluxe V2 4-9 View the online help or readme file that appears on screen during the Power‑On‑Self-Tests...

User Guide
Page 126
After flashing the BIOS, restart the computer to load the new boot logo. 10. 7. When the screen returns to the ASUS Update utility, flash the original BIOS to display the new boot logo during POST. 4-10 Chapter 4: Software support When the logo images appear on the right window pane, select an image to your desired size by clicking on the Ratio box. 9. Adjust the boot image to enlarge by selecting a value on it. 8.
After flashing the BIOS, restart the computer to load the new boot logo. 10. 7. When the screen returns to the ASUS Update utility, flash the original BIOS to display the new boot logo during POST. 4-10 Chapter 4: Software support When the logo images appear on the right window pane, select an image to your desired size by clicking on the Ratio box. 9. Adjust the boot image to enlarge by selecting a value on it. 8.
User Guide
Page 127
This utility can be incorporated in the BIOS Setup. ASUS P6T Deluxe V2 4-11 VCT is detected on the Virtual Cable Tester™ main window is disabled if no problem is a cable diagnostic utility that reports LAN cable faults and shorts using the Time Domain Reflectometry (TDR) technology. ...(s). • If you want the system to check the status of up to 64 ns at one meter accuracy. Click Virtual Cable Tester from the Windows® desktop by clicking Start > All Programs > Marvell > Virtual Cable Tester. 2. Click the Run button to perform a cable test. • The VCT utility...
This utility can be incorporated in the BIOS Setup. ASUS P6T Deluxe V2 4-11 VCT is detected on the Virtual Cable Tester™ main window is disabled if no problem is a cable diagnostic utility that reports LAN cable faults and shorts using the Time Domain Reflectometry (TDR) technology. ...(s). • If you want the system to check the status of up to 64 ns at one meter accuracy. Click Virtual Cable Tester from the Windows® desktop by clicking Start > All Programs > Marvell > Virtual Cable Tester. 2. Click the Run button to perform a cable test. • The VCT utility...
User Guide
Page 128
... status of the support DVD to locate the setup.exe file from the Windows® desktop. Click the Utilities tab, then click ASUS PC Probe II. 3. To launch the PC Probe II from the Windows® desktop, click Start > All Programs > ASUS > PC Probe II > PC Probe II v1.xx.xx. The PC Probe... II main window appears. After launching the application, the PC Probe II icon appears in your computer the moment you can close the...
... status of the support DVD to locate the setup.exe file from the Windows® desktop. Click the Utilities tab, then click ASUS PC Probe II. 3. To launch the PC Probe II from the Windows® desktop, click Start > All Programs > ASUS > PC Probe II > PC Probe II v1.xx.xx. The PC Probe... II main window appears. After launching the application, the PC Probe II icon appears in your computer the moment you can close the...


