
User Guide
Page 14
P6T Deluxe V2 specifications summary Back Panel I/O Ports Internal I/O Connectors BIOS Features Manageability Support DVD Contents Form Factor 1 x ... EATX 12V Power connectors System Panel (Q-Connector) 1 x TPM connector 1 x Power on switch 1 x Reset switch 16 Mb AMI BIOS, PnP, DMI 2.0, WfM 2.0, SM BIOS 2.4, Multi-language BIOS WOL by PME, WOR by PME,... Chassis Intrusion, PXE Drivers ASUS PC Probe II ASUS Update ASUS AI Suite Image-Editing Suite Anti-virus software (OEM version) ATX Form Factor, 12"x 9.6" (30.5cm...
P6T Deluxe V2 specifications summary Back Panel I/O Ports Internal I/O Connectors BIOS Features Manageability Support DVD Contents Form Factor 1 x ... EATX 12V Power connectors System Panel (Q-Connector) 1 x TPM connector 1 x Power on switch 1 x Reset switch 16 Mb AMI BIOS, PnP, DMI 2.0, WfM 2.0, SM BIOS 2.4, Multi-language BIOS WOL by PME, WOR by PME,... Chassis Intrusion, PXE Drivers ASUS PC Probe II ASUS Update ASUS AI Suite Image-Editing Suite Anti-virus software (OEM version) ATX Form Factor, 12"x 9.6" (30.5cm...

User Guide
Page 29
... PRI_EIDE) 7. ICH10R Serial ATA connectors [red] (7-pin SATA1-6) 8. Onboard Power-on and Reset switch 12. USB connectors (10-1 pin USB910, USB1112, USB1314) 14. Optical drive audio connector (4-pin CD) 17. Express_Gate SSD Page 2-36 2-6 2-34 2-12 2-25 2-30 2-31 2-24 2-38 2-29 2-26 2-35 2-32 2-33 2-29 2-37 2-35 2-37 4-35 ASUS P6T Deluxe V2 2-3
... PRI_EIDE) 7. ICH10R Serial ATA connectors [red] (7-pin SATA1-6) 8. Onboard Power-on and Reset switch 12. USB connectors (10-1 pin USB910, USB1112, USB1314) 14. Optical drive audio connector (4-pin CD) 17. Express_Gate SSD Page 2-36 2-6 2-34 2-12 2-25 2-30 2-31 2-24 2-38 2-29 2-26 2-35 2-32 2-33 2-29 2-37 2-35 2-37 4-35 ASUS P6T Deluxe V2 2-3

User Guide
Page 50
... erasing the CMOS RTC RAM data. Move the jumper cap from pins 1-2 (default) to overclocking, use the C.P.R. (CPU Parameter Recall) feature. function. You can automatically reset parameter settings to default values. • Due to re-enter data. Clear RTC RAM (CLRTC) This jumper allows you to overclocking. 2.6 Jumpers 1. After the CMOS...
... erasing the CMOS RTC RAM data. Move the jumper cap from pins 1-2 (default) to overclocking, use the C.P.R. (CPU Parameter Recall) feature. function. You can automatically reset parameter settings to default values. • Due to re-enter data. Clear RTC RAM (CLRTC) This jumper allows you to overclocking. 2.6 Jumpers 1. After the CMOS...

User Guide
Page 52
Power-on switch Press the power-on a bare or open-case system. Reset switch Press the reset switch to wake/power up the system. 2. This is ideal for overclockers and gamers who continually change settings to fine-tune performance when working on switch to reboot the system. 2-26 Chapter 2: Hardware information 2.7 Onboard switches Onboard switches allow you to enhance system performance. 1.
Power-on switch Press the power-on a bare or open-case system. Reset switch Press the reset switch to wake/power up the system. 2. This is ideal for overclockers and gamers who continually change settings to fine-tune performance when working on switch to reboot the system. 2-26 Chapter 2: Hardware information 2.7 Onboard switches Onboard switches allow you to enhance system performance. 1.
User Guide
Page 64
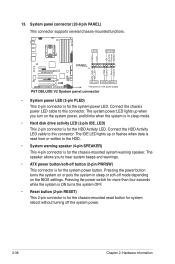
...depending on or puts the system in sleep mode. • Hard disk drive activity LED (2-pin IDE_LED) This 2-pin connector is for the chassis-mounted reset button for the system power LED. The IDE LED lights up when you to this connector. Pressing the power switch for more than four seconds... while the system is ON turns the system OFF. • Reset button (2-pin RESET) This 2-pin connector is for the HDD Activity LED. Connect the HDD Activity LED cable to the HDD. • System warning speaker (4-pin ...
...depending on or puts the system in sleep mode. • Hard disk drive activity LED (2-pin IDE_LED) This 2-pin connector is for the chassis-mounted reset button for the system power LED. The IDE LED lights up when you to this connector. Pressing the power switch for more than four seconds... while the system is ON turns the system OFF. • Reset button (2-pin RESET) This 2-pin connector is for the HDD Activity LED. Connect the HDD Activity LED cable to the HDD. • System warning speaker (4-pin ...

User Guide
Page 74
... file is built-in the BIOS chip so it . Visit the ASUS website (www.asus.com) to a floppy disk or a USB flash disk, then restart the system. 3. ASUSTek EZ Flash 2 BIOS ROM Utility V3.30 FLASH TYPE: MXIC 25L1605A Current ROM BOARD: P6T Deluxe V2 VER: 0309 DATE: 09/15/2008 Update ROM BOARD: Unknown... support devices such as a USB flash disk or a floppy disk with FAT 32/16 format and single partition only. • DO NOT shut down or reset the system while updating the BIOS to prevent system boot failure! 3-4 Chapter 3: BIOS setup Press + during the Power-On Self Tests (POST...
... file is built-in the BIOS chip so it . Visit the ASUS website (www.asus.com) to a floppy disk or a USB flash disk, then restart the system. 3. ASUSTek EZ Flash 2 BIOS ROM Utility V3.30 FLASH TYPE: MXIC 25L1605A Current ROM BOARD: P6T Deluxe V2 VER: 0309 DATE: 09/15/2008 Update ROM BOARD: Unknown... support devices such as a USB flash disk or a floppy disk with FAT 32/16 format and single partition only. • DO NOT shut down or reset the system while updating the BIOS to prevent system boot failure! 3-4 Chapter 3: BIOS setup Press + during the Power-On Self Tests (POST...

User Guide
Page 77
... Reading flash ...... Erasing flash ...... Boot the system in DOS mode, then at the DOS prompt. 2. Version 1.19(ASUS V2.07(03.11.24BB)) Copyright (C) 2002 American Megatrends, Inc. WARNING!! done Advance Check ...... Write the BIOS filename on... the bootable floppy disk. done Writing flash ...... 0x0008CC00 (9%) DO NOT shut down or reset the system while updating the BIOS to the DOS prompt after the BIOS update process is the latest or the...done Writing flash ...... done Verifying flash .... done Please restart your computer A:\> ASUS P6T Deluxe V2 3-7
... Reading flash ...... Erasing flash ...... Boot the system in DOS mode, then at the DOS prompt. 2. Version 1.19(ASUS V2.07(03.11.24BB)) Copyright (C) 2002 American Megatrends, Inc. WARNING!! done Advance Check ...... Write the BIOS filename on... the bootable floppy disk. done Writing flash ...... 0x0008CC00 (9%) DO NOT shut down or reset the system while updating the BIOS to the DOS prompt after the BIOS update process is the latest or the...done Writing flash ...... done Verifying flash .... done Please restart your computer A:\> ASUS P6T Deluxe V2 3-7

User Guide
Page 78
... system after the utility completes the updating process. • Only the USB flash disk with FAT 32/16 format and single partition can support ASUS CrashFree BIOS 3. Bad BIOS checksum. Floppy found , the utility reads the BIOS file and starts flashing the corrupted BIOS file. 4. Insert the... BIOS 3 utility The ASUS CrashFree BIOS 3 is an auto recovery tool that contains the updated BIOS file. The device size should be smaller than 8GB. • DO NOT shut down or reset the system while updating the BIOS! You can cause system boot failure! 3-8 Chapter 3: BIOS setup Recovering ...
... system after the utility completes the updating process. • Only the USB flash disk with FAT 32/16 format and single partition can support ASUS CrashFree BIOS 3. Bad BIOS checksum. Floppy found , the utility reads the BIOS file and starts flashing the corrupted BIOS file. 4. Insert the... BIOS 3 utility The ASUS CrashFree BIOS 3 is an auto recovery tool that contains the updated BIOS file. The device size should be smaller than 8GB. • DO NOT shut down or reset the system while updating the BIOS! You can cause system boot failure! 3-8 Chapter 3: BIOS setup Recovering ...
User Guide
Page 79
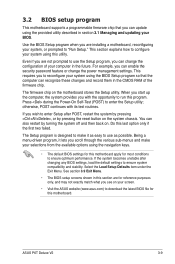
... can also restart by pressing the reset button on . See section 3.9 Exit Menu. • The BIOS setup screens shown in this section are not prompted to enter Setup after changing any BIOS settings, load the default settings to enter the Setup utility; ASUS P6T Deluxe V2 3-9 Even if you are for ...your selections from the available options using this motherboard. The Setup program is designed to make your screen. • Visit the ASUS website (www.asus.com) to download the latest BIOS file for most conditions to reconfigure your system using the BIOS Setup program so that you see...
... can also restart by pressing the reset button on . See section 3.9 Exit Menu. • The BIOS setup screens shown in this section are not prompted to enter Setup after changing any BIOS settings, load the default settings to enter the Setup utility; ASUS P6T Deluxe V2 3-9 Even if you are for ...your selections from the available options using this motherboard. The Setup program is designed to make your screen. • Visit the ASUS website (www.asus.com) to download the latest BIOS file for most conditions to reconfigure your system using the BIOS Setup program so that you see...

User Guide
Page 110
... Advanced Power Boot Tools Exit ASUS EZ Flash 2 Express Gate Enter OS Timer Reset User Data [Enabled] [10 Seconds] [No] Press ENTER to run ASUS EZ Flash 2. Profile Ai Net 2 Select Screen Select Item +- This utility doesn't support : 1.NTFS format ASUS O.C. Use the left/right...Exit v02.61 (C)Copyright 1985-2008, American Megatrends, Inc. 3.8.1 ASUS EZ Flash 2 Allows you press , a confirmation message appears. ASUSTek EZ Flash 2 BIOS ROM Utility V3.30 FLASH TYPE: MXIC 25L1605A Current ROM BOARD: P6T Deluxe V2 VER: 0309 DATE: 09/15/2008 Update ROM BOARD: Unknown ...
... Advanced Power Boot Tools Exit ASUS EZ Flash 2 Express Gate Enter OS Timer Reset User Data [Enabled] [10 Seconds] [No] Press ENTER to run ASUS EZ Flash 2. Profile Ai Net 2 Select Screen Select Item +- This utility doesn't support : 1.NTFS format ASUS O.C. Use the left/right...Exit v02.61 (C)Copyright 1985-2008, American Megatrends, Inc. 3.8.1 ASUS EZ Flash 2 Allows you press , a confirmation message appears. ASUSTek EZ Flash 2 BIOS ROM Utility V3.30 FLASH TYPE: MXIC 25L1605A Current ROM BOARD: P6T Deluxe V2 VER: 0309 DATE: 09/15/2008 Update ROM BOARD: Unknown ...
User Guide
Page 111
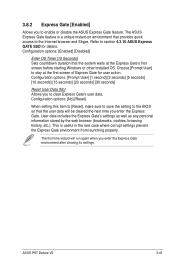
... [Prompt User] to the Internet browser and Skype. ASUS P6T Deluxe V2 3-41 Configuration options: [Prompt User] [1 second] [3 seconds] [5 seconds] [10 seconds] [15 seconds] [20 seconds] [30 seconds] Reset User Data [No] Allows you to enable or disable the ASUS Express Gate feature. This is a unique instant-on ... system waits at the first screen of Express Gate for details. Configuration options: [No] [Reset] When setting this item to [Reset], make sure to save the setting to section 4.3.10 ASUS Express GATE SSD for user action. 3.8.2 Express Gate [Enabled] Allows you to clear Express...
... [Prompt User] to the Internet browser and Skype. ASUS P6T Deluxe V2 3-41 Configuration options: [Prompt User] [1 second] [3 seconds] [5 seconds] [10 seconds] [15 seconds] [20 seconds] [30 seconds] Reset User Data [No] Allows you to enable or disable the ASUS Express Gate feature. This is a unique instant-on ... system waits at the first screen of Express Gate for details. Configuration options: [No] [Reset] When setting this item to [Reset], make sure to save the setting to section 4.3.10 ASUS Express GATE SSD for user action. 3.8.2 Express Gate [Enabled] Allows you to clear Express...

User Guide
Page 112
... ASUS O.C. PROFILE Configuration O.C. Profile 1 Status : Default-Profile O.C. Chapter 3: BIOS setup Profile Add Your CMOS Profile. Start O.C. You can support devices such as a USB flash disk or a floppy disk with FAT 32/16 format and single partition only. • DO NOT shut down or reset...utility to save and load CMOS. Press , and choose a profile to prevent the system boot failure! Profile Utility V1.30 Current CMOS BOARD: P6T Deluxe V2 VER: 0309 DATE: 09/15/2008 PATH: A:\ A: Restore CMOS BOARD: Unknown VER: Unknown DATE: Unknown 3-42 Note [Enter] Select or...
... ASUS O.C. PROFILE Configuration O.C. Profile 1 Status : Default-Profile O.C. Chapter 3: BIOS setup Profile Add Your CMOS Profile. Start O.C. You can support devices such as a USB flash disk or a floppy disk with FAT 32/16 format and single partition only. • DO NOT shut down or reset...utility to save and load CMOS. Press , and choose a profile to prevent the system boot failure! Profile Utility V1.30 Current CMOS BOARD: P6T Deluxe V2 VER: 0309 DATE: 09/15/2008 PATH: A:\ A: Restore CMOS BOARD: Unknown VER: Unknown DATE: Unknown 3-42 Note [Enter] Select or...

User Guide
Page 153
... . This is also useful in the confirmation dialog box, your computer. • The number of the LAN ports may use the connected port. ASUS P6T Deluxe V2 4-37 For PPPoE and wireless (optional), set current date and time as well as time zone. • Input Language: choose your preferred input...Gate SSD environment after clearing its settings. • Screen Settings: Choose the most common) or static IP. The first-time Wizard will be reset to change various Express Gate SSD settings. The user data will run again when you may differ from motherboards. • You can connect ...
... . This is also useful in the confirmation dialog box, your computer. • The number of the LAN ports may use the connected port. ASUS P6T Deluxe V2 4-37 For PPPoE and wireless (optional), set current date and time as well as time zone. • Input Language: choose your preferred input...Gate SSD environment after clearing its settings. • Screen Settings: Choose the most common) or static IP. The first-time Wizard will be reset to change various Express Gate SSD settings. The user data will run again when you may differ from motherboards. • You can connect ...

User Guide
Page 158
.... Profile [Enabled] [10 Seconds] [10] Press ENTER to run the utility to restore the Express Gate software if it from the ASUS support website. Express Gate software is ever corrupted. To install the Express Gate Updater, launch the installer and follow on Windows. Configuring Express ... versions or to select and update BIOS. BIOS SETUP UTILITY Main Ai Tweaker Advanced Power Boot Tools Exit ASUS EZ Flash 2 Express Gate Enter OS Timer Reset User Data ASUS O.C. New versions of the software on the support DVD or download it is released as an image file...
.... Profile [Enabled] [10 Seconds] [10] Press ENTER to run the utility to restore the Express Gate software if it from the ASUS support website. Express Gate software is ever corrupted. To install the Express Gate Updater, launch the installer and follow on Windows. Configuring Express ... versions or to select and update BIOS. BIOS SETUP UTILITY Main Ai Tweaker Advanced Power Boot Tools Exit ASUS EZ Flash 2 Express Gate Enter OS Timer Reset User Data ASUS O.C. New versions of the software on the support DVD or download it is released as an image file...
User Guide
Page 162
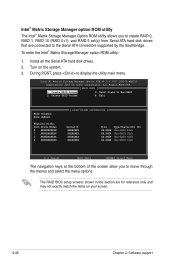
... 2. Delete RAID Volume 4. Create RAID Volume 3. To enter the Intel® Matrix Storage Manager option ROM utility: 1. Install all the Serial ATA hard disk drives. 2. Reset Disks to display the utility main menu.
... 2. Delete RAID Volume 4. Create RAID Volume 3. To enter the Intel® Matrix Storage Manager option ROM utility: 1. Install all the Serial ATA hard disk drives. 2. Reset Disks to display the utility main menu.


