User Guide
Page 4
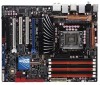
... the OS shut down function 2-42 2.11.2 Using the dual function power switch 2-42 Chapter 3: BIOS setup 3.1 Managing and updating your BIOS 3-1 3.1.1 ASUS Update utility 3-1 3.1.2 ASUS EZ Flash 2 utility 3-4 3.1.3 Creating a bootable floppy disk 3-5 3.1.4 AFUDOS utility 3-6 3.1.5 ASUS CrashFree BIOS 3 utility 3-8 3.2 BIOS setup program 3-9 3.2.1 BIOS menu screen 3-10 3.2.2 Menu bar 3-10 3.2.3 Navigation keys 3-10 3.2.4 Menu items 3-11 3.2.5 Sub-menu items...
... the OS shut down function 2-42 2.11.2 Using the dual function power switch 2-42 Chapter 3: BIOS setup 3.1 Managing and updating your BIOS 3-1 3.1.1 ASUS Update utility 3-1 3.1.2 ASUS EZ Flash 2 utility 3-4 3.1.3 Creating a bootable floppy disk 3-5 3.1.4 AFUDOS utility 3-6 3.1.5 ASUS CrashFree BIOS 3 utility 3-8 3.2 BIOS setup program 3-9 3.2.1 BIOS menu screen 3-10 3.2.2 Menu bar 3-10 3.2.3 Navigation keys 3-10 3.2.4 Menu items 3-11 3.2.5 Sub-menu items...
User Guide
Page 10
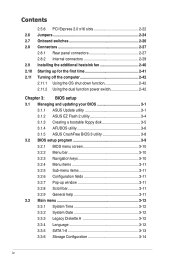
...motherboard. Optional documentation Your product package may have to perform when installing system components. ASUS websites The ASUS website provides updated information on the motherboard. • Chapter 3: BIOS setup This chapter tells how to the following parts: • Chapter 1: Product ...information Refer to change system settings through the BIOS Setup menus. These documents are also provided. • Chapter 4: Software support This chapter describes the contents of the switches, jumpers, and connectors on ASUS hardware and software products. About this guide is...
...motherboard. Optional documentation Your product package may have to perform when installing system components. ASUS websites The ASUS website provides updated information on the motherboard. • Chapter 3: BIOS setup This chapter tells how to the following parts: • Chapter 1: Product ...information Refer to change system settings through the BIOS Setup menus. These documents are also provided. • Chapter 4: Software support This chapter describes the contents of the switches, jumpers, and connectors on ASUS hardware and software products. About this guide is...
User Guide
Page 13
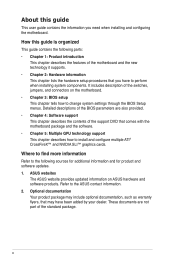
... control - Profile - ASUS EZ Flash 2 ASUS MyLogo 2 Multi-language BIOS ASUS TurboV utility Precision Tweaker 2: - vDRAM Bus: 49-step DRAM bus voltage control - P6T Deluxe V2 specifications summary ASUS Unique features ASUS Stylish Features ASUS Exclusive Overclocking Features ASUS Exclusive Features: - ASUS AI Nap ASUS Quiet Thermal Solution: - ASUS Optional Fan for Water-cooling or Passive-Cooling only ASUS EZ DIY: - ASUS TurboV - ASUS C.P.R.(CPU Parameter Recall...
... control - Profile - ASUS EZ Flash 2 ASUS MyLogo 2 Multi-language BIOS ASUS TurboV utility Precision Tweaker 2: - vDRAM Bus: 49-step DRAM bus voltage control - P6T Deluxe V2 specifications summary ASUS Unique features ASUS Stylish Features ASUS Exclusive Overclocking Features ASUS Exclusive Features: - ASUS AI Nap ASUS Quiet Thermal Solution: - ASUS Optional Fan for Water-cooling or Passive-Cooling only ASUS EZ DIY: - ASUS TurboV - ASUS C.P.R.(CPU Parameter Recall...

User Guide
Page 14
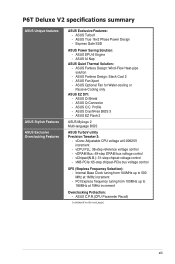
P6T Deluxe V2 specifications summary Back Panel I/O Ports Internal I/O Connectors BIOS Features Manageability Support DVD Contents Form Factor 1 x PS/2 Keyboard / Mouse combo port 1 x S/PDIF Out (Coaxial + Optical) 1 x External SATA 1 x IEEE1394a 2 x RJ45 ports 8 x USB 2.0/1.1 8-...Connector) 1 x TPM connector 1 x Power on switch 1 x Reset switch 16 Mb AMI BIOS, PnP, DMI 2.0, WfM 2.0, SM BIOS 2.4, Multi-language BIOS WOL by PME, WOR by PME, Chassis Intrusion, PXE Drivers ASUS PC Probe II ASUS Update ASUS AI Suite Image-Editing Suite Anti-virus software (OEM version) ATX Form Factor, 12"x 9.6" ...
P6T Deluxe V2 specifications summary Back Panel I/O Ports Internal I/O Connectors BIOS Features Manageability Support DVD Contents Form Factor 1 x PS/2 Keyboard / Mouse combo port 1 x S/PDIF Out (Coaxial + Optical) 1 x External SATA 1 x IEEE1394a 2 x RJ45 ports 8 x USB 2.0/1.1 8-...Connector) 1 x TPM connector 1 x Power on switch 1 x Reset switch 16 Mb AMI BIOS, PnP, DMI 2.0, WfM 2.0, SM BIOS 2.4, Multi-language BIOS WOL by PME, WOR by PME, Chassis Intrusion, PXE Drivers ASUS PC Probe II ASUS Update ASUS AI Suite Image-Editing Suite Anti-virus software (OEM version) ATX Form Factor, 12"x 9.6" ...

User Guide
Page 21
... by different climate conditions in variety of useful profiles offer flexible controls of fan speed to install computer components, update the BIOS or back up your favorite settings. The TPM meets the Windows® Vista BitLocker™ Drive Encryption hardware requirement for...water-cooling or passive-cooling is utilized, ensuring effective heat dissipation for the entire system. ASUS P6T Deluxe V2 1-5 Built-in different geographic regions and system loading. ASUS EZ DIY ASUS EZ DIY feature collection provides you with enhanced data protection via high-level encryption/decryption and...
... by different climate conditions in variety of useful profiles offer flexible controls of fan speed to install computer components, update the BIOS or back up your favorite settings. The TPM meets the Windows® Vista BitLocker™ Drive Encryption hardware requirement for...water-cooling or passive-cooling is utilized, ensuring effective heat dissipation for the entire system. ASUS P6T Deluxe V2 1-5 Built-in different geographic regions and system loading. ASUS EZ DIY ASUS EZ DIY feature collection provides you with enhanced data protection via high-level encryption/decryption and...

User Guide
Page 22
... distribute their favorite settings. See page 3-4 for details. See page 3-42 for details. 1-6 Chapter 1: Product Introduction ASUS Onboard Switch With an easy press during overclock, this new design is a user-friendly BIOS update utility. ASUS Q-Connector ASUS Q-Connector allows you to easily connect or disconnect the chassis front panel cables to conveniently store or...
... distribute their favorite settings. See page 3-4 for details. See page 3-42 for details. 1-6 Chapter 1: Product Introduction ASUS Onboard Switch With an easy press during overclock, this new design is a user-friendly BIOS update utility. ASUS Q-Connector ASUS Q-Connector allows you to easily connect or disconnect the chassis front panel cables to conveniently store or...

User Guide
Page 23
The localized BIOS setup menu helps you to select the language of your choice from the available options. See page 3-12 for details. ASUS P6T Deluxe V2 1-7 ASUS MyLogo2™ This feature allows you configure your system easier and faster. ASUS Multi-language BIOS The multi-language BIOS allows you to convert your favorite photo into a 256-color boot logo for a more colorful and vivid image on your screen. See page 4-9 for details.
The localized BIOS setup menu helps you to select the language of your choice from the available options. See page 3-12 for details. ASUS P6T Deluxe V2 1-7 ASUS MyLogo2™ This feature allows you configure your system easier and faster. ASUS Multi-language BIOS The multi-language BIOS allows you to convert your favorite photo into a 256-color boot logo for a more colorful and vivid image on your screen. See page 4-9 for details.
User Guide
Page 39
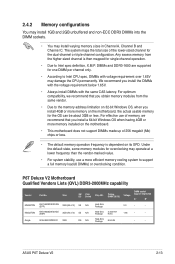
...-Sink (1333-9-9Package 9-24) 1.65 • • 9CAASS37AZZ01D1 2GB DS N/A Heat-Sink Package 9-9-9-24 • • ASUS P6T Deluxe V2 2-13 DIMMs and DDR3-1600 are supported for overclocking may install varying memory sizes in Channel A, Channel B and Channel C. Under the... default state, some memory modules for one DIMM per channel only. • According to Intel spec definition, X.M.P. Timing DIMM (BIOS) Voltage support (Optional) A* B* KHX16000D3K2/2GN (EPP) 2GB (Kit of 2) SS N/A Heat-Sink Package 2.0 • • KHX16000D3K3/3GX ...
...-Sink (1333-9-9Package 9-24) 1.65 • • 9CAASS37AZZ01D1 2GB DS N/A Heat-Sink Package 9-9-9-24 • • ASUS P6T Deluxe V2 2-13 DIMMs and DDR3-1600 are supported for overclocking may install varying memory sizes in Channel A, Channel B and Channel C. Under the... default state, some memory modules for one DIMM per channel only. • According to Intel spec definition, X.M.P. Timing DIMM (BIOS) Voltage support (Optional) A* B* KHX16000D3K2/2GN (EPP) 2GB (Kit of 2) SS N/A Heat-Sink Package 2.0 • • KHX16000D3K3/3GX ...
User Guide
Page 40
...; 2-14 Chapter 2: Hardware information Timing DIMM (BIOS) Heat-Sink Package (1333-9-9-9-24) Heat-Sink Package Heat-Sink Package Heat-Sink Package CL8-8-8-24 (1333-9-9-9-24) CL10 (1333-8-8-8-24) CL10 (1333-8-8-8-24) Voltage DIMM socket support (Optional) A* B* 1.65 • • • • • • • • P6T Deluxe V2 Motherboard Qualified Vendors Lists (QVL) DDR3...
...; 2-14 Chapter 2: Hardware information Timing DIMM (BIOS) Heat-Sink Package (1333-9-9-9-24) Heat-Sink Package Heat-Sink Package Heat-Sink Package CL8-8-8-24 (1333-9-9-9-24) CL10 (1333-8-8-8-24) CL10 (1333-8-8-8-24) Voltage DIMM socket support (Optional) A* B* 1.65 • • • • • • • • P6T Deluxe V2 Motherboard Qualified Vendors Lists (QVL) DDR3...

User Guide
Page 41
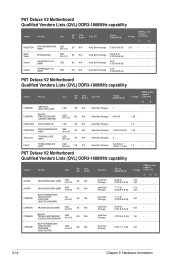
P6T Deluxe V2 Motherboard Qualified Vendors Lists (QVL) DDR3-1600MHz capability (continued) Vendor Part No. Size CORSAIR TR3X6G1600C8D (XMP) CORSAIR Crucial... 2) 3GB (kit of 3) 4GB (kit of 2) 6GB (kit of 3) 2G 2G (kit of 2) SS/ Chip DS Brand Chip NO. Timing DIMM (BIOS) DS N/A Heat-Sink Package 8-8-8-24 (1601-8-8-8-24) DS N/A Heat-Sink Package 9-9-9-24 (1333-9-9-9-24) SS N/A Heat-Sink Package (1601-8-8-8-24) SS N/A... ••• 2.0 ••• 1.65 ••• ••• 1.751.85 ••• ASUS P6T Deluxe V2 2-15
P6T Deluxe V2 Motherboard Qualified Vendors Lists (QVL) DDR3-1600MHz capability (continued) Vendor Part No. Size CORSAIR TR3X6G1600C8D (XMP) CORSAIR Crucial... 2) 3GB (kit of 3) 4GB (kit of 2) 6GB (kit of 3) 2G 2G (kit of 2) SS/ Chip DS Brand Chip NO. Timing DIMM (BIOS) DS N/A Heat-Sink Package 8-8-8-24 (1601-8-8-8-24) DS N/A Heat-Sink Package 9-9-9-24 (1333-9-9-9-24) SS N/A Heat-Sink Package (1601-8-8-8-24) SS N/A... ••• 2.0 ••• 1.65 ••• ••• 1.751.85 ••• ASUS P6T Deluxe V2 2-15

User Guide
Page 42
...65 •••• 2-16 Chapter 2: Hardware information Size SS/ Chip DS Brand Chip NO. P6T Deluxe V2 Motherboard Qualified Vendors Lists (QVL) DDR3-1333MHz capability Vendor Part No. Timing DIMM (BIOS) Voltage DIMM socket support (Optional) A* B* C* D* KINGSTON KVR1333D3N9/1G 1GB SS ELPIDA J1108BASE-DJ-E (...;• G.SKILL F3-10600CL9D-2GBPK 2GB (kit of individual CPUs. • Please load X.M.P or D.O.C.P setting in BIOS for hyper DIMM (DDR3 1800MHz or above) support. • According to Intel spec definition, DDR3-1600 is supported for each memory channel...
...65 •••• 2-16 Chapter 2: Hardware information Size SS/ Chip DS Brand Chip NO. P6T Deluxe V2 Motherboard Qualified Vendors Lists (QVL) DDR3-1333MHz capability Vendor Part No. Timing DIMM (BIOS) Voltage DIMM socket support (Optional) A* B* C* D* KINGSTON KVR1333D3N9/1G 1GB SS ELPIDA J1108BASE-DJ-E (...;• G.SKILL F3-10600CL9D-2GBPK 2GB (kit of individual CPUs. • Please load X.M.P or D.O.C.P setting in BIOS for hyper DIMM (DDR3 1800MHz or above) support. • According to Intel spec definition, DDR3-1600 is supported for each memory channel...

User Guide
Page 43
Timing DIMM (BIOS) Voltage DIMM socket support (Optional) A* B* C* D* G.SKILL F3-10666CL9D-4GBPK 4GB (kit of 2) DS N/A Heat-Sink Package (1333-9-9-9-24) 1.65 •••• G.SKILL F3-... 6GB (kit of 3) DS N/A Heat-Sink Package CL9-9-9-24 (1066-7-7-7-20) 1.65 • PQI MFACR322LA0105 1GB DS PQI PQC3648S15R (1333-9-9-9-24) •••• ASUS P6T Deluxe V2 2-17 Size SS/ Chip DS Brand Chip NO. P6T Deluxe V2 Motherboard Qualified Vendors Lists (QVL) DDR3-1333MHz capability (continued) Vendor Part No.
Timing DIMM (BIOS) Voltage DIMM socket support (Optional) A* B* C* D* G.SKILL F3-10666CL9D-4GBPK 4GB (kit of 2) DS N/A Heat-Sink Package (1333-9-9-9-24) 1.65 •••• G.SKILL F3-... 6GB (kit of 3) DS N/A Heat-Sink Package CL9-9-9-24 (1066-7-7-7-20) 1.65 • PQI MFACR322LA0105 1GB DS PQI PQC3648S15R (1333-9-9-9-24) •••• ASUS P6T Deluxe V2 2-17 Size SS/ Chip DS Brand Chip NO. P6T Deluxe V2 Motherboard Qualified Vendors Lists (QVL) DDR3-1333MHz capability (continued) Vendor Part No.

User Guide
Page 44
... SS ELPIDA DS ELPIDA DS ELPIDA DS ELPIDA Heat-Sink Package Z9HWQ D9JNL D9JNL J1108BABG-DJ-E J5308BASE-AC-E (ECC) J5308BASE-AC-E J1108BABG-DJ-E Timing DIMM (BIOS) 7 7 7 7 CL7 (1066-7-7-7-20) Voltage DIMM socket support (Optional) A* B* C* D* 1.1 ••• •••• ••... 2GB 2GB 1GB 1GB 2GB 2GB SS/ Chip DS Brand Chip NO. Visit the ASUS website for the latest QVL. 2-18 Chapter 2: Hardware information Single-sided DS - P6T Deluxe V2 Motherboard Qualified Vendors Lists (QVL) DDR3-1067MHz capability Vendor Part No. CORSAIR Crucial Crucial...
... SS ELPIDA DS ELPIDA DS ELPIDA DS ELPIDA Heat-Sink Package Z9HWQ D9JNL D9JNL J1108BABG-DJ-E J5308BASE-AC-E (ECC) J5308BASE-AC-E J1108BABG-DJ-E Timing DIMM (BIOS) 7 7 7 7 CL7 (1066-7-7-7-20) Voltage DIMM socket support (Optional) A* B* C* D* 1.1 ••• •••• ••... 2GB 2GB 1GB 1GB 2GB 2GB SS/ Chip DS Brand Chip NO. Visit the ASUS website for the latest QVL. 2-18 Chapter 2: Hardware information Single-sided DS - P6T Deluxe V2 Motherboard Qualified Vendors Lists (QVL) DDR3-1067MHz capability Vendor Part No. CORSAIR Crucial Crucial...

User Guide
Page 46
... cards do so may need IRQ assignments. Remove the system unit cover (if your motherboard is completely seated on the system and change the necessary BIOS settings, if any. See Chapter 3 for later use . Failure to the chassis with the screw you removed earlier. 6. Turn on the slot. 5. Before ...need to unplug the power cord before adding or removing expansion cards. Install the software drivers for the card. 2. When using PCI cards on BIOS setup. 2. Otherwise, conflicts will arise between the two PCI groups, making the system unstable and the card inoperable.
... cards do so may need IRQ assignments. Remove the system unit cover (if your motherboard is completely seated on the system and change the necessary BIOS settings, if any. See Chapter 3 for later use . Failure to the chassis with the screw you removed earlier. 6. Turn on the slot. 5. Before ...need to unplug the power cord before adding or removing expansion cards. Install the software drivers for the card. 2. When using PCI cards on BIOS setup. 2. Otherwise, conflicts will arise between the two PCI groups, making the system unstable and the card inoperable.
User Guide
Page 49
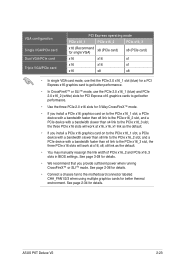
ASUS P6T Deluxe V2 2-23 See page 2-34 for details. • We recommend that you install a PCIe x16 graphics card on to the PCIe x16_1 slot, a PCIe device with a ... work at x16, x8, x8 link as the default. • You may manually reassign the link width of PCIe x16_2 and PCIe x16_3 slots in BIOS settings. VGA configuration Single VGA/PCIe card Dual VGA/PCIe card Triple VGA/PCIe card PCI Express operating mode PCIe x16_1 PCIe x16_2 PCIe x16_3...
ASUS P6T Deluxe V2 2-23 See page 2-34 for details. • We recommend that you install a PCIe x16 graphics card on to the PCIe x16_1 slot, a PCIe device with a ... work at x16, x8, x8 link as the default. • You may manually reassign the link width of PCIe x16_2 and PCIe x16_3 slots in BIOS settings. VGA configuration Single VGA/PCIe card Dual VGA/PCIe card Triple VGA/PCIe card PCI Express operating mode PCIe x16_1 PCIe x16_2 PCIe x16_3...

User Guide
Page 50
...CMOS. Turn OFF the computer and unplug the power cord. 2. You must turn ON the computer. 4. function. Hold down and reboot the system so the BIOS can clear the CMOS memory of date, time, and system setup parameters by erasing the CMOS RTC RAM data. Except when clearing the RTC RAM... or unplug and plug the power cord before rebooting the system. 2-24 Chapter 2: Hardware information Shut down the key during the boot process and enter BIOS setup to pins 2-3. To erase the RTC RAM 1. Move the jumper cap from pins 1-2 (default) to re-enter data. Removing the cap will cause system...
...CMOS. Turn OFF the computer and unplug the power cord. 2. You must turn ON the computer. 4. function. Hold down and reboot the system so the BIOS can clear the CMOS memory of date, time, and system setup parameters by erasing the CMOS RTC RAM data. Except when clearing the RTC RAM... or unplug and plug the power cord before rebooting the system. 2-24 Chapter 2: Hardware information Shut down the key during the boot process and enter BIOS setup to pins 2-3. To erase the RTC RAM 1. Move the jumper cap from pins 1-2 (default) to re-enter data. Removing the cap will cause system...
User Guide
Page 51
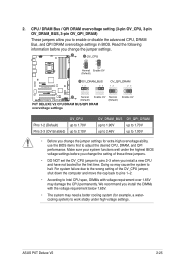
..., and QPI DRAM overvoltage settings in BIOS. For system failure due to the wrong setting of these three jumpers. • DO NOT set the OV_CPU jumper to Intel CPU spec, DIMMs with the voltage requirement below 1.65V. • The system may damage the CPU permanently. ASUS P6T Deluxe V2 2-25 Read the following information before...
..., and QPI DRAM overvoltage settings in BIOS. For system failure due to the wrong setting of these three jumpers. • DO NOT set the OV_CPU jumper to Intel CPU spec, DIMMs with the voltage requirement below 1.65V. • The system may damage the CPU permanently. ASUS P6T Deluxe V2 2-25 Read the following information before...

User Guide
Page 57
...ICH10R RAID controller. • These connectors are set , refer to section 4.4.3 Intel RAID configurations or the manual bundled in the BIOS to create a Serial ATA RAID set using Serial ATA hard disk drives. See section 3.3.6 Storage Configuration for Serial ATA hard disk... SATA as item in the motherboard support DVD. • You must install the Windows® XP Service Pack 1 before using these connectors. ASUS P6T Deluxe V2 2-31 See section 3.3.6 Storage Configuration for details. • Before creating a RAID set to [AHCI]. ICH10R Serial ATA connectors (7-pin SATA ...
...ICH10R RAID controller. • These connectors are set , refer to section 4.4.3 Intel RAID configurations or the manual bundled in the BIOS to create a Serial ATA RAID set using Serial ATA hard disk drives. See section 3.3.6 Storage Configuration for Serial ATA hard disk... SATA as item in the motherboard support DVD. • You must install the Windows® XP Service Pack 1 before using these connectors. ASUS P6T Deluxe V2 2-31 See section 3.3.6 Storage Configuration for details. • Before creating a RAID set to [AHCI]. ICH10R Serial ATA connectors (7-pin SATA ...

User Guide
Page 61
... intrusion sensor or switch sends a high-level signal to this connector, set to this connector when a chassis component is removed or replaced. ASUS P6T Deluxe V2 2-35 Chassis intrusion connector (4-1 pin CHASSIS) This connector is then generated as a chassis intrusion event. By default , the pin labeled "Chassis...chassis intrusion detection feature. 9. Connect one end of the front panel audio I /O module that the Front Panel Type item in the BIOS is set the item to this connector. Front panel audio connector (10-1 pin AAFP) This connector is for a chassis-mounted intrusion ...
... intrusion sensor or switch sends a high-level signal to this connector, set to this connector when a chassis component is removed or replaced. ASUS P6T Deluxe V2 2-35 Chassis intrusion connector (4-1 pin CHASSIS) This connector is then generated as a chassis intrusion event. By default , the pin labeled "Chassis...chassis intrusion detection feature. 9. Connect one end of the front panel audio I /O module that the Front Panel Type item in the BIOS is set the item to this connector. Front panel audio connector (10-1 pin AAFP) This connector is for a chassis-mounted intrusion ...
User Guide
Page 64
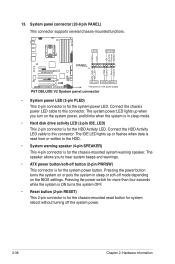
... turns the system OFF. • Reset button (2-pin RESET) This 2-pin connector is for the system power button. The speaker allows you turn on the BIOS settings. 13. Connect the HDD Activity LED cable to hear system beeps and warnings. • ATX power button/soft-off the system power. 2-38 Chapter...
... turns the system OFF. • Reset button (2-pin RESET) This 2-pin connector is for the system power button. The speaker allows you turn on the BIOS settings. 13. Connect the HDD Activity LED cable to hear system beeps and warnings. • ATX power button/soft-off the system power. 2-38 Chapter...


