
User Manual
Page 1
P5P43TD PRO Motherboard
P5P43TD PRO Motherboard

User Manual
Page 3
Contents Notices...vi Safety information vii About this guide vii P5P43TD PRO specifications summary ix Chapter 1: Product introduction 1.1 Welcome 1-1 1.2 Package contents 1-1 1.3 Special features 1-1 1.3.1 Product highlights 1-1 1.3.2 Innovative ASUS features 1-2 1.4 Before you proceed 1-4 1.5 Motherboard overview 1-5 1.5.1 Placement direction 1-5 1.5.2 Screw holes 1-5 1.5.3 Motherboard layout 1-6 1.5.4 Layout contents 1-6 1.6 Central Processing Unit (CPU 1-7 1.6.1 Installing the CPU 1-7 1.6.2 Installing the CPU heatsink and fan 1-10 1.6.3 Uninstalling...
Contents Notices...vi Safety information vii About this guide vii P5P43TD PRO specifications summary ix Chapter 1: Product introduction 1.1 Welcome 1-1 1.2 Package contents 1-1 1.3 Special features 1-1 1.3.1 Product highlights 1-1 1.3.2 Innovative ASUS features 1-2 1.4 Before you proceed 1-4 1.5 Motherboard overview 1-5 1.5.1 Placement direction 1-5 1.5.2 Screw holes 1-5 1.5.3 Motherboard layout 1-6 1.5.4 Layout contents 1-6 1.6 Central Processing Unit (CPU 1-7 1.6.1 Installing the CPU 1-7 1.6.2 Installing the CPU heatsink and fan 1-10 1.6.3 Uninstalling...

User Manual
Page 6
...and Restriction of the monitor to the graphics card is required to comply with the limits for disposal of Communications. DO NOT throw the motherboard in a residential installation. This equipment has been tested and found to assure compliance with FCC regulations. These limits are designed to an... cause harmful interference to which can radiate radio frequency energy and, if not installed and used in our products at ASUS REACH website at http://green.asus.com/english/REACH.htm. vi If this equipment. This class B digital apparatus complies with Canadian ICES-003. Notices ...
...and Restriction of the monitor to the graphics card is required to comply with the limits for disposal of Communications. DO NOT throw the motherboard in a residential installation. This equipment has been tested and found to assure compliance with FCC regulations. These limits are designed to an... cause harmful interference to which can radiate radio frequency energy and, if not installed and used in our products at ASUS REACH website at http://green.asus.com/english/REACH.htm. vi If this equipment. This class B digital apparatus complies with Canadian ICES-003. Notices ...

User Manual
Page 7
... If the power supply is organized This guide contains the following parts: • Chapter 1: Product introduction This chapter describes the features of the motherboard and the new technology it , carefully read all the manuals that the battery should not be placed in municipal waste. About this guide is ... any area where it may become wet. • Place the product on it supports. If you need when installing and configuring the motherboard. DO NOT throw the mercury-containing button cell battery in municipal waste. This symbol of the electrical outlet you are not sure about ...
... If the power supply is organized This guide contains the following parts: • Chapter 1: Product introduction This chapter describes the features of the motherboard and the new technology it , carefully read all the manuals that the battery should not be placed in municipal waste. About this guide is ... any area where it may become wet. • Place the product on it supports. If you need when installing and configuring the motherboard. DO NOT throw the mercury-containing button cell battery in municipal waste. This symbol of the electrical outlet you are not sure about ...

User Manual
Page 11
... the list below. 1.2 Package contents Check your motherboard package for the following items. Motherboard Cables Accessories Application DVD Documentation ASUS P5P43TD PRO motherboard 2 x Serial ATA cables 1 x Ultra DMA 133/100/66 cable 1 x I/O shield ASUS motherboard support DVD User Manual If any of 1600 ...1066/800 MHz providing great performance for 3D graphics and other memory-demanding applications. ASUS P5P43TD PRO 1-1 Dual channel DDR3 1600 (O.C.)/1333/1066/800 support This motherboard supports DDR3 memory that features data transfer rates of the above items is damaged or...
... the list below. 1.2 Package contents Check your motherboard package for the following items. Motherboard Cables Accessories Application DVD Documentation ASUS P5P43TD PRO motherboard 2 x Serial ATA cables 1 x Ultra DMA 133/100/66 cable 1 x I/O shield ASUS motherboard support DVD User Manual If any of 1600 ...1066/800 MHz providing great performance for 3D graphics and other memory-demanding applications. ASUS P5P43TD PRO 1-1 Dual channel DDR3 1600 (O.C.)/1333/1066/800 support This motherboard supports DDR3 memory that features data transfer rates of the above items is damaged or...
User Manual
Page 12
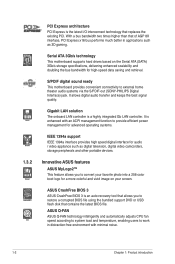
...ASUS Q-FAN ASUS Q-FAN technology intelligently and automatically adjusts CPU fan speed according to system load and temperature, enabling users to work in applications such as digital television, digital video camcorders, storage peripherals and other portable devices. Serial ATA 3Gb/s technology This motherboard... With a bus bandwidth two times higher than that replaces the existing PCI. S/PDIF digital sound ready This motherboard provides convenient connectivity to provide efficient power management for advanced operating systems. IEEE 1394a support IEEE 1394a interface provides...
...ASUS Q-FAN ASUS Q-FAN technology intelligently and automatically adjusts CPU fan speed according to system load and temperature, enabling users to work in applications such as digital television, digital video camcorders, storage peripherals and other portable devices. Serial ATA 3Gb/s technology This motherboard... With a bus bandwidth two times higher than that replaces the existing PCI. S/PDIF digital sound ready This motherboard provides convenient connectivity to provide efficient power management for advanced operating systems. IEEE 1394a support IEEE 1394a interface provides...
User Manual
Page 13
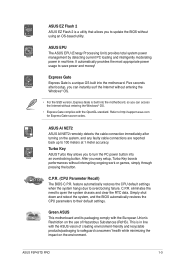
... can access the Internet without using an OS-based utility. ASUS P5P43TD PRO 1-3 Refer to turn the PC power button into the motheroard. C.P.R. ASUS EZ Flash 2 ASUS EZ Flash 2 is in real-time. Turbo Key ASUS Turbo Key allows you to 100 meters at 1 meter accuracy...appropriate power usage to their default settings. C.P.R. (CPU Parameter Recall) The BIOS C.P.R. Green ASUS This motherboard and its packaging comply with the OpenGL standard. ASUS EPU The ASUS EPU (Energy Processing Unit) provides total system power management by detecting current PC loading and intelligently...
... can access the Internet without using an OS-based utility. ASUS P5P43TD PRO 1-3 Refer to turn the PC power button into the motheroard. C.P.R. ASUS EZ Flash 2 ASUS EZ Flash 2 is in real-time. Turbo Key ASUS Turbo Key allows you to 100 meters at 1 meter accuracy...appropriate power usage to their default settings. C.P.R. (CPU Parameter Recall) The BIOS C.P.R. Green ASUS This motherboard and its packaging comply with the OpenGL standard. ASUS EPU The ASUS EPU (Energy Processing Unit) provides total system power management by detecting current PC loading and intelligently...

User Manual
Page 14
...damage to indicate that the system is ON, in sleep mode, or in any motherboard component. Onboard LED The motherboard comes with the component. • Before you install motherboard components or change any motherboard settings. • Unplug the power cord from the wall socket before removing or ...component, place it on a grounded antistatic pad or in the bag that came with a standby power LED that lights up to the motherboard, peripherals, or components. The illustration below shows the location of the following precautions before you install or remove any component, ensure that...
...damage to indicate that the system is ON, in sleep mode, or in any motherboard component. Onboard LED The motherboard comes with the component. • Before you install motherboard components or change any motherboard settings. • Unplug the power cord from the wall socket before removing or ...component, place it on a grounded antistatic pad or in the bag that came with a standby power LED that lights up to the motherboard, peripherals, or components. The illustration below shows the location of the following precautions before you install or remove any component, ensure that...

User Manual
Page 15
... so can cause you physical injury and damage motherboard components. 1.5.1 Placement direction When installing the motherboard, ensure that you unplug the power cord before installing or removing the motherboard. Ensure that the motherboard fits into it into the chassis in the ...motherboard to do so can damage the motherboard. Failure to the chassis. Do not overtighten the screws! 1.5 Motherboard overview Before you install the motherboard, study the configuration of your chassis to ensure that you place it . Place this side towards the rear of the chassis ASUS P5P43TD PRO...
... so can cause you physical injury and damage motherboard components. 1.5.1 Placement direction When installing the motherboard, ensure that you unplug the power cord before installing or removing the motherboard. Ensure that the motherboard fits into it into the chassis in the ...motherboard to do so can damage the motherboard. Failure to the chassis. Do not overtighten the screws! 1.5 Motherboard overview Before you install the motherboard, study the configuration of your chassis to ensure that you place it . Place this side towards the rear of the chassis ASUS P5P43TD PRO...
User Manual
Page 16
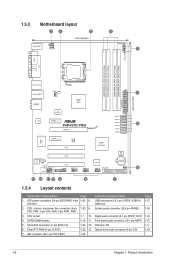
... 1-22 9. Clear RTC RAM (3-pin CLRTC) 1-20 13. USB connectors (10-1 pin USB78, USB910, 1-27 ATX12V) USB1112) 2. Front panel audio connector (10-1 pin AAFP) 1-27 5. 1.5.3 Motherboard layout 1.5.4 Layout contents Connectors/Jumpers/Slots Page Connectors/Jumpers/Slots Page 1. Digital audio connector (4-1 pin SPDIF_OUT) 1-23 4. IDE connector (40-1 pin PRI_EIDE) 1-25 1-6 Chapter 1: Product...
... 1-22 9. Clear RTC RAM (3-pin CLRTC) 1-20 13. USB connectors (10-1 pin USB78, USB910, 1-27 ATX12V) USB1112) 2. Front panel audio connector (10-1 pin AAFP) 1-27 5. 1.5.3 Motherboard layout 1.5.4 Layout contents Connectors/Jumpers/Slots Page Connectors/Jumpers/Slots Page 1. Digital audio connector (4-1 pin SPDIF_OUT) 1-23 4. IDE connector (40-1 pin PRI_EIDE) 1-25 1-6 Chapter 1: Product...

User Manual
Page 17
...the Intel® Enhanced Intel SpeedStep® Technology (EIST) and Hyper-Threading Technology. 1.6.1 Installing the CPU To install a CPU: 1. ASUS P5P43TD PRO 1-7 1.6 Central Processing Unit (CPU) The motherboard comes with a surface mount LGA775 socket designed for the Intel® Core™2 Extreme / Core™2 Quad / Core™2 Duo...cap. Locate the CPU socket on the socket and the socket contacts are not bent. ASUS will shoulder the cost of repair only if the damage is on the motherboard. Before installing the CPU, ensure that the PnP cap is shipment/transit-related. •...
...the Intel® Enhanced Intel SpeedStep® Technology (EIST) and Hyper-Threading Technology. 1.6.1 Installing the CPU To install a CPU: 1. ASUS P5P43TD PRO 1-7 1.6 Central Processing Unit (CPU) The motherboard comes with a surface mount LGA775 socket designed for the Intel® Core™2 Extreme / Core™2 Quad / Core™2 Duo...cap. Locate the CPU socket on the socket and the socket contacts are not bent. ASUS will shoulder the cost of repair only if the damage is on the motherboard. Before installing the CPU, ensure that the PnP cap is shipment/transit-related. •...

User Manual
Page 20
... down two fasteners at a time in a diagonal sequence to the CPU fan connector. 2. A B A B B A 1 1 B A The type of the installed CPU, ensuring that you have installed the motherboard to ensure optimum thermal condition and performance. • When you buy a CPU separately, ensure that you have properly applied Thermal Interface Material to the CPU...
... down two fasteners at a time in a diagonal sequence to the CPU fan connector. 2. A B A B B A 1 1 B A The type of the installed CPU, ensuring that you have installed the motherboard to ensure optimum thermal condition and performance. • When you buy a CPU separately, ensure that you have properly applied Thermal Interface Material to the CPU...

User Manual
Page 21
Connect the CPU fan cable to connect the CPU fan connector! Disconnect the CPU fan cable from the motherboard. Do not forget to the connector on the motherboard. 2. Pull up two fasteners at a time in a diagonal sequence to plug this connector. 1.6.3 Uninstalling the CPU heatsink and fan To uninstall the CPU heatsink and fan: 1. A B A B B A B A ASUS P5P43TD PRO 1-11 Rotate each fastener counterclockwise. 3. Hardware monitoring errors can occur if you fail to disengage the heatsink and fan assembly from the connector on the motherboard labeled CPU_FAN. 3.
Connect the CPU fan cable to connect the CPU fan connector! Disconnect the CPU fan cable from the motherboard. Do not forget to the connector on the motherboard. 2. Pull up two fasteners at a time in a diagonal sequence to plug this connector. 1.6.3 Uninstalling the CPU heatsink and fan To uninstall the CPU heatsink and fan: 1. A B A B B A B A ASUS P5P43TD PRO 1-11 Rotate each fastener counterclockwise. 3. Hardware monitoring errors can occur if you fail to disengage the heatsink and fan assembly from the connector on the motherboard labeled CPU_FAN. 3.
User Manual
Page 22
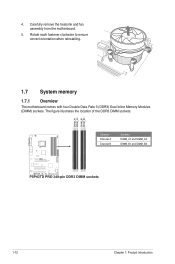
The figure illustrates the location of the DDR3 DIMM sockets: Channel Channel A Channel B Sockets DIMM_A1 and DIMM_A2 DIMM_B1 and DIMM_B2 1-12 Chapter 1: Product introduction Rotate each fastener clockwise to ensure correct orientation when reinstalling. 1.7 System memory 1.7.1 Overview The motherboard comes with four Double Data Rate 3 (DDR3) Dual Inline Memory Modules (DIMM) sockets. 4. Carefully remove the heatsink and fan assembly from the motherboard. 5.
The figure illustrates the location of the DDR3 DIMM sockets: Channel Channel A Channel B Sockets DIMM_A1 and DIMM_A2 DIMM_B1 and DIMM_B2 1-12 Chapter 1: Product introduction Rotate each fastener clockwise to ensure correct orientation when reinstalling. 1.7 System memory 1.7.1 Overview The motherboard comes with four Double Data Rate 3 (DDR3) Dual Inline Memory Modules (DIMM) sockets. 4. Carefully remove the heatsink and fan assembly from the motherboard. 5.

User Manual
Page 23
... than the vendor-marked value. • For system stability, use of memory, we recommend that you want to install 4GB or more memory on the motherboard, the actual usable memory for the OS can : - Install a 64-bit �W�i�nd�o�w��s® OS when you obtain memory...;m���m�e�m��o�r�y�i�f �y�o�u�a�r�e��u�s�in DIMM_A1 and DIMM_B1; ASUS P5P43TD PRO 1-13
... than the vendor-marked value. • For system stability, use of memory, we recommend that you want to install 4GB or more memory on the motherboard, the actual usable memory for the OS can : - Install a 64-bit �W�i�nd�o�w��s® OS when you obtain memory...;m���m�e�m��o�r�y�i�f �y�o�u�a�r�e��u�s�in DIMM_A1 and DIMM_B1; ASUS P5P43TD PRO 1-13
User Manual
Page 24
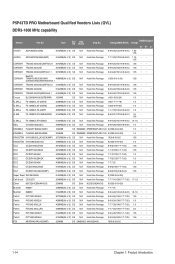
...) 1.65 • • • PQI MFADR401PA0102(XMP) 2048MB DS SAMSUNG K4B1G08460 1066-8-8-8-20 • 1-14 Chapter 1: Product introduction Size SS/ Chip DD Brand Chip No. P5P43TD PRO Motherboard Qualified Vendors Lists (QVL) DDR3-1600 MHz capability Vendor Part No.
...) 1.65 • • • PQI MFADR401PA0102(XMP) 2048MB DS SAMSUNG K4B1G08460 1066-8-8-8-20 • 1-14 Chapter 1: Product introduction Size SS/ Chip DD Brand Chip No. P5P43TD PRO Motherboard Qualified Vendors Lists (QVL) DDR3-1600 MHz capability Vendor Part No.

User Manual
Page 27
...on the socket. 1 2 DDR3 DIMM notch 1 Unlocked retaining clip A DDR3 DIMM is properly seated. Visit the ASUS website at www.asus.com for the latest QVL. 1.7.3 Installing a DIMM Unplug the power supply before adding or removing DIMMs or other ...motherboard and the components. DO NOT force a DIMM into either the orange or black slots as one direction. To install a DIMM: 1. Double - sided DIMM support: • A*: Supports one module inserted into any slot as two pairs of modules inserted into a socket to unlock a DDR3 DIMM socket. 2. Locked Retaining Clip ASUS P5P43TD PRO...
...on the socket. 1 2 DDR3 DIMM notch 1 Unlocked retaining clip A DDR3 DIMM is properly seated. Visit the ASUS website at www.asus.com for the latest QVL. 1.7.3 Installing a DIMM Unplug the power supply before adding or removing DIMMs or other ...motherboard and the components. DO NOT force a DIMM into either the orange or black slots as one direction. To install a DIMM: 1. Double - sided DIMM support: • A*: Supports one module inserted into any slot as two pairs of modules inserted into a socket to unlock a DDR3 DIMM socket. 2. Locked Retaining Clip ASUS P5P43TD PRO...
User Manual
Page 29
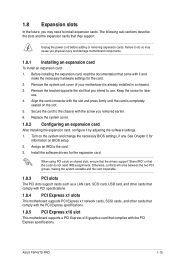
... 1.8.2 Configuring an expansion card After installing the expansion card, configure it and make the necessary hardware settings for later use . ASUS P5P43TD PRO 1-19 Unplug the power cord before adding or removing expansion cards. Otherwise, conflicts will arise between the two PCI groups, making ...1. When using PCI cards on the slot. 5. 1.8 Expansion slots In the future, you may cause you physical injury and damage motherboard components. 1.8.1 Installing an expansion card To install an expansion card: 1. The following sub‑sections describe the slots and the expansion ...
... 1.8.2 Configuring an expansion card After installing the expansion card, configure it and make the necessary hardware settings for later use . ASUS P5P43TD PRO 1-19 Unplug the power cord before adding or removing expansion cards. Otherwise, conflicts will arise between the two PCI groups, making ...1. When using PCI cards on the slot. 5. 1.8 Expansion slots In the future, you may cause you physical injury and damage motherboard components. 1.8.1 Installing an expansion card To install an expansion card: 1. The following sub‑sections describe the slots and the expansion ...

User Manual
Page 32
...two 4-pin Universal Serial Bus (USB) ports are not jumpers! These are available for connecting USB 2.0 devices. 12. Only the CPU fan supports the ASUS Q-FAN feature. 1-22 Chapter 1: Product introduction This 9-pin COM1 port is for audio/video devices, storage peripherals, PCs, or portable devices. 13. CPU... cooling fans of 350 mA~2000 mA (24 W max.) or a total of the connector. Insufficient air flow inside the system may damage the motherboard components. Do not forget to connect the fan cables to an external Serial ATA hard disk drive. 14. Audio 2, 4, 6, or 8-channel configuration...
...two 4-pin Universal Serial Bus (USB) ports are not jumpers! These are available for connecting USB 2.0 devices. 12. Only the CPU fan supports the ASUS Q-FAN feature. 1-22 Chapter 1: Product introduction This 9-pin COM1 port is for audio/video devices, storage peripherals, PCs, or portable devices. 13. CPU... cooling fans of 350 mA~2000 mA (24 W max.) or a total of the connector. Insufficient air flow inside the system may damage the motherboard components. Do not forget to connect the fan cables to an external Serial ATA hard disk drive. 14. Audio 2, 4, 6, or 8-channel configuration...

User Manual
Page 34
... signal cables for Serial ATA hard disk drives. • Install the Windows® XP Service Pack 2 or later version before using Serial ATA. • The motherboard does not provide a floppy disk drive connector. You could use a USB floppy disk drive when installing Windows® XP operating system on a hard disk drive...
... signal cables for Serial ATA hard disk drives. • Install the Windows® XP Service Pack 2 or later version before using Serial ATA. • The motherboard does not provide a floppy disk drive connector. You could use a USB floppy disk drive when installing Windows® XP operating system on a hard disk drive...


