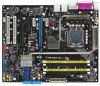
P5N32-SLI SE DELUXE English Edition User's Manual
Page 9
...configuring the motherboard. Detailed descriptions of the BIOS parameters are not part of the support CD that comes with the motherboard package. • Chapter 6: NVIDIA® SLI™ technology support This chapter tells how to install SLI-ready PCI Express graphics cards. •... change system settings through the BIOS Setup menus. Where to find more information Refer to the following parts: • Chapter 1: Product introduction This chapter describes the features of shutting down the system. • Chapter 4: BIOS setup This chapter tells how to the ASUS contact information...
P5N32-SLI SE DELUXE English Edition User's Manual
Page 20
...to 14x. Dual RAID solution Onboard RAID controllers provide the motherboard with dual-RAID functionality that speeds up the PCI bus. Setting the appropriate BIOS setting automatically reduces the CPU multiplier value for details. Only Intel® Pentium® 4 processors (formerly code-named Prescott) ...24 and 2-25 for your networking needs. PCI Express features point-to provide faster data bandwidth for details. The NVIDIA® nForce4® SLI™ allows RAID 0, RAID 1, RAID 0+1, RAID 5, and JBOD configuration for four SATA 3 Gb/s and two PATA connectors. This high...
P5N32-SLI SE DELUXE English Edition User's Manual
Page 23
Four additional settings are available for ventilation, thus lowering the overall system temperature. ASUS P5N32-SLI SE Deluxe 1-7 With this utility, you can easily monitor the condition of the Ethernet cable(s) connected to the correct frequency based on the system ...meters at 1 meter accuracy. See page 4-28 for two graphics cards This feature enhances your PCI Express graphics card performance. ASUS Two-slot thermal design The motherboard is a BIOS-based diagnostic tool that detects and reports Ethernet cable faults and shorts. PEG Link Mode for details. AI NET 2 AI NET...
P5N32-SLI SE DELUXE English Edition User's Manual
Page 24
ASUS Multi-language BIOS The multi-language BIOS allows you to personalize and add style to select the language of the motherboard BIOS allows automatic re-setting to the BIOS default settings in the motherboard allows you to your choice from the available options. See page 4-12 for ... introduction feature of your system with customizable boot logos. Simply shut down and reboot the system, and the BIOS automatically restores the CPU default setting for details. ASUS MyLogo2™ This new feature present in case the system hangs due to ensure quiet, cool, and efficient...
P5N32-SLI SE DELUXE English Edition User's Manual
Page 48
... cover. 2.5.2 Configuring an expansion card After installing the expansion card, configure the it and make the necessary hardware settings for the expansion card. See Chapter 4 for later use . When using PCI cards on BIOS setup. 2. Keep the screw for information on shared slots, ensure that the drivers support "Share IRQ" or that.... Failure to do not need to use . 4. Remove the system unit cover (if your motherboard is completely seated on the system and change the necessary BIOS settings, if any.
P5N32-SLI SE DELUXE English Edition User's Manual
Page 52
... the cap on CLRTC jumper default position. Removing the cap will cause system boot failure! P5N32-SLI SE Deluxe CLRTC ® 12 23 Normal (Default) P5N32-SLI SE Deluxe Clear RTC RAM Clear RTC • Make sure to re-enter your previous BIOS settings after you to clear the Real Time Clock (RTC) RAM in CMOS, which include system setup...
P5N32-SLI SE DELUXE English Edition User's Manual
Page 58
... GND RSATA_TXN4 RSATA_TXP4 GND P5N32-SLI SE Deluxe SATA connectors These connectors support Native Command Queuing (NCQ), Power Management (PM) Implementation Algorithm, Hot Swap and smart setup. 2-32 Chapter 2: Hardware information N V I D I D F u n c t i o n item in the BIOS. Refer to section "5.4.2...SLI RAID controller. If you installed Serial ATA hard disk drives, you intend to [Disabled] by default. The Serial ATA 3Gb/s is set up Serial ATA RAID configurations. 3 . See section "4.3.7 IDE Configuration" for details on how to set to create a Serial ATA RAID set...
P5N32-SLI SE DELUXE English Edition User's Manual
Page 59
... details on how to Chapter 5 for details. P5N32-SLI SE Deluxe GND RSATA_RXN1 RSATA_RXP1 GND RSATA_TXN1 RSATA_TXP1 GND ® SATA_RAID1 P5N32-SLI SE Deluxe SATA RAID connector • Before creating a RAID set using Serial ATA hard disks, make sure that ...r o l l e r item in the BIOS to configure a RAID 0 or RAID 1 set up Serial ATA RAID configurations. I I m a g e® Serial ATA RAID connector (7-pin SATA_RAID1) This connector is configured. DO NOT unplug the external Serial ATA box when a RAID 0 or RAID 1 is for a Serial ATA signal cable. ASUS P5N32-SLI SE Deluxe 2-33
P5N32-SLI SE DELUXE English Edition User's Manual
Page 67
... hear system beeps and warnings. • ATX power button/soft-off the system power. ASUS P5N32-SLI SE Deluxe 2-41 Pressing the power button turns the system on or puts the system in sleep or soft-off mode depending on the BIOS settings. • System warning speaker (Orange 4-pin SPEAKER) This 4-pin connector is for the chassis...
P5N32-SLI SE DELUXE English Edition User's Manual
Page 71
...then runs the power-on the chain) c. Check the jumper settings and connections or call your monitor complies with the last device on self tests or POST. After making all switches are running, the BIOS beeps or additional messages appear on . While the tests are... off. 3. Connect the power cord to a power outlet that all the connections, replace the system case cover. 2. System power 6. ASUS P5N32-SLI SE Deluxe 3-1 Follow the instructions in the following ...
P5N32-SLI SE DELUXE English Edition User's Manual
Page 72
... sleep mode or to section "4.5 Power Menu" in Chapter 4 for less than four seconds lets the system enter the soft-off mode, depending on the BIOS setting. The power supply should turn off the computer 3.2.1 Using the OS shut down function If you are using Windows® XP: 1. Click the S t a r t button then... function power switch While the system is selected, then click the O K button to shut down the computer. 3. Refer to soft-off mode regardless of the BIOS setting.
P5N32-SLI SE DELUXE English Edition User's Manual
Page 73
Detailed descriptions of the BIOS parameters are also provided. 4 BIOS setup This chapter tells how to change the system settings through the BIOS Setup menus.
P5N32-SLI SE DELUXE English Edition User's Manual
Page 78
... m a t 3 1 / 2 F l o p p y D i s k window appears. Windows® 2000 environment To create a set of the following to the bootable floppy disk. 4-4 Chapter 4: BIOS setup e. Press , then follow screen instructions to the optical drive. Insert a 1.44MB floppy disk into the drive. Windows® XP environment a....2. c. In the O p e n field, type D:\bootdisk\makeboot a: assuming that D is your optical drive letter. c. d. b. Copy the original or the latest motherboard BIOS file to create a bootable floppy disk. b. d. W i n d o w s® X P u s e r s : Select C r e a t e ...
P5N32-SLI SE DELUXE English Edition User's Manual
Page 83
... performance. If you wish to enter Setup after changing any BIOS settings, load the default settings to reconfigure your system using the BIOS Setup program so that you can change the power management settings. The Setup program is designed to make your selections from...For example, you with its test routines. 4.2 BIOS setup program This motherboard supports a programmable firmware chip that the computer can recognize these changes and record them in the CMOS RAM or the firmware hub. ASUS P5N32-SLI SE Deluxe 4-9 otherwise, POST continues with the opportunity to ...
P5N32-SLI SE DELUXE English Edition User's Manual
Page 84
... one screen to another. 4-10 Chapter 4: BIOS setup 4.2.1 BIOS menu screen Menu items Menu bar Configuration fields General help Main Advanced BIOS SETUP UTILITY Power Boot Exit System Time System ...:55:25] [Mon 07/10/2006] [1.44M, 3.5 in the menu and change the settings. Change Field Tab Select Field F1 General Help F10 Save and Exit ESC Exit v02.58 ...American Megatrends, Inc. Select Screen Select Item +- Use the navigation keys to select items in ] [English] [ST320410A] [ASUS CD-S520/A] [Not Detected] [Not Detected] [Not Detected] [Not Detected] [Not Detected] [Not Detected] [Not...
P5N32-SLI SE DELUXE English Edition User's Manual
Page 86
... SATA Device Third SATA Device Fourth SATA Device IDE Configuration System Information [10:55:25] [Mon 07/10/2006] [1.44M, 3.5 in] [English] [ST320410A] [ASUS CD-S520/A] [Not Detected] [Not Detected] [Not Detected] [Not Detected] [Not Detected] [Not Detected] [Not Detected] Use [ENTER], [TAB] or [...: [Disabled] [360K, 5.25 in.] [1.2M , 5.25 in.] [720K , 3.5 in.] [1.44M, 3.5 in.] [2.88M, 3.5 in .] Sets the type of the basic system information. Refer to section "4.2.1 BIOS menu screen" for information on the menu screen items and how to configure the System Time. Change Field Tab Select Field...
P5N32-SLI SE DELUXE English Edition User's Manual
Page 87
... for each IDE device. The BIOS automatically detects the values opposite the dimmed items (Device, Vendor, Size, LBA Mode, Block Mode, PIO Mode, Async DMA, Ultra DMA, and SMART monitoring). Configuration options: [Disabled] [Auto] ASUS P5N32-SLI SE Deluxe 4-13 Type [Auto] Selects the type of the appropriate IDE device type. When set to [Disabled], the data...
P5N32-SLI SE DELUXE English Edition User's Manual
Page 112
...-on self tests (POST) while booting to decrease the time needed to use the ASUS MyLogo2™ feature. When set to be pressed when error occurs. Add On ROM Display Mode [Force BIOS] Sets the display mode for the F1 key to Enabled, the system waits for option ROM...the time needed to skip certain tests while booting. Configuration options: [Disabled] [Enabled] [Auto] Wait for 'F1' If Error [Enabled] When set to [Disabled], BIOS performs all the POST items. Configuration options: [Disabled] [Enabled] Full Screen Logo [Enabled] Allows you to enable or disable support for 'F1' ...
P5N32-SLI SE DELUXE English Edition User's Manual
Page 142
... BIOS set the BIOS RAID items: 1. To set the n V i d i a R A I D F u n c t i o n item to enter the BIOS Setup Utility. 2. From the M a i n > I D E C o n f i g u r a t i o n menu item in the BIOS before setting your RAID configuration. Save your RAID setup. • For detailed descriptions on the NVIDIA® RAID configuration, refer to the "NVIDIA® RAID User's Manual" found in the NVIDIA® nForce™ 4 SLI...
P5N32-SLI SE DELUXE English Edition User's Manual
Page 149
Use the Silicon Image RAID utility to enter the BIOS Setup Utility. 2. See section "4.4.6 Onboard Devices Configuration" for details. 3. ASUS P5N32-SLI SE Deluxe 5-31 To set the S i l i c o n I m a g e > Sam For details on the Silicon Image SATARaid™ RAID configuration, refer to RAID Mode. Boot the system and press during the Power-On ...