
User Guide
Page 7
...8226; Before installing the motherboard and adding devices on a stable surface. • If you are not sure about the voltage of electronic products. If possible, disconnect all power cables from the existing system before using , contact your local power company. • If the power supply is set to fix...all the manuals that came with the product, contact a qualified service technician or your retailer. Do not place the product in your power supply is broken, do not try to the correct voltage in any damage, contact your retailer. vii If you encounter technical problems with...
...8226; Before installing the motherboard and adding devices on a stable surface. • If you are not sure about the voltage of electronic products. If possible, disconnect all power cables from the existing system before using , contact your local power company. • If the power supply is set to fix...all the manuals that came with the product, contact a qualified service technician or your retailer. Do not place the product in your power supply is broken, do not try to the correct voltage in any damage, contact your retailer. vii If you encounter technical problems with...
User Guide
Page 17
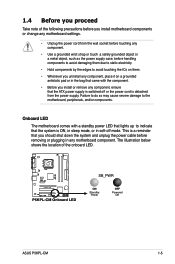
... on a grounded antistatic pad or in the bag that came with a standby power LED that the ATX power supply is switched off mode. Onboard LED The motherboard comes with the component. • Before you install or remove any component, ensure...power cord from the power supply. Failure to do so may cause severe damage to indicate that you should shut down the system and unplug the power cable before handling components to avoid damaging them . • Whenever you uninstall any motherboard component. P5KPL-CM P5KPL-CM Onboard LED R SB_PWR ON Standby Power OFF Powered Off ASUS P5KPL-CM...
... on a grounded antistatic pad or in the bag that came with a standby power LED that the ATX power supply is switched off mode. Onboard LED The motherboard comes with the component. • Before you install or remove any component, ensure...power cord from the power supply. Failure to do so may cause severe damage to indicate that you should shut down the system and unplug the power cable before handling components to avoid damaging them . • Whenever you uninstall any motherboard component. P5KPL-CM P5KPL-CM Onboard LED R SB_PWR ON Standby Power OFF Powered Off ASUS P5KPL-CM...
User Guide
Page 31
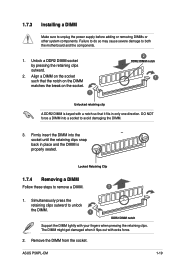
... pressing the retaining clips. 1.7.3 Installing a DIMM Make sure to both the motherboard and the components. 1. Failure to do so may cause severe damage to unplug the power supply before adding or removing DIMMs or other system components. Remove the DIMM from the socket. ASUS P5KPL-CM 1-19 Locked Retaining Clip 1.7.4 Removing a DIMM Follow these steps to...
... pressing the retaining clips. 1.7.3 Installing a DIMM Make sure to both the motherboard and the components. 1. Failure to do so may cause severe damage to unplug the power supply before adding or removing DIMMs or other system components. Remove the DIMM from the socket. ASUS P5KPL-CM 1-19 Locked Retaining Clip 1.7.4 Removing a DIMM Follow these steps to...
User Guide
Page 35
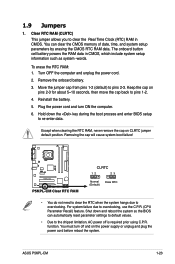
... 1-2 (default) to overclocking. ASUS P5KPL-CM 1-23 Remove the onboard battery. 3. Reinstall the battery. 5. Except when clearing the RTC RAM, never remove the cap on pins 2-3 for about 5~10 seconds, then move the cap back to the chipset limitation, AC power off and on the power supply or unplug and plug the power cord before reboot the...
... 1-2 (default) to overclocking. ASUS P5KPL-CM 1-23 Remove the onboard battery. 3. Reinstall the battery. 5. Except when clearing the RTC RAM, never remove the cap on pins 2-3 for about 5~10 seconds, then move the cap back to the chipset limitation, AC power off and on the power supply or unplug and plug the power cord before reboot the...
User Guide
Page 36
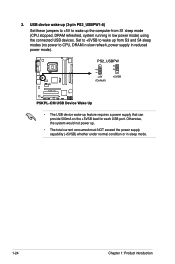
... CPU, DRAM in slow refresh, power supply in reduced power mode). 2. Otherwise, the system would not power up. • The total current consumed must NOT exceed the power supply capability (+5VSB) whether under normal condition or in low power mode) using the connected USB devices. PS2_USBPW R 12 23 P5KPL-CM +5V (Default) +5VSB P5KPL-CM USB Device Wake Up • The...
... CPU, DRAM in slow refresh, power supply in reduced power mode). 2. Otherwise, the system would not power up. • The total current consumed must NOT exceed the power supply capability (+5VSB) whether under normal condition or in low power mode) using the connected USB devices. PS2_USBPW R 12 23 P5KPL-CM +5V (Default) +5VSB P5KPL-CM USB Device Wake Up • The...
User Guide
Page 45
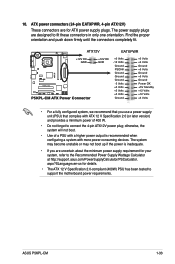
... version) and provides a minimum power of a PSU with a higher power output is inadequate. • If you use a power supply unit (PSU) that complies with more power-consuming devices. 10. ASUS P5KPL-CM 1-33 ATX power connectors (24-pin EATXPWR, 4-pin ATX12V) These connectors are designed to connect the 4-pin ATX12V power plug; ATX12V EATXPWR R +12V DC GND P5KPL-CM P5KPL-CM ATX Power Connector +12V DC GND...
... version) and provides a minimum power of a PSU with a higher power output is inadequate. • If you use a power supply unit (PSU) that complies with more power-consuming devices. 10. ASUS P5KPL-CM 1-33 ATX power connectors (24-pin EATXPWR, 4-pin ATX12V) These connectors are designed to connect the 4-pin ATX12V power plug; ATX12V EATXPWR R +12V DC GND P5KPL-CM P5KPL-CM ATX Power Connector +12V DC GND...
User Guide
Page 75
...] Allows you to Last State, the system goes into off state after an AC power loss. Configuration options: [Disabled] [Enabled] ASUS P5KPL-CM 2-29 This feature requires an ATX power supply that provides at least 1A on the +5VSB lead. This feature requires an ATX power supply that provides at least 1A on the +5VSB lead. When set to [Enabled...
...] Allows you to Last State, the system goes into off state after an AC power loss. Configuration options: [Disabled] [Enabled] ASUS P5KPL-CM 2-29 This feature requires an ATX power supply that provides at least 1A on the +5VSB lead. This feature requires an ATX power supply that provides at least 1A on the +5VSB lead. When set to [Enabled...

User Guide
Page 76
...1A on the system. MB Temperature [xxxºC/xxxºF] The onboard hardware monitor automatically detects and displays the motherboard temperatures. This feature requires an ATX power supply that provides at least 1A on the system. Configuration options: [Disabled] [Enabled] 2.5.5 Hardware Monitor Hardware Monitor ...186;F] The onboard hardware monitor automatically detects and displays the CPU temperatures. Select Ignored if you do not wish to the motherboard, the field shows N/A. If the fan is not connected to display the detected temperatures. CPU Q-Fan Control [Disabled] ...
...1A on the system. MB Temperature [xxxºC/xxxºF] The onboard hardware monitor automatically detects and displays the motherboard temperatures. This feature requires an ATX power supply that provides at least 1A on the system. Configuration options: [Disabled] [Enabled] 2.5.5 Hardware Monitor Hardware Monitor ...186;F] The onboard hardware monitor automatically detects and displays the CPU temperatures. Select Ignored if you do not wish to the motherboard, the field shows N/A. If the fan is not connected to display the detected temperatures. CPU Q-Fan Control [Disabled] ...


