Motherboard Installation Guide
Page 6
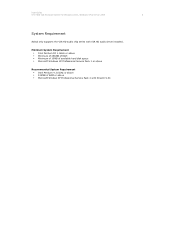
Minimum System Requirement Intel Pentium III 1.0GHz or above Minimum of 256MB of RAM Minimum of 10MB of available hard disk space Microsoft Windows XP Professional Service Pack 1 or above Recommended System Requirement Intel Pentium 4 2.0GHz or above 512MB of RAM or above Microsoft Window XP Professional Service Pack 2 with VIA HD audio driver installed. User Guide VT1708A VIA HD Audio Adeck For Windows 2000, Windows XP & Server 2003 6 System Requirement Adeck only supports the VIA HD audio chip series with DirectX 9.0C
Minimum System Requirement Intel Pentium III 1.0GHz or above Minimum of 256MB of RAM Minimum of 10MB of available hard disk space Microsoft Windows XP Professional Service Pack 1 or above Recommended System Requirement Intel Pentium 4 2.0GHz or above 512MB of RAM or above Microsoft Window XP Professional Service Pack 2 with VIA HD audio driver installed. User Guide VT1708A VIA HD Audio Adeck For Windows 2000, Windows XP & Server 2003 6 System Requirement Adeck only supports the VIA HD audio chip series with DirectX 9.0C
User Guide
Page 35
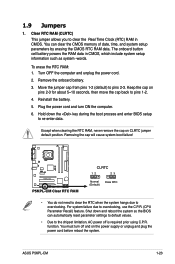
... the RTC when the system hangs due to overclocking, use the C.P.R. (CPU Parameter Recall) feature. For system failure due to overclocking. ASUS P5KPL-CM 1-23 The onboard button cell battery powers the RAM data in CMOS. Remove the onboard battery. 3. Plug the power cord and turn off is required prior using C.P.R. Removing the cap...
... the RTC when the system hangs due to overclocking, use the C.P.R. (CPU Parameter Recall) feature. For system failure due to overclocking. ASUS P5KPL-CM 1-23 The onboard button cell battery powers the RAM data in CMOS. Remove the onboard battery. 3. Plug the power cord and turn off is required prior using C.P.R. Removing the cap...
User Guide
Page 57
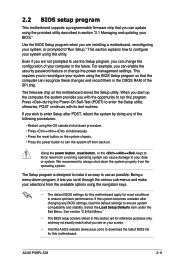
...this program. See section "2.8 Exit Menu." • The BIOS setup screens shown in this motherboard. This section explains how to configure your screen. • Visit the ASUS website (www.asus.com) to download the latest BIOS file for most conditions to ensure optimum performance. The ...selections from the operating system. ASUS P5KPL-CM 2-11 The Setup program is designed to make your data or system. 2.2 BIOS setup program This motherboard supports a programmable firmware chip that the computer can recognize these changes and record them in the CMOS RAM of the SPI chip. Use...
...this program. See section "2.8 Exit Menu." • The BIOS setup screens shown in this motherboard. This section explains how to configure your screen. • Visit the ASUS website (www.asus.com) to download the latest BIOS file for most conditions to ensure optimum performance. The ...selections from the operating system. ASUS P5KPL-CM 2-11 The Setup program is designed to make your data or system. 2.2 BIOS setup program This motherboard supports a programmable firmware chip that the computer can recognize these changes and record them in the CMOS RAM of the SPI chip. Use...
User Guide
Page 79
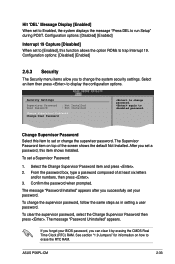
...how to run Setup" during POST. To set your BIOS password, you can clear it by erasing the CMOS Real Time Clock (RTC) RAM. The message "Password Installed" appears after you set to trap Interrupt 19. Select an item then press to change the system security settings.... "1.9 Jumpers" for information on top of at least six letters and/or numbers, then press . 3. Select Screen Change Supervisor Password Select Item +- ASUS P5KPL-CM 2-33 Hit 'DEL' Message Display [Enabled] When set or change the supervisor password. Change Option Select this item to set to Enabled, the system...
...how to run Setup" during POST. To set your BIOS password, you can clear it by erasing the CMOS Real Time Clock (RTC) RAM. The message "Password Installed" appears after you set to trap Interrupt 19. Select an item then press to change the system security settings.... "1.9 Jumpers" for information on top of at least six letters and/or numbers, then press . 3. Select Screen Change Supervisor Password Select Item +- ASUS P5KPL-CM 2-33 Hit 'DEL' Message Display [Enabled] When set or change the supervisor password. Change Option Select this item to set to Enabled, the system...
User Guide
Page 82
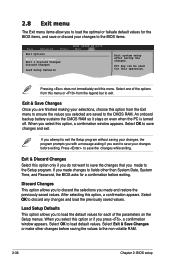
... setup After selecting this option from the Exit menu to ensure the values you selected are saved to discard the selections you to the CMOS RAM. Select OK to discard any changes and load the previously saved values. If you made to the Setup program. Load Setup Defaults This option ...the optimal or failsafe default values for the BIOS items, and save or discard your changes before exiting. An onboard backup battery sustains the CMOS RAM so it stays on the Setup menus. When you select this option or if you select this operation. Select Screen Pressing from this does not...
... setup After selecting this option from the Exit menu to ensure the values you selected are saved to discard the selections you to the CMOS RAM. Select OK to discard any changes and load the previously saved values. If you made to the Setup program. Load Setup Defaults This option ...the optimal or failsafe default values for the BIOS items, and save or discard your changes before exiting. An onboard backup battery sustains the CMOS RAM so it stays on the Setup menus. When you select this option or if you select this operation. Select Screen Pressing from this does not...


